
An Interest In:
Web News this Week
- April 3, 2024
- April 2, 2024
- April 1, 2024
- March 31, 2024
- March 30, 2024
- March 29, 2024
- March 28, 2024
Some of Our Sources
- BoingBoing
- Techcrunch
- TutsPlus - Code
- Smashing Apps
- Fuel Your Creativity
- Inspiredology
- Crazy Leaf Design
- Stylized Web
- The Verge
- TechPowerUp
Help Webnuz
Referal links:
Scaling Identity Access Management: From Startups to Enterprises with AWS Solutions - Part 2
In Part 1, we discussed the benefits of AWS Organizations, such as centralized billing, organisational units (OUs), tagging policies, and service control policies (SCP), which provide enhanced security and standardization across AWS accounts. We also touched on AWS IAM Identity Center's capabilities, including integration with other Identity Providers (IdP) like Azure or Okta and the introduction of Attribute-based Access Control (ABAC). In Part 2, we'll explore how to leverage AWS Organizations, IAM Identity Center, and other AWS services together for easy, secure, and flexible access to your AWS environment
The meat and potatoes
Managing resource access with Identity Center, Tagging and SCP
The corner stone of this solution is the following IAM Policy condition:
"ec2:ResourceTag/Department": "${aws:PrincipalTag/Department}"
This policy line is comparing a dynamic resource tag to a dynamic principal tag. In short, this policy is Incredibly flexible and this section will explain why.
Lets start with a high-level diagram.
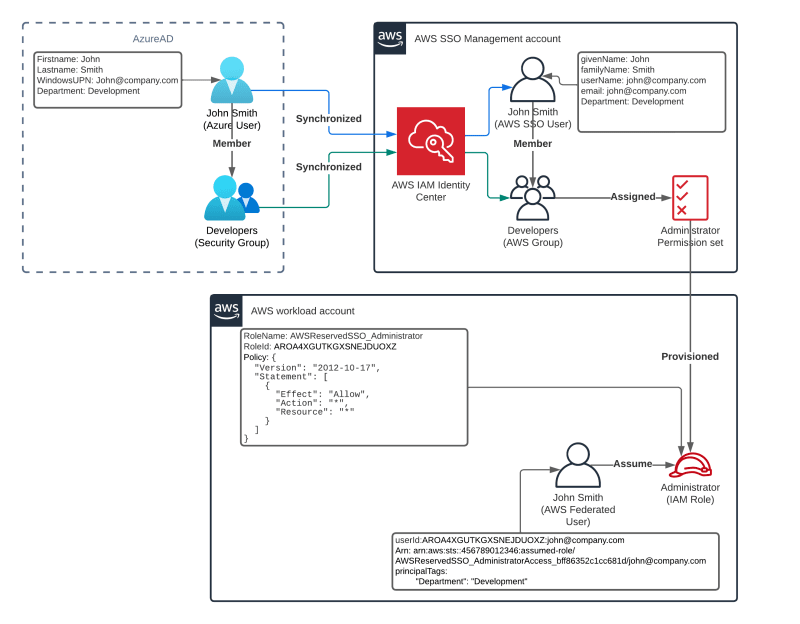
This diagram describes a user called John Smith within the Azure AD of Company. This organisation has setup AWS IAM Identity Center with SAML and SCIM and John is being synced into Identity Center. Further, John is a member of the Security group Developers within AzureAD.
The admins of the organisation have setup a permission set granting Administrator rights and have provisioned this permission set into their workload account for the Developer group to use.
In short, John now has admin rights to the AWS Workload account with his AzureAD user credentials.
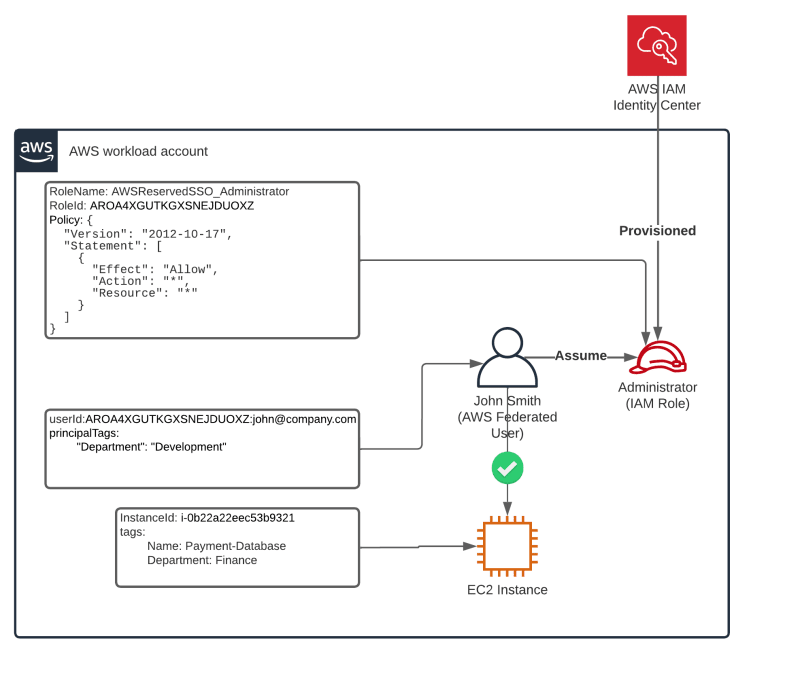
The workload account that John has logged into with his administrator rights has an EC2 instance that belongs to the Finance department. Looking at the rules Deny unless Allow unless Deny we can infer that John can do anything and everything with this EC2 instance.
Now, lets bring in the condition "ec2:ResourceTag/Department": "${aws:PrincipalTag/Department}"
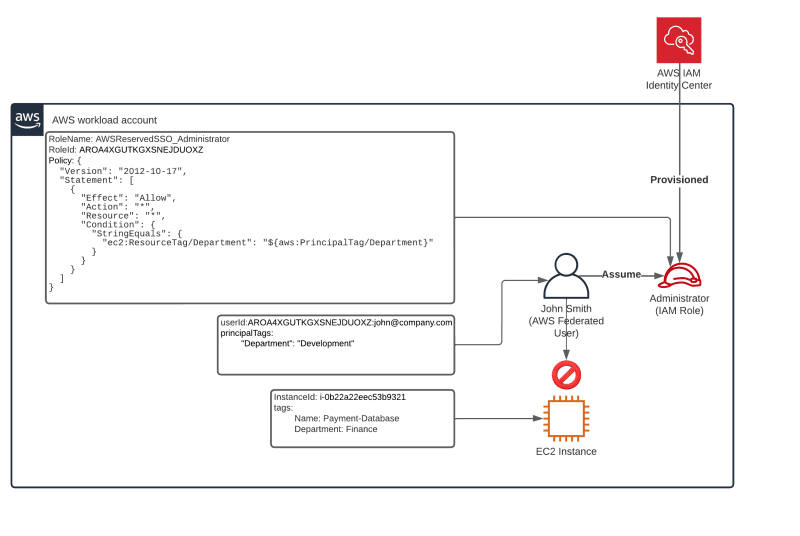
The EC2 instance has a tag that defines the Department as Finance. By modifying the policy with a condition to only allow admin access if the users department matches that of the Instances department tag, as such:
{ "Version": "2012-10-17", "Statement": [ { "Effect": "Allow", "Action": "*", "Resource": "*", "Condition": { "StringEquals": { "ec2:ResourceTag/Department": "${aws:PrincipalTag/Department}" } } } ]}We can define that they are an administrator but within a certain scope. Do be aware that this policy removes an allow so the rights for this now exists as an implicit deny which means that another policy could still grant access. To block any possible allows, the policy could be rewritten as
{ "Version": "2012-10-17", "Statement": [ { "Effect": "Allow", "Action": "*", "Resource": "*" }, { "Effect": "Deny", "Action": "*", "Resource": "*", "Condition": { "StringNotEqualsIfExists": { "ec2:ResourceTag/Department": "${aws:PrincipalTag/Department}" } } } ]}This places the policy in the explicit deny instead of implicit.
Do be aware that the above policy might break many things as not all resources can be tagged. Especially list and describe actions will be affected. A better way of specifying the policy for our EC2 instance example would be to declare the actions like this:
{ "Version": "2012-10-17", "Statement": [ { "Effect": "Allow", "Action": "*", "Resource": "*" }, { "Effect": "Deny", "Action": [ "ec2:delete*", "ec2:modify*", "ec2:stop*", "ec2:start*", "ec2:create*", "ec2:associate*", "ec2:terminate*" ], "Resource": "*", "Condition": { "StringNotEqualsIfExists": { "ec2:ResourceTag/Department": "${aws:PrincipalTag/Department}" } } } ]}Web federated user
The core of AWS IAM Identity Center works via the federated user architecture specifically, web identity federation. This login method has existed for a long time and is also used by Amazon Cognito to authenticate. Keeping this in mind will make working with federated identities that are passed to the AWS accounts by Identity Center easier.
When the user arrives in the workload AWS account, only a few bits of identifying information are left that can be read and worked with.
aws sts get-caller-identity{ "UserId": "AROA4XGUTKGXSNEJDUOXZ:[email protected]", "Account": "456789012346", "Arn": "arn:aws:sts::456789012346:assumed-role/AWSReservedSSO_AdministratorAccess_bff86352c1cc681d/[email protected]"}- UserId, which replaces UserName when a user is federated. This contains the RoleID of the assumed role which will start with AROA and the username.
- FriendlyName, which is the last part of the UserID, in this case [email protected]
- Account, which is the AWS account ID the user is logged into.
- Arn, which is the full Amazon Resource name of the principal user within the account.
UserId, FriendlyName and the PrincipalArn called in an IAM policy by using the
AWS:userID, AWS:friendlyName or AWS:PrincipalArn variables respectively.
These four items are the main identifying variables for a federated user. Identity Center however, also passes along the attributes of the federated user defined in Attribute-based Access Control as principal tags and this is what makes it possible to compare the principal tags against resource tags!
At the time of writing, there is no API call that can present a list of the full AWS session tags. So checking if a federated user has received the right tags into their account is a bit convoluted. A work around to this is looking up the AssumeRoleWithSAML event in CloudTrail of the account being logged into.
Such an event looks as follows and is split up into three main sections.
{ eventVersion: 1.08, userIdentity: { type: SAMLUser, principalId: lUqu3Gchksa6MnzH4DmnCtbi8nA=:[email protected], sername: [email protected], identityProvider: lUqu3Gchksa6MnzH4DmnCtbi8nA= }, eventTime: 2022-10-21T14:25:20Z, eventSource: sts.amazonaws.com, eventName: AssumeRoleWithSAML, awsRegion: eu-west-1, sourceIPAddress: xx.xx.xx.xx, userAgent: aws-internal/3 aws-sdk-java/1.12.291 Linux/4.14.287-148.504.amzn1.x86_64 OpenJDK_64-Bit_Server_VM/11.0.16+9-LTS java/11.0.16 vendor/Amazon.com_Inc. cfg/retry-mode/standard,The first section is the event information. Who is making the request, against what service, which region, when, etc.requestParameters: { sAMLAssertionID: x, roleSessionName: [email protected], principalTags: { Department: Development }, roleArn: arn:aws:iam::456789012346:role/aws-reserved/sso.amazonaws.com/eu-west-1/AWSReservedSSO_AdministratorAccess_bff86352c1cc681d, principalArn: arn:aws:iam::456789012346:saml-provider/AWSSSO_6a25cda37e6197d5_DO_NOT_DELETE, durationSeconds: 28800 }Next comes the request parameters these contain variables presented to the service. For the request itself, the sAMLAssertionID, roleSessionName, roleArn and principalArn are the most important components but within this we can also see the principal tags being passed through:
principalTags: { Department: Development}Lastly, the service responds with what has been issued to the user.
responseElements: { credentials: { accessKeyId: ASIA4xxx, sessionToken: xxx, expiration: Oct 21, 2022, 10:25:19 PM }, assumedRoleUser: { assumedRoleId: AROA4XGUTKGXSNEJDUOXZ:[email protected], arn: arn:aws:sts::456789012346:assumed-role/AWSReservedSSO_AdministratorAccess_bff86352c1cc681d/[email protected] }, packedPolicySize: 1, subject: [email protected], subjectType: persistent, issuer: https://portal.sso.eu-west-1.amazonaws.com/saml/assertion/ODc0NDxxxx, audience: https://signin.aws.amazon.com/saml, nameQualifier: lUqu3Gchksa6MnzH4DmnCtbi8nA= }}Especially the assumedRoleId is important here as that is the main userId that the user identifies itself with inside the AWS account.
Adding oomph to IAM
In the last chapter we setup IAM policies with IAM Identity Center to only allow users to work with resources that they own, so to speak. Weve done this by defining a policy that only allows actions on a resource if the principal making the request has the same department tag value as the resource.
Now lets add an extra layer of enforcement to make sure resources actually have this tag!
All credits go to Arun Chandapillai and Shak Kathir who have written a blog about this exact subject. A link to the blog can be found in the sources.
Within the AWS Organizations, three types of policies can be defined that enforce certain behaviour and/or restrictions on its member accounts. Backup policies, Tagging policies and Service control policies (SCPs).
By creating a tagging policy that looks as follows:
{ tags: { costcenter: { tag_key: { @@assign: department }, tag_value: { @@assign: [ Development, Finance, Sales, Legal ] }, enforced_for: { @@assign: [ ec2:instance, ec2:volume ] } } }}And attaching it to either an account to just effect that account or an OU to affect all accounts in that OU and its children, it will enforce that when the tag department is used on an EC2 instance or volume, it must comply with having a specific value.
The challenge here is that this policy does not prevent the tag from not being created in the first place and this is where an SCP comes in.
{ "Version": "2012-10-17", "Statement": [ { "Effect": "Deny", "Action": [ "ec2:RunInstances", "ec2:CreateTags", "ec2:DeleteTags" ], "Resource": [ "arn:aws:ec2:*:*:instance/*", "arn:aws:ec2:*:*:volume/*" ], "Condition": { "StringNotEquals": { "ec2:ResourceTag/department": "${aws:PrincipalTag/department}" }, "Null": { "ec2:ResourceTag/department": false } } } ]}By creating the following SCP and attaching it to the same accounts, EC2 instances or EC2 volumes cannot be created without having the department tag attached to the resources. The tags can also not be (re)created by someone thats not from the same department nor can it be removed at all.
The combination of the tagging policy forcing a specific value for resource tag, enforcing newly created resources to have this tag and then blocking access to modify the resource tag will ensure that resources in scope will always meet the tagging requirement.
Then using the IAM policies to only allow access to resources if they match their department tag with the principals department tag will guarantee only the right access is provided.
Managing organisation access with Identity Center and SCP
AWS advises that, wherever possible, as many separate AWS accounts should be used within your AWS Organization (AWS Org) as possible and workable. An AWS account provides natural security, access and billing boundaries for your AWS resources, and enables you to achieve resource independence and isolation.
Following this advice, we can break accounts into out different ways.
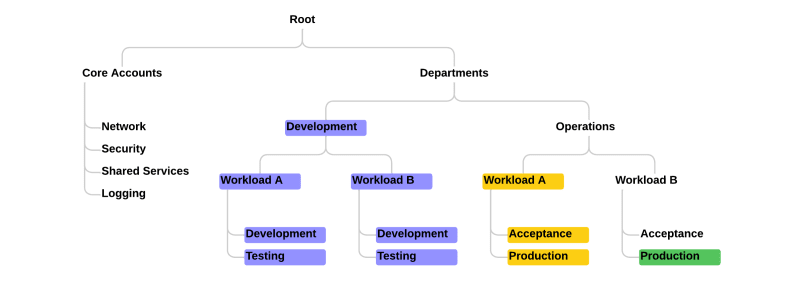
Several examples are a workload-based design: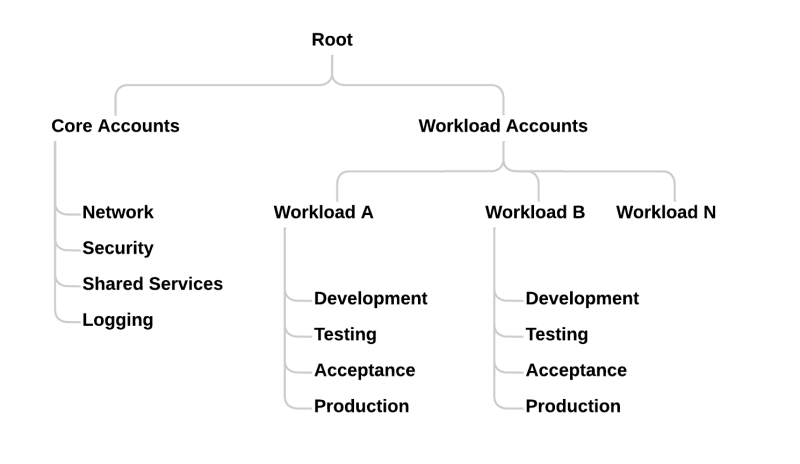
Or a prod/non prod design:
Or a department style setup:
The options here are numerous and each organisation should take care to make an OU design that fits for their purpose.
By splitting the OUs in the way that works for the organisation, creating specialised policies becomes easier.
Weve spoken about how AWS IAM Identity center provides access to users by linking them directly or via a group to an AWS account via a permission set.
What is also possible within Identity center is to delegate access to another AWS account. For instance, a dedicated security account.
By setting up access permissions in such a way, users that cannot access the master billing account can access Identity center from the Delegated Administrator account.
These two components, a delegated Identity center and SCPs can combine to give an extra layer of security to who can and cannot access the AWS accounts within the AWS Org.
Within this example, the following SCP is assigned to the Development OU:
{ "Version": "2012-10-17", "Statement": [ { "Effect": "Deny", "Action": "*", "Resource": "*", "Condition": { "ForAllValue:StringNotEquals": { "aws:PrincipalTag/Department": [ "Development", "Audit" ] } } } ]}This policy will add a second layer of defence that will prevent any user that is not part of the Development or Audit department to perform any action within the accounts under the Development OU.
Even if, for an example, a user/group from the Operations department is assigned to a development account, the SCP will block usage of this account as the department is defined in the organisations identity provider.
And due to the SCP and Identity Center running in different accounts, these two vectors of security can be kept separate.
Outro
Combining AWS Organizations with AWS IAM Identity Center enables organisations to securely grant their teams access to AWS accounts and resources while utilising their existing Identity Access Management solution.
This native toolset is ideal for organisations as they begin working with AWS, providing essential guardrails and tools. Additional services like AWS GuardDuty, Inspector, and AWS Config help address security and compliance needs, while AWS Billing offers insights into costs across the AWS estate. These services effortlessly scale with your organisation in AWS, regardless of its size.
Nick de Wijer Principal AWS platform architect.
Original Link: https://dev.to/aws-builders/scaling-identity-access-management-from-startups-to-enterprises-with-aws-solutions-part-2-52m9
Dev To
More About this Source Visit Dev To