
An Interest In:
Web News this Week
- April 3, 2024
- April 2, 2024
- April 1, 2024
- March 31, 2024
- March 30, 2024
- March 29, 2024
- March 28, 2024
Some of Our Sources
- TutsPlus - Code
- The Logo Smith
- Spoon Graphics
- TutsPlus - Design
- Vandelay Design
- Fuel Your Creativity
- Inspiredology
- Naldz Graphics
- Wal You
- Hashedout
Help Webnuz
Referal links:
Creating a To-Do App in Flutter using Amplication
Author: Akshita Dixit (https://twitter.com/plastic96_)
Co-author: Hamdaan Ali (https://twitter.com/violinblackeye)
Flutter is a mobile application development framework created by Google. It allows developers to build high-performance, natively compiled applications for mobile, web, and desktop from a single codebase. Flutter uses a reactive programming model, which means that the user interface is updated automatically whenever there is a change in the underlying data.
Amplication is an open-source platform that simplifies the process of building web applications. It provides developers with a set of tools for building scalable, maintainable, and secure applications. Amplication generates a backend server and a frontend UI based on a data model defined by the developer. It also supports GraphQL and REST APIs, allowing developers to create flexible and modern applications.
In this article, we will discuss how to create a to-do app in Flutter using Amplication. We will cover the pre-requisites, getting started, creating and utilizing the backend server, creating the Flutter UI, and running the app.
Pre-requisites
- Node.js and npm (Node Package Manager): Amplication generates a Node.js and NestJS code. To run your own server, you will need npm installed. Head over to download Node, which comes with npm from the given link https://nodejs.org/en/download/
- Docker: The server created by Amplication will execute a Docker container running PostgreSQL that is required for the development or testing of a Node.js application. Docker is required here to provide an isolated and reproducible environment for running the database service. Head over to the Docker and follow the steps to install it locally, you can find that here https://www.docker.com/get-started/.
Getting Started
To begin, navigate to Amplications website at https://app.amplication.com/login and log in using your GitHub account. This will allow Amplication to push the generated code to repositories in your GitHub. After logging in, proceed to your GitHub profile and create a repository where you want Amplication to generate your code.
Upon logging in to your Amplication dashboard, you will find an option to create a new workspace in the sidebar, however by default youre given a default workspace.

After entering your desired workspace name, you can proceed to add new projects to this workspace. To do this, simply navigate to the sidebar and select Add New Project to create the backend for your Flutter application.

Once you have given your project a name, its time to add a service and connect your GitHub repository where you wish Amplication to push the backend code, click on Add a Resource and then select Service among the options.

Give your service a meaningful name. Next we will be connecting our GitHub repository with this service.

Creating and Utilizing the Backend Server

Your chosen GitHub repository is where Amplication will push the generated backend code. After setting up the service, the next step is to add entities to your database.
In the context of Amplication, an entity is a high-level representation of a data model that maps to a database table in SQL or a collection in NoSQL. Essentially, an entity is a blueprint for a specific type of data object that will be stored in your applications database.
Entities consist of fields, which represent the different pieces of data that make up an object of that entity type. For example, in the case of the title entity mentioned in the question, the fields might include id, name, description, createdAt, updatedAt, and so on, depending on the specific requirements of the application.
In SQL, you might think of an entity as a table, which has a set of columns that define the attributes of the data stored within it. In NoSQL, an entity might correspond to a collection, which can store documents with different fields and structures. However, its worth noting that the exact mapping between entities and database structures can vary depending on the specific implementation and data modeling approach used by the application.
Now, to do this, navigate to the Entities section and click on Add Entity, giving it a meaningful name. For this particular application, we will be adding entities for title, description, dueDate, and status.
Amplication makes the process even simpler by automatically detecting the datatype for each entity. Additionally, there are over 14 predefined entities available, including email, JSON, and geographic location, that can be utilized.

With your entities set up, you are now ready to commit your changes to your GitHub repository. Amplication will create a pull request in your repository for you to review and merge. Once the pull request is merged, the backend server is ready to run and you can begin creating the frontend using Flutter.
Now, navigate to your GitHub repository and clone it to your local.
git clone <git-url>To get started, navigate to the server director in your freshly cloned repository and run the following commands:
npm i forcenpm run prisma:generateThese commands will install any necessary dependencies and generate the Prisma client.
Next, start the PostgresSQL using Docker by typing:
npm run docker:dbOnce Docker is running, initialize the database by entering:
npm run db:initOnce you have confirmed that everything is set up correctly, you can start the server by running:
npm startAfter starting the server, switch to the admin-ui folder and run the Admin UI panel by typing:
npm i force | npm startYour Admin UI panel is now up and running at http://localhost:3001. Additionally, you can find a complete list of REST API endpoints at http://localhost:3000/api/

This is the Self Documenting Swagger Page for the REST API endpoints. This includes a useful built-in functionality that allows you to send requests to your API directly within the page. To use this feature, simply select any endpoint and click on Try it out. This will provide you with fields to add headers, and upon execution, you will also receive a curl request that you can run from your terminal or import into Postman to try it out. This feature is helpful when understanding the structure of your response and debugging errors.
To authorize your endpoints and generate the JWT Bearer Token, navigate to the Auth section and select the /api/login endpoint. Here, you will need to pass the following JSON as the request body:
{username: admin,password: admin}Upon submitting this request, you will receive a JWT Bearer Token, which you will need to enter in the Authorize section. This will allow you to invoke any request passing this Bearer token in the headers section. Be sure to take note of this Bearer token for the upcoming steps.
Creating Flutter UI
In your main.dart file import the following packages:
import dart:convert;import package:flutter/material.dart;import package:http/http.dart as http;Now, lets create a stateless widget that will contain the MyApp widget that is the root of the Flutter application. It is a MaterialApp widget that defines the basic material design visual elements, such as colors, typography, and shapes. It also sets the title of the application and specifies the initial route to display, which in this case is the TaskListPage widget. The TaskListPage widget is the first screen that will be displayed in the application.
void main() { runApp(MyApp());}class MyApp extends StatelessWidget { @override Widget build(BuildContext context) { return MaterialApp( title: Amplification REST API Demo, home: TaskListPage(), ); }}Next up, lets define the TaskListPage class which will extend a stateful widget. This widget will display the list of tasks fetched from the REST API.
class TaskListPage extends StatefulWidget { @override _TaskListPageState createState() => _TaskListPageState();}class _TaskListPageState extends State<TaskListPage> {}Now inside this _TaskListPageState class you need to define a List of tasks, your bearer token and a string for task response. In this code snippet, we are defining three variables inside the _TaskListPageState class:
- _tasks: A list variable that will store the tasks fetched from the REST API.
- __token: _A final string variable that will store the bearer token we obtained from the REST API authorization process.
- _getTasksResponse: A string variable that will store the response obtained from the REST API endpoint for fetching tasks.These variables will be used in later parts of the code to make REST API requests and handle their responses.
List _tasks = [];final String _token = <your-bearer-token-here>;String _getTasksResponse = ;It should be noted that the _token variable shouldnt be hardcoded (done here for demo purposes). Instead an authentication screen should be introduced in the flow of the app here which will generate a sign-in token that should be stored into the _token variable via a controller.
Next we need to create methods to send a get request using the tasks api endpoint. This method is an essential part of retrieving the list of tasks from the backend and displaying them in the Flutter app.
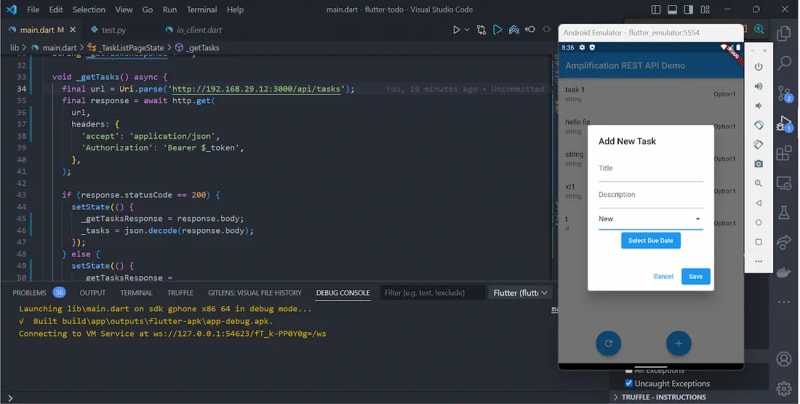
void _getTasks() async { final url = Uri.parse('http://192.168.29.12:3000/api/tasks'); final response = await http.get( url, headers: { 'accept': 'application/json', 'Authorization': 'Bearer $_token', }, ); if (response.statusCode == 200) { setState(() { _getTasksResponse = response.body; _tasks = json.decode(response.body); }); } else { setState(() { _getTasksResponse = 'Request failed with status: ${response.statusCode}.'; _tasks = []; }); } }Now you need to create a method to handle the post request to create a new task.
String _postTaskTitle = ''; String _postTaskDescription = ''; String _postTaskStatus = 'New'; DateTime _postTaskDueDate = DateTime.now(); void _postTask() async { final formKey = GlobalKey<FormState>(); String title = ''; String description = ''; String status = 'New'; DateTime? dueDate; await showDialog( context: context, builder: (context) { return AlertDialog( title: Text('Add New Task'), content: Form( key: formKey, child: SingleChildScrollView( child: Column( mainAxisSize: MainAxisSize.min, children: [ TextFormField( decoration: InputDecoration( labelText: 'Title', ), validator: (value) { if (value == null || value.isEmpty) { return 'Please enter a title'; } return null; }, onSaved: (value) { title = value!; }, ), TextFormField( decoration: InputDecoration( labelText: 'Description', ), onSaved: (value) { description = value!; }, ), DropdownButtonFormField<String>( value: status, items: [ DropdownMenuItem( child: Text('New'), value: 'New', ), DropdownMenuItem( child: Text('In Progress'), value: 'In Progress', ), DropdownMenuItem( child: Text('Done'), value: 'Done', ), DropdownMenuItem( child: Text('Option 1'), value: 'Option1', ), ], onChanged: (value) { setState(() { status = value!; }); }, onSaved: (value) { status = value!; }, ), ElevatedButton( onPressed: () async { final selectedDate = await showDatePicker( context: context, initialDate: DateTime.now(), firstDate: DateTime.now(), lastDate: DateTime(2100), ); if (selectedDate != null) { setState(() { dueDate = selectedDate; }); } }, child: Text( dueDate == null ? 'Select Due Date' : 'Due Date: ${dueDate!.toString().substring(0, 10)}', ), ), ], ), ), ), actions: [ TextButton( onPressed: () { Navigator.pop(context); }, child: Text('Cancel'), ), ElevatedButton( onPressed: () { final form = formKey.currentState; if (form != null && form.validate()) { form.save(); Navigator.pop(context); _addTask(title, description, status, dueDate); } }, child: Text('Save'), ), ], ); }, );} void _addTask(String title, String description, String status, DateTime? dueDate) async { final url = Uri.parse('http://192.168.29.12:3000/api/tasks'); final response = await http.post( url, headers: { 'Content-Type': 'application/json', 'Authorization': 'Bearer $_token', 'accept': 'application/json', }, body: jsonEncode({ 'title': title, 'description': description, 'status': status, 'dueDate': dueDate?.toIso8601String(), }), ); if (response.statusCode == 201) { final jsonData = json.decode(response.body); setState(() { _tasks.add(jsonData); }); } else { print('Request failed with status: ${response.statusCode}.'); }}Now we go ahead with the design of the UI for this application which you can customise further by adding more widgets and styles.
@override Widget build(BuildContext context) { return Scaffold( appBar: AppBar( title: Text('Amplification REST API Demo'), ), body: Column( children: [ Expanded( child: ListView.builder( itemCount: _tasks.length, itemBuilder: (context, index) { final task = _tasks[index]; return ListTile( title: Text(task['title']), subtitle: Text(task['description']), trailing: Text(task['status']), ); }, ), ), ], ), floatingActionButton: Row( mainAxisAlignment: MainAxisAlignment.spaceEvenly, // spread the buttons evenly in the row crossAxisAlignment: CrossAxisAlignment.end, children: [ FloatingActionButton( onPressed: _getTasks, child: Icon(Icons.refresh), ), FloatingActionButton( onPressed: _postTask, child: Icon(Icons.add), ), ], ), ); }Run the project using flutter run or F5.

Conclusion
In conclusion, the combination of Flutter and Amplification offers developers a powerful and versatile toolkit to create high-quality mobile and web applications. While these two technologies have their unique features and strengths, they can work together to overcome each others limitations and provide an unparalleled development experience.
Flutters fast development cycles, customizable widgets, and hot-reload functionality make it an ideal choice for building engaging and responsive user interfaces. Amplification, on the other hand, offers a seamless backend infrastructure, serverless architecture, and a comprehensive set of tools for data modeling and management.
By combining the two, developers can take advantage of Flutters UI capabilities while leveraging Amplifications robust backend services to create applications that are both performant and scalable. Moreover, the integration between Flutter and Amplification is straightforward, and the two technologies work seamlessly together.
Looking forward, the potential for the combination of Flutter and Amplification is significant. As Flutter continues to gain popularity and adoption, more developers will likely explore the benefits of integrating it with Amplification. Furthermore, the integration of Flutter and Amplification can also pave the way for the development of innovative and powerful applications that can run across multiple platforms, including mobile, web, and desktop.
Community Support
While trying to implement Flutter first-hand with Amplication given there were no previous guidelines about the two being used together, it was pretty challenging to navigate the complexities of building this app. However, thanks to the thriving community of developers at Amplication and their commitment to creating a collaborative and inclusive environment, stumbling across obstacles and tackling them became much easier.
With the official Amplication Discord server as the central hub, this community of experienced and passionate developers is always willing to offer support, advice, and feedback to help others succeed. You can join them here: https://amplication.com/discord
Original Link: https://dev.to/hamdaanaliquatil/creating-a-to-do-app-in-flutter-using-amplication-2mem
Dev To
More About this Source Visit Dev To