
An Interest In:
Web News this Week
- April 3, 2024
- April 2, 2024
- April 1, 2024
- March 31, 2024
- March 30, 2024
- March 29, 2024
- March 28, 2024
Some of Our Sources
- Techcrunch
- Spoon Graphics
- Smashing Magazine
- Smashing Apps
- Abduzeedo
- Vandelay Design
- Fuel Your Creativity
- My Ink Blog
- Line 25
- Willems Lab
Help Webnuz
Referal links:
How We Converted a GitHub Tool Into a General Purpose Webhook Proxy to Supercharge Our Integration Development
General Purpose Webhook Proxy
Doron Guttman and Roei Ben-Harush @ [arnica], April 2023
TL;DR
Webhooks automate workflows by sending data from one app to another on certain events. They require a public URL, which can be a problem for testing or development. Smee.io is a payload delivery service which proxies payloads from the webhook source and transmit them to a locally running app. However, it was designed for GitHub, so customizing it for other services is necessary - here's how we did it.
WIIFM (what's in it for me)
- Learn what is a webhook
- Learn what is smee.io and how it can be used with webhooks
- Learn how to customize smee.io for your own needs
- Learn about some alternatives
Introduction
Webhooks are a powerful way to automate workflows and integrate different applications. They allow you to send data from one service to another when certain events happen. For example, you can use webhooks to notify your team on Slack when someone pushes code to GitHub, or when a new issue is created. Slack also uses webhooks to let your application know a user has interacted with a card you sent them on Slack.
However, webhooks have a limitation: they require a public URL that can receive HTTP requests from the webhook source. This means that a webhook cannot be configured to send a message to an endpoint it can't reach, like http://localhost; if you want to test or develop your webhook integration locally, you need some way to expose your local host to the internet.
This is where smee.io comes in handy. Smee.io is a webhook payload delivery service that uses Server-Sent Events (SSE) to proxy payloads from the webhook source, then transmit them to your locally running application. Smee.io is "Made with by the Probot team." (and we thank them for it ). It's free, easy to use, and works with any service that supports webhooks - or at lease, in theory it should.
Since smee.io was designed to work with Probot for enabling development of GitHub applications it works very well with GitHub webhooks and its UI is somewhat tailored for use with GitHub (parsing GitHub specific headers); however, if you want to leverage smee.io for other services that use webhooks you may hit a few snags.
Specifically when developing our Slack app, we ran into some of those snags.
In this blog post, I will show how I customized smee.io so we can use it to integrate with Slack webhooks. This should be applicable for other webhook services.
So what are the issues with Smee.io?
While smee.io provides a lot of benefits while developing and testing your webhook integrations, especially with GitHub, it does have some downfalls. Some of which proved to be a real blocker for us.
Downtime
First of all, since smee.io is a free service (thank you again!) it is completely understood why it would have some limitations. One of which is that there is no guarantee to it's availability. Unfortunately I could not find a service which monitors smee.io so I can provide factual information on how often it is down, but I can tell you that as a team working mostly in US Eastern time zone, we encounter it a lot.
Reservation
In order to create a channel on smee.io, you should point your browser to https://smee.io/new, which will then redirect you to a randomly created channel. That random channel ID would be up to 16 alphanumeric characters. From the smee.io code:
app.get('/new', (req, res) => { const protocol = req.headers['x-forwarded-proto'] || req.protocol const host = req.headers['x-forwarded-host'] || req.get('host') const channel = crypto .randomBytes(12) .toString('base64') .replace(/[+/=]+/g, '') res.redirect(307, `${protocol}://${host}/${channel}`)})Since that channel ID is not saved anywhere, together with the fact the channel endpoints (app.get('/:channel'...) and app.post('/:channel'...)) don't care about the channel name itself, means you can actually pick your own (e.g. https://smee.io/foo). However, if anyone knows your channel ID, they will be able to listen to messages sent to the channel, so you don't want to pick an easily guessable channel ID.
Security
Smee.io relies on message authentication rather than channel security. This makes a lot of sense as smee.io has no configuration and all the webhook messages GitHub sends out have a signature header (e.g. X-Hub-Signature-256: sha256=xxxxxxx...). This is actually a good practice, which Slack follows as well (different header), however, not all services do. It would have been great if you could protect your channel with a key somehow, wouldn't it? Without it, someone can spam or listen to our channel, intentionally or not. It would also mean that you would give your channels meaningful names, like /slack-integration or /github-app
Content Type
Smee.io only supports application/json content as the webhook payload. I do not think that was intentional, but it was not intentionally designed to support other content types as well. This is due to the use of a common Express.js body parsers:
app.use(express.json())app.use(express.urlencoded())Taking Slack webhooks as an example, most events are sent as application/json, however, some others like the interaction events, are sent as URL encoded (application/x-www-form-urlencoded). I, personally, don't understand why Slack chose to do so, but it is what it is.
Because smee.io uses the express.urlencoded body parse, when the it receives content-type: application/x-www-form-urlencoded it will automatically convert the payload (e.g. key1=Some%20Value&key2=Other%20Value) to JSON:
JSON.stringify(req.body) // -> '{"key1":"Some Value","key2":"Other Value"}'This is very useful when you want to work with the content, which smee.io does in order to display the content on the web UI, but it is breaking the forwarding of the message to the clients (as the client expects it to arrive as URL encoded payload)
Endpoint Verification
Smee.io is a payload delivery service (PubSub) which receives payloads and forwards them to all subscribers:
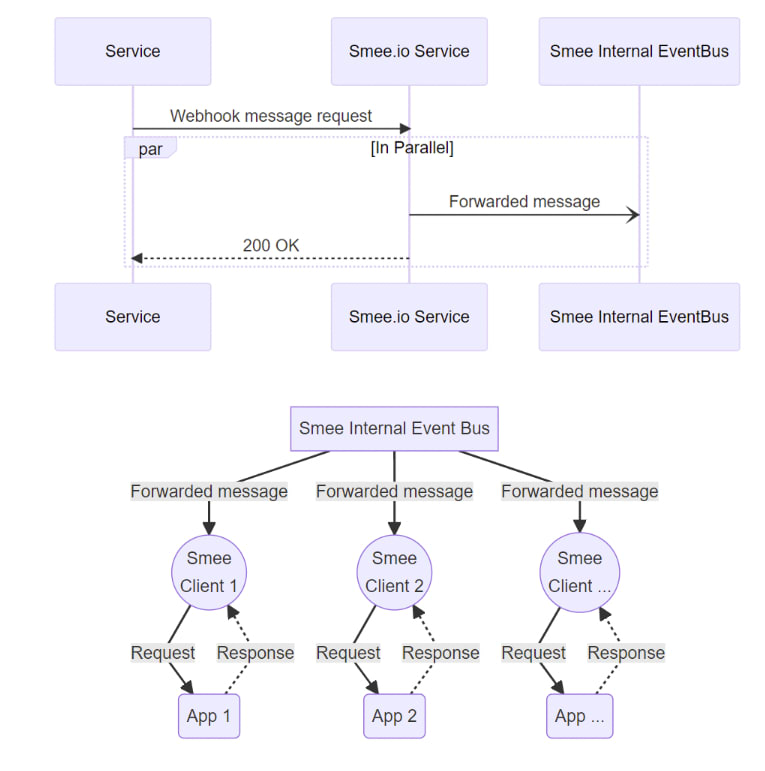
This means it automatically responds to the service with 200 OK, this happens even if there are no subscribers:
app.post('/:channel', async (req, res, next) => { await bus.emitEvent({ ... }) res.status(200).end()})Unfortunately, with Slack, there's an ownership verification phase, in which you have to respond with a challenge. With a payload delivery service, like Smee.io, there is no way to verify the endpoint, which means you can't use it for Slack webhooks. Note this verification only happens once, when you configure the service.
Path Forwarding
Smee.io does not support path forwarding. For example, if your webhooks service includes some of the important information in the path (e.g. https://smee.io/foo/:type, where :type is the type of payload/event), it would not work with smee.io as it is not subscribing to the rest of the path which follows the /:channel. The service will actually receive a 404 Cannot POST /foo/:type.
Alternative Solutions
Public IP / Port Forwarding
Public IPs can be costly and hard to manage. In addition, it require a different configuration (and sometimes entire new application instance) for each developer. Your app has to be deployed out in the public as you'll need a public connection to your dev box. You can combine a public IP solution with port forwarding and trade off some of the complexity, but you will probably have to ask your IT for help with this every time there's a change.
Tunneling Service
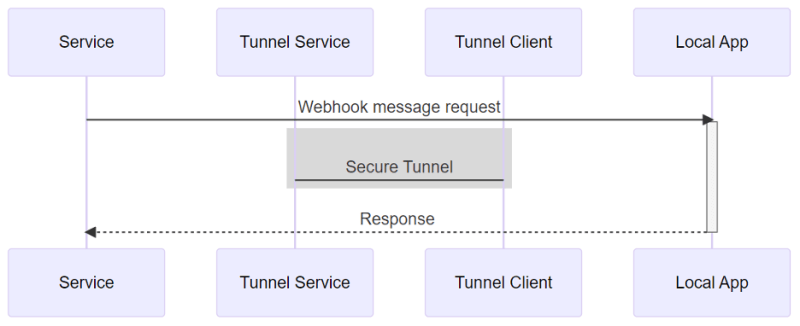
Tunneling services can be considered as a solution in some cases. Services like ngrok, frp, localtunnel and sish create a public endpoint that tunnels communication to your local endpoint via a tunnel client.
This is great when you need to craft a special response to the webhook service, for example the Slack ownership verification mentioned above. In addition, tunneling solutions support path forwarding out of the box as it tunnels the full request.
Tunneling services have downsides too. For example, it is a 1:1 relationship between a tunnel endpoint and a local app (there can be only one local app listening to a public endpoint). When using HTTP webhooks, for every webhook message (request) there must be a response.
In our case, we have multiple developers working on the integration at the same time; this means that at any given time, while using ngrok we had to edit the webhook configuration and switch it over from one developer to the other, thus "stealing" the connection.
Comparison
Let's compare the different solutions discussed above:
| Alternative | Description | One-to-One ^1^ | One-to-Many | Security | Location | Cost | Path Forwarding | Comments |
|---|---|---|---|---|---|---|---|---|
| Public IP | Webhooks will call your public IP | Up to you | Static^2^ | $$$ | Usually public IPs are not free and are complex to manage for each developer. App has to be deployed out in the public and you need a public connection to your dev box. | |||
| Port forwarding | Webhooks will call your public IP:PORT | Up to you | Static^2^ | $ | You will probably have to ask your IT for help with this every time there's a chance. | |||
| Tunneling service | Webhooks will call your assigned tunneling endpoint | Built-in | Everywhere | $ | Usually there's a cost associated with keeping a fixed tunneling endpoint. | |||
| Free Delivery Service | Like smee.io | Guess channel name | Everywhere | 0 | No special cases. Downtime. | |||
| Self-hosted Delivery Service | You can host your own smee.io | Customized | Everywhere | 0-$ | Customized | You can customize the code for your needs. You can deploy for free in some cases (e.g. Vercel or free-tier cloud providers) or at low cost (e.g. ECS) |
^1^ One-to-one solution meaning you need to configure it for each developer.
^2^ If you want to work from another location it won't work (without additional services, like VPN).
Customize Smee.io
Given the above, we decided to take Smee.io and customize it to our needs.
Starting Point
My recommended starting point is to fork/clone the smee.io repo and get it working. And by working, I don't mean deploying it, but being able to build and run it locally to a point where you can place a break point in the code and have it pause there. This is necessary in order to customize any code. I actually had some issues doing that with the main branch as it was in commit 3a01759.
I'm using WSL2 and I'm not sure it was related, but I had to replace [email protected] with [email protected]
- "node-sass": "^4.14.0",+ "sass": "^1.58.3",and upgrade a bunch of packages:
- "babel-loader": "^8.1.0",+ "babel-loader": "^9.1.2",- "mini-css-extract-plugin": "^0.9.0",+ "mini-css-extract-plugin": "^2.7.2",- "node-sass": "^4.14.0",+ "sass": "^1.58.3",- "webpack": "^4.43.0",+ "webpack": "^5.75.0",- "webpack-cli": "^3.3.11"+ "webpack-cli": "^5.0.1"I also had to add the --inspect flag to the start-dev npm script
- "start-dev": "concurrently \"nodemon --ignore src/ ./index.js\" \"webpack -w --mode development\"",+ "start-dev": "concurrently \"nodemon --inspect --ignore src/ ./index.js\" \"webpack -w --mode development\"",and declare a newer version of the node engine compatibility in package.json
"engines": {- "node": "12.x.x"+ "node": "16.x.x" },as well as in the Dockerfile together with specifying the platform architecture for compatibility building on MacBooks as well
-FROM node:12-alpine as bundles+FROM --platform=linux/amd64 node:16-alpine as bundlesYou can find the final package.json and Dockerfile here.
Do the Work
Now that I had a working local dev environment and was able to successfully build and run the docker image, I was ready to customize the application.
Support Configuration
This will allow to set a security operation mode and configure the channels. I chose to use the config package as I had good experience with it and it supports cascading config options.
Create the default base configuration:
// config/default.js/** * Mode enum * @enum {string} */const Mode = { /** block all */ block: 'block', /** no protection */ open: 'open', /** only in list */ allowed: 'allowed', /** requires password */ password: 'password'}module.exports = { channels: { /** * Mode * @param mode {Mode} one of the modes */ mode: Mode.allowed, list: { protected: { password: 'password' }, open: { password: null }, slack: { password: 'slack', handler: 'slack' } } }}Later, during deployment I can mount a config/local.js file to my docker and it will override some items in the config/default.js file.
You'll note that the slack channel configuration defines a handler: 'slack', you'll see where that comes to play in a bit.
Add Support for URL Encoded Payloads
When a URL encoded payload is received, I want to pass it as is to the subscribers. For that, we need to keep the raw content (it will be signed as well in most cases), so I piggybacked on the body parser verifier:
app.use(express.urlencoded({ extended: true, verify (req, res, buf, encoding) { if (buf?.length) { req.rawBody = buf.toString(encoding || 'utf8') } }}))This saves the original buffer into a new rawBody property based on this wonderful gist (thanks stigok! ). Then we need to forward the raw body to the subscribers:
await bus.emitEvent({ channel: req.params.channel, payload: { ...req.headers, // forward raw body if captured (application/x-www-form-urlencoded) // otherwise, forward the parsed body body: req.rawBody ?? req.body, query: req.query, timestamp: Date.now() }})Create Custom Middleware
I wanted to touch the original code as little as possible, so it would be easy to merge updates from the upstream repo. This means there should be a minimal footprint for the custom handlers and security and the changes should be encapsulated as much as possible. The best way to do that in the Express.js world is via middleware.
First thing first, load the configuration and create a custom middleware installer:
// custom-middleware.jsconst config = require('config').util.toObject()const mode = config.channels?.mode || 'block'module.exports = function customMiddlewareInstaller(app) { }The middleware will first take care of the /new route and block it if not in open mode:
module.exports = function customMiddlewareInstaller(app) { app.get('/new', (req, res, next) => { if (mode !== "open") return forbidden(res) // let the next layer handle the request return next() })}Next we need to handle the /:channel routes:
module.exports = function customMiddlewareInstaller(app) { app.get('/new', (req, res, next) => { ... }) app.use('/:channel', async (req, res, next) => { }}To simplify the password protection we can embed it in the channel name (e.g. http://mysmee.io/foo:password). That way we will be able to support all (I hope) webhook services. Even those who do not support custom headers or query params. To resolve the password^3^:
module.exports = function customMiddlewareInstaller(app) { ... app.use('/:channel', async (req, res, next) => { const channel = req.params.channel; const [name, password] = channel?.split(':') || []; // Note: password cannot contain the `:` character }}^3^ Do note that I'm using clear-text password in both sender (URL) and configuration for the sake of simplicity. This solution is not meant to be used in production. You can extend this code to support a more robust and secure solution, but that is outside of the scope of this post
Resolve the channel options from configuration:
module.exports = function customMiddlewareInstaller(app) { ... app.use('/:channel', async (req, res, next) => { ... const options = config.channels?.list?.[name]; }}Resolve custom handler from channel options:
module.exports = function customMiddlewareInstaller(app) { ... app.use('/:channel', async (req, res, next) => { ... const handler = req.method === 'POST' && options?.handler ? require(`./handlers/${options.handler}`)?.bind(null, req, res, next) : null; }}What this means is that is a handler is configured, the code will try to load it from the /handlers folder. e.g. for the configuration shown above the slack channel had the handler: 'slack' configured, which means that the code will try to resolve the module from ./handlers/slack; if it finds it, it will bind the connection params to the default export method and later execute it if it passes all the conditions.
Note that with node, loaded modules are cached, so it actually only loads it once while the application is running.
Moving on... based on the configured mode, apply conditions:
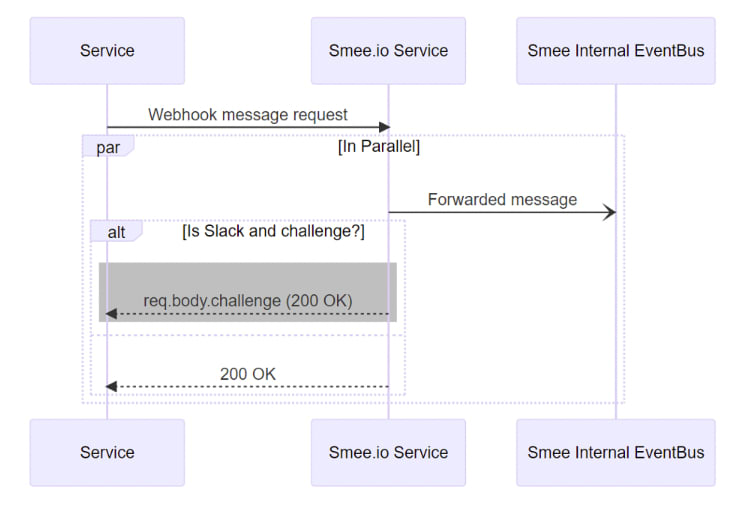
module.exports = function customMiddlewareInstaller(app) { ... switch (mode) { // block everything case 'block': return forbidden(res) // allow everything case 'open': break; // allow only if in list case 'allowed': { if (options?.password && options.password !== password) return forbidden(res) break; } // allow only if in list and password protected case 'password': { if (!options?.password || options.password !== password) return forbidden(res) break; } // misconfiguration default: throw new Error(`Invalid mode ${mode}`) } // if there's no handler OR it return 'false' // request should be handled by the next layer if (!await handler?.(req, res, next)) return next()}And here's the special Slack handler:
// handlers/slack.jsmodule.exports = function slackHandler (req, res) { const challenge = req.body?.challenge console.log(`slackHandler[${challenge || 'passthrough'}]`) if (!challenge) return false res.send(challenge) return true}With this custom handler, our flow would look like this:
Put it all together with error handling:
// custom-middleware.jsconst config = require('config').util.toObject();const mode = config.channels?.mode || 'block'function forbidden(res) { return res.status(403).send('Forbidden')}function internalServerError(res) { return res.status(500).send('Internal Server Error')}module.exports = function customMiddlewareInstaller(app) { app.get('/new', (req, res, next) => { try { if (mode !== "open") return forbidden(res) // let the next layer handle the request return next() } catch (e) { console.error('customMiddleware', e) return internalServerError(res) } }) app.use('/:channel', async (req, res, next) => { try { const channel = req.params.channel; const [name, password] = channel?.split(':') || []; const options = config.channels?.list?.[name]; const handler = req.method === 'POST' && options?.handler ? require(`./handlers/${options.handler}`)?.bind(null, req, res, next) : null; switch (mode) { // block everything case 'block': return forbidden(res) // allow everything case 'open': break; // allow only if in list case 'allowed': { if (options?.password && options.password !== password) return forbidden(res) break; } // allow only if in list and password protected case 'password': { if (!options?.password || options.password !== password) return forbidden(res) break; } // misconfiguration default: throw new Error(`Invalid mode ${mode}`) } // if there's no handler OR it return 'false' // request should be handled by the next layer if (!await handler?.(req, res, next)) return next() } catch (e) { console.error('customMiddleware', e); return internalServerError(res) } })}Install the Middleware
In the server.js file, we'll import the middleware:
const customMiddlewareInstaller = require('./custom-middleware')and use it as the last middleware before the endpoint registrations:
...app.use('/public', express.static(pubFolder))customMiddlewareInstaller(app)app.get('/', (req, res) => {...Path Forwarding?
Well, that will require a change in the smee-client as well. So maybe a follow-up?
Deployment
We decided to deploy on our AWS ECS. For simplification we created a deploy.sh script, you're welcome to use it as well, though it is outside the scope of this post.
References
- Arnica's smee.io repo
- Smee.io and repo
- smee-client
- The good folks of the Probot team
- stigok's gist
- ngrok, frp, localtunnel, sish
Original Link: https://dev.to/arnica/how-we-converted-a-github-tool-into-a-general-purpose-webhook-proxy-to-supercharge-our-integration-development-3ic
Dev To
More About this Source Visit Dev To