
An Interest In:
Web News this Week
- April 3, 2024
- April 2, 2024
- April 1, 2024
- March 31, 2024
- March 30, 2024
- March 29, 2024
- March 28, 2024
Some of Our Sources
- Mashable
- Web Designer Wall
- Team Treehouse
- Pearsonified
- You The Designer
- Inspiredology
- Android Headlines
- Daily Now
- Dev To
- TechPowerUp
Help Webnuz
Referal links:
User Authentication with JWT tokens in node js
User authentication is the most important part of developing a website. To prevent any malicious activity in user accounts, we must implement a strong authentication system. Today, we will explore user authentication using JSON web tokens.
Getting Started
first, we need to set up our Node.js boilerplate using Express. Make sure you have installed the npm and node
create a directory for your project. We are going to use server
go inside the newly created directory and run
npm init
This will initialize our project with a package.json file.
Now we will need to install Express
npm install express
create a new file index.js.
put following code in the file
const express = require('express')const app = express()require("./db/conn")const PORT=8083app.use(require("./route/router"))app.listen(PORT, () => console.log(`connected to port number ${PORT}`))now we will need another dependency "mongoose"
npm install mongoose
Database Connection
first we are going to connect our database.
create a new folder as db and create a file inside it as conn.js
paste the following code inside the file
const mongoose=require("mongoose")const DB=process.env.DATABASE;mongoose.connect(DB).then(()=>{console.log("connection successfull")}).catch((e)=>{console.log(e)})In this code snippet, we are connecting our database to MongoDB Atlas by importing Mongoose. We access the database connection link from the config.env file using the process.env.DATABASE variable. The config.env file stores custom environment variables, which can be created using the dotenv library
Creating User Collection
lets create collection in database with mongoose schema
first create new folder with name models.
create a new file user.model.js inside the folder
user.model.js will have our user data such as name, email,password.
paste the following code in the user.model.js
const mongoose=require("mongoose");const user=new mongoose.Schema({name:{type:String},email:{type:String},password:{type:String},token:{type:String})const User=new mongoose.model("User",user)module.exports=Userwe are creating schema here for the collection.
Mongoose Schema defines document's properties, default values, types of data, validators, etc. In contrast, a Mongoose model provides an interface for the database to create, query, update, delete records, and so on.
mongoose model accepts two parameters
mongoose.model(collection name,collection schema)
Installing JWT
before moving ahead lets just install the JWT package
npm i jsonwebtoken
Creating Routes and Authentication for User
After creating collection now lets create routes.
create a new folder "routes" in this folder create router.js file
paste the following code into the file
const express=require("express")const router=express.Router()const mongoose=require("mongoose")const User=require("../model/user.model.js")router.post("/Login",async (req,res)=>{ //Login API const {email,Password}=req.body; if(!email || !Password){ return res.status(403).json({error:"empty Fields"}) } try{ const exist=await User.findOne({email}) if(exist){ if(exist.password==Password){ const token= await exist.generateAuthToken(); res.cookie("authcookie",token,{ expires:new Date(Date.now()+36000000), httpOnly:false, }) res.status(200).json({token:token}) } else{ return res.status(401).json({error:"invalid credentials"}) } } else{ return res.status(401).json({error:"invalid credentials"})}}catch(e){ console.log(e) res.status(500).json({error:"wont be able to login"})}})here we are checking if email and password are not empty if empty we are returning status code 403 "Empty fields"
If the password and email fields are not empty, we check if the email exists in the collection. If it does, we compare the entered password with the stored password to determine if they match. If the passwords match, we call the generateAuthToken() method to generate an authentication token.
now go to user.model.js and paste this code
user.methods.generateAuthToken=async function(){ try{ const tokenGen= jwt.sign({_id:this._id},process.env.SECRET)//genertaes token this.tokens=this.tokens.splice(0,1,{token:tokenGen}) await this.save(); return tokenGen; } catch(e){ console.log(e) }}generateAuthToken function generates the token .
jwt.sign() sign takes two parameter id and JWT_secret and returns signed token (it is recommended that JWT_secret must be stored in config.env file).
Creating Middleware
create a new folder middleware inside the folder create a new file authentication.js
paste the following code :-
const jwt=require("jsonwebtoken")const User=require("../models/user.model.js")const authenticate= async (req,res,next)=>{ try{ const token= req.cookies.authcookie || req.headers["x-access-token"]; // taking token const authnToken= jwt.verify(token,process.env.SECRET)//verfify token with secret key{token is made up of user unique id and secret key} return unique id const userInfo= await User.find({_id:authnToken._id},{"tokens.token":token})//finding document that matches the unique id and token if(!userInfo){res.status(209).json({error:"user info is not available"})} req.token=token; req.userinfo=userInfo; req.userId=userInfo[0]._id; next(); } catch(e){ res.status(401).json({message:"Please loggin first"}) console.log(e) }}module.exports=authenticateThe jwt.verify function takes a token and a secret key (which is composed of the user's unique ID) as parameters. It returns the user's unique ID.
Now lets create the /somepage route and update router.js with the following code to test the middleware
router.get("/somepage",authetication,(req,res)=>{console.log("working")})Checking The API In POSTMAN
paste the localhost:8003/login into the path
pass email and Password in body as a JSON
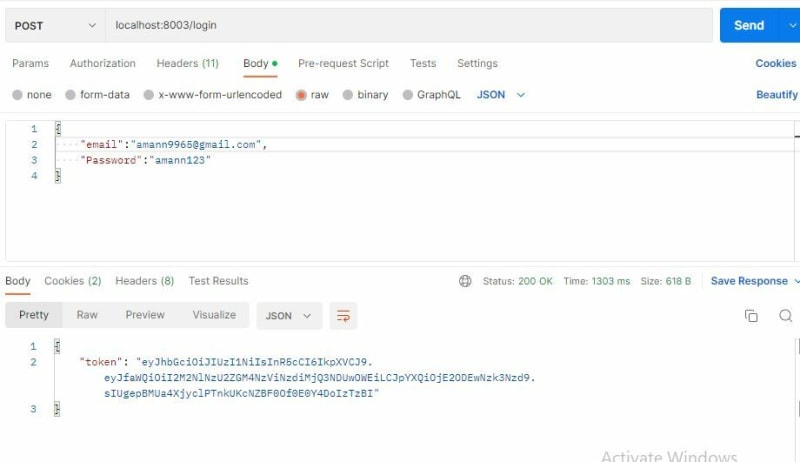
it gives token as response
for now copy this token
Change the route to /somepage and include the x-access-token key in the headers with the token value pasted as its value. Then, send the request

token is verified by middleware.
Conclusion
In this tutorial we learned about JWT, authentication, authorization and how to develop an API using JWT token for authentication in Node.js.
Original Link: https://dev.to/amann5153/user-authentication-with-jwt-tokens-in-node-js-1952
Dev To
More About this Source Visit Dev To