
An Interest In:
Web News this Week
- April 15, 2024
- April 14, 2024
- April 13, 2024
- April 12, 2024
- April 11, 2024
- April 10, 2024
- April 9, 2024
Some of Our Sources
- Simplebits
- TutsPlus - Code
- Spoon Graphics
- Smashing Magazine
- You The Designer
- Inspiredology
- Noupe
- 24 Ways
- Specky Boy
- The Verge
Help Webnuz
Referal links:
How to Contribute to a GitHub Repository
GitHub is a platform that allows you to collaborate with other developers on projects using version control and code hosting. Whether you are the owner of a repository or a contributor, you need to follow some steps to make sure your work is synced and updated with the main branch. Here is a guide on how to do that using Git commands.
For Owners
As an owner of a repository, you have full control over the project and can manage the access and permissions of other contributors. You can also create branches, merge pull requests and push changes to the main branch. Here are the steps you need to follow as an owner:
Step 1: Fork the Repository
Forking a repository means creating a copy of it on your GitHub account. This allows you to make changes to the project without affecting the original source. To fork a repository, go to its page on GitHub and click on the Fork button at the top right corner. You will see a message saying that the repository is being forked. Once it is done, you will have your own copy of the repository on your account.
Step 2: Clone the Repository
Cloning a repository means downloading it to your local machine so that you can work on it offline. To clone a repository, you need to use the git clone command followed by the URL of the repository. You can find the URL by clicking on the Code button on your forked repository page and copying the HTTPS link. For example:
git clone https://github.com/your-username/xamtrack.gitThis will create a folder called xamtrack on your current directory with all the files and folders of the repository.
Step 3: Create a Branch
A branch is a separate version of the repository that allows you to work on different features or bug fixes without affecting the main branch. To create a branch, you need to use the git branch command followed by the name of the branch. For example:
git branch new-featureThis will create a new branch called new-feature but it will not switch to it. To switch to a branch, you need to use the git checkout command followed by the name of the branch. For example:
git checkout new-featureThis will switch to the new-feature branch and update your working directory accordingly.
Step 4: Check Your Status
To see what files have been changed or added in your working directory, you can use the git status command. This will show you which files are staged (ready to be committed), modified (changed but not staged) or untracked (new files that are not tracked by Git). For example:
git statusThis will show something like this:
On branch new-featureChanges not staged for commit: (use "git add <file>..." to update what will be committed) (use "git restore <file>..." to discard changes in working directory) modified: README.mdUntracked files: (use "git add <file>..." to include in what will be committed) new-file.txtno changes added to commit (use "git add" and/or "git commit -a")Step 5: Add Your Changes
To stage your changes for committing, you need to use the git add command followed by the name of the file or folder. For example:
git add README.mdThis will add the modified README.md file to the staging area. You can also use . (dot) as a shortcut to add all the files in your working directory. For example:
git add .This will add all the modified and untracked files to the staging area.
Step 6: Commit Your Changes
To save your changes in your local repository, you need to use the git commit command followed by a message that describes what you have done. For example:
git commit -m "Added new feature"This will create a new commit with the message "Added new feature" and include all the files that are staged.
Step 7: Push Your Changes
To upload your changes to your remote repository on GitHub, you need to use the git push command followed by the name of your branch. For example:
git push origin new-featureThis will push your new-feature branch to your forked repository on GitHub. You can also use -u (upstream) as a shortcut to set the remote branch as the default for your local branch. For example:
git push -u origin new-featureThis will push your new-feature branch and set it to track the remote branch.
Step 8: Pull Request
A pull request is a way of requesting the owner of the original repository to review and merge your changes into the main branch. To create a pull request, you need to go to your forked repository page on GitHub and click on the Pull request button. You will see a page where you can compare your branch with the main branch and write a title and a description for your pull request. For example:
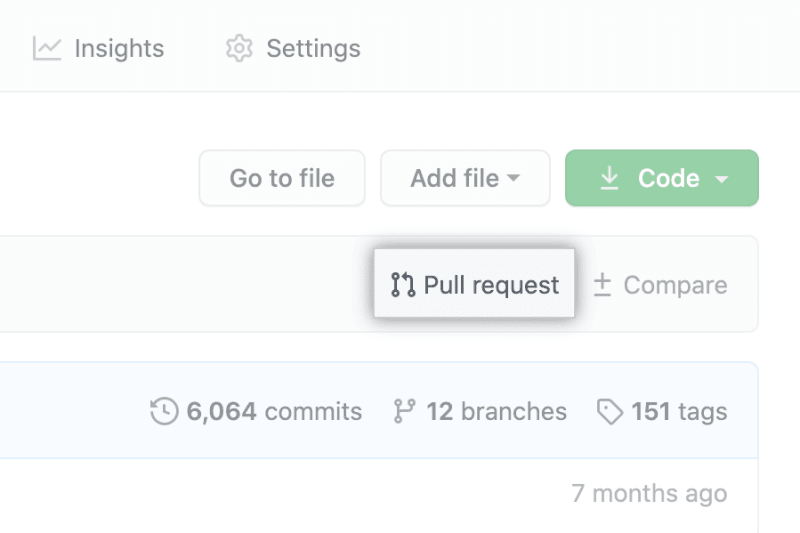
Once you are done, click on the Create pull request button. This will send a notification to the owner of the original repository and they can review your changes and decide whether to accept them or not.
For Contributors
As a contributor, you can help improve an existing project by adding new features, fixing bugs or improving documentation. You can also learn from other developers and get feedback on your work. Here are the steps you need to follow as a contributor:
Step 1: Fork the Repository
Just like the owner, you need to fork the repository you want to contribute to. This will create a copy of it on your GitHub account and allow you to make changes without affecting the original source. To fork a repository, go to its page on GitHub and click on the Fork button at the top right corner.
Step 2: Clone the Repository
After forking the repository, you need to clone it to your local machine so that you can work on it offline. To clone a repository, you need to use the git clone command followed by the URL of your forked repository. You can find the URL by clicking on the Code button on your forked repository page and copying the HTTPS link.
Step 3: Add an Upstream Link
An upstream link is a way of connecting your forked repository with the original repository. This will help you keep your forked repository up to date by pulling from the upstream (the original source). To add an upstream link, you need to use the git remote add command followed by a name (usually upstream) and the URL of the original repository. For example:
git remote add upstream https://github.com/Subham-Maity/xamtrack.gitThis will add an upstream link called upstream that points to the original repository.
Step 4: Keep Your Forked Repository Up to Date
Before you start working on any changes, you need to make sure that your forked repository is up to date with the original repository. This will also avoid any merge conflicts while committing new changes. To keep your forked repository up to date, you need to use the git pull command followed by the name of the upstream link and the name of the main branch. For example:
git pull upstream mainThis will fetch and merge any changes from the original repository's main branch into your local branch.
Step 5: Create a Branch
Before you start working on any changes, you need to create a branch for each feature or bug fix you want to contribute. A branch is a separate version of the repository that allows you to isolate your work from the main branch. To create a branch, you need to use the git branch command followed by the name of the branch. For example:
git branch new-featureThis will create a new branch called new-feature but it will not switch to it. To switch to a branch, you need to use the git checkout command followed by the name of the branch. For example:
git checkout new-featureThis will switch to the new-feature branch and update your working directory accordingly. You can also use -b (branch) as a shortcut to create and switch to a new branch in one command. For example:
git checkout -b new-featureThis will create and switch to the new-feature branch at the same time.
Step 6: Check Your Status
After creating a branch and making some changes to the files or folders in your working directory, you need to check your status using the git status command. This will show you which files are staged, modified or untracked. For example:
git statusThis will show something like this:
On branch new-featureChanges not staged for commit: (use "git add <file>..." to update what will be committed) (use "git restore <file>..." to discard changes in working directory) modified: README.mdUntracked files: (use "git add <file>..." to include in what will be committed) new-file.txtno changes added to commit (use "git add" and/or "git commit -a")Step 7: Add Your Changes
To stage your changes for committing, you need to use the git add command followed by the name of the file or folder. For example:
git add README.mdThis will add the modified README.md file to the staging area. You can also use . (dot) as a shortcut to add all the files in your working directory. For example:
git add .This will add all the modified and untracked files to the staging area.
Step 8: Commit Your Changes
To save your changes in your local repository, you need to use the git commit command followed by a message that describes what you have done. For example:
git commit -m "Added new feature"This will create a new commit with the message "Added new feature" and include all the staged files in it. You can also omit the -m flag and write a longer message in an editor that will open after running the command. For example:
git commitThis will open an editor where you can write a more detailed message for your commit.
Step 9: Push Your Changes
To upload your changes to your remote repository on GitHub, you need to use the git push command followed by the name of your branch. For example:
git push origin new-featureThis will push your new-feature branch to your forked repository on GitHub.
Step 10: Pull Request
To request the owner of the original repository to review and merge your changes into the main branch, you need to create a pull request on GitHub. To do that, go to your forked repository page on GitHub and click on the Pull request button. You will see a page where you can compare your branch with the main branch and write a title and a description for your pull request. For example:
Once you are done, click on the Create pull request button. This will send a notification to the owner of the original repository and they can review your changes and decide whether to accept them or not.
Congratulations! You have successfully contributed to a GitHub repository!
CheatSheet
For the owner of the repository:
- Fork the repository.
- Clone the repository to your local machine.
- Create a new branch by typing
git branch your_branch_name. - Switch to your new branch by typing
git checkout your_branch_name. - Check the status of your changes by typing
git status. - Add your changes by typing
git add . - Commit your changes by typing
git commit -m "your changes". - Push your changes to the remote repository by typing
git push origin your_branch_name. - Create a pull request by typing
git pull origin main_branch_name.
Tip: You can use
git commitwithout the-mflag to open a text editor where you can write a more detailed commit message.
For contributors:
- Fork the repository and clone it to your local machine.
- Add an upstream link to the main branch in your cloned repository by typing
git remote add upstream https://github.com/Subham-Maity/xamtrack.git. - Keep your cloned repository up-to-date by pulling from upstream by typing
git pull upstream main. - Create a new feature branch by typing
git checkout -b <feature-name>. - Add your changes by typing
git add . - Commit all your changes with a meaningful message by typing
git commit -m "Write a meaningful but small commit message". - Push your changes for review by typing
git push origin <branch-name>. - Create a pull request (PR) on GitHub with a clear message explaining why and what you are contributing.
Original Link: https://dev.to/codexam/how-to-contribute-to-a-github-repository-1nk2
Dev To
More About this Source Visit Dev To