
An Interest In:
Web News this Week
- April 29, 2024
- April 28, 2024
- April 27, 2024
- April 26, 2024
- April 25, 2024
- April 24, 2024
- April 23, 2024
Some of Our Sources
- BoingBoing
- Simplebits
- Web Designer Wall
- Team Treehouse
- Spoon Graphics
- Fuel Your Creativity
- Web Design Ledger
- Specky Boy
- Hashedout
- The Verge
Help Webnuz
Referal links:
Introduction to Flutter: Setting up your Development Environment
Introduction
Hey there! Long time, no talk...
You're welcome back to my blog and we'd continue with the "Build with Flutter" series. If you haven't read my previous post on where I talked extensively about getting started in cross-platform development using Flutter, you should check it out here. You can read it during your coffee break when you're at work ;)
In this article, I would give you a detailed step-by-step guide on how to set up your local Flutter development environment. I'd cover the plugins and extensions you'd need in Android Studio and VS Code respectively (yes, they are important requirements you'd need to install on your local machine). I would also take you through configuring PATH for Flutter SDK as well as installing JDK (Java Development Kit) and configuring its PATH. What's more, I would also teach you about "whitespaces" (or the "no spaces" rule, as I like to call it that).
Finally, I would show you how to verify if each piece of software from above was installed properly.
This is going to be quite the process and a very long read, so grab a beverage and let's get started.
Quick Note/Disclaimer
This article assumes you're on Windows but the installation process on Mac and Linux is relatively similar (I'm currently on Windows 10 Pro). 
Prerequisites
This article assumes that you already have Git installed on your Windows machine, if not, download it here. Also, check out this video on how to install Git and get familiar with its commands on a Windows machine.
So, enough talk... Let's dive right in!!!
First, you'd need to download Android Studio. At the time of writing, the available version is the latest, which is Android Studio Electric Eel | 2022.1.1 Patch 2 for Windows. So, expect to see a newer version when you're reading this article weeks, months (or even years later).
Next, download Visual Studio Code (popularly called VS Code). Depending on what machine you're on be it Windows, Linux or Mac, download the one that is specified for your local machine (your computer). 
Finally, download JDK by Oracle. At the time of writing this, JDK 20 has already been released but this article uses JDK 19.0.2 as that's what I have installed on my local machine.
Scroll down and download either of these for your Windows 10 Pro 64-bit system
Installing & configuring JDK and JAVA_HOME
This is where the fun begins, so put on your caps and fasten your seat-belts as we begin to install the necessary tools & software, starting with JDK... To begin, navigate to the folder where your downloads are located and then double-click the JDK installation file to run it. It should be named something like "jdk_XX_OS-Name_Processor-Type_bin"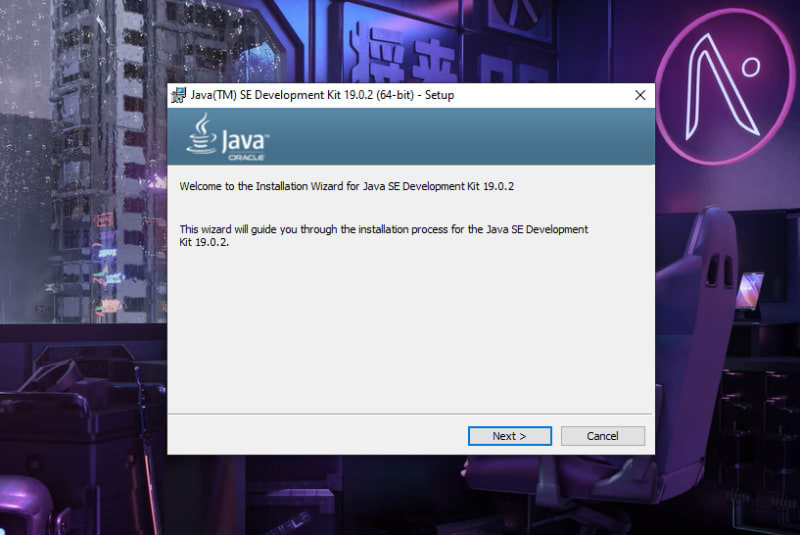
When it runs, you would be greeted by the screen above. Go ahead and click "Next". On doing so, you would see the screen below. This is where you would be able to customize your JDK installation. Go ahead and click "Change"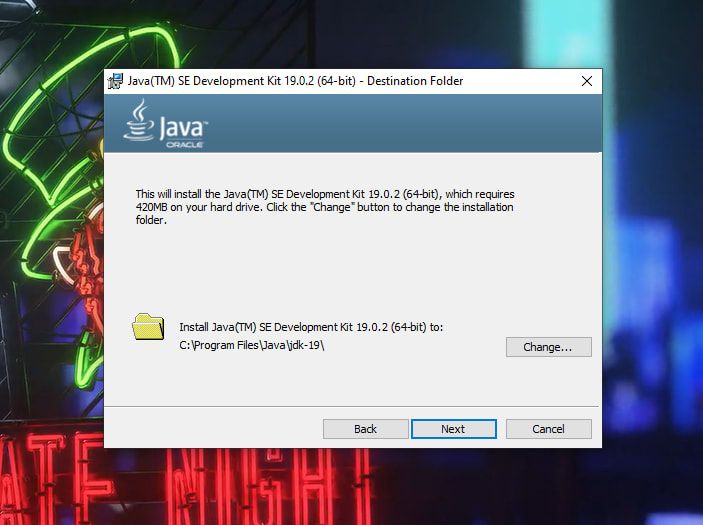
By clicking "Change" from above, you would be able to customize your JDK installation. Ensure that the directory for the JDK does not have any "whitespaces". Notice how mine is set up from the picture below. I would explain what "whitespaces" are shortly.
The installation process should take a few minutes, depending on your system specs. At some point, Windows would request User Access Control. Just simply allow it by clicking "Yes". Shortly afterwards, you should see the screen below. Congratulations, you've successfully installed JDK. Your JDK PATH directory should be similar to "C:\Users\Dexter\java\jdk19.02" and You can click on "Close" now.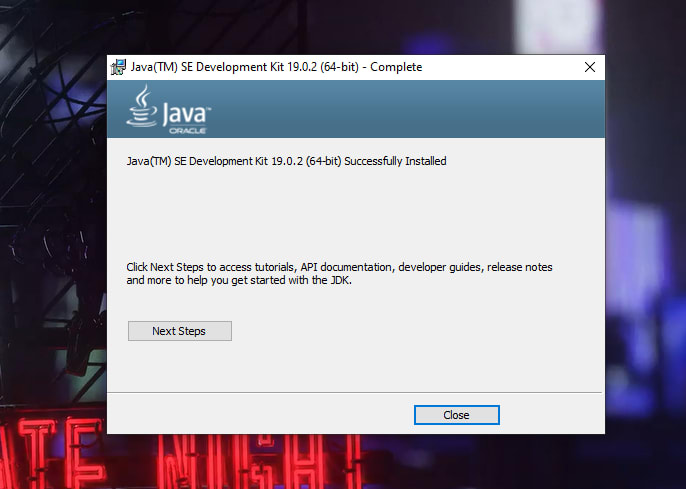
To set the "JAVA_HOME" variable, search "PATH" from Windows Search and click on the first option above named "Edit the system environment variables" like below
You would then see this screen below. Click on "Environment Variables" at the bottom right corner.
On clicking "Environment Variables", you would then see this screen below. 
Configuring PATH on Windows can be a little tricky and you could alter a lot for bad if you don't know what you're doing, so pay close attention to the next steps as they are extremely crucial.
Under the "System variables" section from the image above, click on "New". You would then be presented with this screen below.
Just like in the picture above, input "JAVA_HOME" in the "Variable name" field. For the "Variable value" field, insert the directory of your Java installation. Mine is pointing to "C:\Users\Dexter\java\jdk19.02" because that's where my Java installation is housed. When you're done, click on "OK" and yours should look nearly similar to mine, like below...
There you go! You have successfully installed Java and JDK, as well as configured PATH on your local Windows machine.
Next up, let's install and configure Android Studio.
Installing & configuring Android Studio
Next, we would install Android Studio... By now you've downloaded Android Studio and if not, pause right here and go download it... Take your time, I'd be waiting for you.
Now that you've downloaded it, allow me to walk through the installation process.
You see the way I've setup the directory C:\Users\Dexter\Android\AndroidStudio where Android Studio would be installed, and you've noticed that there are no spaces (also known as whitespaces) in between the characters and words. This is intentionally so when we would configure PATH and use our command-line(terminal) when running Flutter commands like flutter run, flutter doctor, flutter pub get and flutter upgrade etc. More on that later
Please, don't mind the checkbox saying something about "Uninstalling the previous version". That is displayed because I already have Android Studio fully installed and configured on my local machine.
The installation process should take 30 minutes or less, depending on your internet speed and system specs. The process would take you through setting up Android Studio for the first time and it would install the latest SDKs, libraries & platform tools.
You'd get to a point in the installation process where you would be required to install Android SDKs to a certain directory on your local machine. Do you remember out "no spaces" rule from earlier? It also applies here when installing Android SDK because of PATH.
When the installation is done, you would be greeted by this screen below.
But there's still work to be done. Click on the "More Actions" button from the shot above and then click on "SDK Manager", which would then display this screen below.

From the shot above, the PATH for your own Android SDK installation would most likely not be the same as mine C:\Users\Dexter\Android\android-sdk, and that's totally fine, but ensure that you obey the "no spaces" rule mentioned earlier. When at the screen above, you are to check the boxes of a couple of options under the "SDK Platforms" tab as these are a must-have, like I did above. Don't click "Apply" or "OK" just yet. Next, click on the "SDK Tools" tab and select a couple of options like I did in the screen below.

NOTE I prefer to use a physical device (my Android device) as my emulator when developing for mobile, as opposed to setting up and running a virtual device. That's why I didn't check the "Android Emulator" option in the screen above.
Now, go ahead an click "Apply".

You would then see a modal box asking you to confirm the packages you want installed, like in the shot above. Click on "OK"
Next, you would be greeted by the "License Agreement" window. Select "Accept" and click "Next".
Just like in the shot below, you should wait until the setup process is done. If your internet or power goes out during this process, you would have to start this step all over.

When everything is done and completed, just like in the shot below, go ahead and click on "Finish".
And with that, you've successfully installed Android SDK tools, packages & platforms on your local machine. But we're not done yet. From the main screen, click on "Plugins" in the left pane and you should be greeted with this screen below, where you can see the "Plugins" menu.
In this menu, you can search for plugins to download in the "Marketplace" tab at the top, while the "Installed" tab has every plugin you've already installed. Under the "Marketplace" tab, search for the "Flutter", "Dart" and "Gradle" plugins. They are all free to install and use. When you search for and install them, you would have to restart Android Studio to enable the installed plugins. You can do that by simply clicking on "Restart IDE" when it appears against any of the plugins you've installed.
NOTE -You don't have to restart Android Studio after every plugin you've installed. Instead, install all the necessary plugins before restarting Android Studio.
Installing & configuring VS Code
VS Code, the last software development tool we would install. Earlier on, you should have already downloaded VS Code. Go ahead and run the VS Code installation executable file and you should be greeted by the screen below.
From above, select the "I accept the agreement" option and then click on "Next"
Next up, you would see this screen with a couple of installation options. Just like in the shot below, check all options as it would enable you to be able to customize how you want VS Code to be installed on your local machine. Then, click on "Next".
You should see the screen below that gives a summary of the options you selected previously. Then, click on "Install".
On clicking "Install", the installer would start its magic, like in the screen below. Allow the installer to finish up the process automatically and don't tamper with it.
When it is done, you would see the screen telling you that VS Code Setup is done. You can leave the "Launch Visual Studio Code" option checked and then click "Finish".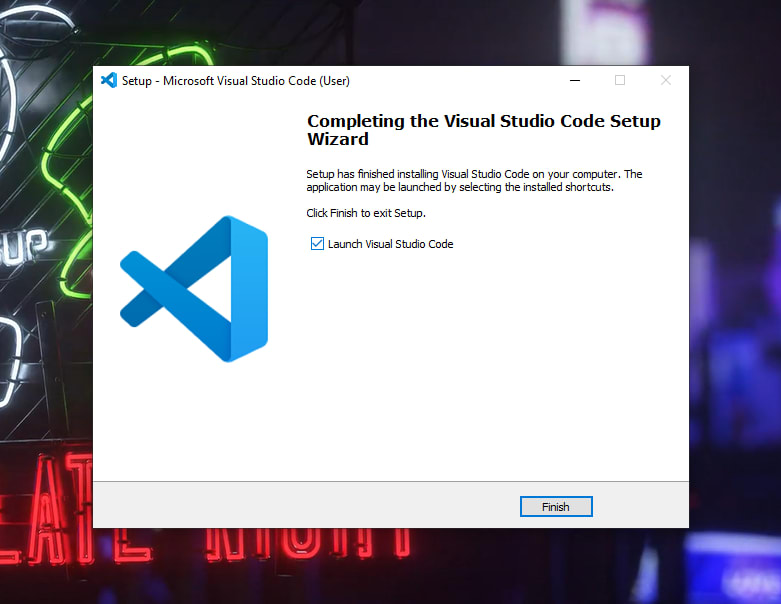
Finally, you would see this screen below of your VS Code running. Yours won't look like mine because I've already customized mine to my taste, but you'd definitely see the "Welcome" page in VS Code.
Installing & configuring the Flutter SDK
Hey, you've made it this far, and that's really commendable. Now, it's time to install Flutter SDK. Go ahead and download the latest version from the Flutter's official website. At the moment of writing this, flutter_windows_3.7.9-stable is the latest.
When it's downloaded, extract it and place the extracted folder named "flutter" in a directory (or PATH) that follows our "no spaces" rule from above. Mine looks like this C:\Users\Dexter\flutter
Next, fire up a command-line shell and run the command flutter --version and this should print out the Flutter version installed on your local machine.
Next, you would run flutter doctor for the first time. You would have a screen similar to below.
Give it some time to work its magic and when it's done, you should see a screen similar to below. 
Don't panic just yet, if you have issues with "Android SDK Licenses".
Simply run the command flutter doctor --android-licenses from within the same command-line shell window and accept all the Android SDK licenses.
Now, let's verify a couple of things.
Verify your installation
Now, it's time to configure PATH variables and verify our installation.
First off, Git... Fire up a command-line shell window and run the following command git --version and you should have a result similar to mine in the picture below, where it prints out 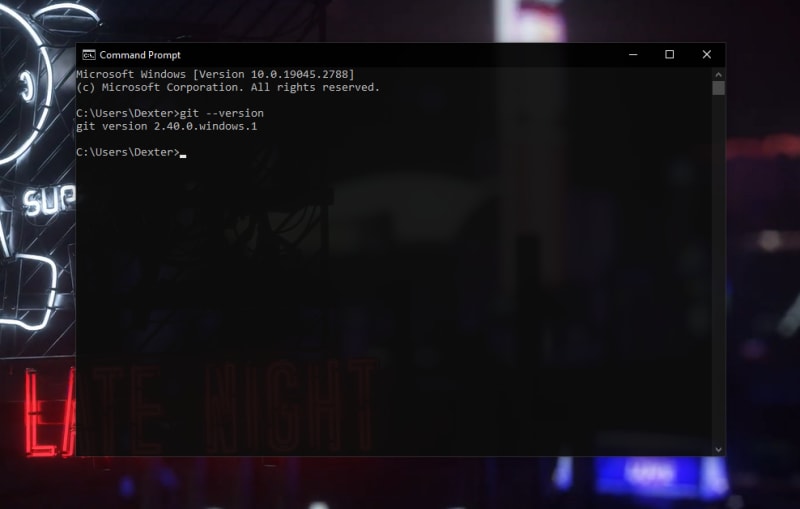
Next, you're going to run a couple of Flutter commands. First, we would check our Flutter version by firing up a command-line shell and run the command flutter --version. You should have a result remotely similar to mine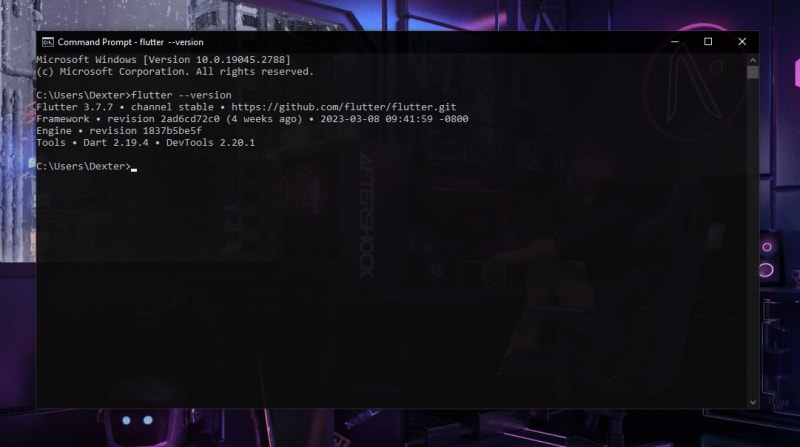
From that same command-line shell window, you would run the command flutter doctor. This command would display some useful information such as the OS of your local machine, Android SDK etc like below.
NOTE Don't worry about the 2 warnings you see with regards Chrome and Visual Studio. I don't have Chrome installed because I prefer Microsoft Edge. As for Visual Studio, we would install it and the necessary components in an article when we want to develop desktop apps for Windows using Flutter
Conclusion
This is where I draw the curtains on this piece. In my next article, I would take you through creating and running your first Flutter application as well as a comparison between emulators (virtual emulators and physical devices) to view and interact with your app in real-time. See you next time
P.S.
You may have noticed that I changed the directory of my JDK installation from "C:\Users\Dexter\java\bin" to "C:\Users\Dexter\java\jdk19.02". I was having issues setting up "JAVA_HOME" with the former directory, hence the change to a new directory. Also, if you have any questions or run into any roadblock, I'd be in the comments section of this article and I'd be glad to help out!
P.P.S.
While writing and preparing this article, I was listening to the phenomenal and legendary composer, Steve Jablonsky
Original Link: https://dev.to/bigdexter/introduction-to-flutter-setting-up-your-development-environment-1gi5
Dev To
More About this Source Visit Dev To