
An Interest In:
Web News this Week
- April 3, 2024
- April 2, 2024
- April 1, 2024
- March 31, 2024
- March 30, 2024
- March 29, 2024
- March 28, 2024
Some of Our Sources
- Just Creative
- Spoon Graphics
- Six Revisions
- Noupe
- Crazy Leaf Design
- Wal You
- Web Resource Source
- Codrops
- Daily Now
- The Verge
Help Webnuz
Referal links:
VS Code - Easy workflows and configurations with profiles
Have you ever wanted a custom setup in VS Code for a particular workflow or environment?
Well, you're in luck! Today, I will show you how to do this inside VS Code with profiles.
Profiles were added to VS Code in February 2023 (v1.7.6). Previously, people did this configuration outside of VS Code and had to do some command-line wrangling to make their own system. For example, Joe Previte created a teaching workflow for his egghead courses. This method can get messy if you are not careful!
What is a profile?
Profiles enable a user to save a configuration set including ui state,settings, and extensions. It can capture preferences that can help you switch between contexts. You can switch between profiles easily.
Profiles can be synced across machines. You can export them and share them with colleagues to coordinate your work.
This was a missing piece of the setup for VS Code for a long time in my opinion.
What can a profile include?
A profile can include:
- UI state: View layout, visible views, and actions.
- Settings: A profile-specific
settings.jsonfile. - Extensions: You can add or remove extensions from a profile.
- Keybindings: A profile-specific
keybindings.jsonfile is created. - Snippets: A profile-specific
<<language>>.jsonfile is created. - User Tasks: A profile-specific
tasks.jsonfile is created.
When a profile is created, it is creating a separate set of configuration files. It creates a folder in your user configuration folder named after your profile. Depending on your platform, the folder will be located in:
- Windows:
%APPDATA%\Code\User/profiles - MacOS:
$HOME/Library/Application/Support/Code/User/profiles - Linux:
$HOME/.config/Code/User/profiles
Use cases for profiles
The primary use case is for work modes, in my opinion. If you find yourself doing a particular type of work, you could benefit from this. Activity such as demonstrations, screencasting, reviewing pull requests, or writing docs have different requirements.
A secondary use case is for particular environments. If you have a fullstack project, it may be useful to have a frontend and backend profile to switch to a different UI layout and have certain actions more prominently available. Maybe you want your Ruby on Rails projects to be set-up differently than other Ruby projects.
I would issue some caution with creating profiles for languages and frameworks that you use, you could quickly get into a habit of overspecializing. Remember, it is possible to have language-specific settings in your global settings file! If some configuration is tied to a language, it may be better to put the configuration in there. I spoke about this in a previous article, Customize your VS Code setup for a project, or for a language if you want to learn more about that. It is something that people often are not familiar with.
A good rule of thumb is to only create a profile if you find yourself wanting to have the same configuration between projects, and it is not tied to a particular language.
One exception to the rule of thumb is that some extensions can always be loaded and you may not want this. This is not common because extensions are conditionally loaded, usually only when they are needed. It is usually only extensible extensions such as linters that are always loaded because they can be configured to be used by more languages or file types. I spoke about this in a previous article, VS Code - How many extensions should I use? if you want to learn more about the topic.
If you want tighter control, a profile can gives you that power. I would try to avoid micromanaging though!
Creaing a "Teaching" profile
Let's return to Joe Previte's "Teaching" workflow that he created outside of VS Code. It should be instructive (pardon the pun) to do this with a profile, and compare my efforts and the outcome with what Joe did. Joe made his custom configuration in 5 steps. Let's see how we fare!
Essentially, we want a minimal configuration. We want to be close to stock installation to be as simple and distraction-free as possible for students. We want to make text bigger and hide the minimap. We will have a short set of settings like so:
{ "editor.fontSize": 18, "terminal.integrated.fontSize": 16, "window.zoomLevel": 1.25, "editor.minimap.enabled": false}You have 3 choices for creating a profile:
- Create a profile based on the current profile with the command
Profiles: Create from Current Profiles. This is a duplicated copy of your current configuration. - Create an empty profile with the command
Profiles: Create Empty Profile... This is like a clean slate. - Create a temporary profile with the command
Profiles: Create Temporary Profile. A temporary profile is useful for experimentation. It creates an empty profile with an automatically generated name such as Temp 1. You can use the profile for the lifetime of your VS Code session. It will be deleted once you close VS Code.
Before we create a new profile, let me show you my default configuration for reference. Below is a screenshot of editing a markdown file, this post, with my current config.
We will create an empty profile because we want to start from zero.
Open the Command Palette ([[Ctrl]]+[[Shift]]+[[P]]) and run the Create Empty Profile.. command. You will be promoted for a name. I will name the profile as "Teaching".
You will see the UI flash and we are now in our new profile.
Everything looks different now because we have reverted back to the base settings!
VS Code identifies the current custom profile by showing the first two letters of the profile name as a badge on the gear icon on the sidebar. This is the Manage Activity item according to the VS Code docs. It is positioned at the bottom of the sidebar by default, I have circled it in yellow in the screenshot below.
![]()
You can see "TE" for my teaching profile.
![]()
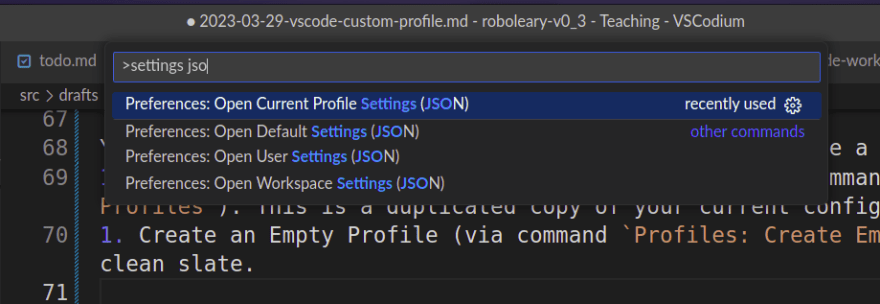
Let's edit our profile by changing the settings. Run the command Preferences: Open Current Profile Settings (JSON) to open the settings.json for the "Teaching" profile. Paste in the aforementioned settings and save. You will see the text increase in size and everything is zoomed in now.

Mission accomplished for our simple use case!
We did it in just 2 steps! Although, Joe uses the command-line for opening a project with his configuration. You can do this too without any extra effort!
If you want to open a project direct from the command-line with your "Teaching" profile, you can use the code command with the --profile option. You supply the name of the profile as an argument, just like this:
# open a project with a profilecode ~/projects/teaching/website-tutorial --profile "Teaching"Switching profiles
You can quickly switch between profiles with the Profiles: Switch Profile command. The command will presents a dropdown listing your available profiles. Pick one and it will change your configuration.

The current profile is associated with the current workspace. When you open that folder again, it will open with the profile from your last session.
Editing a profile
One thing to keep in mind when you want to edit the settings of a profile is that there are multiple settings.json files. There is: default, user, current profile, and project. There is a command for each of these in the command palette.
Make sure you run the Preferences: Open Current Profile Settings (JSON) command to open the settings.json for the current profile. If you are in your default profile, you will not see this command in the list.
You can open the profiles view to review the customizations for a profile with the Profiles: Show Contents command.
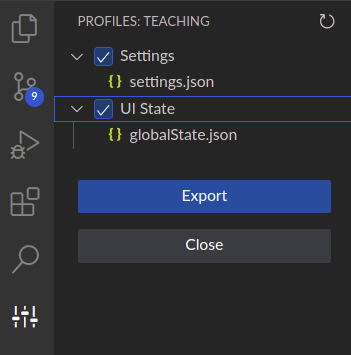
Since I only edited the setteing, my "Teaching" profile has just Settings and UI State listed. You will see entries for keybindings, tasks, and extensions listed here if you customised them!
If you expand the UI State node, there is a globalState.json entry. This is an in-memory JSON representation of your profile's UI State. This file does not actually exist on disk. Just in case you were wondering -- I wondered!
You can rename an existing profile via the Profiles: Rename.. command in the Profiles menu.
You can delete a profile via the Profiles: Delete command.
You can import and export profiles with the Profiles: Import.. and Profiles: Export.. commands respectively. A profile can be exported as a GitHub gist or as file. If you chose to save the profile as a local file, a Save Profile dialog lets you place the file on your local machine. A profile is persisted in a file with the extension .code-profile.
Syncing profiles
You can use the builtin Settings Sync feature to use your profiles across machines.
To add profiles to your sync, run the Settings Sync: Configure command. A drop down will appear showing configuration items to include in the sync, check the Profiles item.
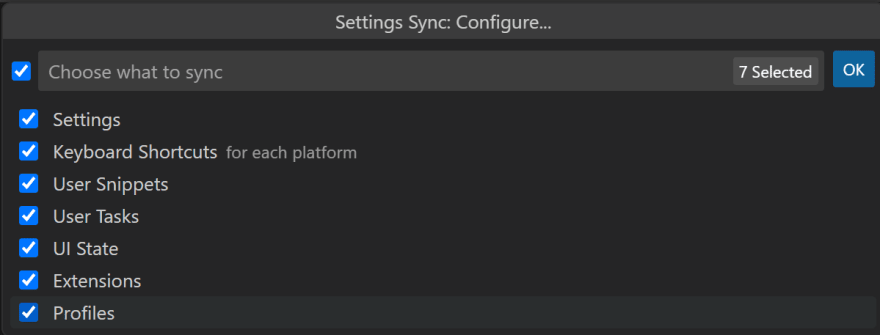
Don't forget to enable syncing, otherwise nothing will be synced!
Final thoughts
Profiles are a great addition to VS Code and can help you tailor your editor experience to work in different contexts and environments. You no longer need to go outside VS Code to create your own configuration sets. The editor integration means you can switch between contexts with ease, and benefit from other builtin features such as syncing and sharing. That's a signficant win in my book!
Further reading
Original Link: https://dev.to/robole/vs-code-custom-workflows-and-project-configuration-with-profiles-2ib6
Dev To
More About this Source Visit Dev To