
An Interest In:
Web News this Week
- April 29, 2024
- April 28, 2024
- April 27, 2024
- April 26, 2024
- April 25, 2024
- April 24, 2024
- April 23, 2024
Some of Our Sources
- Pearsonified
- The Logo Smith
- Six Revisions
- Creative Curio
- Inspiredology
- FanExtra - PSD
- My Ink Blog
- Web Design Ledger
- Spyre Studios
- TechPowerUp
Help Webnuz
Referal links:
How to Create a 'Stranger Things' Inspired Text Effect in Adobe Photoshop
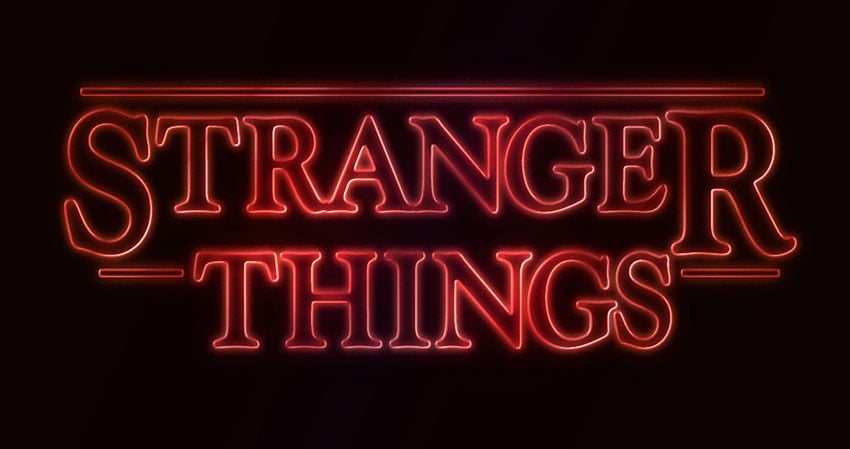


This quick tutorial will show you an easy way to create a text effect inspired by the 'Stranger Things' series, using only layer styles and some simple adjustments. Let's get started!
This text effect was inspired by the many Stranger Things style fonts available on Envato Elements. You can get MidWinter Fire, a similar Stranger Things logo font available to download.


Tutorial Assets for the Stranger Things Text Tutorial
The following assets were used during the production of this Stranger Things text tutorial:
Indira K: A similar Stranger Things font for free
by Supertuts007 (Load the CHROMES.grd file)
1. Create the Background and the Text
Step 1
Create a new 1280 x 720px Stranger Things PSD document, and fill the Background with the color #0c0101.


Step 2
Create the text in White using the font Indira K.
The original font used is Benguiat, but this is a similar Stranger Things font for free that you can use instead.
Set the Size to a value around 141 pt, and check the Faux Bold and All Caps icons in the Character panel (Window > Character).


Step 3
Change the Tracking value to -100.


Step 4
Change the Vertical Scale to 115. This will stretch the text vertically.


2. Adjust the Bigger Letters
Step 1
Select (highlight) the first letter of your text, and change its Size to a value around 212 pt.


Step 2
Next, you'll need to change the Baseline Shift value in order to move the big letter downwards, until its top is on the same level as the tops of the rest of the letters.
To do that, you can either enter numerical values, or scrub the Set the baseline shift icon to the left.


Step 3
Do the same for the last letter of the first line of text, or whatever other letters you like.


3. Adjust the Kerning
Step 1
Place the text cursor between the first two letters you have, and change the Kerning to a value you think looks good.


Step 2
Depending on your text and the result you're looking for, adjust the Kerning for the rest of the letters you have. Not all the letters should be adjusted, just the ones you think need that.


Step 3
Once you're done, change the text layer's Fill value to 0.


4. Add the Stranger Things Text Effect
Now it's time to add the Stranger Things text effect! Double-click the text layer to apply the following layer style:
Step 1
Add a Bevel and Emboss, which will give us the popular Stranger Things neon sign glow effect. Just add the following settings:
Style: Stroke Emboss
Depth: 220
Size: 3- Uncheck the Use Global Light box
Angle: 156
Altitude: 37
Gloss Contour: Cone - Inverted- Check the Anti-aliased box
Highlight Mode - Opacity: 35%
Shadow Mode - Opacity: 50%


Step 2
Add a Contour with these settings:
Contour: Cove - Deep- Check the Anti-aliased box.


Step 3
Add a Stroke with these settings:
Size: 3
Position: Inside
Color:#ce1725


Step 4
Add an Inner Glow with these settings:
Opacity: 50%
Noise: 5%
Color:#ea0f0f
Size: 17


Step 5
Add an Outer Glow with these settings:
Opacity: 50%
Noise: 5%
Color:#ea2314
Size: 12
Range: 60%


Step 6
This will style the text. Right-click the styled text layer, and choose Copy Layer Style.


5. Create the Rectangles
Step 1
The rectangles are an essential part of creating a Stranger Things design. Pick the Rounded Rectangle Tool, and set the Radius in the Options bar to 2. Click-drag to create a rectangle above the text, with a Height value around 7px.
Then, click-drag to create more rectangles at the beginning and end of the second line of text, or anywhere else you'd like to add them. Just make sure to maintain the same Height for all the rectangles you create.


Step 2
Change all the rectangle layers' Fill value to 0.


6. Style the Rectangles
Right-click any of the rectangle layers you have, and choose Paste Layer Style. This will apply the same layer style copied from the text layer.
After that, double-click the styled rectangle layer to adjust some of the values:
Step 1
Add a Bevel and Emboss with these settings:
Size: 2


Step 2
Add a Stroke with these settings:
Size: 2
Position: Outside


Step 3
Add an Inner Glow with these settings:
Size: 5


Step 4
Add an Outer Glow with these settings:
Size: 17


Step 5
Right-click the styled rectangle layer, and choose Copy Layer Style.


Step 6
Select the other rectangle layers you have, right-click any of them, and choose Paste Layer Style.


Step 7
Place the text and rectangle layers in a group, and call it Text Effect.


7. Style the Group
Double-click the Text Effect group to apply the following layer style:
Step 1
Add a Gradient Overlay with these settings:
- Check the Dither box
Blend Mode: Soft Light
Style: Reflected
Angle: 135- Create the Gradient fill using the colors
#fbe7c2to the left and#e69f99to the right


Step 2
Add another Gradient Overlay effect with these settings:
- Check the Dither box
Blend Mode: Overlay
Style: Reflected
Angle: 135- Use the faucet 10 gradient fill


Step 3
Add an Outer Glow with these settings:
Opacity: 20%
Color:#de1b22
Size: 34
Range: 60%


This will enhance the effect.


8. Add Some Light Spots
Step 1
Let's add some more effects to our Stranger Things design. First, set the Foreground Color to #451d08, and then create a new layer on top of all layers, call it Light, and change its Blend Mode to Color Dodge.


Step 2
Pick the Brush Tool, and choose a big, soft, round tip. Then start clicking over some letters to brighten them up.
You can change the tip's size, and play around with the Opacity value in the Options bar to control the intensity of the light spots you're adding.


Step 3
Click the Create new fill or adjustment layer icon in the Layers panel, and choose Hue/Saturation.


Step 4
Change the Saturation value to 35, and the Lightness to 15, or any other values you like.


9. Adjust the Coloring
Step 1
Let's add one more Stranger Things text effect. Add a Gradient adjustment layer on top of the Text Effect group.
Create the gradient fill using the colors #5c456e to the right, #b26b73 in the center, and #fda982 to the left. Change the Style to Reflected, the Angle to 155, and the Scale to 55%.


Step 2
Change the Gradient layer's Blend Mode to Color, and its Opacity to 35%. Finally, just export your Stranger Things PSD file into your desired file extension and you're done!


That's It! Now You Know How to Create a Stranger Things Neon Sign
In this tutorial, we created a Stranger Things design with simple text and modified it using the different Character panel options and settings. Then we styled the text, created the rectangles, and styled them as well.
After that, we grouped all the layers and added one more layer style. Finally, we added some light spots and a gradient adjustment layer to modify the coloring of the final result. Follow along with us over on our Envato Tuts+ YouTube channel if you prefer video tutorials:
Discover Similar Stranger Things Style Fonts
Do you want similar Stranger Things logo fonts? Check out these amazing vintage 80s fonts for your next graphic design or illustration projects:

 35+ Best Retro 80s Fonts to Download in 2023


 1980s Logos: Retro 80s Logo Design Inspiration


 24+ Best Free Retro Fonts (50s–80s Fonts to Download)


 30+ Cool Photoshop Text Effects, Actions & Styles for 2023
 How to Make an 80s Book Cover Template in Photoshop
 16 Cool Neon Light Fonts (Neon Sign Text Effects)

Original Link: https://design.tutsplus.com/tutorials/stranger-things-inspired-text-effect--cms-27139
TutsPlus - Design
More About this Source Visit TutsPlus - Design