
An Interest In:
Web News this Week
- April 26, 2024
- April 25, 2024
- April 24, 2024
- April 23, 2024
- April 22, 2024
- April 21, 2024
- April 20, 2024
Some of Our Sources
- Slashdot
- BoingBoing
- Techcrunch
- Technology Review
- Abduzeedo
- Fuel Your Creativity
- Web Design Ledger
- Design Modo
- Willems Lab
- The Verge
Help Webnuz
Referal links:
Deploying your API to the web
Overview
In previous articles, we have built APIs and tested them in our local environment. In this article we will deploy a back-end to the internet.
Here's the project we will be deploying:
Authentication in an Express app
- Implementing user authentication in an express app.
Technologies used
- Authentication done using
jwt (json web token). Passwords are hashed usingbcrypt. The API uses a MongoDB database.
Endpoints
| URL | METHOD | DESCRIPTION |
|---|---|---|
| api/users/ | POST (public) | register a user |
| api/users/login | POST (public) | logs in a user |
| api/users/me | GET (private) | gets the info of the logged in user |
How to run
- Clone the repository on your local computer
- Do
npm run installto install the required dependencies - Set up your MongoDB collection
- Do
npm run devto start the API
Test the API with Postman
We will use Railway as our preferred hosting provider. There are many considerations when choosing a provider. Some considerations include cost, ease of scaling, customer support amongst many more.
Why Railway?
They provide a free basic tier which is perfect for learners who want to experiment and learn how to deploy our projects. For more traffic heavy applications, you may have to upgrade your plan. Read more about Railway here.
Railway makes deployment for learners easy since it takes care of most of the infrastructure (servers, load balancing, reverse proxies etc) behind the scenes.
The skills acquired when deploying on Railway are transferable and can be used on other popular hosting sites
Preparing for deployment
So far, we have been working on our projects in our local environment. We now want to deploy our API to the web and to do so, we need to make some changes to our API to make it 'production ready'.
First we will set NODE_ENV to 'production' in our .env file.
This will result in less verbose error messages being displayed to the user of the API, increasing efficiency.
This error handling feature is defined in our error handling middleware (in this case it's in the file jwt_auth/middleware/errorMiddleware.js).
Second we will install compression and helmet.
Compression enables us to compress the response sent back to the client making our app more efficient. Once installed, we will use compression in the root of our project as we do with other middleware.
We will also install helmet in the root of our project. Helmet provides additional HTTP headers that protect our app from some vulnerabilities.
To install both helmet and compression, run npm install helmet compression. Import and chain to your project in server.js as below.
app.use(helmet())app.use(compression())app.use(cors())app.use(bodyParser.json())app.use(bodyParser.urlencoded({extended:false}))We can also make some changes to how we handle logging in our project but that will be covered in a later article.
Creating a new project on Railway
Our project is ready to be deployed. Let's head over to the Railway website.
Create an account on Railway and start a new project by clicking on new project:
Click on deploy from GitHub repo and install the Railway app to your GitHub account:
Select on the repos you gave railway access to. In my case, this is the jwt_auth repo:
Click on deploy now and wait for the project to build and deploy. You might get an error since we haven't set our environment variables yet:
Set environment variables. Remember these are the variables we had defined in our .env file:
Wait for the build and deploy process to finish and if successful, you will get a success message as below:
Since our aim is to expose our API to the world, we then generate a domain name for our API:
This is what we get when we click on generate domain: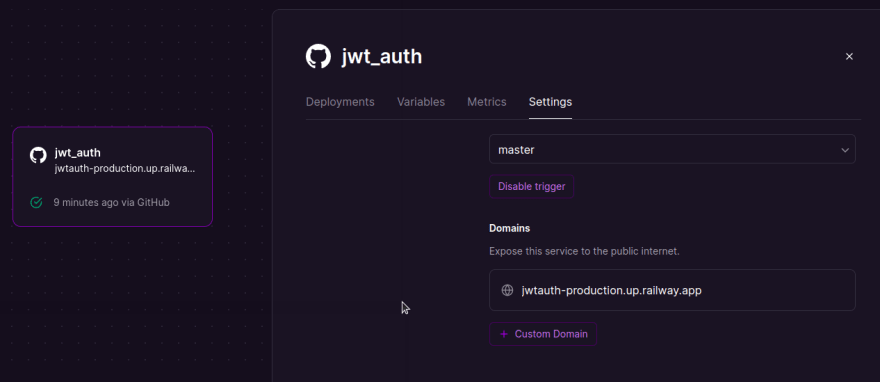
With that done, we have successfully deployed our API. You can monitor your deployment logs every once in a while since if an error occurs you can get the details there.
Conclusion
We have successfully build an API with jwt authentication and deployed it to the web. In the next article, we will test our API and debug some of the common issues encountered when deploying.
Original Link: https://dev.to/danielstai/deploying-your-api-to-the-web-107o
Dev To
More About this Source Visit Dev To