
An Interest In:
Web News this Week
- April 2, 2024
- April 1, 2024
- March 31, 2024
- March 30, 2024
- March 29, 2024
- March 28, 2024
- March 27, 2024
Some of Our Sources
- Technology Review
- Team Treehouse
- Pearsonified
- The Logo Smith
- Fuel Your Creativity
- FanExtra - PSD
- Reencoded
- 24 Ways
- Willems Lab
- Daily Now
Help Webnuz
Referal links:
Supercharge Go APIs with Serverless Functions
Serverless Function is a single-purpose programming feature that allows developers to write and deploy software without purchasing and maintaining servers. It lets developers focus on the core business logic of their application without worrying about logistics, operation, and infrastructure associated with software development.
In this post, we will learn how to use Serverless Functions to build a user management API in Go using Netlify, Xata, and Cloudinary.
Technology overview
Netlify is a platform for deploying and building highly-performant and dynamic websites, e-commerce stores, and web applications.
Xata is an HTTP API-based serverless database for building scalable applications. It supports a built-in search engine, branching, scalability, and durability without manually managing database configuration and deployment.
Cloudinary is a visual media service for uploading, storing, managing, transforming, and delivering images and videos for websites and applications.
GitHub links
The project source codes are below:
Prerequisites
To follow along with this tutorial, the following requirements apply:
- Basic understanding of Go
- Basic understanding of JavaScript
- Node.js installed
- A Netlify account for deploying Serverless Functions. Signup is completely free
- A Xata account for storing data. Signup is completely free
- A Cloudinary account for image optimization. Signup is completely free.
- A Github account for saving source code. Signup is completely free.## Set up a Database on Xata
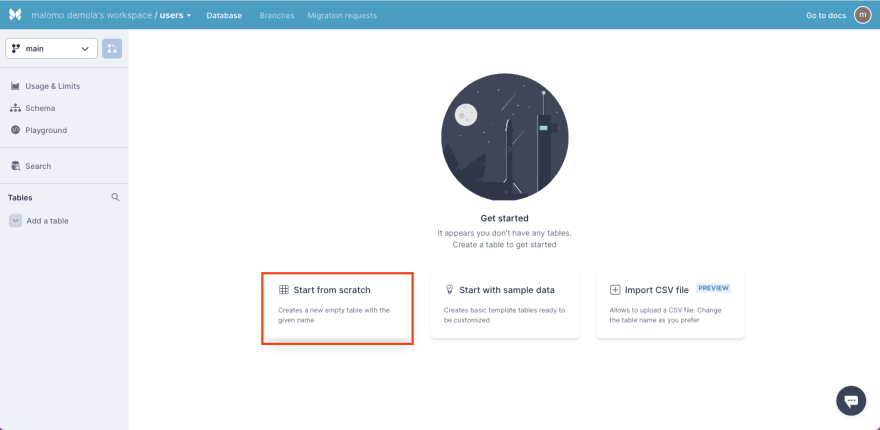
To create a database for storing our user management APIs data, we need to log into our Xatas workspace, click the Add a Database button, input users as the database name, and Create.


Next, we need to create a table in our database. To do this, click the Start from scratch menu, input userDetails as the table name, and Add table.

PS: Xata auto-generates an ID column (a unique identifier) for our table.
With that done, we need to add a firstName, lastName, phoneNumber, and avatar columns to our table. To do this, click on the Plus icon, select String, input column name, and Create column.
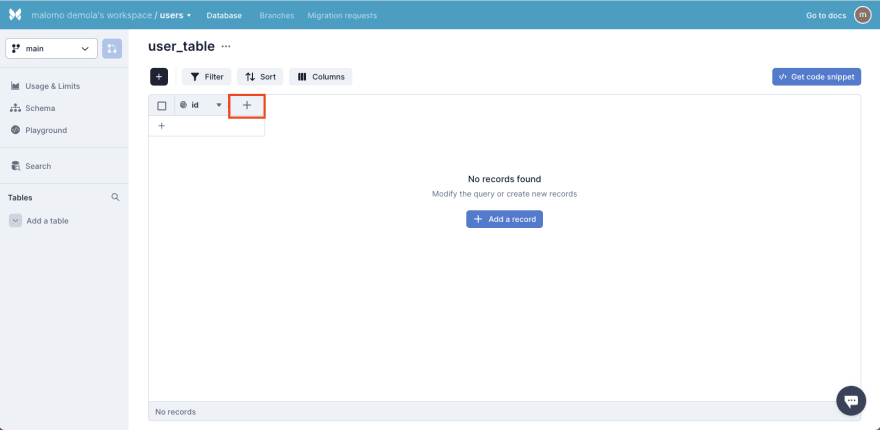


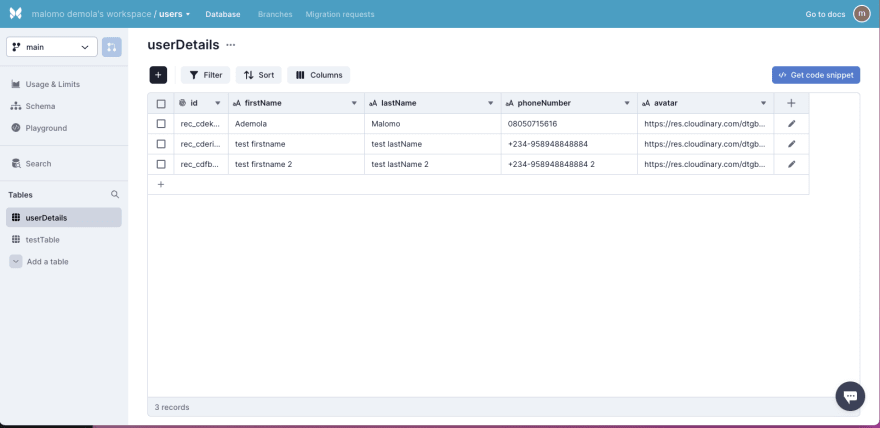
After creating the columns, our updated table should be similar to the screenshot below:

Get Database URL and set up API Key
By default, Xata provides a unique and secure URL for accessing the database. To get our database URL, click the Get code snippet button, copy the URL, and then click the Set up API key button to generate API key.

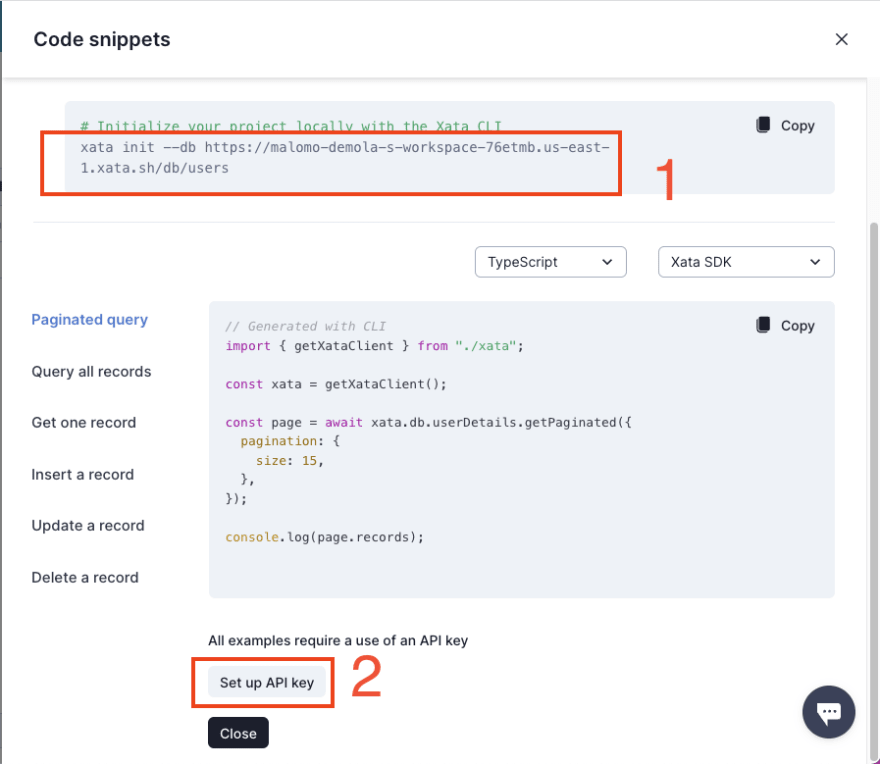
PS: The URL we need to copy starts from the *https://* section
Click the Add a key button, input xata-function as the name, and Save.


We must copy and keep the URL and generated API key, as they will come in handy when building our serverless functions.
Image sourcing and upload to Cloudinary
Next, we need to upload an image we will use as a default avatar when creating a user.
Avatar url
- bit.ly/3gUBL7E
In our Cloudinary dashboard, we uploaded the image by clicking on the Media Library tab, clicking on Upload, selecting the Web Address option, inputting the URL, and clicking on the Arrow Button to upload.


After uploading the image, we will see it displayed on the console. To get the image URL, mouse hover on the image and click on the Copy URL icon. The URL will come in handy when building our Serverless Functions.

Creating Serverless Functions
To get started, we need to navigate to the desired directory and run the command below:
mkdir xata-functions && cd xata-functionsThe command creates a directory called xata-functions and navigates into it.
Initializing project and installing dependencies
First, we need to initialize an empty Node.js project by running the command below:
npm init -yLastly, we need to install node-fetch, a package for making HTTP requests. To do this, we need to run the command below:
npm i node-fetchAdding logics to the Serverless Functions
With that done, we can start creating our application logic. To get started; first, we need to create a netlify folder and create a functions folder in this folder.
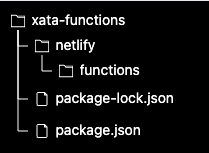
Secondly, we need to create a create.js file inside the functions folder and add the snippet below:
import fetch from 'node-fetch';exports.handler = async function (event, context, callback) { let bodyRequest = JSON.parse(event.body); const body = { firstName: bodyRequest.firstName, lastName: bodyRequest.lastName, phoneNumber: bodyRequest.phoneNumber, avatar: 'https://res.cloudinary.com/dtgbzmpca/image/upload/v1667083687/abstract-user-flat-4.png', }; const response = await fetch( `${process.env.XATA_URL}:main/tables/userDetails/data`, { method: 'POST', headers: { 'Content-Type': 'application/json', Authorization: `Bearer ${process.env.XATA_API_KEY}`, }, body: JSON.stringify(body), } ); const data = await response.json(); return { statusCode: 200, body: JSON.stringify(data), };};The snippet above does the following:
- Imports the required dependency
- Gets the request body
- Uses the request body to create a
bodyobject by passing in thefirstName,lastName,phoneNumber, andavatardefault URL we got from Cloudinary - Creates a
POSTrequest to the Xata database by passing the URL as an environment variable with the database details and API key - Returns the appropriate response.
We also constructed the Xata database URL by passing in the branch, table name, and endpoint type.
https://sample-databaseurl/users:<BRANCH NAME>/tables/<TABLE NAME>/ENDPOINT TYPEWe can get the required details from our workspace

In our case, we filled it using an environment variable. We will add it when deploying our application to Netlify. An adequately filled URL is below:
https://sample-databaseurl/users:main/tables/userDetails/dataThirdly, we need to create a get.js file inside the same functions folder and add the snippet below:
import fetch from 'node-fetch';exports.handler = async function () { const body = { page: { size: 15, }, }; const response = await fetch( `${process.env.XATA_URL}:main/tables/userDetails/query`, { method: 'POST', headers: { 'Content-Type': 'application/json', Authorization: `Bearer ${process.env.XATA_API_KEY}`, }, body: JSON.stringify(body), } ); const data = await response.json(); return { statusCode: 200, body: JSON.stringify(data), };};The snippet above works similarly to the create.js file. However, we created a body object to paginate the requested data from the Xata database.
Lastly, we need to add a deployment file that instructs Netlify to build our application effectively. To do this, we need to create a netlify.toml file in the root directory of our project and add the snippet below:
[functions] node_bundler = "esbuild"Pushing our source code to GitHub
To enable a seamless deployment process, we need to push our source code to GitHub. To get started, we need to log into our GitHub account, create a repository, input xata-functions as the name and Create repository.
Next, we initialize a git project and save recent changes in our project by running the command below:
git initgit add .git commit -m "add serverless functions"To push our changes, copy and run the highlighted commands on the terminal:

Deploying to Netlify
To get started, we need to log into our Netlify dashboard. Click on Add new site dropdown and select Import an existing project.
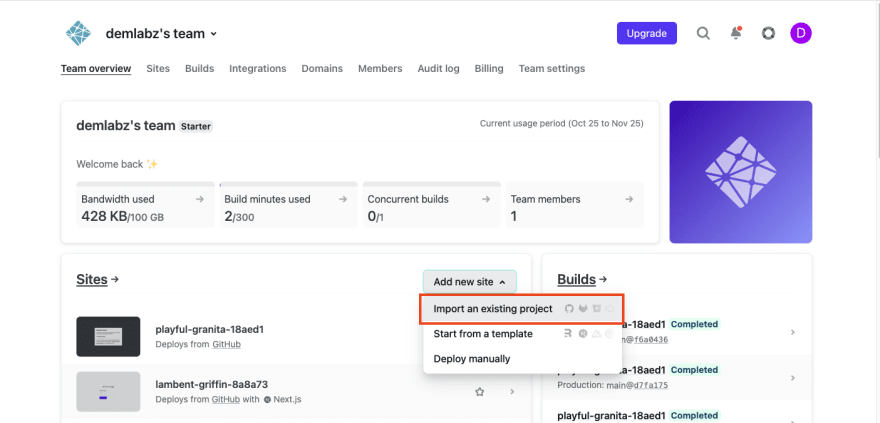
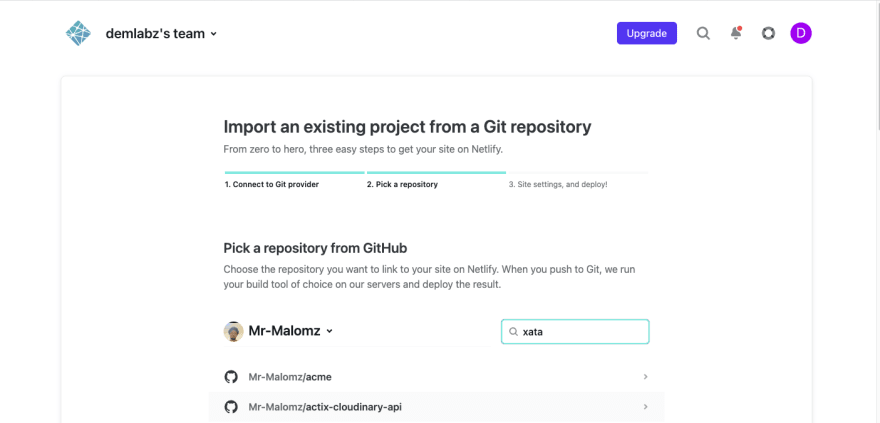
Select GitHub as the Git provider and authorize Netlify.

Search for xata-function and select the repository.
Click on Show advanced, click the New variable button and add the XATA_URL and XATA_API_KEY environment variables as key and their corresponding values.

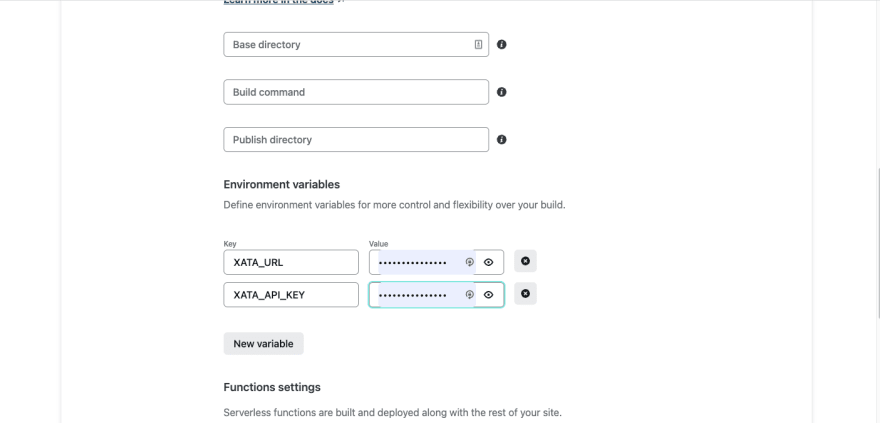
As earlier mentioned, we can get Xatas URL and API key from our workspace.


Click on Deploy site button to start deployment. It might take a few minutes.
We can view and get our deployed Serverless Functions URL by navigating to the Functions tab, and click on any of the functions to access the URL.


Leveraging the Serverless Functions to build Go APIs
With our Serverless Functions up and running, we can start leveraging them to build our user management APIs. To get started, we need to navigate to the desired directory and run the command below in our terminal:
mkdir go-user-service && cd go-user-serviceThis command creates a go-user-service and navigates into the project directory.
Next, we need to initialize a Go module to manage project dependencies by running the command below:
go mod init go-user-serviceThis command will create a go.mod file for tracking project dependencies.
We proceed to install the required dependencies with:
go get github.com/gin-gonic/gin github.com/go-playground/validator/v10github.com/gin-gonic/gin is a framework for building web applications.
github.com/go-playground/validator/v10 is a library for validating structs and fields.
Structuring our application
It is essential to have a good project structure as it makes the project maintainable and easier for us and others to read our codebase.
To do this, we need to create an api, cmd, and data folder in our project directory.
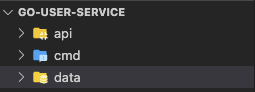
api is for structuring our API-related files
cmd is for structuring our application entry point
data is for structuring our application data
Create the API models
Next, we need to create models to represent our application data. To do this, we need to navigate to the data folder and, in this folder, create a model.go file and add the snippet below:
package datatype User struct { Id string `json:"id,omitempty"` FirstName string `json:"firstName,omitempty" validate:"required"` LastName string `json:"lastName,omitempty" validate:"required"` PhoneNumber string `json:"phoneNumber,omitempty" validate:"required"` Avatar string `json:"avatar,omitempty"`}type Records struct { Records []User `json:"records,omitempty" validate:"required"`}type CreateResponse struct { Id string `json:"id,omitempty" validate:"required"`}The snippet above creates a User, Records, and CreateResponse struct with the required properties to describe requests and response type.
Create the API routes, helpers, service, and handlers
With the models fully set up, we need to navigate to the api folder and do the following:
First, we need to create a route.go file for configuring the API routes and add the snippet below:
package apiimport "github.com/gin-gonic/gin"type Config struct { Router *gin.Engine}func (app *Config) Routes() { //routes will come here}The snippet above does the following:
- Imports the required dependency
- Creates a
Configstruct with aRouterproperty to configure the application methods - Creates a
Routesfunction that takes in theConfigstruct as a pointer
Secondly, we need to create a helper.go file and add the snippet below:
package apiimport ( "net/http" "github.com/gin-gonic/gin" "github.com/go-playground/validator/v10")type jsonResponse struct { Status int `json:"status"` Message string `json:"message"` Data any `json:"data"`}var validate = validator.New()func (app *Config) validateBody(c *gin.Context, data any) error { //validate the request body if err := c.BindJSON(&data); err != nil { return err } //use the validator library to validate required fields if err := validate.Struct(&data); err != nil { return err } return nil}func (app *Config) writeJSON(c *gin.Context, status int, data any) { c.JSON(status, jsonResponse{Status: status, Message: "success", Data: data})}func (app *Config) errorJSON(c *gin.Context, err error, status ...int) { statusCode := http.StatusBadRequest if len(status) > 0 { statusCode = status[0] } c.JSON(statusCode, jsonResponse{Status: statusCode, Message: err.Error()})}The snippet above does the following:
- Imports the required dependencies
- Creates a
jsonResponsestruct andvalidatevariable to describe the API response and to validate the API fields - Creates a
validateBodyfunction that takes in theConfigstruct as a pointer and returns anerror. Inside the function, we validate that requestdatain the correct format and also use the validator library to also validate and check for the required fields - Creates a
writeJSONfunction that takes in theConfigstruct as a pointer and uses thejsonResponsestruct to construct API response when theres no error - Creates a
errorJSONfunction that takes in theConfigstruct as a pointer and uses thejsonResponsestruct to construct API response when theres an error
Thirdly, we need to create a service.go file that uses the Serverless Functions to abstract the application logic and add the snippet below:
package apiimport ( "bytes" "encoding/json" "go-user-service/data" "io/ioutil" "net/http")func (app *Config) getUserService() (*data.Records, error) { url := "<NETLIFY FUNCTION GET URL>" records := data.Records{} resp, err := http.Get(url) if err != nil { return nil, err } body, err := ioutil.ReadAll(resp.Body) if err != nil { return nil, err } err = json.Unmarshal([]byte(body), &records) if err != nil { return nil, err } return &records, nil}func (app *Config) createUserService(newUser data.User) (*data.CreateResponse, error) { url := "<NETLIFY FUNCTION CREATE URL>" response := data.CreateResponse{} jsonData := data.User{ FirstName: newUser.FirstName, LastName: newUser.LastName, PhoneNumber: newUser.PhoneNumber, } postBody, _ := json.Marshal(jsonData) bodyData := bytes.NewBuffer(postBody) resp, err := http.Post(url, "application/json", bodyData) if err != nil { return nil, err } body, err := ioutil.ReadAll(resp.Body) if err != nil { return nil, err } err = json.Unmarshal([]byte(body), &response) if err != nil { return nil, err } return &response, nil}The snippet above does the following:
- Imports the required dependencies
- Creates a
getUserServicefunction that takes in theConfigstruct as a pointer, and returns either the list of users or an error. The functions also get the list of users by making an HTTP request to thegetServerless Function URL, reads the response accordingly, and returns the appropriate response - Creates a
createUserServicefunction that accepts anewUser, takes in theConfigstruct as a pointer, and returns the created user details or an error. The functions also creates a user by making an HTTP request to thecreateServerless Function URL, reads the response accordingly, and returns the appropriate response
Fourthly, we need to create a handler.go file for modifying the incoming request and add the snippet below:
package apiimport ( "context" "go-user-service/data" "net/http" "time" "github.com/gin-gonic/gin")const appTimeout = time.Second * 10func (app *Config) getUser() gin.HandlerFunc { return func(ctx *gin.Context) { _, cancel := context.WithTimeout(context.Background(), appTimeout) defer cancel() data, err := app.getUserService() if err != nil { app.errorJSON(ctx, err) return } app.writeJSON(ctx, http.StatusOK, data) }}func (app *Config) createUser() gin.HandlerFunc { return func(ctx *gin.Context) { _, cancel := context.WithTimeout(context.Background(), appTimeout) var payload data.User defer cancel() app.validateBody(ctx, &payload) newData := data.User{ FirstName: payload.FirstName, LastName: payload.LastName, PhoneNumber: payload.PhoneNumber, } data, err := app.createUserService(newData) if err != nil { app.errorJSON(ctx, err) return } app.writeJSON(ctx, http.StatusAccepted, data) }}The snippet above does the following:
- Imports the required dependencies
- Creates an
appTimeoutvariable to set request timeout - Creates a
getUserfunction that returns a Gin-gonic handler and takes in theConfigstruct as a pointer. Inside the returned handler, we defined the API timeout, used the helper functions and the service created earlier to get the list of users - Creates a
createUserfunction that returns a Gin-gonic handler and takes in theConfigstruct as a pointer. Inside the returned handler, we defined the API timeout, used the helper functions and the service created earlier to verify the request body, create a user, and return the created user details
Finally, we need to update the routes.go files with the API route and corresponding handler.
package apiimport "github.com/gin-gonic/gin"type Config struct { Router *gin.Engine}//modify belowfunc (app *Config) Routes() { app.Router.GET("/users", app.getUser()) app.Router.POST("/users", app.createUser())}Putting it all together
With our API fully set up, we need to create the application entry point. To do this, we need to navigate to the cmd folder and, in this folder, create a main.go file and add the snippet below:
package mainimport ( "go-user-service/api" "github.com/gin-gonic/gin")func main() { router := gin.Default() //initialize config app := api.Config{Router: router} //routes app.Routes() router.Run(":8080")}The snippet above does the following:
- Imports the required dependencies
- Creates a Gin router using the
Defaultconfiguration - Initialize the
Configstruct by passing in theRouter - Adds the route and run the application on port
:8080
With that done, we can start a development server using the command below:
go run cmd/main.go 

We can also verify the APIs by checking the Xatas workspace
Conclusion
This post discussed how to quickly create user management APIs in Go without manually deploying and managing databases and servers. With the powerful trio of Xata, Netlify, and Cloudinary, developers can build and ship applications faster by focusing on what matters and not being bothered by infrastructure bottlenecks.
These resources might be helpful:
Original Link: https://dev.to/hackmamba/supercharge-go-apis-with-serverless-functions-4o6d
Dev To
More About this Source Visit Dev To