
An Interest In:
Web News this Week
- April 3, 2024
- April 2, 2024
- April 1, 2024
- March 31, 2024
- March 30, 2024
- March 29, 2024
- March 28, 2024
Some of Our Sources
- Mashable
- Technology Review
- The Logo Smith
- Vandelay Design
- Creative Curio
- Inspiredology
- My Ink Blog
- Web Design Ledger
- Spyre Studios
- TechPowerUp
Help Webnuz
Referal links:
An introduction to the Zerops build & deploy pipeline: A Golang example
Welcome back to our article series about Golang in Zerops! In case you missed the previous post, have a look at Building a Simple TODO App with Gin-gonic in Zerops: A step-by-step Guide to catch up on the basics.
In this post we will focus on building and deploying your own application in Zerops. All you need to do is add a zerops.yml configuration file to the root directory of your app. We will go in detail through the file so that it works best for your application.
1. Set up your project in Zerops
Feel free to skip this section if you are already familiar with Zerops.
Complete these steps to have Zerops ready for your application:
Note down the names of the project and the service, you will need them for future reference. For our example application we created a project called myProject and a Golang service called helloworld.
1.1. Pipeline triggering (GUI/zCLI)
Once you have your zerops.yml ready, there are two options to trigger the build & deploy pipeline:
Git integration + Zerops GUI
Recommended when your app source code is already versioned in a git repository. In the detail of your Go service, go to Build, deploy, run pipeline settings, connect with either a Github or Gitlab repository and Activate pipeline trigger according to your needs.
zCLI
If command line is your best friend or it just better suits your use case, you can:
- Install zCLI
- Login to zCLI with an access token generated in GUI
- Run a
zcli push <project_name> <service_name>command (in our case it iszcli push myProject helloworld)
Nevertheless, once the pipeline is triggered, you can follow its progress in the Zerops GUI with more information provided.
1.2. Example application
The most simple example was chosen to eliminate the need to test the app locally before trying out Zerops.
You are more than welcome to build, deploy and run your own Go application in Zerops while following this example only as a guide.
Our example app is a slight modification of the famous Hello, World! program. There is only one file, main.go. The main function first sets up the getHelloWorld handler function to the /hello-world path, and then it starts the http server with the gin-gonic library. The getHelloWorld function only prints Hello, World!. The server is listening on port 8080, which is the default port created for Go services in Zerops.
package mainimport (  "fmt"  "log"  "net/http" "github.com/gin-gonic/gin")func main() {  fmt.Println("Running http server")  router := gin.Default()  router.GET("/hello-world", getHelloWorld)  log.Fatal(router.Run(":8080"))}func getHelloWorld(c *gin.Context) {  fmt.Println("received /hello-world request
")  c.String(http.StatusOK,"Hello, World!")}
We also need to initialize a go module, which creates go.mod and go.sum files. You can either do it yourself or copy the contents from our repository. The project structure is as follows:
myProject go.mod go.sum zerops.yml main.go2. Build & deploy pipeline explained
First we will illustrate the process and then explain the key words when editing the zerops.yml file. It all starts with an image. It is either created by combining a base image with prepare commands, or loaded from the cache from previous builds if nothing has changed (which contains your cached files as well). The image is then run inside a "build" container. After that, all build commands are executed and a deployment artifact is created. It is 'deployed' to another 'runtime' container, where it is run.
Now lets have a look at the build section of the zerops.yml file where you can customize the process above for your Go services. Note that the service name is the root key in the zerops.yml file.
helloworld: build: base: # optional prepare: # optional build: # required deploy: # required cache: # optionalrun: ...To build your Go application, you definitely need to run the go build ... command. Thats what the required build section is for! The following command compiles our package with a single main.go source file into an executable called app.
... build: - go build -o app main.go...And thats it? Well, at the moment the command would fail as we have not installed go itself and set the environment. To save you the trouble of finding the right package and going through the installation process, Zerops has created several base images with the most common dependencies preinstalled, such as go and git in go@1 base image:
... base: [go@1] build: - go build -o app main.go...In case you need to use an older version of go or want to customize the dependencies in any way, use the prepare section. It is designed for any commands you might need to execute to successfully run the build commands. For instance, have you got git or wget in mind? No problem, here is an example:
... prepare: -| add-apt-repository ppa:longsleep/golang-backports apt update apt install -y golang-1.17 git wget ln -s /usr/lib/go-1.17/bin/go /usr/bin/go ln -s go-1.17 /usr/lib/go build: - go build -o app main.go...Another required key in the build section of zerops.yml file is deploy. You need to let Zerops know which files or folders need to be deployed to a container where your application will be running. In our case we only need the app executable. The value is an array of paths allowing you to deploy single files or entire folders, see the documentation for all supported formats.
... build: base: [ go@1 ] build: - go build -o app main.go deploy: [ app ]...The last part of the build section is an optional cache. After every build the resulting image of base image and prepare commands is cached and used next time if nothing changes in these sections of the zerops.yml. However all files in your project root directory are discarded, unless you explicitly tell Zerops to cache them too. In the Go service there is not much to cache that would significantly speed up the build process compared to the node_modules folder in a Node.js service, for example. However lets see how we can cache go dependencies as well - but take it only as an example!
It is possible to cache any files and folders in the project root directory except the .git folder. Since the default folder where the go modules are stored is ~/go/pkg/mod, we need to change it to e.g. $(pwd)/mod (working directory is by default the root of your project), and then we can cache this folder. The expected format is the same as for deploy.
... build: base: [ go@1 ] build: - go env -w GOMODCACHE=$(pwd)/mod - go build -o app main.go deploy: [ app ] cache: [ mod ]...To check that the cache is applied, you should see in the logs that the dependencies are only downloaded during the first build.
Now we are done! The last thing is to run your deployed code. The only required key for Go services is start, its value is expected to be a command that starts your application, such as ./app runs the app executable in our example.
The full working zerops.yml file to build, deploy and run our helloworld application is as follows:
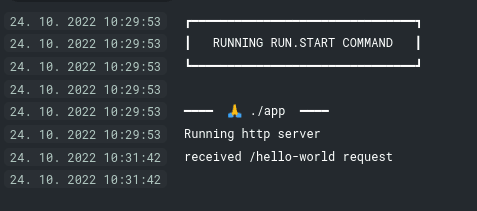
helloworld: build: base: [ go@1 ] build: - go build -o app main.go deploy: [ app ] run: start: ./appTo make sure the application is up and running, open the Runtime log section in the Golang service detail.

If you have followed our example, or you have your own http server running, you can also test it by enabling a subdomain (for development purposes) or setting up your domain. Either way, when the /hello-world request is made, you should see Hello, World! printed.

Easy, right? :) We are well aware that the real-life application will be more complex. If you have any issues, join our Discord server to ask any questions and/or share your solutions with others. Also check our documentation to learn more about Zerops.
We are looking forward to seeing your own pipelines running!
Conclusion (tl;dr)
- always specify
buildcommand - use predefined
baseimages or specify custompreparecommands to build your app - or BOTH! - always specify which files you want to
deployto a runtime container - you can optionally
cacheany deployed files to speed up future builds
Original Link: https://dev.to/reoops/an-introduction-to-the-zerops-build-deploy-pipeline-a-golang-example-4opd
Dev To
More About this Source Visit Dev To