
An Interest In:
Web News this Week
- April 3, 2024
- April 2, 2024
- April 1, 2024
- March 31, 2024
- March 30, 2024
- March 29, 2024
- March 28, 2024
Some of Our Sources
- Spoon Graphics
- You The Designer
- Inspiredology
- Reencoded
- Line 25
- Specky Boy
- CSS Tricks
- Design Modo
- Codrops
- Willems Lab
Help Webnuz
Referal links:
Building THE MOST practical Todolist with React and Websockets
What is this article about?
In this article, you'll learn how to build a team to-do list with React.js and Socket.io. Users can create, read, and delete to-dos and add comments to each to-do via Socket.io. You'll also learn how to add notifications to the application when you create or delete a to-do item.

Novu - the first open-source notification infrastructure
Just a quick background about us. Novu is the first open-source notification infrastructure. We basically help to manage all the product notifications. It can be In-App (the bell icon like you have in the Dev Community - Websockets), Emails, SMSs and so on.
I would be super happy if you could give us a star! It will help me to make more articles every week
https://github.com/novuhq/novu
We will also send some awesome swag during Hacktoberfest
What is Socket.io?
Socket.io is a popular JavaScript library that allows us to create real-time, bi-directional communication between web browsers and a Node.js server. It is a highly performant and reliable library designed to process a large volume of data with minimal delay. It follows the WebSocket protocol and provides better functionalities, such as fallback to HTTP long-polling or automatic reconnection, which enables us to build efficient real-time applications.
How to create a real-time connection with React & Socket.io
Here, we'll set up the project environment for the to-do list application. You'll also learn how to add Socket.io to a React and Node.js application and connect both development servers for real-time communication via Socket.io.
Create the project folder containing two sub-folders named client and server.
mkdir todo-listcd todo-listmkdir client serverNavigate into the client folder via your terminal and create a new React.js project.
cd clientnpx create-react-app ./Install Socket.io client API and React Router.React Router is a JavaScript library that enables us to navigate between pages in a React application.
npm install socket.io-client react-router-domDelete the redundant files such as the logo and the test files from the React app, and update theApp.js file to display Hello World as below.
function App() { return ( <div> <p>Hello World!</p> </div> );}export default App;Navigate into the server folder and create apackage.json file.
cd server & npm init -yInstall Express.js, CORS, Nodemon, and Socket.io Server API.
Express.jsis a fast, minimalist framework that provides several features for building web applications in Node.js.CORSis a Node.js package that allows communication between different domains.
Nodemonis a Node.js tool that automatically restarts the server after detecting file changes, andSocket.ioallows us to configure a real-time connection on the server.
npm install express cors nodemon socket.ioCreate anindex.jsfile - the entry point to the web server.
touch index.jsSet up a simple Node.js server using Express.js. The code snippet below returns a JSON object when you visit thehttp://localhost:4000/apiin your browser.
//index.jsconst express = require("express");const app = express();const PORT = 4000;app.use(express.urlencoded({ extended: true }));app.use(express.json());app.get("/api", (req, res) => { res.json({ message: "Hello world", });});app.listen(PORT, () => { console.log(`Server listening on ${PORT}`);});Import the HTTP and the CORS library to allow data transfer between the client and the server domains.
const express = require("express");const app = express();const PORT = 4000;app.use(express.urlencoded({ extended: true }));app.use(express.json());// New importsconst http = require("http").Server(app);const cors = require("cors");app.use(cors());app.get("/api", (req, res) => { res.json({ message: "Hello world", });});http.listen(PORT, () => { console.log(`Server listening on ${PORT}`);});Next, add Socket.io to the project to create a real-time connection. Before theapp.get()
block, copy the code below.
// New imports.....const socketIO = require('socket.io')(http, { cors: { origin: "http://localhost:3000" }});// Add this before the app.get() blocksocketIO.on('connection', (socket) => { console.log(`: ${socket.id} user just connected!`); socket.on('disconnect', () => { socket.disconnect() console.log(': A user disconnected'); });});From the code snippet above, thesocket.io("connection")function establishes a connection with the React app, then creates a unique ID for each socket and logs the ID to the console whenever a user visits the web page.
When you refresh or close the web page, the socket fires the disconnect event showing that a user has disconnected from the socket.
Configure Nodemon by adding the start command to the list of scripts in thepackage.jsonfile. The code snippet below starts the server using Nodemon.
// In server/package.json"scripts": { "test": "echo \"Error: no test specified\" && exit 1", "start": "nodemon index.js" },You can now run the server with Nodemon by using the command below.
npm startBuilding the user interface
Here, we'll create the user interface for the to-do list application. Users will be able to sign in, add and delete a to-do, and add comments to every to-do.
Navigate into the client/src folder and create a components folder containing a Home.js and Main.js file.
cd clientmkdir componentscd componentstouch Home.js Main.jsUpdate the App.js file to render the newly created components on different routes via React Router.
import React from "react";import socketIO from "socket.io-client";import { BrowserRouter, Routes, Route } from "react-router-dom";import Main from "./components/Main";import Home from "./components/Home";const socket = socketIO.connect("http://localhost:4000");const App = () => { return ( <BrowserRouter> <Routes> <Route path='/' element={<Home />} /> <Route path='/app' element={<Main socket={socket} />} /> </Routes> </BrowserRouter> );};export default App;Navigate into the src/index.css file and copy the code below. It contains all the CSS required for styling this project.
@import url("https://fonts.googleapis.com/css2?family=Space+Grotesk:wght@300;400;500;600;700&display=swap");* { box-sizing: border-box; margin: 0; padding: 0; font-family: "Space Grotesk", sans-serif;}.navbar { width: 100%; height: 10vh; background-color: #256d85; display: flex; align-items: center; justify-content: space-between; padding: 0 20px; color: #dff6ff;}.form { width: 100%; min-height: 20vh; display: flex; align-items: center; justify-content: center; padding: 0 30px;}.input { padding: 10px 15px; width: 80%; margin-right: 15px;}.form__cta,.home__form > button { width: 200px; cursor: pointer; padding: 10px; height: 45px; font-size: 16px; background-color: #256d85; color: #dff6ff; border: none; outline: none; border-radius: 3px;}.todo__container { width: 100%; display: flex; align-items: center; flex-direction: column; min-height: 300px;}.todo__item { display: flex; align-items: center; width: 70%; padding: 20px; background-color: #ddd; margin: 10px 0; justify-content: space-between; color: #06283d;}.deleteBtn { padding: 5px 10px; background-color: rgb(202, 22, 22); border: none; outline: none; color: #fff; cursor: pointer;}.deleteBtn:hover { color: rgb(202, 22, 22); background-color: #fff;}.commentsBtn { padding: 5px 10px; margin-right: 10px; outline: none; cursor: pointer; border: none; background-color: #fff;}.commentsBtn:hover { background-color: #ddd; border: 1px solid #000;}.modal { min-height: 100vh; width: 100%; position: fixed; top: 0; background-color: #fff; display: flex; align-items: center; justify-content: center;}.modal__container { width: 70%; background-color: #fff; min-height: 80vh; padding: 30px; border-radius: 3px; border: 1px solid #333;}.modal__container > h3 { margin-bottom: 30px;}.comment__form { display: flex; margin-bottom: 30px; align-items: center;}.comment__form > input { padding: 10px; border: 1px solid #256d85; width: 70%; margin-right: 20px;}.comment { margin-bottom: 5px;}.comment__form > button { padding: 15px 20px; cursor: pointer; background-color: #256d85; color: #fff; outline: none; border: none; height: 45px;}.home { width: 100%; min-height: 100vh; display: flex; flex-direction: column; align-items: center; justify-content: center;}.home__form { width: 100%; display: flex; flex-direction: column; align-items: center;}.home__form > * { margin-bottom: 10px;}.home > h2 { margin-bottom: 15px;}The Home page
Here, the application accepts the username and saves it in the local storage for user identification. Copy the code below into the Home component.
import React, { useState } from "react";import { useNavigate } from "react-router-dom";const Home = () => { const [username, setUsername] = useState(""); const navigate = useNavigate(); const handleSubmit = (e) => { e.preventDefault(); localStorage.setItem("_username", username); // Navigates to the application navigate("/app"); }; return ( <div className='home'> <h2>Sign in to your todo-list</h2> <form onSubmit={handleSubmit} className='home__form'> <label htmlFor='username'>Your Username</label> <input value={username} required onChange={(e) => setUsername(e.target.value)} className='input' /> <button>SIGN IN</button> </form> </div> );};export default Home;The Main component
Here, we'll build the user interface for the central part of the application.

Copy the code snippet below into the Main.js file.
import React, { useState } from "react";import Nav from "./Nav";function Main({ socket }) { const [todo, setTodo] = useState(""); // Generates a random string as the todo ID const generateID = () => Math.random().toString(36).substring(2, 10); const handleAddTodo = (e) => { e.preventDefault(); // Every todo has this structure - id, todo & comments. console.log({ id: generateID(), todo, comments: [], }); setTodo(""); }; return ( <div> <Nav /> <form className='form' onSubmit={handleAddTodo}> <input value={todo} onChange={(e) => setTodo(e.target.value)} className='input' required /> <button className='form__cta'>ADD TODO</button> </form> <div className='todo__container'> <div className='todo__item'> <p>Contributing to open-source</p> <div> <button className='commentsBtn'>View Comments</button> <button className='deleteBtn'>DELETE</button> </div> </div> <div className='todo__item'> <p>Coffee chat with the team</p> <div> <button className='commentsBtn'>View Comments</button> <button className='deleteBtn'>DELETE</button> </div> </div> <div className='todo__item'> <p>Work on my side projects</p> <div> <button className='commentsBtn'>View Comments</button> <button className='deleteBtn'>DELETE</button> </div> </div> </div> </div> );}export default Main;The code snippet above represents the user interface that enables users to create a to-do, view comments, and delete existing to-dos.
The Nav component is the navigation bar for the application - later in this tutorial, we'll send notifications with Novu within this component.
Create the Nav component and copy the code below into it:
// Within /src/components/Nav.jsimport React from "react";const Nav = () => { return ( <nav className='navbar'> <h2>Todo List</h2> </nav> );};export default Nav;Congratulations! We've created the user interface for the application. In the upcoming sections, you'll learn how to send real-time data with Socket.io and notifications with Novu.
How to create a new to-do
In this section, I'll guide you through creating new to-dos and display them on the React app with Socket.io.
Update the handleAddTodo function within the Main.js file to send the new to-do to the server via Socket.io.
const handleAddTodo = (e) => { e.preventDefault(); // Sends a event - addTodo via Socket.io // containing the id, todo, and the comments array socket.emit("addTodo", { id: generateID(), todo, comments: [], }); setTodo("");};Create a listener to the event on the server.
socketIO.on("connection", (socket) => { console.log(`: ${socket.id} user just connected!`); socket.on("addTodo", (todo) => { // todo - contains the object from the React app console.log(todo); }); socket.on("disconnect", () => { socket.disconnect(); console.log(": A user disconnected"); });});Create an array on the backend server that holds all the to-dos, and add the new to-do to the list.
// Array containing all the to-doslet todoList = [];socketIO.on("connection", (socket) => { console.log(`: ${socket.id} user just connected!`); socket.on("addTodo", (todo) => { // Adds the to-do object to the list of to-dos todoList.unshift(todo); // Sends all the to-dos to the React app socket.emit("todos", todoList); }); socket.on("disconnect", () => { socket.disconnect(); console.log(": A user disconnected"); });});Create a listener for the to-dos on the React app via the useEffect hook. Copy the code below:
//In src/components/Main.jsuseEffect(() => { socket.on("todos", (data) => console.log(data));}, [socket]);Display the to-dos as below:
import React, { useState, useEffect } from "react";import Nav from "./Nav";function Main({ socket }) { const [todo, setTodo] = useState(""); const [todoList, setTodoList] = useState([]); const generateID = () => Math.random().toString(36).substring(2, 10); const handleAddTodo = (e) => { e.preventDefault(); socket.emit("addTodo", { id: generateID(), todo, comments: [], }); setTodo(""); }; useEffect(() => { socket.on("todos", (data) => setTodoList(data)); }, [socket]); return ( <div> <Nav /> <form className='form' onSubmit={handleAddTodo}> <input value={todo} onChange={(e) => setTodo(e.target.value)} className='input' required /> <button className='form__cta'>ADD TODO</button> </form> <div className='todo__container'> {todoList.map((item) => ( <div className='todo__item' key={item.id}> <p>{item.todo}</p> <div> <button className='commentsBtn'>View Comments</button> <button className='deleteBtn'>DELETE</button> </div> </div> ))} </div> </div> );}export default Main;So far, we can only view the existing to-dos when we add one. Next, let's make it possible for us to display the to-dos when we load the page.
Create a route on the server that returns the to-do list.
app.get("/api", (req, res) => { res.json(todoList);});Update the useEffect hook to fetch the to-do list from the server, and listen when for new to-dos.
useEffect(() => { function fetchTodos() { fetch("http://localhost:4000/api") .then((res) => res.json()) .then((data) => setTodoList(data)) .catch((err) => console.error(err)); } fetchTodos(); socket.on("todos", (data) => setTodoList(data));}, [socket]);Congratulations, we can now add new to-dos to the to-do list.

How to delete existing to-dos
Add an onClick event to the delete button that gets the ID of the selected to-do.
<button className='deleteBtn' onClick={() => deleteTodo(item.id)}> DELETE</button>Create the deleteTodo function and send the to-do's ID to the server via Socket.io.
const deleteTodo = (id) => socket.emit("deleteTodo", id);Create a listener for the deleteTodo event that removes the to-do via its ID from the to-do list.
// Array containing all the to-doslet todoList = [];socketIO.on("connection", (socket) => { console.log(`: ${socket.id} user just connected!`); socket.on("addTodo", (todo) => { todoList.unshift(todo); socket.emit("todos", todoList); }); // Filters the array of to-dos and // sends the updated to-do to the React app. socket.on("deleteTodo", (id) => { todoList = todoList.filter((todo) => todo.id !== id); // Sends the updated to-do to the React app socket.emit("todos", todoList); }); socket.on("disconnect", () => { socket.disconnect(); console.log(": A user disconnected"); });});You can now add and delete each to-do via Socket.io. Next, you'll learn how to add and display comments for each to-do.

How to display and add comments for each to-do
In this section, I'll guide you through adding comments to each to-do, and you'll also learn how to create Modals in React.
Creating a modal in React.js
Create a Modal.js file that will contain the comments for each to-do as below:
import React, { useState } from "react";const Modal = ({ socket }) => { const [comment, setComment] = useState(""); const addComment = (e) => { e.preventDefault(); console.log({ comment }); setComment(""); }; return ( <div className='modal'> <div className='modal__container'> <h3>Comments</h3> <form className='comment__form' onSubmit={addComment}> <input className='comment__input' type='text' value={comment} onChange={(e) => setComment(e.target.value)} required /> <button>Add Comment</button> </form> <div className='comments__container'> <div className='comment'> <p> <strong>Nevo - </strong> Hello guys </p> </div> </div> </div> </div> );};export default Modal;To make this component display as a Modal, we need to give it some styling as done below within the src/index.css file, especially the position and z-index property.
.modal { min-height: 100vh; width: 100%; position: fixed; z-index: 10; top: 0; background-color: #fff; display: flex; align-items: center; justify-content: center;}Next, let's toggle the Modal.js component when we click on the View Comment button within the Main.js file.
import React, { useState, useEffect } from "react";import Nav from "./Nav";import Modal from "./Modal";function Main({ socket }) { const [todo, setTodo] = useState(""); const [todoList, setTodoList] = useState([]); const [showModal, setShowModal] = useState(false); const toggleModal = () => setShowModal(!showModal); //...other functions return ( <div> ... <div className='todo__container'> {todoList.map((item) => ( <div className='todo__item' key={item.id}> <p>{item.todo}</p> <div> {/* This button toggles the Modal component---*/} <button className='commentsBtn' onClick={toggleModal}> View Comments </button> <button className='deleteBtn' onClick={() => deleteTodo(item.id)}> DELETE </button> </div> </div> ))} </div> {/* The Modal replaces the Main component*/} {showModal ? ( <Modal showModal={showModal} setShowModal={setShowModal} /> ) : ( "" )} </div> );}export default Main;
Since we've been able to display the Modal when we click on the View Button, next, let's toggle the Modal when we click outside the comments container.
Update the Modal.js file as below:
import React, { useState, useRef } from "react";const Modal = ({ socket, showModal, setShowModal }) => { const [comment, setComment] = useState(""); const modalRef = useRef(); // If the container (modalRef) is clicked, it closes the modal. const closeModal = (e) => { if (modalRef.current === e.target) { setShowModal(!showModal); } }; const addComment = (e) => { e.preventDefault(); console.log({ comment }); setComment(""); }; return ( <div className='modal' onClick={closeModal} ref={modalRef}> ... </div> );};
Congratulations! You've learnt how to add Modals to a React application. Hence, let's make it possible to users to add and display comments.
Displaying the to-do comments
Update the toggleModal function within the Main.js file to send the ID of the selected to-do to the server.
const toggleModal = (todoId) => { socket.emit("viewComments", todoId); setShowModal(!showModal);};Create a listener on the server that accepts the to-do ID, fetches its details, and sends it back to the React app.
socket.on("viewComments", (id) => { for (let i = 0; i < todoList.length; i++) { if (id === todoList[i].id) { // sends the todo details back to the React app for display socket.emit("commentsReceived", todoList[i]); } }});Create a listener for the commentsReceived event within the Modal.js file.
useEffect(() => { socket.on("commentsReceived", (todo) => console.log(todo));}, [socket]);Render the comments by copying the below:
import React, { useEffect, useRef, useState } from "react";const Modal = ({ showModal, setShowModal, socket }) => { const modalRef = useRef(); const [comment, setComment] = useState(""); const [comments, setComments] = useState([]); const closeModal = (e) => { if (modalRef.current === e.target) { setShowModal(!showModal); } }; const addComment = (e) => { e.preventDefault(); console.log({ comment }); setComment(""); }; // Listens for the todo details from the server useEffect(() => { socket.on("commentsReceived", (todo) => setComments(todo.comments)); }, [socket]); return ( <div className='modal' onClick={closeModal} ref={modalRef}> <div className='modal__container'> <h3>Comments</h3> <form className='comment__form' onSubmit={addComment}> <input className='comment__input' type='text' value={comment} onChange={(e) => setComment(e.target.value)} required /> <button>Add Comment</button> </form> {/* Displays the comments --- */} <div className='comments__container'> {comments.length > 0 ? ( comments.map((item, index) => ( <div className='comment' key={index}> <p> <strong>{item.name} - </strong> {item.text} </p> </div> )) ) : ( <p>No comments available yet...</p> )} </div> </div> </div> );};export default Modal;Adding Comments to to-dos
Create a state within the Main.js that holds the ID of the selected to-do. Pass the state to the Modal.js component.
const toggleModal = (itemId) => { socket.emit("viewComments", itemId); // Pass this ID into the Modal component setSelectedItemID(itemId); setShowModal(!showModal);};Update the addComment function within the Modal.js file to send the comment details to the server.
const addComment = (e) => { e.preventDefault(); socket.emit("updateComment", { todoID: selectedItemID, //The ID passed from the Main.js file comment, user: localStorage.getItem("_username"), }); setComment("");};Create a listener for the addComment event on the server that adds the comment to the to-dos comments.
socket.on("updateComment", (data) => { // Destructure the items from the object const { user, todoID, comment } = data; for (let i = 0; i < todoList.length; i++) { // Gets the todo if (todoID === todoList[i].id) { // Add the comment to the list of comments todoList[i].comments.push({ name: user, text: comment }); // Sends an update to React app socket.emit("commentsReceived", todoList[i]); } }});Congratulations! We can now add comments to each to-do and display them on the React app.

EXTRA: Sending notifications with Novu
If you want to add notifications to the application when a user adds a comment or a new to-do, you can do that easily with Novu within the Nav.js component.
Novu allows you to add various notification types, such as email, SMS, and in-app notifications.
How to add Novu to a React and Node.js application
To add the in-app notification, install the Novu Node.js SDK on the server and the Notification Center in the React app.
Install on the clientnpm install @novu/notification-center Install on the servernpm install @novu/nodeCreate a Novu project by running the code below. A personalised dashboard is available to you.
Install on the clientnpx novu initYou will need to sign in with Github before creating a Novu project. The code snippet below contains the steps you should follow after runningnpx novu init
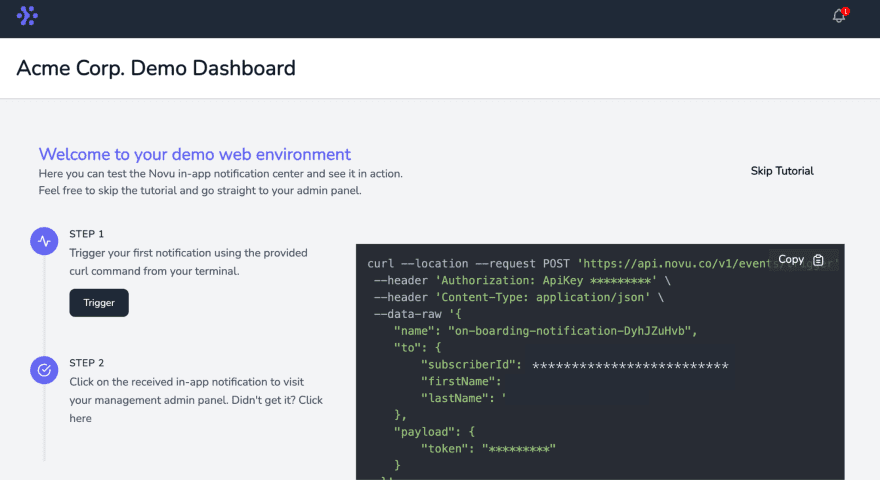
Now let's setup your account and send your first notification What is your application name? Devto Clone Now lets setup your environment. How would you like to proceed? > Create a free cloud account (Recommended) Create your account with: > Sign-in with GitHub I accept the Terms and Condidtions (https://novu.co/terms) and have read the Privacy Policy (https://novu.co/privacy) > Yes Create your account successfully.We've created a demo web page for you to see novu notifications in action.Visit: http://localhost:57807/demo to continueVisit the demo web pagehttp://localhost:57807/demo, copy your subscriber ID from the page, and click the Skip Tutorial button. We'll be using it later in this tutorial.
Update thecomponents/Nav.jsfile to contain Novu and its required elements for in-app notifications from thedocumentation.
import React from "react";import { NovuProvider, PopoverNotificationCenter, NotificationBell,} from "@novu/notification-center";import { useNavigate } from "react-router-dom";const Nav = () => { const navigate = useNavigate(); const onNotificationClick = (notification) => navigate(notification.cta.data.url); return ( <nav className='navbar'> <h2>Todo List</h2> <div> <NovuProvider subscriberId='<YOUR_SUBSCRIBER_ID' applicationIdentifier='<YOUR_APP_ID>' > <PopoverNotificationCenter onNotificationClick={onNotificationClick} colorScheme='light' > {({ unseenCount }) => ( <NotificationBell unseenCount={unseenCount} /> )} </PopoverNotificationCenter> </NovuProvider> </div> </nav> );};export default Nav;The code snippet above adds Novu notification bell icon to the Nav component, enabling us to view all the notifications from the application.
TheNovuProvidercomponent requires your Subscriber ID - copied earlier fromhttp://localhost:57807/demoand your application ID available in the Settings section under API Keys on theNovu Manage Platform.

Next, lets create the workflow for the application, which describes the features you want to add to the application.
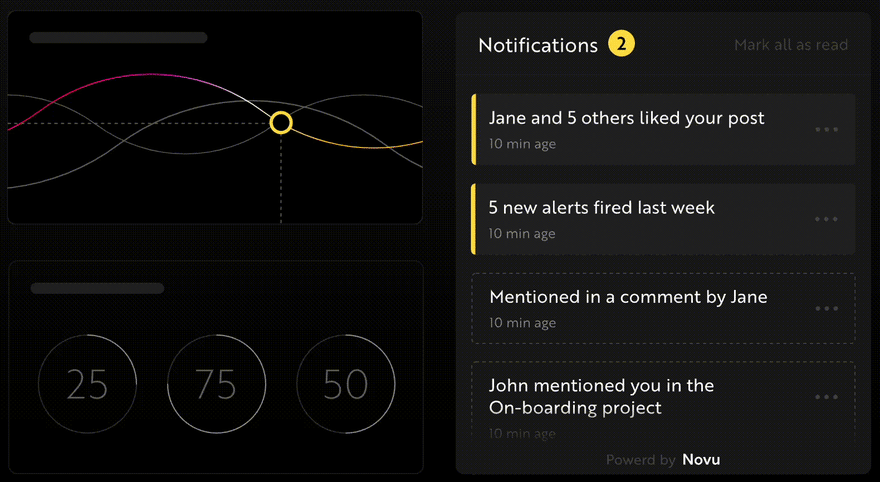
Select Notification from the Development sidebar and create a notification template. Select the newly created template, click on Workflow Editor, and ensure the workflow is as below:

From the image above, Novu triggers the Digest engine before sending the in-app notification.
Novu Digestallows us to control how we want to send notifications within the application. It collects multiple trigger events and sends them as a single message. The image above sends notifications every 2 minutes, and it can be effective when you have many users and frequent updates.
Click theIn-Appstep and edit the notification template to contain the content below.
{{userId}} added a new to-do.Novu allows you to add dynamic content or data to the templates usingthe Handlebars templating engine. The data for the username variable will be inserted into the template as a payload from the request.
Save the template by clickingUpdatebutton and head back to your code editor.
Adding Novu to the application
Import Novu from the package and create an instance using your API Key on the server.
//server/index.jsconst { Novu } = require("@novu/node");const novu = new Novu("<YOUR_API_KEY>");Create a function that sends the notification via Novu to the React app.
const sendNotification = async (template_id) => { try { const result = await novu.trigger(template_id, { to: { subscriberId: <SUBSCRIBER_ID>, }, }); console.log(result); } catch (err) { console.error("Error >>>>", { err }); }};socket.on("addTodo", (todo) => { todoList.unshift(todo); socket.emit("todos", todoList); // Triggers the notification via Novu sendNotification("<TEMPLATE_ID>"); });The code snippet above sends a notification to all users when a new to-do is added to the application.

Congratulation you have finished building the Todolist!
Conclusion
So far, you've learnt how to set up Socket.io in a React and Node.js application, and communicate between a server and a client via Socket.io.
This is a demo of what you can build using Socket.io and React. Feel free to improve the application by adding authentication, a real-time database, and notifications via Novu when a user drops a comment.
The source code for this tutorial is available here:
https://github.com/novuhq/blog/tree/main/todolist-with-react-and-socketIO

P.S Novu is sending awesome swag on Hacktoberfest! Come and participate! Happy if you can support us by giving us a star!
Original Link: https://dev.to/novu/building-the-most-practical-todolist-with-react-and-websockets-18hd
Dev To
More About this Source Visit Dev To