
An Interest In:
Web News this Week
- April 17, 2024
- April 16, 2024
- April 15, 2024
- April 14, 2024
- April 13, 2024
- April 12, 2024
- April 11, 2024
Some of Our Sources
- Technology Review
- Smashing Apps
- Abduzeedo
- Fuel Your Creativity
- Noupe
- My Ink Blog
- Reencoded
- Line 25
- Design Modo
- Daily Now
Help Webnuz
Referal links:
How to build a real-time movie voting system using React.js
What we'll be building?
First we'll try to build a simple(not so simple actually) movie review app. Where users can vote on movies, write comments and may be add movies too.
Then in the second part we can go deeper by adding a booking system to the movies and have multiple theaters. We'll be using Rocketgraph to do this as it provides a complete backend with auth ad db so we don't have to worry about that.
For this you'll need to define users, movies and a place to store them:
Authentication: You need to store users in a table on say a Postgres DB.
Realtime: You need to get realtime comments, and likes from the DB straight to your frontend for the user.
A Database: Where you can map users to movies and users and movies to likes.
To read this article you need to have a basic understanding of React.js
Rocketgraph : A complete backend that beats Firebase and is open-source
A little background. Rocketgraph provides a complete backend. It comes with a Postgres DB, Hasura console to manage your Postgres and add GraphQL layer to your data, Authentication and Serverless functions.
So to sum it up we provide auth for your web apps, GraphQL for realtime things like messages/notifications/comments etc and Serverless functions for anything you want to offload. Our Serverless Github app auto-compiles your Github code to AWS Lambda functions.
So what the hack is GraphQL?
GraphQL is a language specification by Meta to achieve realtime queries on your data by asking for exactly what you need. This is different from traditional API approach where the query is coded into the backend and front-end has very little control over what/how to ask for data.
Think of it like a JSON query. You ask for what data you want inn a json-like query and it will return exactly those fields.
In this article we'll leverage the power of GraphQL, React Apollo and Hasura to build a real-time system for rating and commenting on movies. We can use this same system to book movie tickets too.
TLDR Version
If you just want to see the code. Here is the code base for this article. Here you can see more examples. This is the open-source software behind Rocketgraph
Keep reading

Cool, let's start from the basics
Create a react project and develop the front-end. Forget about the backend, we'll add it later.
mkdir movie-votingcd movie-votingNext scaffold a basic react application.
npx create-react-app ./Install react router to be able to navigate between pages. Install react-apollo and graphql for real-time stuff as mentioned above.
yarn add react-router-domyarn add @apollo/client graphqlDelete the redundant files such as logo from the project and update the index.js file to as follows:
// src/index.jsimport React from "react";import ReactDOM from "react-dom";import { BrowserRouter as Router, Routes, Route } from "react-router-dom";import App from "./App";ReactDOM.render( <React.StrictMode> <Router> <Routes> <Route path="/login" /> <Route path="/signup" /> <Route path="/" element={<App />} /> </Routes> </Router> </React.StrictMode>, document.getElementById("root"));Now we need to add the App.js and login/signup components. Thats easy.
App.js
import logo from './logo.svg';import './App.css';const movies = [ { name: 'Snatch', img: 'https://occ-0-3934-3211.1.nflxso.net/dnm/api/v6/E8vDc_W8CLv7-yMQu8KMEC7Rrr8/AAAABVJgO06RKuruJpcyezdM43Ai2ZjvNDmtbnwUXVtvXVhhvpL0tvhr4s9e3j8UojFCLao5a7v8Dg5kti1vFKcA0ldZXWnnC03nBRIt.jpg?r=cbf', likes: 10, state: true, }];function App() { return ( <div className="App"> <header className="App-header"> <p> Movies list </p> </header> { movies.map(movie => { return ( <div className="movie-box"> <div className="movie-box-header"> </div> <div className="movie-box-body"> <img alt={movie.name} className="movie-image" src={movie.img} /> </div> <div className="movie-box-footer"> {movie.name} <div className="like-button"><i class="fa fa-heart" style={{"color": "red"}}aria-hidden="true"></i></div> </div> </div> ) }) } </div> );}export default App;Now we have the basic home page design. Let's create the login and signup pages.
signup.js
import React, { useState } from "react";import { useNavigate } from 'react-router-dom';export default function Login(props) { const [email, setEmail] = useState(""); const [password, setPassword] = useState(""); const navigate = useNavigate(); async function handleSubmit(e) { e.preventDefault(); navigate("/"); } return ( <div> <h1>Signup</h1> <form onSubmit={handleSubmit}> <input type="email" placeholder="email" value={email} onChange={(e) => setEmail(e.target.value)} /> <input type="password" placeholder="password" value={password} onChange={(e) => setPassword(e.target.value)} /> <button>Signup</button> </form> </div> );}Let's see if that worked
yarn startCongratulations, you just created the skeleton for the web application. Now we just have to fill in the data, auth and realtime.
Enter Rocketgraph. How to create a backend with authentication and serverless functions.
Just signup and click on create a project in the dashboard:

Next we'll learn about some amazing features that will magically build the backend for you with the power of GraphQL.
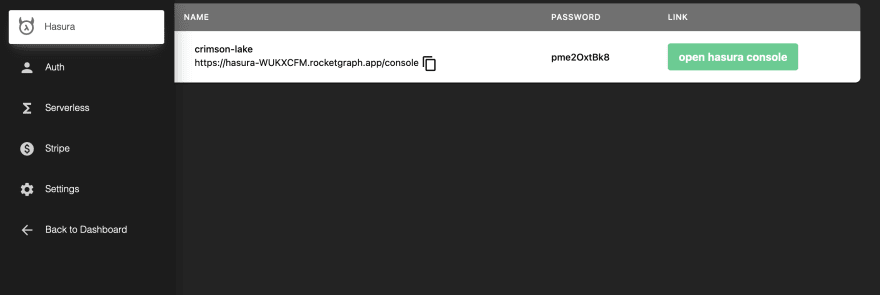
Once your project is up, you get a Hasura console and a Postgres DB as shown below. Please wait for the services to boot up. It might take about 3-5 minutes.
What is Hasura?
Hasura is an amazing open-source tool that GraphQLises your postgres database. What it means is that your data is still in the postgres db but you get the powers of GraphQL. It also has an editor which automatically generates GraphQL queries based on your Postgres Tables.
Back to Rocketgraph
When your project is booted up, you get a Hasura link here:

Open Hasura, and now we ca start creating tables for our Database.
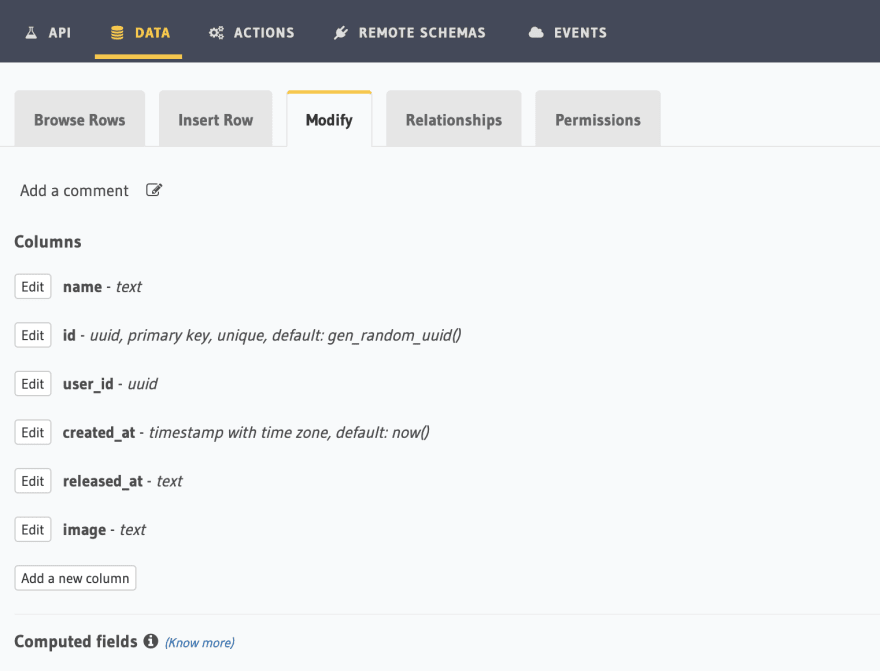
We need a Movies table as shown below:
We also need to let the users access it. In Rocketgraph user is a role that is authenticated and our JS SDKs send in the JWT with your requests so you don't have to.
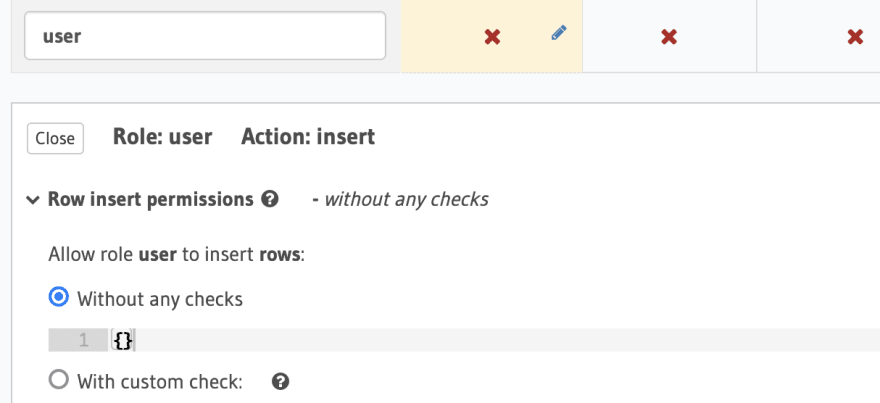
Go to the permissions tab on the movies and add the following permissions:
For insert put permissions as follows:

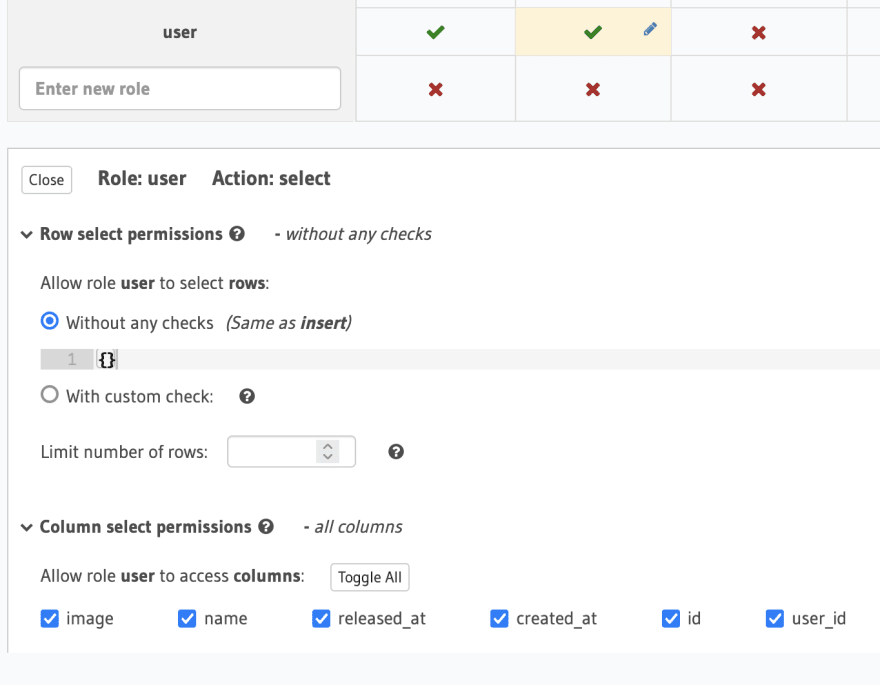
And for select, it's the same:
Enter GraphQL using react-apollo and graphql packages. Apollo makes it easier to query your GraphQL directly from React and provides some powerful functionality like useSubscription which we will discuss later.
Let's install them.
yarn add @apollo/client graphqlWe'll also need some custom made JS libraries to get authentication to work.
yarn add @rocketgraphql/react-apollo @rocketgraphql/rocketgraph-js-sdkNow we will add auth to our code using the RApolloProvider provided by @rocketgraphql/react-apollo
First create a folder named utils and then create config.js inside it with the following content:
import { createClient } from "@rocketgraphql/rocketgraph-js-sdk";import Cookies from 'js-cookie';const config = { baseURL: "https://backend-REPLACE",};const { auth } = createClient(config);export { auth };Replace the above https://backend-REPLACE with the backend url in your Rocketgraph dashboard:
You'll find it in the Auth section.
Change the code in index.js to:
// src/index.jsimport React from "react";import ReactDOM from "react-dom";import { BrowserRouter as Router, Routes, Route } from "react-router-dom";import App from "./App";import Signup from "./components/login";import { RApolloProvider } from "@rocketgraphql/react-apollo";import { auth } from "./utils/config";ReactDOM.render( <React.StrictMode> <RApolloProvider auth={auth} gqlEndpoint="https://gqlEndpoint/v1/graphql"> <Router> <Routes> <Route path="/login" element={<Signup />}/> <Route path="/signup" /> <Route path="/" element={<App />} /> </Routes> </Router> </RApolloProvider> </React.StrictMode>, document.getElementById("root"));Change the above https://gqlEndpoint/v1/graphql to the graphql endpoint you have here in your Hasura console:

Next we'll add auth.
login.js
import React, { useState } from "react";import { useNavigate } from 'react-router-dom';import { auth } from "../utils/config";export default function Login(props) { const [email, setEmail] = useState(""); const [password, setPassword] = useState(""); const navigate = useNavigate(); async function handleSubmit(e) { e.preventDefault(); // login try { await auth.signIn({email, password, provider: "local"}); } catch (error) { alert("error logging in"); console.error(error); return; } navigate("/"); } return ( <div> <h1>Login</h1> <form onSubmit={handleSubmit}> <input type="email" placeholder="email" value={email} onChange={(e) => setEmail(e.target.value)} /> <input type="password" placeholder="password" value={password} onChange={(e) => setPassword(e.target.value)} /> <button>Login</button> </form> </div> );}signup.js
import React, { useState } from "react";import { useNavigate } from 'react-router-dom';import { auth } from "../utils/config";export default function Login(props) { const [email, setEmail] = useState(""); const [password, setPassword] = useState(""); const navigate = useNavigate(); async function handleSubmit(e) { e.preventDefault(); // login try { await auth.register({email, password}); } catch (error) { alert("error logging in"); console.error(error); return; } navigate("/"); } return ( <div> <h1>Signup</h1> <form onSubmit={handleSubmit}> <input type="email" placeholder="email" value={email} onChange={(e) => setEmail(e.target.value)} /> <input type="password" placeholder="password" value={password} onChange={(e) => setPassword(e.target.value)} /> <button>Login</button> </form> </div> );}That's it. Rocketgraph will do the rest. Users will be populated in the user database.

You can test this by signing up and checking that the user is created.
Let's build more features
Enter react-apollo.
App.js
import './App.css';import { gql, useSubscription } from "@apollo/client";const GET_MOVIES = gql` subscription { movies { id created_at name image } }`;function App() { const { data, loading } = useSubscription(GET_MOVIES); if (loading) { return <div>Loading</div>; } return ( <div className="App"> <header className="App-header"> <p> Movies list </p> </header> { data && data.movies && data.movies.length ? data.movies.map((movie, index) => { return ( <div className="movie-box" key={index}> <div className="movie-box-header"> </div> <div className="movie-box-body"> <img alt={movie.name} className="movie-image" src={movie.image} /> </div> <div className="movie-box-footer"> {movie.name} <div className="like-button"><i className="fa fa-heart" style={{"color": "red"}} aria-hidden="true"></i></div> </div> </div> ) }) : "No movies" } </div> );}export default App;That's it, just add records in your db and you can see it here in realtime.
Awesome Now finally let's add the like button
Important part (User-Id)
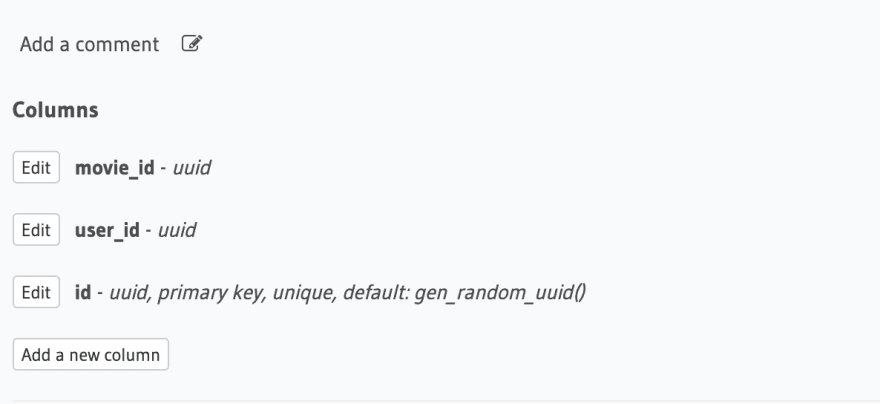
First create likes table with id, movie_id and user_id as shown below in Hasura
We will have to extract this User-Id from the jwt token itself.
To do that
Step 1
Create a new role named user and click on Insert to edit it's permissions
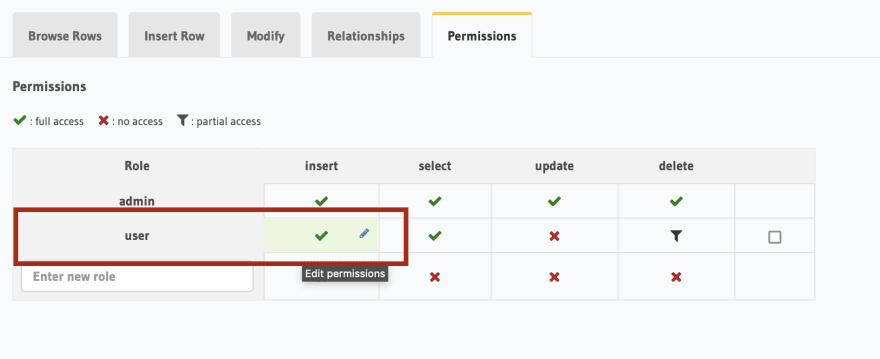
Step 2
Allow user role to modify all. Check these boxes

Step 3 - most important
Set the user-id automatically
Click on column presets and select user-id. Set from X-Hasura-user-id.
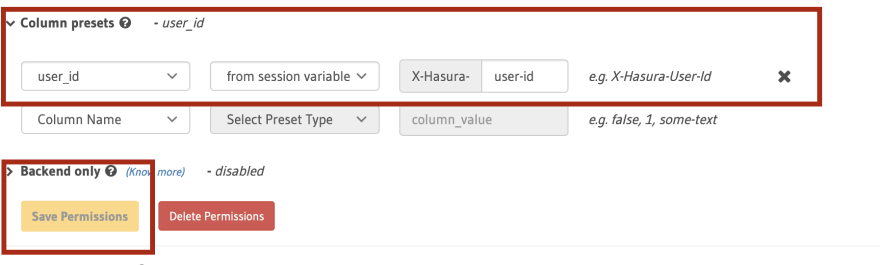
And click save. Now we have prepared our table to hold the likes/votes
Enter Aggregations (Likes)
Create a new file in components namedlikeCount.js
import React, { useState } from "react";import { gql, useSubscription, useMutation } from "@apollo/client";const likes = (movie_id) => gql` subscription { likes(where: {movie_id: {_eq: "${movie_id}"}}) { id user_id } }`;const LIKE = gql` mutation like($movie_id: uuid!) { insert_likes(objects: {movie_id: $movie_id}) { affected_rows } }`;const UNLIKE = gql` mutation unlike($movie_id: uuid!) { delete_likes(where: {movie_id: {_eq: $movie_id}}) { affected_rows } }`;function Component({movie}) { const LIKE_COUNT = likes(movie.id); const [addLike, { like_data, like_loading, error }] = useMutation(LIKE); const [unLike, _] = useMutation(UNLIKE); const [isRed, setIsRed] = useState(false); const { data, loading } = useSubscription(LIKE_COUNT); console.log(data, movie); if (loading) { return <div>Loading</div>; } const likeThis = () => { setIsRed(!isRed); if (isRed) { unLike({variables: {movie_id: movie.id}}); } else { addLike({ variables: { movie_id: movie.id }}); } } return ( <span> {data.likes.length} <i className="fa fa-heart" style={{"color": isRed ? "red" : "gray"}} aria-hidden="true" onClick={likeThis}></i> </span> );}export default Component;Oh wait! That would delete all likes in the table. So let's secure our table by:
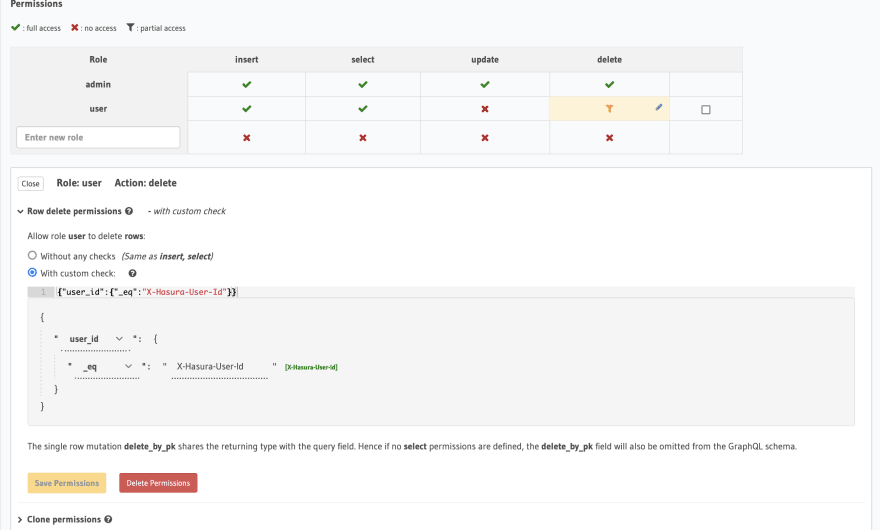
And import this into App.js like this:
import './App.css';import { gql, useSubscription } from "@apollo/client";import LikeCountComponent from "./components/likeCount";const GET_MOVIES = gql` subscription { movies { id created_at name image } }`;function App() { const { data, loading } = useSubscription(GET_MOVIES); if (loading) { return <div>Loading</div>; } return ( <div className="App"> <header className="App-header"> <p> Movies list </p> </header> { data && data.movies && data.movies.length ? data.movies.map((movie, index) => { return ( <div className="movie-box" key={index}> <div className="movie-box-header"> </div> <div className="movie-box-body"> <img alt={movie.name} className="movie-image" src={movie.image} /> </div> <div className="movie-box-footer"> {movie.name} <div className="like-button"><LikeCountComponent movie={movie} /></div> </div> </div> ) }) : "No movies" } </div> );}export default App;That's a wrap! Congrats, you just made a movie voting app.

Original Link: https://dev.to/kaushik94/how-to-build-a-real-time-movie-voting-system-using-reactjs-3nfa
Dev To
More About this Source Visit Dev To