
An Interest In:
Web News this Week
- April 2, 2024
- April 1, 2024
- March 31, 2024
- March 30, 2024
- March 29, 2024
- March 28, 2024
- March 27, 2024
Some of Our Sources
- Slashdot
- Team Treehouse
- Smashing Apps
- Inspiredology
- FanExtra - PSD
- Crazy Leaf Design
- Reencoded
- Spyre Studios
- Codrops
- TechPowerUp
Help Webnuz
Referal links:
Insights into Forms in Flask
Hey there!
Today, we will look into implementing forms in Flask. We will start with quick rendering of forms and look into details of customising the form.
Background
Flask is popular web development framework implemented in python.
Forms are important part of developing any websites and are used heavily to take inputs from users.
We would see the usage of wtform module for flask. For frontend, we will use jinja2 templating.
Pre-requisites
A basic understanding of python and flask is required. It is expected that you know how a flask server is started and have it running.
With all the above information, let's get started -
Setup
We need following things before we can render a form to frontend -
- A basic flask app running
- A python form class implemented
- A controller which would render the form
It is assumed that you already have (1) running. For (2), add the following code to your forms.py
# forms.pyfrom flask_wtf import FlaskFormfrom wtforms import StringField, IntegerField, TextField, SubmitFieldfrom wtforms.fields.html5 import IntegerRangeFieldfrom wtforms.validators import DataRequired, Optional, NumberRangeclass SampleForm(FlaskForm): name = StringField('Name', validators=[DataRequired()]) age = IntegerField('Age', validators=[DataRequired()]) moto = TextField('moto', validators=[Optional()]) range = IntegerRangeField('range', default=10, validators=[DataRequired(), NumberRange(min=1, max=50)]) submit = SubmitField('Submit')You can read more details about wtf at https://wtforms.readthedocs.io/en/3.0.x/ and more about validators at https://wtforms.readthedocs.io/en/3.0.x/validators/
For 3, add following code to create controller
# routes.pyfrom flask import Blueprint, url_for, redirect, render_templatefrom app.sample.forms import SampleFormsample = Blueprint('sample', __name__)@sample.route("/sample-form", methods=["GET", "POST"])def sample_controller(): form = SampleForm() if form.validate_on_submit(): return redirect(url_for('sample.sample_controller')) return render_template('sample/sample_form.html', form=form)To attach the route to your app, add following to the create_app method
# app/__init__.pyfrom app.sample.routes import sampleapp.register_blueprint(sample)Quick form rendering
First, we'll look at the quickest way to render beautiful forms.
create sample/sample_form.html in templates/ folder
{% extends 'base.html' %}{% import 'bootstrap/wtf.html' as wtf %}{% block app_content %}<div class="container-fluid"> {{ wtf.quick_form(form, button_map={'submit': 'success'}) }}</div>{% endblock %}Once you reload the server the output should look like
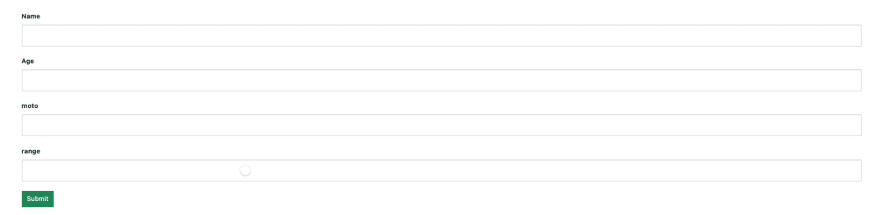
Voila! You have your beautiful form rendered with just one line of html code. Note that, button_map maps the field to bootstrap styling class (btn-success in this case). Another thing to note, the flask setup is using bootstrap in this case so your styling may vary depending on whether you are using bootstrap or not.
Field wise form rendering
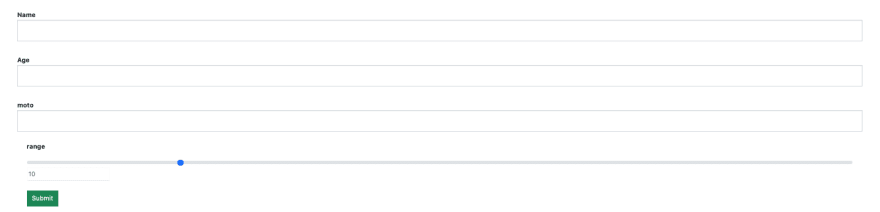
Change your sample html to following
{% extends 'base.html' %}{% import 'bootstrap/wtf.html' as wtf %}{% block app_content %}<div class="container-fluid"> <form class="form form-horizontal" method="post" role="form"> {{ form.hidden_tag() }} {{ wtf.form_field(form.name) }} {{ wtf.form_field(form.age) }} {{ wtf.form_field(form.moto) }} {{ wtf.form_field(form.range, class="form-range") }} {{ wtf.form_field(form.submit, class="btn btn-success") }} </form></div>{% endblock %}This gives more control over handling fields, as we can render field by field and provide custom styling. The end result should look like following -

Further customising
This is the most interesting part for me as I was not able to locate any corresponding docs online easily.
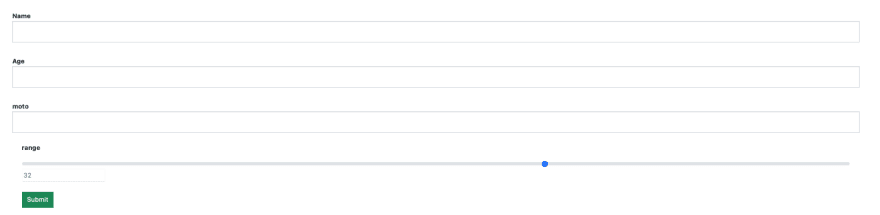
Consider that in the range field, we also want to show the value that is currently selected and we also want to show the default value be default.
Here's how we can achieve this. Change html file to following -
{% extends 'base.html' %}{% import 'bootstrap/wtf.html' as wtf %}{% block app_content %}<div class="container-fluid"> <form class="form form-horizontal" method="post" role="form"> {{ form.hidden_tag() }} {{ wtf.form_field(form.name) }} {{ wtf.form_field(form.age) }} {{ wtf.form_field(form.moto) }}{# {{ wtf.form_field(form.range, class="form-range") }}#} <label for="range" class="form-label">{{ form.range.label }}</label> {{ form.range(min='1', max='50', oninput="r_value.value = this.value", class="form-range") }} <input type="text" id="r_value" value="{{ form.range.data }}" disabled></input><br/><br/> {{ wtf.form_field(form.submit, class="btn btn-success") }} </form></div>{% endblock %}Notice the code for range input, we have separately accessed label and input field and we have added a customer oninput to update value of the new input added.
The end result looks like this -
That's all this time!
Original Link: https://dev.to/1995yogeshsharma/insights-into-forms-in-flask-2abl
Dev To
More About this Source Visit Dev To