
An Interest In:
Web News this Week
- April 12, 2024
- April 11, 2024
- April 10, 2024
- April 9, 2024
- April 8, 2024
- April 7, 2024
- April 6, 2024
Some of Our Sources
- Techcrunch
- Team Treehouse
- The Logo Smith
- Six Revisions
- FanExtra - PSD
- 24 Ways
- Specky Boy
- CSS Tricks
- Daily Now
- Dev To
Help Webnuz
Referal links:
How to Design a Wine Bottle Label


In this tutorial, you'll learn how to design a wine bottle label. This custom wine label is minimalist and based on only two fonts, a sans serif and a serif style display font.
The wine label design is simple and chic. Print this label with your own text or use it for a mockup. In this tutorial, you'll also find awesome options if you're running out of time. I included a list of wine bottle label design templates and a quick how-to on a beer label generator.


If you're short on time, Envato Elements is a great platform offering high-quality assets and unlimited downloads. For a small monthly fee, you can have access to the best wine label designs, T-shirt label designs, fonts, and much more. Be sure to check them out!
What You'll Learn While Designing a Wine Label
In this wine label design tutorial you'll learn how to:
- properly set up an InDesign file
- use grids
- use and arrange different fonts
What You'll Need to Design a Wine Label
For this wine label design tutorial, you'll need the Adobe InDesign software or similar and the following assets:
Install the fonts in your system, and you're ready to start this tutorial on how to design a wine label!
1. How to Set Up an InDesign File for a Wine Label Design
Step 1
Open Adobe InDesign and create a New Document. In the popup window, set the Width to 100 mm and the Height to 150 mm. Set the Margins to 5 mm, and set the Bleeds to 5 mm.
Click Create.


Step 2
Go to Layout > Create Guides.
Set the Rows to 5 and the Columns to 3. Set both Gutters to 0 mm. Under Options, set the Fit Guides to option to Page.
Click OK.


Step 3
Go to the Layers panel. Create a New Layer by clicking on the drop-down menu and choosing New Layer.


Step 4
Rename Layer 1 to Brand Name.
Rename Layer 2 to Details. We'll start working with the Details layer, so be sure it's selected.


2. How to Design a Wine Label
Step 1
Let's start designing a wine label. Select the Line Tool from the tools panel. Create a vertical line that extends to the bleed lines. Set the X value to 17 mm.


Step 2
Open the Stroke panel by going to Window > Stroke. Set the Weight to 0.5 pt. Set the Stroke Color to Black on the options bar.


Step 3
To design a wine label, we need to add some details.
Open the Character panel by going to Window > Type > Character. Create a text box using the Text Tool (T). Add the amount of wine in the bottle—in this case, it's "750 ML". Set the Font to Regas and the Size to 20 pt.


Step 4
Select the Rotate Tool (R) and rotate the text box 90°. Place it in the bottom-left corner of the wine bottle label design, to the left of the stroke we created before.


Step 5
Duplicate the text box by pressing Option and dragging it. Edit the text box and add the alcohol volume: "13% vol". Place it at the bottom of the third guide.


Step 6
Duplicate the text box by pressing Option and dragging the text box. Edit the text box, and add the fermentation year: "2020". Place it flush to the top margin.


Step 7
Create a new text box with the Text Tool (T). Add the vineyard name—in this case "VENUS VINEYARD SINCE 1973".
Using the Character panel, set the Font to Marison Sans and the Size to 6 pt. Change the Tracking to 200. Place the text box under the top margin and to the right of the line.


Step 8
Create a new text box. Add the type of wine—in this case "PINOT GRIGIO".
Using the Character panel, set the Font to Regas and the Size to 30 pt. Change the Leading to 30. Place the text box under the vineyard name.


Step 9
Create a new text box. This is a limited-edition wine, so we'll add: "LOT OF 1500 BOTTLES" and "LIMITED EDITION". To create cohesiveness, use the same typesetting as for the top text.
Using the Character panel, set the Font to Marison Sans and the Size to 6 pt. Change the Tracking to 200. Place this text box near the bottom margin.


Step 10
Select the number "1500" and change the Font to Marison Brieny and the Size to 22 pt.


Step 11
Create a new text box to add a tagline: "ENJOY IN GOOD COMPANY".
Using the Character panel, set the Font to Marison Sans and the Size to 9 pt. Change the Tracking to 200. Place the text box under the "limited edition" text box.


Step 12
Create a new text box, and add "PRODUCT OF ITALY".
Using the Character panel, set the Font to Marison Sans and the Size to 6 pt. Change the Tracking to 200.


Step 13
Create a text box and add the abbreviations for the region of Sicily and the country of Italy: "SIC" and "IT".
Using the Character panel, set the Font to Marison Sans and the Size to 7 pt. Change the Tracking to 200.


Step 14
Using the Ellipse Tool (L), create a circle. Go to the Options bar and set the Width and Height to 12 mm. Set the Stroke to 0.5 pt and the Stroke Color to Black.


Step 15
Select the circle and the text box we created in the previous step. Using the Align panel, align both objects to their Horizontal Center and Vertical Center.


Step 16
Select both objects and press Command-G to Group.
Select the Rotate Tool (R) from the Tools bar. Rotate the grouped object slightly to the right.


Step 17
In the Layers panel, select the Brand Name layer.
Create a text box with the Text Tool (T). Add the name of the brand: "TERRA". Using the Character panel, set the Font to Regas and the Size to 164 pt. Set the Color to #e15c59.


Step 18
While selecting the brand text box, select the Rotate Tool (T) from the toolbar. Rotate the text box 90° to the right. Place the text flush to the right-side margin.


3. How to Export a Custom Wine Label
Step 1
If you wish to export the wine label design for print, go to File > Export. In the Export popup window, set the Format to Adobe PDF Print. Click Save.


Step 2
In the Export Adobe PDF pop-up window, set the Adobe PDF Preset to High Quality Print.
Select the Marks and Bleeds option from the left side menu. Check the Crop Marks option under Marks. Check the Use Document Bleed Settings option.
Click Export.


Step 3
If you want to export the wine label design for a mockup, go to File > Export. Set the Format to JPEG and click Save.


Step 4
In the Export JPEG pop-up window, set the Quality to High and the Resolution to 72 dpi. Click Export.


Your Custom Wine Label Design Is Ready!
Congratulations! You've completed this tutorial on how to design a wine label in InDesign. After I exported my file, I used this wine bottle mockup from Envato Elements to show how my custom wine label would look on a bottle. If you want to make a wine bottle mockup or a wine label but you don't feel too confident using specialized software, we've got a solution for you coming up next!


Placeit Beer Label Maker
Do you want to make a wine bottle mockup or a wine bottle label design, but you don't want to use design software? You can use Placeit's wine label generator.


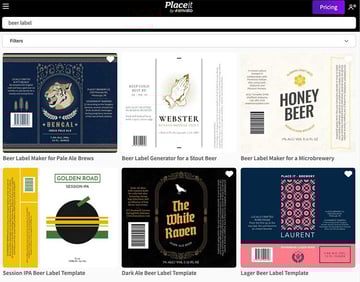
If you need an amazing wine label generator with tons of designs, Placeit is a great option. This affordable online design generator has high-quality label designs, mockups, and much more. You can edit the designs right from your browser, with no need for any software, and you can download the results in just a few seconds. Here's how easy it is to use:
Step 1
Choose your design. When you click on it, it should open in a new window/tab.
You'll notice that there are plenty of options to customize the label. One of the right-side options is Color. You can choose a different ornament color, background, and even bar color.


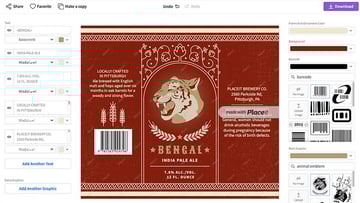
Step 2
Lower in the options, you can change the animal emblem.


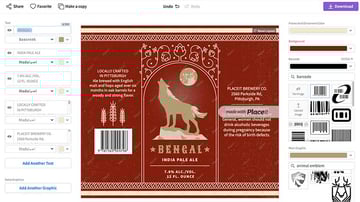
Step 3
Last, on the left side, there are options to set the typography. Here you can change the contents and also the font.


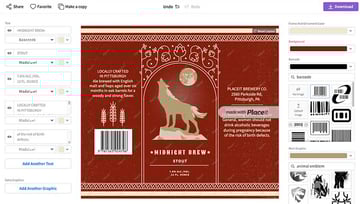
That's It!
In this tutorial, I showed you how to design a wine bottle label. The design is modern and experimental. I also showed you some awesome wine bottle label design templates that can help you when you're short on time.
If you're looking for a wine label generator, be sure to check out Placeit. And last but not least, to present your stylish wine label designs, be sure to use a great mockup. Which wine bottle label design was your favorite?
Wine Label Design at Envato Elements
If you're looking for the best assets right now, be sure to check out Envato Elements. Find anything from amazing wine bottle mockups to wine label designs, beer label designs, and much more. For a small monthly fee, you have access to high-quality assets and unlimited downloads. Be sure to check them out!
Vintage Wine Label Design (AI)


Designing a wine label can get tricky if you want to achieve a vintage look. You don't have to worry about that with this vintage wine label design. The beautiful illustration is already done, so all you need to do is customize the text and you're all set.
Vintage Wine Label Design (AI)


This wine bottle label design is intricate and elegant. The gold details make the bottle look like something from the Art Deco era. The content that you need to add is just text, so there's no need for an intricate logo.
Vintage Wine Set Labels Design (AI)


If you're looking for a custom wine label, this is a great option. While it's a shortcut, this wine bottle label design is unique and beautiful. The pack comes with a front and back label design that allows you to add even more information for customers.
Vintage Wine Label Design (AI)


This delicate wine label design is romantic. The complex lines and adornments make it perfect for wedding favours. The symmetrical design is classic and very representative of a high-quality reserve.
Vintage Wine Label Design (AI)


This wine bottle label design comes with three elements: the main label at the front, the supporting label, and a back label. This is a great wine label design pack if you're looking for something very classic and stylish.
If you liked this tutorial, you might like:

 32 Best Custom Beer Bottle Labels (Using a Beer Bottle Label Maker)


 38 Best T-Shirt Tag Templates Using a Clothing Label Maker
 10 Top Tips for Designing Awesome Packaging and Labels


 44 Best Beer Mockups (Beer Bottles, Cans, Glasses - PSD and Mockup Generator)
 How to Make a Beer Can Mockup in Photoshop


 Design a Print-Ready Beer Label in Adobe Illustrator

Original Link: https://design.tutsplus.com/tutorials/how-to-design-a-wine-bottle-label--cms-41208
TutsPlus - Design
More About this Source Visit TutsPlus - Design