
An Interest In:
Web News this Week
- April 26, 2024
- April 25, 2024
- April 24, 2024
- April 23, 2024
- April 22, 2024
- April 21, 2024
- April 20, 2024
Some of Our Sources
- BoingBoing
- Simplebits
- TutsPlus - Code
- Web Designer Wall
- Spoon Graphics
- Smashing Apps
- Fuel Your Creativity
- Reencoded
- Hashedout
- TechPowerUp
Help Webnuz
Referal links:
Using HarperDB with Kubernetes
Table of contents
- Table of contents
- HarperDB
- Kubernetes and Databases
- Containerizing HarperDB
- Migrating to Kubernetes
- Create a Kubernetes cluster
- Create manifests
- Accessing HarperDB
- Conclusion
When working with any sort of application, one of the biggest challenges is to make it reusable and maintainable. This is why we usually choose containers as the tool to get around this problem.
Containers are simple to build and easy to maintain, a while ago I wrote this article on FreeCodeCamp that explains a lot about what are containers and why should we use them.
Now, while building an application recently, I ran into another problem: How can I run my database, using HarperDB, in a container? And then how can I install it using Kubernetes?
After some brainstorming I came up with a solution, and now it's the time to share that with you!
But, first things first, what is HarperDB?
HarperDB
HarperDB is a multi-paradigm, general-purpose database that is designed to be fast and easy to use. It encapsulates SQL and NoSQL functionality, CSV data aggregation and a whole lot of helpers like Math.js for working with math, GeoJSON support for working with geographical data, and moment for working with dates.
Ok, but what's the big catch? Other databases already do this. The catch is that HarperDB stores this as a unified data structure and serves it through a unique storage algorithm that makes it really fast for all the different types of data.
On top of that, HarperDB is also projected to be a full fledged solution to build not only your database alone, but also a complete API that interacts with that through the use of Custom Functions (which I'll talk about in another article), websockets, and the cherry on top is that it doesn't require a specific driver to work with. It exposes a standard REST API that can be used by any language, so you can both query data and perform operations using simple HTTP calls.
Here's a quick diagram of how HarperDB works, taken straight from the HarperDB website:

In short, I wanted to try it out and wasn't disappointed! Now, how can we install this database in a Kubernetes environment?
Kubernetes and Databases
Usually, when dealing with databases, we tend to install it on a separate computer or VM, and connect our application to that. While this is a good option to make it easier to manage, it's not the best option to make it faster, nor distributable, highly available, or reliable.
To do that, we need to distribute the database into several machines using a cluster approach, which means we have a main control plane, which is the main connection point for a database, and several other instances of the same database on which the control plane will distribute the load. These instances are called nodes.
Some nodes can be read only, some can be write only, some can be both. This allows us to make sure we have the correct permissions for each node, and we can also make sure that we don't have any data loss or corruption. When any data is inserted, deleted, or changed in the database, these nodes publish a message to other nodes to make that change too, so that the data is always consistent. However it takes a while for this data to be replicated when we have a large infrastructure, this is what we call eventual consistency.
In this article I'll be creating a single HarperDB instance on Kubernetes, however, I plan to show you how to create a cluster of HarperDB instances in future articles.
Containerizing HarperDB
Most databases already have a container-ready approach, and Harper is not different. You can find the containerized version of HarperDB in their Docker Hub page, it's very straight-forward to install and run. Before putting the database in Kubernetes, let's make sure we can run it locally using Docker.
If you don't have Docker installed, you can install it from the Docker website.
The simple and easy command to run is:
docker run -d \ -e HDB_ADMIN_USERNAME=user \ -e HDB_ADMIN_PASSWORD=password \ -p 9925:9925 \ harperdb/harperdbHarperDB needs port 9925 to be opened so we can connect it to the HarperDB Studio application, so we can manage it straight from the browser.
Aside from that, we need to remember that containers are ephemeral, which means they do not persist after they are stopped. This is why we need a volume to persist the data, for that we can add the -v flag in our Docker command, pointing to the /opt/harperdb/hdb directory inside the container:
docker run -d \ -e HDB_ADMIN_USERNAME=user \ -e HDB_ADMIN_PASSWORD=password \ -p 9925:9925 \ -v $PWD/.hdb:/opt/harperdb/hdb \ harperdb/harperdbIn this command we're telling Docker to mount the /opt/harperdb/hdb directory in a local folder called /.hdb, so that we can persist the data. After the command is run, we can ls -la the /.hdb directory to see that it's actually mounted:

Now, we go to the HarperDB Studio application and login. If you don't have an account yet, go to the sign-up page and create one, it's free. Then create an organization for you and you should land on this page:
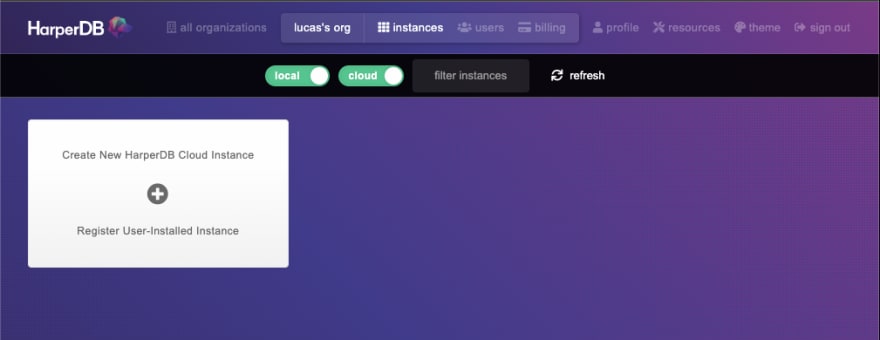
Let's create a local instance by clicking the Register User-installed Instance button:
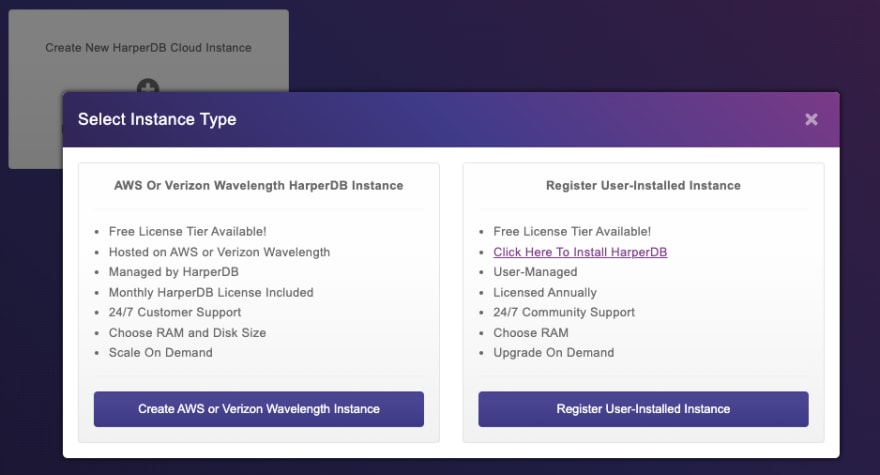
Let's fill up the details of the instance, and then click the instance details button:

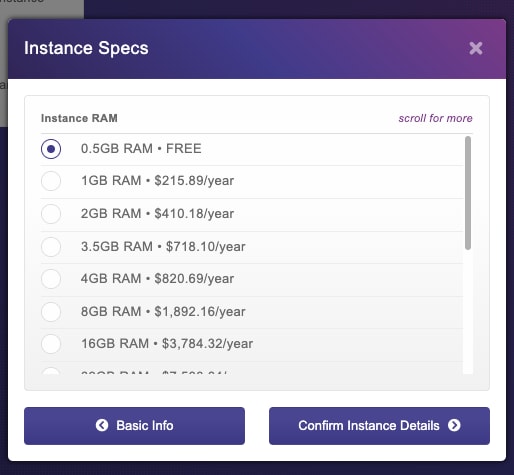
Then we select the free tier and click next:
Confirm the terms of service and Add Instance. You should end up with a local registered instance of the database:

If you click it, you should have access to all your schemas and tables. So that's what we need to do.
Migrating to Kubernetes
First, let's set up a plan of what we need to do:
- Create a Kubernetes cluster
- Create a namespace called
databaseso we can organize our resources - Create a deployment for HarperDB so we can deploy it to the cluster
- Create a persistent volume claim for the
/opt/harperdb/hdbdirectory - Create a service for HarperDB so we can port-forward it locally and connect to it from the browser
Since we'll not be exposing the database to the internet, we won't create an Ingress rule for it, instead, we'll only connect to it from inside the cluster.
Create a Kubernetes cluster
There are a ton of ways to create a new Kubernetes cluster, but the easiest and fastest way is to use a managed cluster. In this tutorial we'll be using Azure's AKS, but you can use any other provider.
The first thing is to log in to your Azure account on the Azure Portal, if you don't have an Azure account, just create one in the Azure website. There are two ways to create a managed AKS cluster, one of them is through the Azure CLI, the other is through the portal itself, which is the way we'll be doing this tutorial.
Search for "Kubernetes" in the Azure Portal, and click on the Kubernetes Services result:

Then click on create dropdown and create a new cluster:

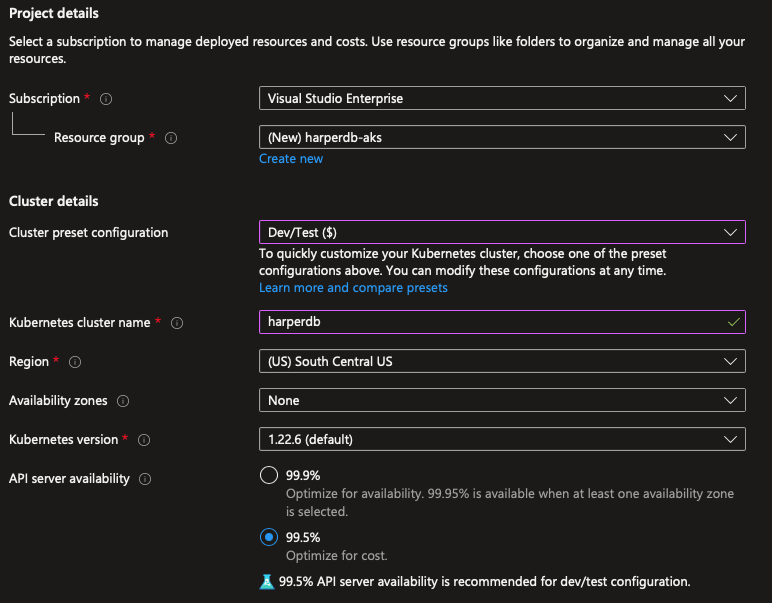
Let's create a new resource group called harperdb-aks, let's change the preset to development to save some money since we'll not be using the cluster for production, then name the cluster harperdb, choose your preferred region:
Let's select the B2s instance in the instance picker and remove the autoscale method, since we'll be using a fixed size cluster of 1 single node:

Click the blue Review+Create button to create the cluster:

The process will take a while to complete, so let's wait until it's done.
While you wait, take your time to install and login to the Azure CLI if you haven't done so yet, because we'll need it to connect to the cluster.
After the process is complete, jump to your terminal, start your az cli and install the kubectl tool with az aks install-cli. After that we'll download the credentials to our kubeconfig file, so we can connect to the cluster using az aks get-credentials -n harperdb -g harperdb-aks --admin.
If everything went well, you should be able to connect to the cluster with kubectl get nodes and get a response with a single node like this:
NAME STATUS ROLES AGE VERSIONaks-agentpool-17395436-vmss000000 Ready agent 2m6s v1.22.6Let's create our namespace with kubectl create namespace database, and now we're able to create our manifests.
Create manifests
To start the manifest creation, we'll need to create a deployment for HarperDB, so we can deploy it to the cluster. Let's create a new file called manifests.yaml where we'll add all the manifests we'll need. In this file, we'll start with the deployment:
# Deployment for HarperDBapiVersion: apps/v1kind: Deploymentmetadata: name: harperdb namespace: database # note the namespace we created earlierspec: selector: matchLabels: app: harperdb # group all the pods under the same label template: metadata: labels: app: harperdb # create pods with the label we want to group them under spec: containers: - name: harperdb-container image: harperdb/harperdb # same hdb image from dockerhub env: - name: HDB_ADMIN_USERNAME value: harperdb # fixing username, in production this should be a secret - name: HDB_ADMIN_PASSWORD value: harperdb # fixing password, in production this should be a secret resources: limits: memory: "512Mi" # limiting the usage of memory cpu: "128m" # limiting the usage of CPU to 128 millicores ports: - containerPort: 9925 # exposing the port 9925 to the outside world name: hdb-api # naming the port volumeMounts: # creating a persistent volume to store the data - mountPath: "/opt/harperdb" # mounting the volume to the path we want name: hdb-data # referencing the volume we want to mount livenessProbe: # creating a liveness probe to check if the container is running tcpSocket: # we'll ping hdb's port 9925 port: 9925 initialDelaySeconds: 30 # wait 30 seconds before starting the probe periodSeconds: 10 # then check the probe every 10 seconds readinessProbe: # creating a readiness probe to check if the container is ready to accept connections tcpSocket: port: 9925 initialDelaySeconds: 10 # wait 10 seconds before starting the probe periodSeconds: 5 # then check the probe every 5 seconds volumes: - name: hdb-data # this is the volume we'll mount persistentVolumeClaim: # it references another persistent volume claim claimName: harperdb-data # this is the name of the persistent volume claimBefore we go further, some explanation on volumes is necessary. Since we're dealing with managed volumes on Azure, we don't need (and can't) create a volume inside the host nor inside the pod because they'll be deleted when we delete the resources. What we want to do is to delegate the creation process to Azure through StorageClasses and PersistentVolumeClaims.
The usual process is to create a
PersistentVolumeand then claim it with aPersistentVolumeClaim
The idea is that we declare that we want to claim a determined amount of space from the Azure pool for the volume, and then we'll mount it to the path we want. Azure will receive this request through a Kubernetes operator that manages the CSI (Container Storage Interface) plugin and create the volume in our Azure account.
By default, Azure has two types of storages: Azure File and Azure Disk. We'll be using the Azure File storage because it's easier to see the files in the Azure Portal, also, clusterization is only supported in Azure File storage.
Also note that we're mounting the volume not on /opt/harperdb/hdb but on /opt/harperdb. This is because if we mount the volume in the innermost directory, we'll have permission problems since the outermost directory is owned by the user that runs the container, and the innermost directory is created by Azure.
The other important information is that HDB takes a small while to start, so we're setting a livenessProbe and readinessProbe to check if the pod is ready, these probes will check the connection on TCP port 9925, when this port is open, the service is online.
Next, we'll add the persistent volume claim:
apiVersion: v1kind: PersistentVolumeClaimmetadata: name: harperdb-data namespace: databasespec: resources: requests: storage: 2Gi # We'll request 2GB of storage accessModes: - ReadWriteOnce storageClassName: azurefile-csi # We'll use the Azure File storageAnd to finish the manifest file, we'll add a service:
apiVersion: v1kind: Servicemetadata: name: harperdb namespace: databasespec: selector: app: harperdb ports: - port: 9925 name: api targetPort: hdb-apiThe final file will look like this:
# manifests.ymlapiVersion: v1kind: PersistentVolumeClaimmetadata: name: harperdb-data namespace: databasespec: resources: requests: storage: 2Gi accessModes: - ReadWriteOnce storageClassName: azurefile-csi---apiVersion: apps/v1kind: Deploymentmetadata: name: harperdb namespace: databasespec: selector: matchLabels: app: harperdb template: metadata: labels: app: harperdb spec: containers: - name: harperdb-container image: harperdb/harperdb env: - name: HDB_ADMIN_USERNAME value: harperdb - name: HDB_ADMIN_PASSWORD value: harperdb resources: limits: memory: "512Mi" cpu: "128m" ports: - containerPort: 9925 name: hdb-api volumeMounts: - mountPath: "/opt/harperdb" name: hdb-data livenessProbe: tcpSocket: port: 9925 initialDelaySeconds: 30 periodSeconds: 10 readinessProbe: tcpSocket: port: 9925 initialDelaySeconds: 10 periodSeconds: 5 volumes: - name: hdb-data persistentVolumeClaim: claimName: harperdb-data---apiVersion: v1kind: Servicemetadata: name: harperdb namespace: databasespec: selector: app: harperdb ports: - port: 9925 name: api targetPort: hdb-apiThe last thing is to apply the manifests to the cluster using kubectl apply -f ./manifests.yml. You'll receive a message like this:
persistentvolumeclaim/harperdb-data createddeployment.apps/harperdb createdservice/harperdb createdWe can check if everything is fine by running kubectl get deploy harperdb -n database:
NAME READY UP-TO-DATE AVAILABLE AGEharperdb 1/1 1 1 20mThen we can take a look on our Azure Portal and see if the volume is there. First, select Resource Groups in the portal, you can do this by searching for it or clicking in the home page.
Find a resource group that matches MC_harperdb-aks_harperdb_<location>, click it, you should see a bunch of resources.

One of these resources is our Storage Account, click it. Then, in the left panel, go to File Shares, you should see a Azure File volume starting with pvc-, click it.

Here's our mounted volume with all HDB's files. Now let's access our HDB instance and check if everything is working.
Accessing HarperDB
To access the database from the outside world, since we didn't expose it as a good practice, let's port forward our own connection to our service connection using the following command:
kubectl port-forward svc/harperdb 9925:9925 -n databaseYou should see the following messages:
Forwarding from 127.0.0.1:9925 -> 9925Forwarding from [::1]:9925 -> 9925Handling connection for 9925Handling connection for 9925Handling connection for 9925...Then, let's go to our studio in the browser and create a new instance with the credentials that we included in our deployment manifest, the username and the password are harperdb.

After that, you can follow the same steps to create a new database, create a new user, and then grant permissions to the user.
Conclusion
We made it to the end of this tutorial and I hope you enjoyed it! Now you're able to create your own HDB instance in a Kubernetes cluster.
For more information on how HDB works, check out their documentation.
Original Link: https://dev.to/_staticvoid/using-harperdb-with-kubernetes-2pf6
Dev To
More About this Source Visit Dev To