
An Interest In:
Web News this Week
- April 2, 2024
- April 1, 2024
- March 31, 2024
- March 30, 2024
- March 29, 2024
- March 28, 2024
- March 27, 2024
Some of Our Sources
- TutsPlus - Code
- Just Creative
- Pearsonified
- Fuel Your Creativity
- Noupe
- My Ink Blog
- Specky Boy
- CSS Tricks
- Daily Now
- Dev To
Help Webnuz
Referal links:
Create an Open Source Ecommerce Marketplace Part 2: Vender-Specific Orders
In the first part of this series, you learned about Medusa Extender and how to use it to create a marketplace ecommerce platform. The first part demonstrated how to link stores to users so that each new user has their own store, then how to link products to a store so that the user can see and manage only their products.
In this part, youll learn how to link orders to their respective stores. This will cover use cases where a customer purchases products from multiple stores, and how to manage the overall status of that order.
You can find the full code for this tutorial in this GitHub repository.
You can alternatively use the Medusa Marketplace plugin as indicated in the README of the GitHub repository. If youre already using it make sure to update to the latest version:
npm install medusa-marketplace@latestPrerequisites
It is assumed that youve followed along with the first part of the series before continuing this part. If you havent, please start from there.
If you dont have the Medusa Admin installed, it is recommended that you install it so that you can easily view products and orders, among other functionalities.
Alternatively, you can use Medusas Admin APIs to access the data on your server. However, the rest of the tutorial will mostly showcase features through the Medusa Admin.
To add products with images you also need a file service plugin like MinIO installed on your Medusa server. You can also check the documentation for more options for a file service.
This tutorial additionally makes use of the Next.js starter storefront to showcase placing orders. This is also optional and you are free to use other storefronts or Medusas Storefront APIs instead.
Finally, this part uses version 1.6.5 of the Medusa Extender which introduced new features and a better developer experience.
If you have an old version of the Medusa Extender installed, update the extender on your Medusa server:
npm install [email protected]Change the content of tsconfig.json to the following:
{ "compilerOptions": { "module": "CommonJS", "declaration": true, "emitDecoratorMetadata": true, "experimentalDecorators": true, "allowSyntheticDefaultImports": true, "moduleResolution": "node", "target": "es2017", "sourceMap": true, "skipLibCheck": true, "allowJs": true, "outDir": "dist", "rootDir": "src", "esModuleInterop": true }, "include": [ "src", ], "exclude": [ "dist", "node_modules", "**/*.spec.ts", "medusa-config.js", ]}And change scripts in package.json to the following:
"scripts": { "seed": "medusa seed -f ./data/seed.json", "build": "rm -rf dist && ./node_modules/.bin/tsc -p tsconfig.json", "start": "npm run build && NODE_ENV=development node ./dist/main.js", "typeorm": "node --require ts-node/register ./node_modules/typeorm/cli.js", "start:watch": "nodemon --watch './src/**/*.ts' --exec 'ts-node' ./src/main.ts", "start:prod": "npm run build && NODE_ENV=production node dist/main"},What You Will Be Building
As mentioned in the introduction, this part of the series will guide you through linking orders to stores. To do that, youll override the Order model to add the relation between it and the Store model.
In a marketplace, customers should be able to purchase products from multiple vendors at the same time. So, youll also add a subscriber that, when an order is placed, will create child orders. Child orders will be linked to a store, will only have products from the original order that belongs to that store, and will be linked to the parent order.
For that reason, youll also add a parent-child relation between Order models. This relation will additionally let you manage the parent orders status based on the statuses of child orders.
Moreover, youll add a filter that ensures when a user retrieves the list of orders in their store, only orders that belong to their store are retrieved. This will also allow a super admin who does not belong to any store to track the parent orders.
Add Relations to the Order Model
The first step is adding the relation between the Order and Store model, and between Order models. To do that, you need to override the Order model.
Create a new directory src/modules/order which will hold all order-related classes that you create throughout this tutorial.
Then, create the file src/modules/order/order.entity.ts with the following content:
import { Column, Entity, Index, JoinColumn, ManyToOne, OneToMany } from "typeorm";import { Entity as MedusaEntity } from "medusa-extender";import { Order as MedusaOrder } from "@medusajs/medusa";import { Store } from "../store/entities/store.entity";@MedusaEntity({override: MedusaOrder})@Entity()export class Order extends MedusaOrder { @Index() @Column({ nullable: true }) store_id: string; @Index() @Column({ nullable: false }) order_parent_id: string; @ManyToOne(() => Store, (store) => store.orders) @JoinColumn({ name: 'store_id' }) store: Store; @ManyToOne(() => Order, (order) => order.children) @JoinColumn({ name: 'order_parent_id' }) parent: Order; @OneToMany(() => Order, (order) => order.parent) @JoinColumn({ name: 'id', referencedColumnName: 'order_parent_id' }) children: Order[];}You add the model Order which overrides and extends Medusas Order model. In this model, you add 2 new columns: store_id and order_parent_id. The store_id column will be used for the many-to-one relation between the Order model and Store model, which you demonstrate through the store property.
The order_parent_id column will be used for the many-to-one and one-to-many relation between Order models. This leads to parent and children properties resulting from these relations.
Next, in src/modules/store/entities/store.entity.ts add a new import for the Order model at the beginning of the file:
import { Order } from '../../order/order.entity';And inside the Store class add the relation to the Order model:
@OneToMany(() => Order, (order) => order.store)@JoinColumn({ name: 'id', referencedColumnName: 'store_id' })orders: Order[];Add a New Migration
To reflect the new columns in the database, you need to create a migration file in the order module.
As migration files have the format <timestamp>-order.migration.ts, a migration file is unique to you so you need to create it yourself.
Luckily, the new update of Medusa Extender added a lot of helpful CLI commands to make redundant tasks easier for you. You can generate the migration file using the following command:
./node_modules/.bin/medex g -mi orderThis will create the file src/modules/order/<timestamp>-order.migration.ts for you. Open that file and replace the up and down methods with the following implementation:
public async up(queryRunner: QueryRunner): Promise<void> { const query = ` ALTER TABLE public."order" ADD COLUMN IF NOT EXISTS "store_id" text; ALTER TABLE public."order" ADD COLUMN IF NOT EXISTS "order_parent_id" text; ALTER TABLE public."order" ADD CONSTRAINT "FK_8a96dde86e3cad9d2fcc6cb171f87" FOREIGN KEY ("order_parent_id") REFERENCES "order"("id") ON DELETE CASCADE ON UPDATE CASCADE; `; await queryRunner.query(query);}public async down(queryRunner: QueryRunner): Promise<void> { const query = ` ALTER TABLE public."order" DROP COLUMN "store_id"; ALTER TABLE public."order" DROP COLUMN "order_parent_id"; ALTER TABLE public."order" DROP FOREIGN KEY "FK_8a96dde86e3cad9d2fcc6cb171f87cb2"; `; await queryRunner.query(query);}The up method adds the columns store_id and order_parent_id to the order table with a foreign key, and the down method removes those columns and foreign key from the order table.
Run Migrations
Part of the Medusa Extender new CLI commands is the [migrate command](https://adrien2p.github.io/medusa-extender/#/?id=command-migrate-reference) which looks inside the src and dist directories for both files ending with .migration.js and JavaScript files inside a migrations sub-directory of the 2 directories.
You can refer to the Medusa Marketplace plugin to learn how you can run migrations from it.
Then, if the migrations inside those files havent been run before it runs or show them based on the option you pass to the command.
As the migration file youve created is a TypeScript file, you need to transpile it to JavaScript first before migrating the changes. So, run the following command:
npm run buildThis will transpile all TypeScript files inside the src directory into JavaScript files inside the dist directory.
Finally, run the migration with the following command:
./node_modules/.bin/medex migrate --runIf you get an error about duplicate migrations because of migrations from the previous part of this series, go ahead and remove the old ones from the dist directory and try running the command again.
If you check your database once the migration is run successfully, you can see that the 2 new columns have been added to the order table.
Override OrderRepository
Since youve overridden the Order model, you should override OrderRepository to make sure that when an order is retrieved, the overridden model is used.
Create the file src/modules/order/order.repository.ts with the following content:
import { Repository as MedusaRepository, Utils } from "medusa-extender";import { EntityRepository } from "typeorm";import { OrderRepository as MedusaOrderRepository } from "@medusajs/medusa/dist/repositories/order";import { Order } from "./order.entity";@MedusaRepository({override: MedusaOrderRepository})@EntityRepository(Order)export class OrderRepository extends Utils.repositoryMixin<Order, MedusaOrderRepository>(MedusaOrderRepository) {}List Orders By Store
In this section, youll retrieve orders based on the store of the currently logged-in user.
Modify LoggedInUserMiddleware
In the previous part, you created a middleware LoggedInUserMiddleware which checks if a user is logged in and registers them in the scope. This allows you to access the logged-in user from services and subscribers, and this was used to retrieve products based on the logged-in users store.
However, the previous implementation affects both storefront and admin routes in Medusa. This can cause inconsistencies for customers accessing the storefront.
To ensure that the logged-in user is only added to the scope for admin routes, change the code in src/modules/user/middlewares/loggedInUser.middleware.ts to the following content:
import { MedusaAuthenticatedRequest, MedusaMiddleware, Middleware } from 'medusa-extender';import { NextFunction, Response } from 'express';import UserService from '../services/user.service';@Middleware({ requireAuth: true, routes: [{ method: "all", path: '*' }] })export class LoggedInUserMiddleware implements MedusaMiddleware { public async consume(req: MedusaAuthenticatedRequest, res: Response, next: NextFunction): Promise<void> { let loggedInUser = null; if (req.user && req.user.userId && **/^\/admin/.test(req.originalUrl)**) { const userService = req.scope.resolve('userService') as UserService; loggedInUser = await userService.retrieve(req.user.userId, { select: ['id', 'store_id'], }); } req.scope.register({ loggedInUser: { resolve: () => loggedInUser, }, }); next(); }}The new change adds a new condition to check if the current route starts with /admin. If it does and if the user is logged in, the logged-in user is added to the scope. Otherwise, the value of loggedInUser in the scope will be null.
Although you can specify the path of the middleware to be /admin/* to register this middleware for admin routes only, this approach is necessary because if the loggedInUser is not registered in the scope an error will be thrown in any service or subscriber that uses it.
Override the OrderService
The Medusa server uses the method [buildQuery_](https://github.com/adrien2p/medusa-extender/releases/tag/v1.7.0) in OrderService to build the query necessary to retrieve the orders from the database. Youll be overriding the OrderService, and particularly the buildQuery_ method to add a selector condition for the store_id if there is a currently logged-in user that has a store.
Create the file src/modules/order.service.ts with the following content:
import { EntityManager } from 'typeorm';import { OrderService as MedusaOrderService } from "@medusajs/medusa/dist/services";import { OrderRepository } from './order.repository';import { Service } from 'medusa-extender';import { User } from "../user/entities/user.entity";type InjectedDependencies = { manager: EntityManager; orderRepository: typeof OrderRepository; customerService: any; paymentProviderService: any; shippingOptionService: any; shippingProfileService: any; discountService: any; fulfillmentProviderService: any; fulfillmentService: any; lineItemService: any; totalsService: any; regionService: any; cartService: any; addressRepository: any; giftCardService: any; draftOrderService: any; inventoryService: any; eventBusService: any; loggedInUser: User; orderService: OrderService;};@Service({ scope: 'SCOPED', override: MedusaOrderService })export class OrderService extends MedusaOrderService { private readonly manager: EntityManager; private readonly container: InjectedDependencies; constructor(container: InjectedDependencies) { super(container); this.manager = container.manager; this.container = container; } buildQuery_(selector: object, config: {relations: string[], select: string[]}): object { if (this.container.loggedInUser && this.container.loggedInUser.store_id) { selector['store_id'] = this.container.loggedInUser.store_id; } config.select.push('store_id') config.relations = config.relations ?? [] config.relations.push("children", "parent", "store") return super.buildQuery_(selector, config); }}Inside buildQuery_ you first check if there is a logged-in user and if that user has a store. If true, you add to the selector parameter (which is used to filter out data from the database) a new property store_id and set its value to the store ID of the logged-in user.
You also add to the selected fields store_id, and you add the children, parent, and store relations to be retrieved along with the order.
Create the Order Module
The last thing before you can test out the changes youve just made is you need to create an order module that imports those new classes you created into Medusa.
Create the file src/modules/order/order.module.ts with the following content:
import { Module } from 'medusa-extender';import { Order } from './order.entity';import { OrderMigration1652101349791 } from './1652101349791-order.migration';import { OrderRepository } from './order.repository';import { OrderService } from './order.service';import { OrderSubscriber } from './order.subscriber';@Module({ imports: [Order, OrderRepository, OrderService, OrderMigration1652101349791]})export class OrderModule {}Please notice that you need to change the import and class name of the migration class based on your migrations name.
Then, import this new module at the beginning of the file src/main.ts:
import { OrderModule } from './modules/order/order.module';And inside the array passed to the load method pass the OrderModule:
await new Medusa(__dirname + '/../', expressInstance).load([ UserModule, ProductModule, OrderModule, StoreModule,]);Test it Out
To test it out, start the server with the following command:
npm startThis will start the server on port 9000
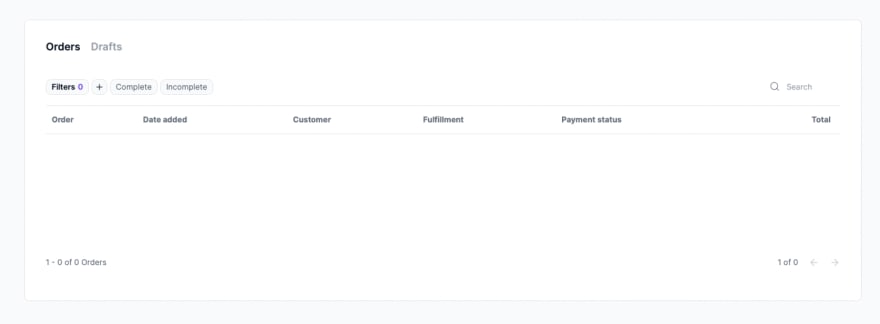
Then, start your Medusa admin and log in with the user you created in the first part of the series. You should see on the orders page that there are no orders for this user.
If youre using Medusas APIs you can view the orders by sending a
GETrequest tolocalhost:9000/admin/orders.
Handle Order Place Event
In this section, youll add a subscriber to handle the order.placed event that is triggered whenever a new order is placed by a customer. As mentioned earlier in the tutorial, youll use this handler to create child orders for each store that the customer purchased products from in their order.
Create a new file src/modules/order/order.subscriber.ts with the following content:
import { EventBusService, OrderService } from "@medusajs/medusa/dist/services";import { LineItem, OrderStatus } from '@medusajs/medusa';import { EntityManager } from "typeorm";import { LineItemRepository } from '@medusajs/medusa/dist/repositories/line-item';import { Order } from './order.entity';import { OrderRepository } from "./order.repository";import { PaymentRepository } from "@medusajs/medusa/dist/repositories/payment";import { Product } from "../product/entities/product.entity";import { ProductService } from './../product/services/product.service';import { ShippingMethodRepository } from "@medusajs/medusa/dist/repositories/shipping-method";import { Subscriber } from 'medusa-extender';type InjectedDependencies = { eventBusService: EventBusService; orderService: OrderService; orderRepository: typeof OrderRepository; productService: ProductService; manager: EntityManager; lineItemRepository: typeof LineItemRepository; shippingMethodRepository: typeof ShippingMethodRepository; paymentRepository: typeof PaymentRepository;};@Subscriber()export class OrderSubscriber { private readonly manager: EntityManager; private readonly eventBusService: EventBusService; private readonly orderService: OrderService; private readonly orderRepository: typeof OrderRepository; private readonly productService: ProductService; private readonly lineItemRepository: typeof LineItemRepository; private readonly shippingMethodRepository: typeof ShippingMethodRepository; constructor({ eventBusService, orderService, orderRepository, productService, manager, lineItemRepository, shippingMethodRepository, paymentRepository}: InjectedDependencies) { this.eventBusService = eventBusService; this.orderService = orderService; this.orderRepository = orderRepository; this.productService = productService; this.manager = manager; this.lineItemRepository = lineItemRepository; this.shippingMethodRepository = shippingMethodRepository; this.eventBusService.subscribe( OrderService.Events.PLACED, this.handleOrderPlaced.bind(this) ); } private async handleOrderPlaced({ id }: {id: string}): Promise<void> { //create child orders //retrieve order const order: Order = await this.orderService.retrieve(id, { relations: ['items', 'items.variant', 'cart', 'shipping_methods', 'payments'] }); //group items by store id const groupedItems = {}; for (const item of order.items) { const product: Product = await this.productService.retrieve(item.variant.product_id, { select: ['store_id']}); const store_id = product.store_id; if (!store_id) { continue; } if (!groupedItems.hasOwnProperty(store_id)) { groupedItems[store_id] = []; } groupedItems[store_id].push(item); } const orderRepo = this.manager.getCustomRepository(this.orderRepository); const lineItemRepo = this.manager.getCustomRepository(this.lineItemRepository); const shippingMethodRepo = this.manager.getCustomRepository(this.shippingMethodRepository); for (const store_id in groupedItems) { //create order const childOrder = orderRepo.create({ ...order, order_parent_id: id, store_id: store_id, cart_id: null, cart: null, id: null, shipping_methods: [] }) as Order; const orderResult = await orderRepo.save(childOrder); //create shipping methods for (const shippingMethod of order.shipping_methods) { const newShippingMethod = shippingMethodRepo.create({ ...shippingMethod, id: null, cart_id: null, cart: null, order_id: orderResult.id }); await shippingMethodRepo.save(newShippingMethod); } //create line items const items: LineItem[] = groupedItems[store_id]; for (const item of items) { const newItem = lineItemRepo.create({ ...item, id: null, order_id: orderResult.id, cart_id: null }) await lineItemRepo.save(newItem); } } }}Heres a summary of this code:
- In the constructor, you register the method
handleOrderPlacedas a handler for the eventorder.placed. - Inside
handleOrderPlacedyou first retrieve the order using the ID passed to the method with the necessary relations for the creation of child orders. - You then loop over the items purchased in the order and group then inside the object
groupedItemswith the key being the unique store IDs and the value being an array of items. - You then loop over the keys in
groupedItemsand create achildOrderfor each store. The child orders have the same data as the parent order but they haveparent_idset to the ID of the parent order andstore_idset to the ID of the store its associated with. - For each child order, you need to create
shippingMethodsthat are identical to the shipping methods of the parent order but associated with the child order. - For each child order, you need to add the items that were in the order for that specific store, as each vendor should only see the items ordered from their store.
Make sure you have Redis installed and configured with Medusa for this subscriber to work.
Test it Out
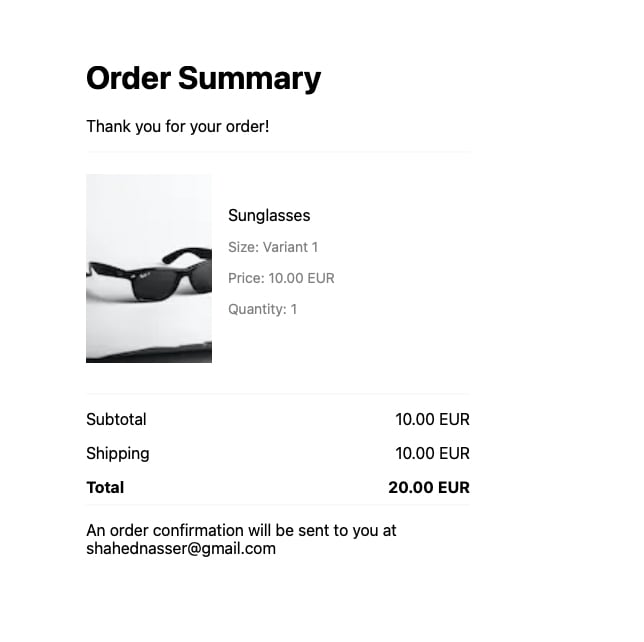
To test it out, first, restart your Medusa server, then run the storefront that youre using for your store and add one of the products you created for a vendor to the cart then place an order.
If you then open the admin panel again and check orders, you should see a new order on the orders page of the vendor. If you open it youll see details related to the order.
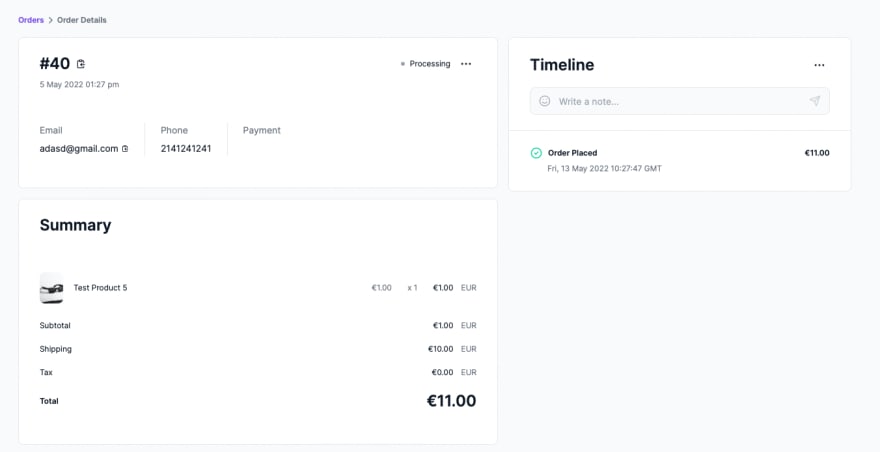
Try creating more users and adding products for different users and stores. Youll see that each user will see the order with items only related to their store.
Handle Order Status Changed Events
To ensure that the status of the parent order changes as necessary with the change of status of the child orders, its necessary to listen to the events triggered whenever an orders status changes.
In the constructor of the OrderSubscriber class in src/modules/order/order.subscriber.ts add the following code:
//add handler for different status changesthis.eventBusService.subscribe( OrderService.Events.CANCELED, this.checkStatus.bind(this));this.eventBusService.subscribe( OrderService.Events.UPDATED, this.checkStatus.bind(this));this.eventBusService.subscribe( OrderService.Events.COMPLETED, this.checkStatus.bind(this));This adds the same method checkStatus as the order handler of the events Canceled, Updated, and Completed of an order.
Next, add inside the class the following methods:
public async checkStatus({ id }: {id: string}): Promise<void> { //retrieve order const order: Order = await this.orderService.retrieve(id); if (order.order_parent_id) { //retrieve parent const orderRepo = this.manager.getCustomRepository(this.orderRepository); const parentOrder = await this.orderService.retrieve(order.order_parent_id, { relations: ['children'] }); const newStatus = this.getStatusFromChildren(parentOrder); if (newStatus !== parentOrder.status) { switch (newStatus) { case OrderStatus.CANCELED: this.orderService.cancel(parentOrder.id); break; case OrderStatus.ARCHIVED: this.orderService.archive(parentOrder.id); break; case OrderStatus.COMPLETED: this.orderService.completeOrder(parentOrder.id); break; default: parentOrder.status = newStatus; parentOrder.fulfillment_status = newStatus; parentOrder.payment_status = newStatus; await orderRepo.save(parentOrder); } } } }public getStatusFromChildren (order: Order): string { if (!order.children) { return order.status; } //collect all statuses let statuses = order.children.map((child) => child.status); //remove duplicate statuses statuses = [...new Set(statuses)]; if (statuses.length === 1) { return statuses[0]; } //remove archived and canceled orders statuses = statuses.filter((status) => status !== OrderStatus.CANCELED && status !== OrderStatus.ARCHIVED); if (!statuses.length) { //all child orders are archived or canceled return OrderStatus.CANCELED; } if (statuses.length === 1) { return statuses[0]; } //check if any order requires action const hasRequiresAction = statuses.some((status) => status === OrderStatus.REQUIRES_ACTION); if (hasRequiresAction) { return OrderStatus.REQUIRES_ACTION; } //since more than one status is left and we filtered out canceled, archived, //and requires action statuses, only pending and complete left. So, return pending return OrderStatus.PENDING;}Heres a summary of the code snippet:
- In
checkStatusyou first retrieve the orders data using its ID. - You check if the order has a parent order. This is to avoid handling events triggered for the parent order as it is not necessary.
- You then retrieve the parent order with its relation to its
childrenorders. - You make use of another method
getStatusFromChildrento deduce the status of the parent order from the children:- You first retrieve all statuses from the child orders then remove any duplicates.
- If the result of removing the duplicates leads to only one status, then it means that all orders have the same status and the parent can have that same status as well.
- Otherwise, if theres more than one status, you remove the archived and canceled orders.
- If this leads to no statuses, this means that all children are either canceled or archived and the parent should have the same status. The code snippet defaults to the canceled status here but you can change that.
- Otherwise, if theres only status left after removing canceled and archived orders you return that status.
- Otherwise, if theres more than one status left, you check if one of those statuses is
requires_actionand return that as the status. - If theres no
requires_actionstatus you can infer there are onlypendingandcompleteorders left. Since its logical to consider that if at least one order ispendingthen you can consider the parent orderpending, you default to that status.
- After retrieving the deduced status of the parent order, if that status is different than the current status of the parent order, you update its status. Depending on the new status, you either use existing methods in the
OrderServiceto update the status, or manually set the status in the order.
Test it Out
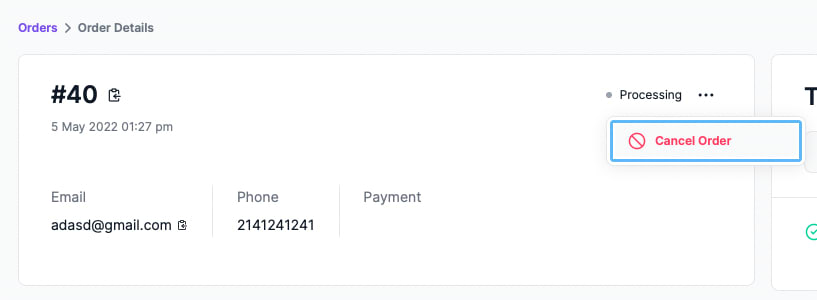
Restart your Medusa server. Then, open the Medusa admin to the order you just created earlier. Try canceling the order by clicking on the top 3 dots then clicking Cancel Order.
After canceling the order, log out and log in with a super admin user. By default, the super admin user is the user created when you seed the database at the beginning of your Medusa server set up. This user has the email [email protected] and password supersecret.
If you open the parent order youll see that its now canceled as well.

Conclusion
By following those 2 parts, you should now have stores for each user with products and orders linked to them.
In the next part of the series, youll learn about how to add more than one user to a store, how to add super admins, and how to customize other settings.
Should you have any issues or questions related to Medusa, then feel free to reach out to the Medusa team viaDiscord.
Original Link: https://dev.to/medusajs/create-an-open-source-ecommerce-marketplace-part-2-vender-specific-orders-1m80
Dev To
More About this Source Visit Dev To