
Some of Our Sources
- Technology Review
- Team Treehouse
- Just Creative
- Smashing Magazine
- Web Designer Depot
- Web Design Ledger
- Specky Boy
- Codrops
- Hashedout
- TechPowerUp
Help Webnuz
Referal links:
Amplication & React: Create the Backend
Welcome to this tutorial on how to build a full-stack application with Amplication.
What we will do is go step by step to create a Todos application using React for your frontend and Amplication for your backend.
If you get stuck, have any questions, or just want to say hi to other Amplication developers like yourself, then you should join our Discord!
Table of Contents
- Step 1 - Create a New App
- Step 2 - Create an Entity
- Step 3 - Create a Role
- Step 4 - Assign Permissions
- Step 5 - Build the Backend
- Step 6 - Run the Backend
- Step 7 - Wrap Up
Step 1 - Create a New App
Hopefully, you've had the chance to create an Amplication account, but if not, don't fret! Visit https://app.amplication.com/ and you'll be directed to the login screen. Here you can log in to an existing Amplication account, or create one, by signing in with a GitHub account. You should end up at the
New Apppage, but if not you can get to it here.Click the
New Appbutton in the top right corner.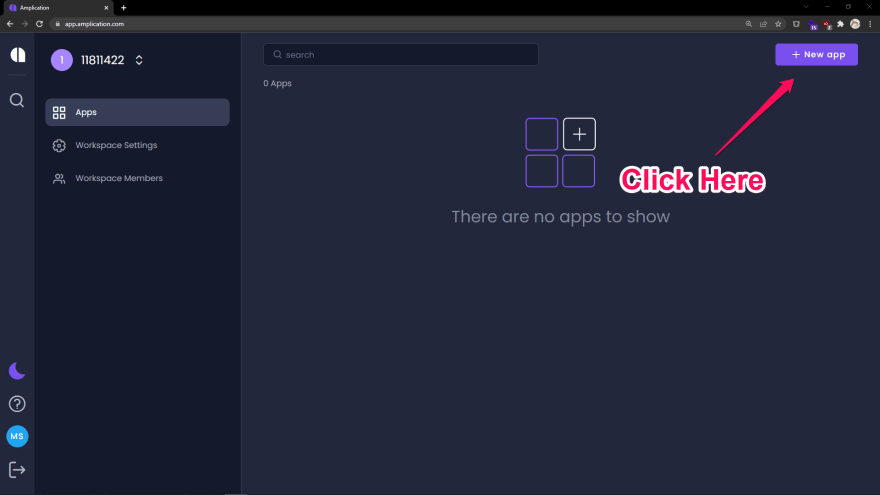
Select
Start from Scratchand wait a few seconds for the app to be generated.
You'll be directed to the application's entities. An entity is equivalent to a collection in a NoSQL database or a table in a relational database.
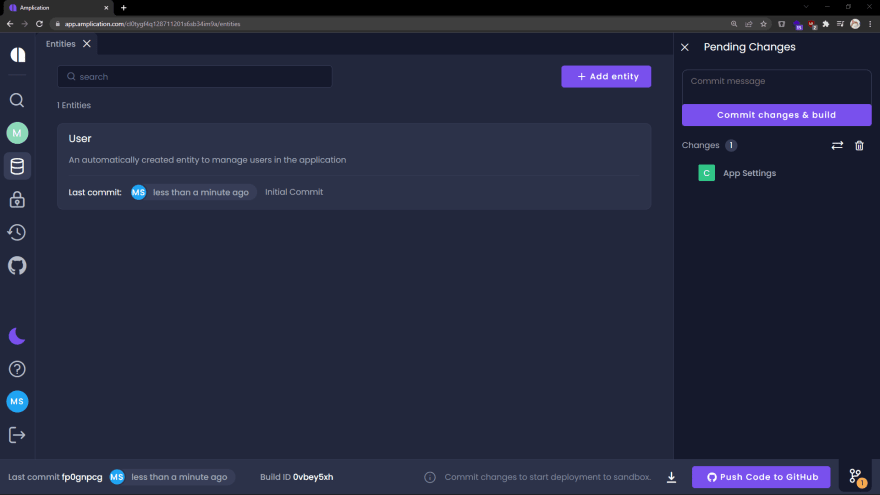
By default, a User entity is created for you. This entity will eventually help us handle authentication. But first, let's deal with the backend.
Step 2 - Create an Entity
The main entity will be used to store tasks created by users.
Click
Add entity.
When a
New entitymodal appears, inputTaskinto the input field and clickCreate Entity. With the entity created we'll want to define a few fields for task elements.On the left-hand panel, you'll see the
Fieldsthis entity has, and at the very bottom, there will be an option to add a field.
The first field will be
Text. Type that into theAdd fieldinput and hitenter. The new field will be created and a few options will appear.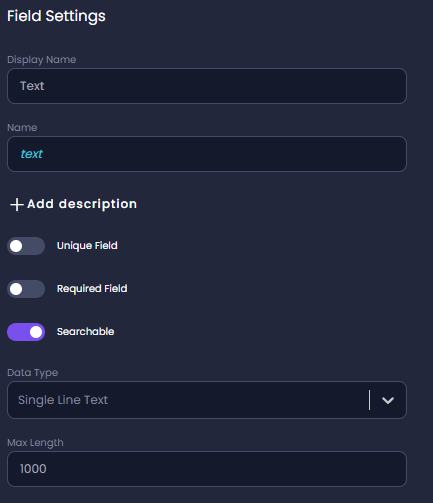
Notice a dropdown for the
Data Typeof this field is set toSingle Line Text. That's perfect as it'll be a string input of a task. There are many different data types Amplication can enforce for fields.The only change that needs to be made here is this will be a required field. Toggle the
Required Fieldswitch. Changes will be automatically saved.Like before, create a new field called
Completed. This field should also be a required field, but we will change the data type. Click theData Typedropdown and change this field to be aBoolean.The final field we will need to create should be called
UID. This field will be used to relate a task to a user. Mark this as a required field. In theData Typedropdown selectRelation to Entity.The
Related Entitydropdown should appear, selectUser. A modal asking to create a relation between a Task and a User will appear. ClickCreateto create the relation. To learn more about entity relations, there's an article on the docs website here.
Step 3 - Create a Role
Amplication allows for granular permission to create, read, update, and delete entries in the different entities of the backend.
User's who will be creating tasks in the Todo app will need to be granted certain permissions to create, read, and update their tasks and prevent them from doing other things.
Click the
Rolesicon on the left-hand panel.
Then, much like the properties, we added to the
Taskentity, create a role calledTodo User.
Step 4 - Assign Permissions
With a role for users of the Todo app created, we'll want to assign certain permissions to the Todo User role.
Click the
Entitiesicon on the left-hand panel.
By default, every role has CRUD (create, read, update, and delete) access to every entity. It is important to limit the scope of our Todo users.Select the
Userentity from the list of entities, and on the left-hand, panel selectPermissions. Every type of command is granted toAll Roles. Users with theUserorTodo Userrole have full access to theUserentity. This can be dangerous. The default admin account created by the backend has the roleUser, so we don't want to mess with that. What we will eventually do is have it so all new users are assigned theTodo Userrole, and we will limit their access to certain commands.Toggle the permissions for each of the entity's commands to
Granularand toggle on theUserrole. Now the only user who can accessUseraccounts will have theUserrole, which will belong only to the admin account.
Return to the
Entitiespage and now select theTaskentity. ClickPermissions. Toggle theDeletecommand, toGranularand enable access to theUserrole. BothUsers (the admin) andTodo Users (regular users of the app) will be able to create, read, and update tasks; but onlyUsers will be able to delete tasks.
Step 5 - Build the Backend
With the new Task entity created, and a relation with User's created. We're now ready to build the backend.
On the right-side panel is the Pending Changes where the changes to Task and User will appear.

Click
Commit changes & buildto finalize the changes as well as to deploy an instance of the backend into a sandbox environment.On the bottom of the page, there's a status button with the text
Preparing sandbox environment.... Clicking that will route you to a log of the backend being dockerized and deployed.
This takes a few minutes, but once complete you can see the backend by clicking theOpen Sandbox environment, but we will not be using the sandbox for the Todo app.
Amplication by default creates a secure environment where all requests need to be authenticated. For this use case, we will want to ease some of those protections. Thanks to Amplication's extensibility, we can build on top of everything that was generated for us.We'll start by downloading the backend. In the bottom right of the page, you'll see a download button. Click that and you'll download a
.zipfile containing all of the code to run the backend.
Extract the zip file and copy all of the contents (except for the
README.md) to the root of theamplication-reactproject.
Step 6 - Run the Backend
The
admin-uiandserverfolders generated by Amplication are two new node projects that need to be set up. One thing both will need is their dependencies. In thepackage.jsonupdate thepostinstallscript:"postinstall": "npm ci --prefix web && npm ci --prefix admin-ui && npm ci --prefix server"Open a new terminal and run the command below. This command will install the dependencies of all the subfolders. Another useful aspect of this command is that if you were to push this project to GitHub and cloned the repo when you run
npm installthis script will occur after the install to install the dependencies of the subfolders automatically.npm run postinstallThere will be some minor conflicts with the code
create-react-appcreated for us and the code Amplication created for us. This should be easy to correct though.Installcross-envandnpm-run-allas a dev dependency as follows:npm install -D cross-env npm-run-allUpdate the
startscript inpackage.jsonand add the script below as well. By doing this the Todo app UI will now run on port5000during development so it won't conflict with Amplication's default port for the server (which is3000).
We've also set the start to script to run our frontend and backend code at the same time."start": "npm-run-all -p start:frontend start:backend","start:frontend": "cross-env PORT=5000 npm --prefix web start","start:admin": "npm --prefix admin-ui start","start:backend": "npm --prefix server start",Before starting the server there are a few additional steps required. Read
server/README.mdfor directions to:- Create a Prisma client
- Start a database in Docker
- Initiate the database
When those steps have been completed run the following command:
npm run start
Step 7 - Wrap Up
The frontend of the Todo app will be running at http://localhost:5000/, and the backend will be running at http://localhost:3000/.
Visiting http://localhost:3000/ will greet you with a 404 error. Instead, visit http://localhost:3000/api/ to see all the endpoints of the backend and to see what our REST endpoints will look like.
With our backend created and running locally, we're almost ready to link it to the frontend. First, we'll need to make some additions to the code.
Check back next week for step three, or visit the Amplication docs site for the full guide now!
To view the changes for this step, visit here.
Original Link: https://dev.to/amplication/amplication-react-create-the-backend-43lf
Dev To
More About this Source Visit Dev To