
An Interest In:
Web News this Week
- April 27, 2024
- April 26, 2024
- April 25, 2024
- April 24, 2024
- April 23, 2024
- April 22, 2024
- April 21, 2024
Some of Our Sources
- BoingBoing
- Mashable
- TutsPlus - Code
- Pearsonified
- Fuel Your Creativity
- Naldz Graphics
- 24 Ways
- Web Resource Source
- Android Headlines
- Hashedout
Help Webnuz
Referal links:
Text Classification with HMS ML Kit Custom Model
We will see how we can classify texts with the Huawei HMS ML Kit custom model!
What is Text Classification?
Text Classification (text tagging or text categorization) provides to organize unstructured data by dividing the texts into groups in a certain way in order to extract values from these data with certain classifications. While it is an expensive process that causes a lot of time and resource consumption when done manually, the text can be automatically analyzed by machine learning method and quickly divided into predefined categories according to its content easily.
Huawei ML Kit Custom Model
One of the best features that ML Kit provides that allows you to customize models is the Custom Model feature. You can train your model quickly, flexibly and at low cost with the AI Create feature to quickly train and create the model you will use in your application.
Lets see how we do text classification using Huawei ML Kit Custom Model!
Before the start
1- Developer Account
You must have an AppGallery Console developer account.
If you do not have an account, you must create an account.
2- HMS Toolkit
Android Studio HMS Toolkit Plugin must be installed in order to use AI Create, where we will create our model.
Android Studio: File Settings Plugins HMS Toolkit
! IDE must be restarted after installation
Important: HMS Toolkit is expected to support Android Studio Bumblebee version from June 2022. It is currently available in the Android Arctic Fox version.
3- Python for ML Kit
AI Creator requires Python v3.7.5 for ML Kit use.
Complete your installation by downloading the Python 3.7.5 version from the Link.
Notes:
- Automatically select the process of adding the path during installation

- Make sure to install with pip selected during installation.
 -The path may conflict if there is another python version already installed. You have to uninstall the old version and install the new one.
 - If Android Studio is open after installing Python, it must be restarted.4- Data PreparationYou can use two types of text data in HMS ML Kit Text Classification.Training text in JSON format: The JSON text format is[{label: , text: },{label: , text: }]
[{label: category1, text: sample text},{label: category2, text: sample text},{label: category3, text: sample text}]Training text in TXT format: Classify the TXT files by category. ~80% of your data as train and ~10% as test dataset, should be foldered in the same wayNow we can start development!Text Classification Demo AppApp: When we provide news text, it will categorize the news text (sports, technology etc.)
 Project Steps1) Create Android ProjectLets start with creating an empty android project.Attention: The min sdk for text classification should be 22.2-)App Gallery Connection:2.1- A project is created from My Projects-> Add new project by going to the App Gallery Connect Console.2.2- Enable data processing location
  2.2- Adding App to Project2.3- Integrating the AppGallery Connect SDK in Android Studio:SDKs are added to the gradle file before the agconnect-services.json file (because we havent activated the ML kit service yet).
a) Project-level build.gradle
allprojects { repositories { // Add the Maven address. maven {url https://developer.huawei.com/repo/'} }}buildscript{ repositories { // Add the Maven address. maven { url https://developer.huawei.com/repo/' } } dependencies { // Add dependencies. classpath com.huawei.agconnect:agcp:1.5.2.300 }}b) App-level build.gradle
dependencies { // Add dependencies. implementation com.huawei.agconnect:agconnect-core:1.5.2.300}// Add the information to the bottom of the file.apply plugin: com.huawei.agconnect2.4- Enable ML Kit Service
My projects Project Build ML Kit (in left menu)
Then click enable now button
2.5- Add agconnect-services.json
top left menu - project settings app information download agconnect-services.json file
Then add it on your project to app directory in project view 
3) Model Creation
Requirements:
The number of image categories is at least 2
Each category contains at least 20 files. More files will guarantee a higher model precision.
The text size does not exceed 10 MB.
The file encoding format is UTF-8.
3.1) Coding Assistant
After installing HMS Toolkit Plugin in Android studio as we mentined earlier, you can see the HMS option.
HMS Coding Assistant AI AI Create Text Classification 
Attention: After this point, Mindspore that ML Kit uses in the base will be loaded, but you may encounter the following situation:


After clicking the ok button here, it will ask you to choose a path and save the mindspore file (.whl) to the location you selected.
- Open CMD from your computer and go to the path where the mindspore file is
cd Mindspore_Path
then install it with pippip install Mindspore_filename
3.2 ) Creating Model
In this section, we add the train dataset we prepared. 
- Currently, only Chinese and English are supported.
- When you press the Case1 and Case 2 options, you can obtain a sample data set.Case1: IMDB dataset (json format), Case2: News Categories (TXT format)
- If you are experienced in this field, you can change the iteration count and learning rate values with Advanced settings. 3.3) Testing ModelTrain and validate is 100% and when it is completed, you will see the accuracy values obtained as a result of the training in detail.You can also see your Final Test Accuracy value in Android Studio Event Logs.

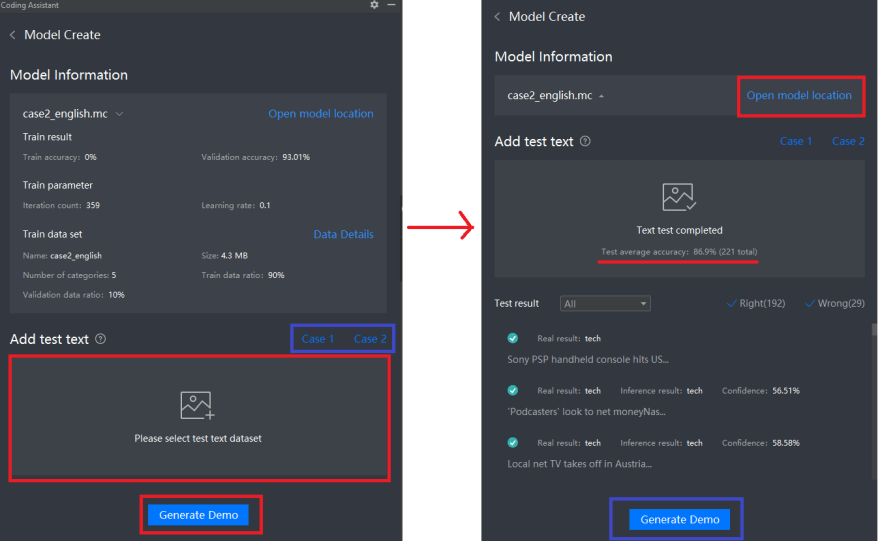 We will upload the test model we have prepared to test the model we have created.
 - Again with Case 1 and Case2, test datasets of the sample dataset given in the train can also be downloaded.When the test process is complete, you will see the Test average accuracy value.
- If you are not satisfied with the success of the model, you can increase your success rate by repeating the training steps with changes related to your data or advanced values.
- To use your model, you can use your saved model in your application by checking the open model location option.
- You can get a sample app file in java language integrated into your model by clicking Generate Demo.
4) Build an App
Add following dependencies to app level gradle file
implementation 'com.huawei.hms:ml-computer-model-executor:2.1.0.300'implementation 'mindspore:mindspore-lite:5.0.5.300'implementation 'com.huawei.hms:base:6.1.0.300'In addition, the .aar file added to the libs file is implemented in the gradle file at the App level.
implementation files('libs/ms-textclassifier-2.0.0.aar')
And the following section must be added under the app-level android section for our model file with .ms extension to work.
android { ... aaptOptions { noCompress "ms", "tflite" }}After training the model, our .mc extension model file is added to our project by creating the assets folder.
Required permissions are also added to the Android Manifest file
<uses-permission android:name="android.permission.WRITE_EXTERNAL_STORAGE" /><uses-permission android:name="android.permission.READ_EXTERNAL_STORAGE" /><uses-permission android:name="android.permission.INTERNET" />First of all, lets prepare our XML file, where our application will find the category by classifying the news after the text is entered:
<?xml version="1.0" encoding="utf-8"?><LinearLayout xmlns:android="http://schemas.android.com/apk/res/android" xmlns:tools="http://schemas.android.com/tools" android:layout_width="match_parent" android:layout_height="match_parent" android:orientation="vertical" tools:context=".MainActivity"> <LinearLayout android:layout_width="match_parent" android:layout_height="wrap_content" android:background="#D6F2F2F2"> <TextView android:layout_width="wrap_content" android:layout_height="48dp" android:textSize="18sp" android:text="News Classification" android:gravity="center_vertical" android:layout_marginTop="25dp" android:layout_marginLeft="20dp"/> </LinearLayout> <LinearLayout android:layout_width="match_parent" android:layout_height="match_parent" android:orientation="vertical" android:background="#FFFFFF" android:padding="15dp"> <EditText android:id="@+id/input_data_edt" android:layout_width="match_parent" android:layout_height="140dp" android:textSize="15sp" android:gravity="top" android:padding="5dp" android:background="@drawable/edittext_background" android:layout_marginTop="20dp"/> <LinearLayout android:layout_width="match_parent" android:layout_height="wrap_content" android:layout_marginTop="40dp"> <Button android:id="@+id/clear_btn" android:layout_width="0dp" android:layout_height="40dp" android:layout_weight="1" android:textSize="15sp" android:textColor="@color/red" android:text="CLEAR" android:background="@drawable/btn_background_gray" /> <Button android:id="@+id/identification_btn" android:layout_width="0dp" android:layout_height="40dp" android:layout_weight="1" android:textSize="15sp" android:textColor="#005BBA" android:text="PREDICT" android:layout_marginLeft="40dp" android:background="@drawable/btn_background_gray"/> </LinearLayout> <TextView android:id="@+id/label_data_txt" android:layout_width="match_parent" android:layout_height="wrap_content" android:textSize="15sp" android:layout_marginTop="40dp" android:visibility="gone"/> </LinearLayout></LinearLayout>Next, lets create a ModelDetector class. In this class, after the user enters the text, when triggered, we will take our model from the asset and make it predict with mindspore.
fun loadFromAssets() { classifier = TextClassifier(context, MODEL_NAME) if (classifier!!.isHighAccMode) { val resName = "text_classifier.mc" if (!classifier!!.loadHighAccModelRes(context.assets.open(resName))) { Log.e(TAG, "load high acc model res error") return } } //load minspore model loadMindsporeModel() }The loadFromAssets method calls our model that we added to the assets and triggers Mindspore
private fun loadMindsporeModel() { val resDir = context.filesDir val resFilePath = resDir.toString() + File.separator + "news_classification.ms" val fos = FileOutputStream(resFilePath) fos.write(classifier!!.msModelBytes, 0, classifier!!.msModelBytes.size) fos.close() val localModel = MLCustomLocalModel.Factory(mModelName).setLocalFullPathFile(resFilePath).create() val settings = MLModelExecutorSettings.Factory(localModel).create() try { modelExecutor = MLModelExecutor.getInstance(settings) loadMindsporeModelOk = true } catch (error: MLException) { error.printStackTrace() } }loadMindsporeModel method
fun getMaxProbLabel(probs: FloatArray): String { Log.d(TAG, Arrays.toString(probs)) var maxLoc = -1 var maxValue = Float.MIN_VALUE for (loc in probs.indices) { if (probs[loc] > maxValue) { maxLoc = loc maxValue = probs[loc] } } return classifier!!.labels[maxLoc] } fun softmax(logits: FloatArray): FloatArray { var maxValue = Float.MIN_VALUE for (i in logits.indices) { maxValue = Math.max(maxValue, logits[i]) } val ans = FloatArray(logits.size) var sumExp = 0.0f for (i in ans.indices) { ans[i] = Math.exp((logits[i] - maxValue).toDouble()).toFloat() sumExp += ans[i] } for (i in ans.indices) { ans[i] = ans[i] / sumExp } return ans }softmax provides us with the calculation of probabilities for each category, while getMaxProbLabel determines the label with the highest probability.
In MainActivity.class, we trigger it to predict when the buttons we initiate are clicked.
private fun bindEvents() { identificationBtn!!.setOnClickListener(View.OnClickListener { if (!detector!!.isReady) { Toast.makeText(this@MainActivity, "Model not ready", Toast.LENGTH_SHORT).show() } else { val inputData = inputEdt!!.text.toString() if (TextUtils.isEmpty(inputData)) { Toast.makeText(this@MainActivity, "Please enter the text to be recognized ", Toast.LENGTH_SHORT).show() return@OnClickListener } getLabelResult(inputData) } }) clearBtn!!.setOnClickListener { inputEdt!!.setText("") labelTxt!!.visibility = View.GONE } }When identificationBtn is clicked, it returns us the result. When clearBtn is clicked, we ensure that the text is cleared.
private fun getLabelResult(inputData: String) { val start = System.currentTimeMillis() detector!!.predict(inputData, { mlModelOutputs -> Log.i("hiai", "interpret get result") val result = mlModelOutputs!!.getOutput<Array<FloatArray>>(0) val probabilities = detector!!.softmax(result[0]) val resultLabel = detector!!.getMaxProbLabel(probabilities) showResult(resultLabel) Toast.makeText(this@MainActivity, "success", Toast.LENGTH_SHORT).show() Log.i("hiai", "result: $resultLabel") }, { e -> e.printStackTrace() Log.e("hiai", "interpret failed, because " + e.message) Toast.makeText(this@MainActivity, "failed", Toast.LENGTH_SHORT).show() }) Log.i("hiai", "time cost:" + (System.currentTimeMillis() - start)) labelTxt!!.visibility = View.VISIBLE }getLabelResult returns the result by calling the prediction methods we wrote on the ModelDetector side.
Thats it!
App Result
For full code Github
Conclusion
As a result, HMS ML Kit Custom Model Text Classification enables us to integrate machine learning into our project to help developers quickly, easily and at low cost.
Glad if it helped, thanks for reading!
Ill be waiting for your comments and claps!
References
TextClassification
AiCreate
developer.huawei.com
Original Link: https://dev.to/hdgurkey/text-classification-with-hms-ml-kit-custom-model-ob7
Dev To
More About this Source Visit Dev To