
An Interest In:
Web News this Week
- April 2, 2024
- April 1, 2024
- March 31, 2024
- March 30, 2024
- March 29, 2024
- March 28, 2024
- March 27, 2024
Some of Our Sources
- Techcrunch
- Team Treehouse
- Just Creative
- TutsPlus - Design
- Vandelay Design
- Creative Curio
- Web Designer Depot
- Naldz Graphics
- Design Modo
- Android Headlines
Help Webnuz
Referal links:
Build Hadoop 2.X Fully distributed Environment by Ubuntu 16.04
1.Experimental model and architecture description
2.Basic environment configuration
3.JDK Hadoop environment configuration
4.Hadoop configuration file modification
5.Start Hadoop cluster (all in AdServer operation)
1.Experimental model and architecture description
Written in the front, these pictures are from another blog of mine. Don't worry
My Chinese Blog:CSDN Address
This experiment uses three Ubuntu 16 04 instance
| HostName | IPAddress | OS | Running Services | Role |
|---|---|---|---|---|
| adserver | 192.168.200.10 | ubuntu 16.04 | NameNodeSecondaryNameNodeResourceManagerJobHistoryServer | Master |
| monserver | 192.168.200.20 | ubuntu 16.04 | DataNodeNodeManager | Slave |
| osdserver-1 | 192.168.200.30 | ubuntu 16.04 | DataNodeNodeManager | Slave |
2.Basic environment configuration
Change Hostname and the network interface name
Ubuntu 16.04 static IP address only
- Check the IP address first

Modify the network card configuration file to make it a static IP address. After modification, restart the instance to take effect$ sudo vi /etc/network/interfaces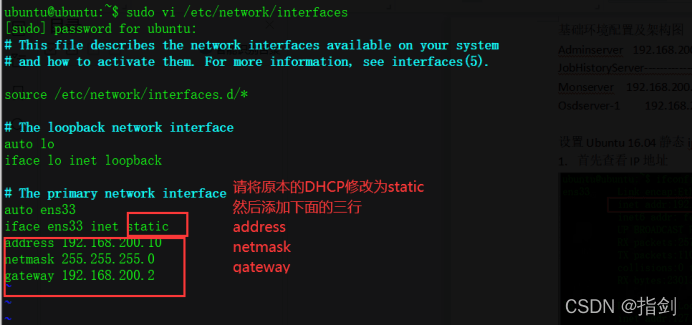
Modify host name, use here
$ sudo hostnamectl set-hostname YOUR_HOSTNAME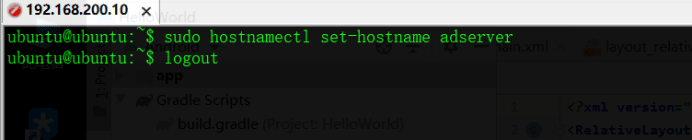

Modify hosts and configure FQDN domain name

Create Hadoop users and configure password free login. Each node needs to be configured
sudo useradd -d /home/hadoop -m hadoop sudo passwd hadoop echo "hadoop ALL = (root) NOPASSWD:ALL" | sudo tee /etc/sudoers.d/hadoop sudo chmod 0440 /etc/sudoers.d/hadoop
To configure SSH password free login, you need to install openssh-server(sudo apt get install openssh-server) first
ubuntu@adserver:~$ ssh-keygen ubuntu@adserver:~$ ssh-copy-id adserverubuntu@adserver:~$ ssh-copy-id monserverubuntu@adserver:~$ ssh-copy-id osdserver-1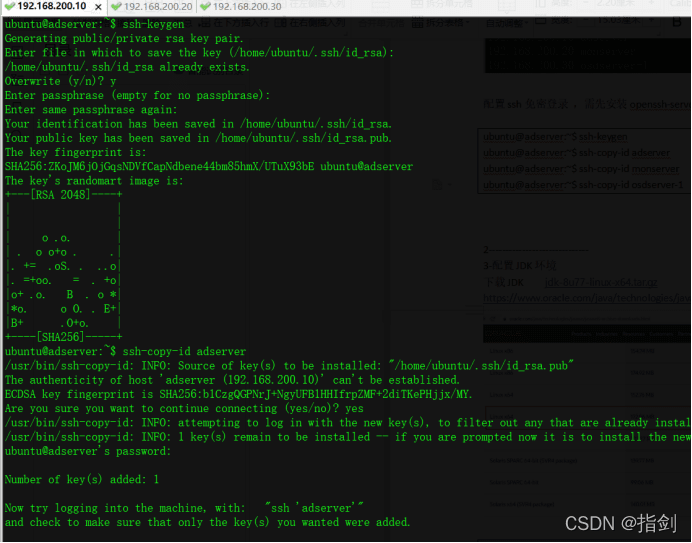

ubuntu@adserver:~$ ssh-copy-id -i .ssh/id_rsa.pub hadoop@adserver ubuntu@adserver:~$ ssh-copy-id -i .ssh/id_rsa.pub hadoop@monserver ubuntu@adserver:~$ ssh-copy-id -i .ssh/id_rsa.pub hadoop@osdserver-1 

3.JDK Hadoop environment
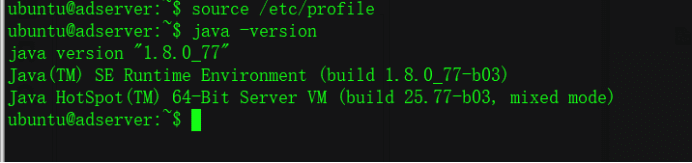
1. Configure JDK environment. Jdk-8u77 is used here
Download JDK jdk-8u77-linux-x64.tar.gz
https://www.oracle.com/java/technologies/javase/javase8-archive-downloads.html
ubuntu@adserver:~$ ls -lhtotal 173M-rw-rw-r-- 1 ubuntu ubuntu 173M Mar 28 09:11 jdk-8u77-linux-x64.tar.gzubuntu@adserver:~$ tar -zxf jdk-8u77-linux-x64.tar.gz ubuntu@adserver:~$ ls -lhtotal 173Mdrwxr-xr-x 8 ubuntu ubuntu 4.0K Mar 21 2016 jdk1.8.0_77-rw-rw-r-- 1 ubuntu ubuntu 173M Mar 28 09:11 jdk-8u77-linux-x64.tar.gz
ubuntu@adserver:~$ sudo mkdir /usr/lib/jdk ubuntu@adserver:~$ sudo mv jdk1.8.0_77/ /usr/lib/jdk/ubuntu@adserver:~$ sudo ls /usr/lib/jdk/jdk1.8.0_77
ubuntu@adserver:~$ sudo vi /etc/profile Add JDK environment#JDKexport JAVA_HOME=/usr/lib/jdk/jdk1.8.0_77 export JRE_HOME=${JAVA_HOME}/jre export CLASSPATH=.:${JAVA_HOME}/lib:${JRE_HOME}/lib export PATH=${JAVA_HOME}/bin:$PATH

2. Configure Hadoop environment
Download HadoopHadoop-2.7.2
Download Link
https://archive.apache.org/dist/hadoop/core/hadoop-2.7.2/hadoop-2.7.2.tar.gz
Unzip
ubuntu@adserver:~$ tar -zxf hadoop-2.7.2.tar.gz ubuntu@adserver:~$ ls -lh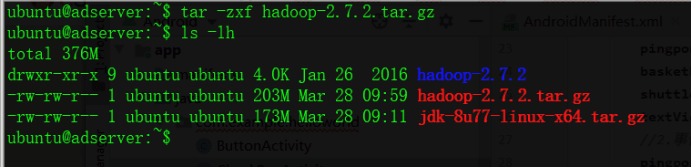
Move Hadoop to /usr/local/ directory
Add Hadoop environment variable
$ sudo vi /etc/profile#HADOOPexport HADOOP_HOME=/usr/local/hadoop-2.7.2export PATH=$HADOOP_HOME/bin:$HADOOP_HOME/sbin:$PATHexport HADOOP_CONF_DIR=$HADOOP_HOME/etc/hadoop
$ vi ~/.bashrc#HADOOPexport HADOOP_HOME=/usr/local/hadoop-2.7.2export PATH=$HADOOP_HOME/bin:$HADOOP_HOME/sbin:$PATHexport HADOOP_CONF_DIR=$HADOOP_HOME/etc/hadoop
$ source /etc/profile$ source ~/.bashrc$ hadoop version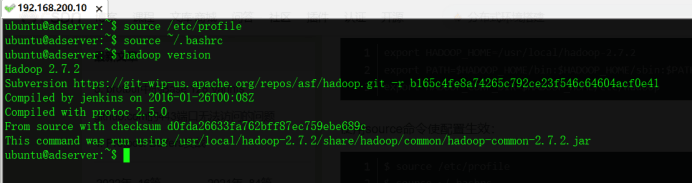
4.Hadoop configuration file modification
Modify Hadoop configuration file
Modify the /hadoop-2.7.2/etc/hadoop directory hadoop-env.shyarn-env.shslavescore-site.xmlhdfs-site.xmlmapred-site.xmlyarn-site.xml
1. Create the tmp folder and its subdirectories under the Hadoop directory
ubuntu@adserver:~$ sudo mkdir -p /usr/local/hadoop-2.7.2/tmp/dfs/dataubuntu@adserver:~$ sudo mkdir -p /usr/local/hadoop-2.7.2/tmp/dfs/name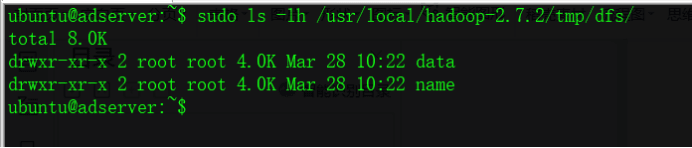
Modify profile:
First enter the corresponding folder
ubuntu@adserver:~$ cd /usr/local/hadoop-2.7.2/etc/hadoop/
2. Add Java_ Home to Hadoop environment profile
Add Java home to Hadoop env sh
export JAVA_HOME=/usr/lib/jdk/jdk1.8.0_77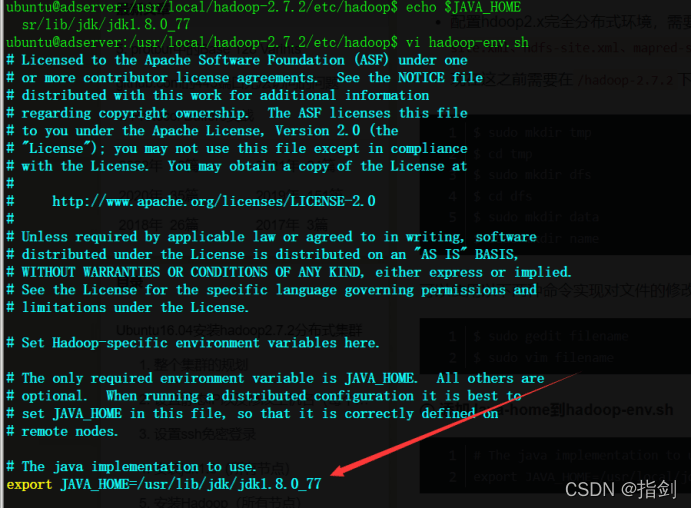
Add Java home to yarn env SH, just add it directly in the first line
export JAVA_HOME=/usr/lib/jdk/jdk1.8.0_77
Add slave hostname to slave
ubuntu@adserver:/usr/local/hadoop-2.7.2/etc/hadoop$ vi slaves monserverosdserver-1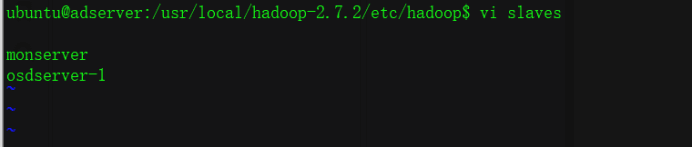
3. Modify the corresponding configuration file
Modification core-site.xml
ubuntu@adserver:/usr/local/hadoop-2.7.2/etc/hadoop$ vi core-site.xml Add the following contents to <configuration></configuration>
<property> <name>fs.defaultFS</name> <value>hdfs://adserver:8020</value> </property> <property> <name>hadoop.tmp.dir</name> <value>file:/usr/local/hadoop-2.7.2/tmp</value> <description>Abase for other temporary directories.</description> </property>
Modify hdfs-site.xml file,
ubuntu@adserver:/usr/local/hadoop-2.7.2/etc/hadoop$ vi hdfs-site.xml Add the following contents to <configuration></configuration>
<property> <name>dfs.namenode.secondary.http-address</name> <value>adserver:50090</value> </property> <property> <name>dfs.namenode.name.dir</name> <value>file:/usr/local/hadoop-2.7.2/tmp/dfs/name</value> </property> <property> <name>dfs.datanode.data.dir</name> <value>file:/usr/local/hadoop-2.7.2/tmp/dfs/data</value> </property> <property> <name>dfs.replication</name> <value>3</value> </property> <property> <name>dfs.webhdfs.enabled</name> <value>true</value> </property>
Modify mapred-site,xml, you need to copy the file as mapred-site.xml, and then
ubuntu@adserver:/usr/local/hadoop-2.7.2/etc/hadoop$ cp mapred-site.xml.template mapred-site.xmlubuntu@adserver:/usr/local/hadoop-2.7.2/etc/hadoop$ vi mapred-site.xmlAdd the following contents to <configuration></configuration>
<property> <name>mapreduce.framework.name</name> <value>yarn</value> </property> <property> <name>mapreduce.jobhistory.address</name> <value>adserver:10020</value> </property> <property> <name>mapreduce.jobhistory.webapp.address</name> <value>adserver:19888</value> </property>
Modify yarn-site.xml
ubuntu@adserver:/usr/local/hadoop-2.7.2/etc/hadoop$ vi yarn-site.xml Add the following contents to <configuration></configuration>
<property> <name>yarn.nodemanager.aux-services</name> <value>mapreduce_shuffle</value> </property> <property> <name>yarn.resourcemanager.scheduler.address</name> <value>adserver:8030</value> </property> <property> <name>yarn.resourcemanager.address</name> <value>adserver:8032</value> </property> <property> <name>yarn.resourcemanager.resource-tracker.address</name> <value>adserver:8031</value> </property> <property> <name>yarn.resourcemanager.admin.address</name> <value>adserver:8033</value> </property> <property> <name>yarn.resourcemanager.webapp.address</name> <value>adserver:8088</value> </property>
4.Use the SCP command to add /etc/hosts, /etc/profile, ~/.bashrc, JDK and Hadoop are distributed to two slave nodes respectively. Here is only a demonstration of copying to monserver
ubuntu@adserver:~$ scp /etc/hosts ubuntu@monserver:~/ubuntu@adserver:~$ scp -r /etc/profile ubuntu@monserver:~/ ubuntu@adserver:~$ scp -r .bashrc ubuntu@monserver:~/ ubuntu@adserver:~$ scp -r /usr/local/hadoop-2.7.2/ ubuntu@monserver:~/ubuntu@adserver:~$ scp -r /usr/lib/jdk/ ubuntu@monserver:~/![]()


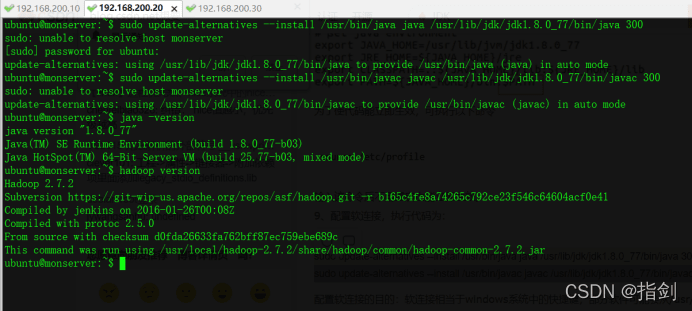
ubuntu@monserver:~$ sudo mv hosts /etc/hostsubuntu@monserver:~$ sudo mv hadoop-2.7.2/ /usr/local/ubuntu@monserver:~$ sudo mv jdk/ /usr/lib/ ubuntu@monserver:~$ sudo update-alternatives --install /usr/bin/java java /usr/lib/jdk/jdk1.8.0_77/bin/java 300 ubuntu@monserver:~$ sudo update-alternatives --install /usr/bin/javac javac /usr/lib/jdk/jdk1.8.0_77/bin/javac 300ubuntu@monserver:~$ source /etc/profileubuntu@monserver:~$ source .bashrc ubuntu@monserver:~$ java -versionubuntu@monserver:~$ hadoop version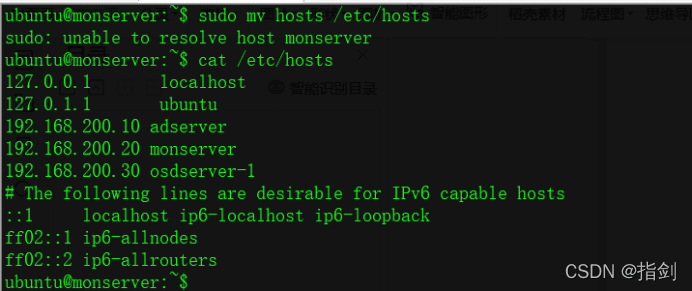
Set the folder permissions of all nodes hadoop-2.7.2 to 0777
Set the folder permissions of all nodes hadoop-2.7.2 to 0777
Set the folder permissions of all nodes hadoop-2.7.2 to 0777
ubuntu@adserver:~$ sudo chmod -R 0777 /usr/local/hadoop-2.7.2ubuntu@monserver:~$ sudo chmod -R 0777 /usr/local/hadoop-2.7.2ubuntu@osdserver-1:~$ sudo chmod -R 0777 /usr/local/hadoop-2.7.2
5.Start Hadoop cluster (all in AdServer operation)
initialization namenode
ubuntu@adserver:~$ hadoop namenode -format
Note: initialization is required for the first run, but not after.
If it runs successfully, it should return exiting with status 0 and prompt shutting down namenode at AdServer/xxx.xxx.xxx.XX (IP address of AdServer). The specific results are shown in the figure below
Start Hadoop daemons (namenode, datanode, ResourceManager, nodemanager, etc.)
AStart namenode, secondarynamenode and datanode first
Execute on the AdServer node
ubuntu@adserver:~$start-dfs.sh
At this time, the processes running on the master node areNameNodeSecondaryNameNode
At this time, the processes running on the slave node areDataNode


BStart ResourceManagerNodeManager
$ start-yarn.sh
Yarn is separated from MapReduce and is responsible for resource management and task scheduling. Yarn runs on MapReduce and provides high availability and scalability
At this time, the processes running on the master node areNameNodeSecondaryNameNodeResourceManager
The processes running on the slave node areDataNodeNodeManager
CStart JobHistoryServer
$ mr-jobhistory-daemon.sh start historyserverNote: a jobhistoryserver process will be added to the master node
After TMP and logP directories on each node are created several times, be sure to delete them again
View the operation status of three nodes
ubuntu@adserver:~$ jpsubuntu@adserver:~$ ssh monserver "/usr/lib/jdk/jdk1.8.0_77/bin/jps"ubuntu@adserver:~$ ssh osdserver-1 "/usr/lib/jdk/jdk1.8.0_77/bin/jps" 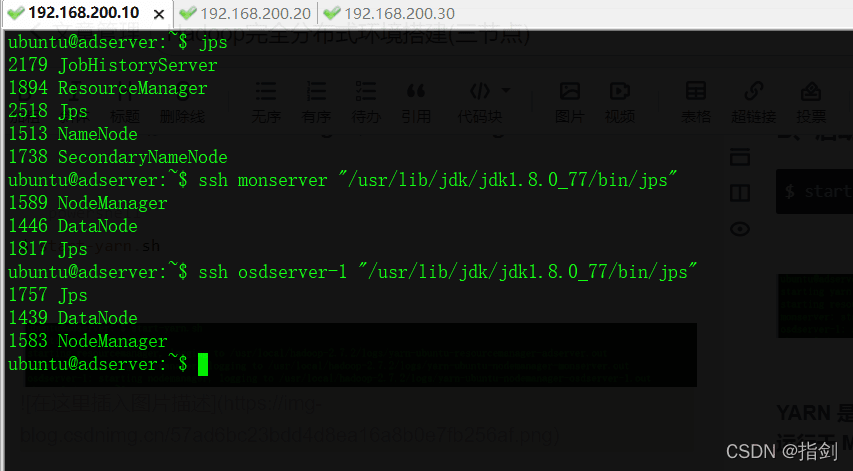

If this article is helpful to you, please like it. Thank you,Have a Nice Day!!!!!
Original Link: https://dev.to/leifengflying/build-hadoop-2x-fully-distributed-environment-by-ubuntu-1604-173c
Dev To
More About this Source Visit Dev To