
An Interest In:
Web News this Week
- April 27, 2024
- April 26, 2024
- April 25, 2024
- April 24, 2024
- April 23, 2024
- April 22, 2024
- April 21, 2024
Some of Our Sources
- Slashdot
- Technology Review
- Web Designer Wall
- Team Treehouse
- You The Designer
- Web Designer Depot
- Reencoded
- Specky Boy
- Spyre Studios
- Codrops
Help Webnuz
Referal links:
How To Deploy And Verify A Smart Contract From Remix
Remix IDE is a convenient tool for building and testing your solidity smart contracts online. This short tutorial will explain how we can build and deploy our smart contract from Remix.
// SPDX-License-Identifier: GPL-3.0pragma solidity >=0.7.0 <0.9.0;contract Destructor { uint256 public num; constructor(uint256 _num){ num = _num; } function doWork() external { selfdestruct(payable(0)); } function getNum() public view returns(uint){ return num; }}Deploying a contract
Above we have a simple Destructor contract which was built and tested using the online Remix IDE. To deploy this contract select the Deploy & Run Transactions tab; selectinjected Web3` as your environment. This will connect to the network that your wallet is connected to.

Set the input value of the constructor function if your contract has one before deploying it. Clicking on deploy will open meta mask which will ask you to confirm the transaction. After confirming the transaction, the contract will be deployed to the network.
Verifying deployed contract
You can verify your contract via Remix by using a plugin called ETHERSCAN-CONTRACT VERIFICATION. Click on the plugin manager icon. Search for the plugin ETHERSCAN-CONTRACT VERIFICATION and activate the plugin. After activation your Etherscan API key will be requested.
You can obtain an API key on etherscan. Registering for a free account and create an API key.

After saving your key on the Etherscan-Contract Verification plugin, a screen will be presented where you enter the details of the just deployed smart contract.

You will have to present three (3) values to the Etherscan plugin which are the contract to verify, the constructor arguments and the address of the deployed smart contract.
If the contract has a constructor with values supplied you will need to go to etherscan and retrieve the constructor argument bytes. We do this by copying the transaction hash which can be found on the console of remix.

Take the transaction hash and go to etherscan.io and input the hash on the search bar to retrieve the transaction. Remember if you deployed to a testnet you will have to search for your transaction on the testnet and not on the mainnet.
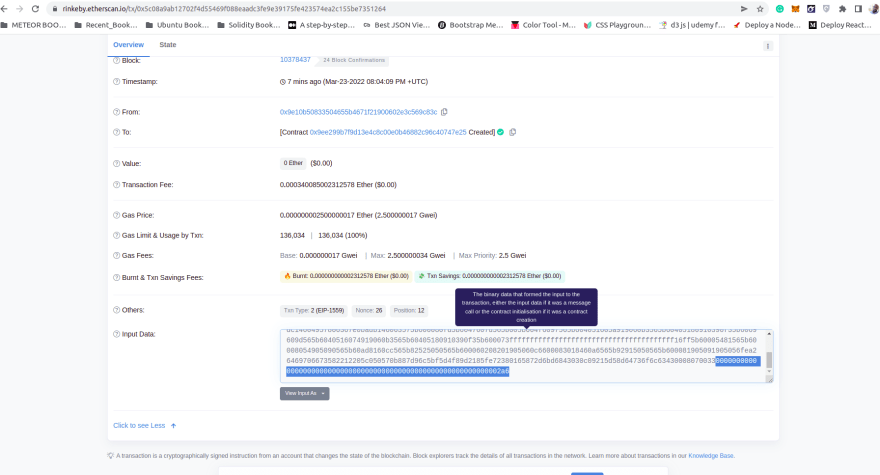
The transaction will be displayed. Scroll down on the transaction page and click on the click to see more button.

The more tab opens and you will see an Input Data textarea which contains the contract bytecode. We want to copy only the input byte of the constructor from this bytecode. The input byte is appended to the end of the bytecode. Search for the number 70033 inside the textarea. The input byte starts after the last 3 in 70033. Copy the remaining number after the last 3 to the end. The copied number is the input byte.
Go back to Remix IDE and input the copied byte inside the Constructor Arguments input box and also select the contract that you are verifying and input the contract address. Click on verify contract and the deployed contract will become verified.
Go to etherscan and search using the deployed contract address and you will see that your contract is now verified.
Original Link: https://dev.to/jamiescript/how-to-deploy-and-verify-a-smart-contract-from-remix-42gl
Dev To
More About this Source Visit Dev To