
An Interest In:
Web News this Week
- April 27, 2024
- April 26, 2024
- April 25, 2024
- April 24, 2024
- April 23, 2024
- April 22, 2024
- April 21, 2024
Some of Our Sources
- Slashdot
- Joshua Blankenship
- Spoon Graphics
- Smashing Apps
- Fuel Your Creativity
- Inspiredology
- Reencoded
- 24 Ways
- CSS Tricks
- Dev To
Help Webnuz
Referal links:
Understanding Advance Git
Branches
Git branching allows developers to diverge from the production version of code to fix a bug or add a feature.
Here is an example of how git branches are helpful. Let's say you need to work on a new website feature, create a branch and checkout to the new branch, and start working. Once you complete new features, you can merge your changes to the master branch.
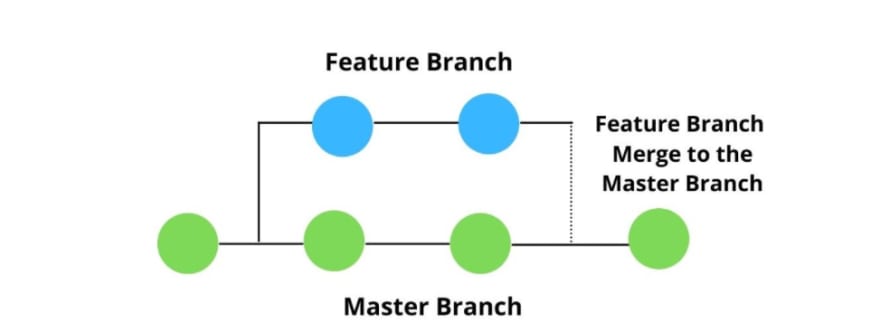
As shown in the image above, we have a default branch, the master branch. To add new features to the project, we can easily create a new branch and start working; someone else from the team member can also contribute to the Repository by creating a new branch.
How to create a branch
Option 1: Creating a branch & Checkout
You can create your new branch with the following command.
git branch <new_branch>Replace with whatever name you want.
and with the following command, you can list the branches
git branchThe current local branch will be marked with an asterisk (*).
If the asterisk is not visible on your new branch, it means you are not on the new branch. With the following command, you can easily check out the new branch.
git checkout <new_branch>Now, you can use the git branch to check which branch you are currently using. The current branch will be marked with an asterisk(*).
Option 2: Creating a branch using checkout
Through this command, you can easily create a new branch and checkout to the branch simultaneously.
git checkout -b <another_branch>And with the git branch you can check on which branch you are currently. The current branch will be marked with an asterisk(*).
delete a branch
To delete the local branch, use the following command.
git branch -d my-branch-nameThe -d option only deletes the branch if it has already been merged. The -D option is a shortcut for --delete --force, which deletes the branch irrespective of its merged status.
git branch -D my-branch-namemerging
Once you complete your work with the branches, you need to use the Merge method. Merging takes your branch changes and merges them to the main branch, the master branch, by default. Depending on the commit history, git performs two ways of merging.
- Fast-forward or two-way merging
- Three-way merging
Fast-forward
In the Fast Forward method, where merging includes only snapshots, let me clear more with an example. Let's say you have completed your work on the feature branch (which is your new branch), and you merge the changes with the master branch, which is the default branch in git. Assume that the master branch has no more commits from the time you created a new branch.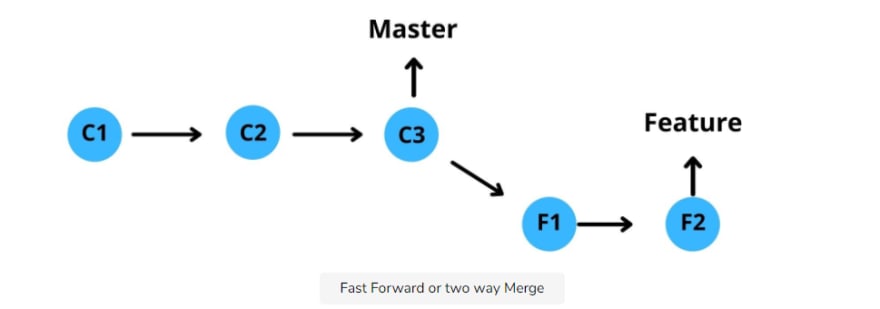
When the feature branch has to be merged with the master branch, the two of the most recent commits on either of these branches, C3 and F2, compare and merge automatically, unless no merge conflict error occurredcalled fast forward or two-way merge.
Three-way merge (or recursive)
The Three-Way process involves three snapshots, two of the snapshots are involved in the two-way process (Fast-Forwarding) as already discussed. The third one is the base file or the Parent, with which two files are compared.

As you see, C3 is the Parent with which C4 and F2 files are compared for merging.
How merging works
As we have already discussed Merge in detail, let's do some practical hands-on. We have also learned how to create a new branch, the file created inside the new branch will not be accessible to the master branch, which is our default branch in Git, until we merge the new branch with the master branch.
Merging branches in a local repository
Use git checkout to switch the branch you want to merge into to merge locally. The branch we usually switch first is typically the master branch, which is the default branch. Next, use the git merge and specify the branch name to merge the new branch with the master branch. This method is also called Fast Forward Merge.
Create a new branch using the command git branch new branch you can change the new branch name specifically to your project feature, for example, dev branch and you can easily checkout using the git checkout command when you create a new file in the new branch you need to follow the staging and committing procedure. Once the process is completed, you can follow the commands given below;
git checkout mastergit merge <newbranch>Aborting merge
You can also abort the merging process in case of merge conflict issues with the following command.
git merge --abortMerge only one specific commit
Sometimes we need to merge a specific commit; use cherry-pick. Let's discuss what cherry-pick is.
Cherry-pick
Cherry-pick allows you to choose the specific existing commit to include in another branch, and with the help of cherry-picking, you can merge a particular commit of exiting.

Create a new branch, checkout to the new branch, add the files, stage, and then commit your changes in the new branch. Use the following command to get the specific commit ID.
git log --pretty=format:"%h %s" You can easily merge the specific commit ID to the default branch master using commit ID. Once copied, the commit ID is then checked out to the master branch and used the following command.
git checkout mastergit cherry-pick 12670fdGit stash
According to the Atlassian
The Git Stash command takes your uncommitted changes(both staged and unstaged changes), saves them for later on, and then revert them from your working copy.
It is a way to store any uncommitted changes and revert your file to the last commit. Then you can do any other git command during this time. When ready, you can reapply your stored changes into your working directory.
Why should we use git stash
Imagine the scenario, you are working on a new feature branch for a project. A Developer asks for some help and wants you to check something in another branch. However, the changes you made in the new feature branch are not entirely committed. Here, git stash comes in handy; instead of making half-completed commits, you can temporarily save your uncommitted changes using git stash. Then you can safely check out to another branch. When you are finished helping the developer, you can return to your branch and continue exactly where you left.
How to use git stash
These are the two basic commands which we will use.
Use this command to stash your current work.
git stashUse this command to reapply your stashed work back to your working area, and with this command, you can remove it from the stash.
git stash popgitignore
.gitignore file is a file that specifies the files or folders that we want to ignore.
Let's say we want to ignore a text file; with the help of the .gitignore file, we can easily ignore the text file. Assume that you created a
readme.txtfile in my working directory, and you want to ignore the file; write the readme.txt file to the.gitignorefile.And if you want to ignore files using the extensions, write the
*.txtto the.gitignorefile.Let's say you want to ignore a folder. Assume that you are working on a python project and usually use the venv environment in python. You can write the
venv/to the.gitignorefile to overlook this folder.
How does gitignore work?
From the Git bash terminal, we can easily create the .gitignore file.
touch .gitignoreWhile using Vim to edit the .gitignore file, you can edit the file from the terminal with this command,
vi .gitignore
- Press I key to insert text into the .gitignore file
- to quit :wq to successfully write and leave from the vim editor.
With the git status command, you can check whether the file is ignored or not.
releases & version tags
Tags are a simple aspect of git; they allow you to identify specific release versions of code. You can think of a tag as a branch that does not change. Once you create the tag, it loses the ability to change the history of commits.
There are two types of git tags.
- Annotated tags
- Lightweight tags
Annotated tags
Annotated tags store metadata such as author name, release notes, tag message, and data stored as an object in the git database. All this data is important for the public release of the project.
To create a tag using the following command.
git tag -a v1.0.0In case if you want to add a tag message, then use the following command.
git tag -a v1.0.0 -m " Release version v1.0.0"Lightweight tags
Lightweight tags are the simplest way to add a tag to your git repository because they store only the hash of commit as lightweight tags do not contain extra information.
Lightweight tags are essentially bookmarks to a commit; they are just a name and pointer to commit. - Bitbucket
To create lightweight tags, you can use the following command.
git tag v2.0.0What have we learned so far?
We learned different advanced concepts of Git, containing branches, merging, cherry-pick, and tags. As these concepts are a bit hard for beginners, but if you focus more on the hands-on git commands, you can easily get the concepts of the git advance features, as we discuss every topic in detail, this is a brief overview of some git advance commands.
To list branches, we use the command
git branchand to create the branch, we usegit branch new branchand then switch to the new branch we use the commandgit checkout new branch.To merge the new branch with the default branch, first, we need to switch back to the default branch with the following command
git checkout masterand then we can merge the new branch to the default branch with the following commandgit merge new branch.To merge a specific commit, we learn about the cherrypick, with the following command, we can merge a specific commit
git cherrypick <commit-ID>
Please feel free to use the terminal for the git commands so that you can learn and have hands-on experience with the git advance commands. Please follow up as I already added the working on every git command.
Summary
This lesson mainly dealt with the advanced git concepts; as we covered branches and why we use branches, we learned advanced concepts of Git. In the next lesson, we will learn about the Git remote repositories, why we use git remote repositories, and How to learn about a handy tool: GitHub.
If you have any question, please feel free to connect with me on LinkedIn.
Original Link: https://dev.to/adilshehzad786/understanding-advance-git-1lh2
Dev To
More About this Source Visit Dev To