
An Interest In:
Web News this Week
- April 26, 2024
- April 25, 2024
- April 24, 2024
- April 23, 2024
- April 22, 2024
- April 21, 2024
- April 20, 2024
Some of Our Sources
- Mashable
- Team Treehouse
- Six Revisions
- Creative Curio
- Web Designer Depot
- Naldz Graphics
- FanExtra - PSD
- My Ink Blog
- Web Design Ledger
- Hashedout
Help Webnuz
Referal links:
Product developers guide to customize data for AI Part 2: Join & merge dataframes
TLDR
Before training ML models from multiple datasets, we need to understand how to relate datasets together. Well cover how to look at relationships in data using join and merge.
Outline
- Introduction
- Before we begin
- Relationships
- Merge Dataframes
- Join Dataframes
- Conclusion
Introduction
In this guide well go over one of the most core concepts in AI that most search for today, how to combine dataframes with join, merge, or concat. Welcome to the 2nd part of the Product developers guide to customizing data for AI. In this article well go over intermediate concepts and run through examples using merge and join in Pandas. Well look at the relationships between the email content dataset and user email dataset. By the end of this series, youll be ready to tackle designing datasets in order to begin training machine learning models.
Before we begin
In this guide, well reuse our email_content dataset and include the user_email dataset. Like all other guides, well be using Google Collab and start by importing those datasets into dataframes. There will be references back to part 1 where we looked at folding, and basic set relations and continue off from there. If you arent familiar with transforming or sorting data, please read our introductory guide before continuing.
 Read from the start
Relationships
Previously, we covered unions and intersections by concatenating dataframes. Building off of it, we introduce relative joins to always include a certain set.
Relative joins
Another type of join is based on a certain side of the dataset. In set theory this is called a relative join, and contains everything on 1 side. In our case of having 2 datasets, we have 2 sides, the left side and the right side.
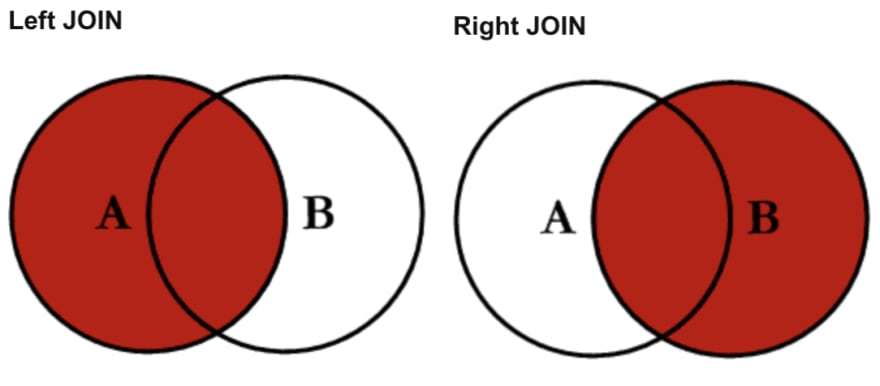 Include all values from the set (Source: CodeProject)
Merge dataframes
In Pandas, the merge function can be used together with keys, or unique pairs used to form the relationships seen in above. These are demonstrated best when there is data that is unique to both dataframes, in other words when the data doesnt always exist.
Our starting dataframes are too ideal, so well begin by spliting them to make it more realistic for an email campaign. Well take the leading 60 rows of the email_content, then ignore the 1st 10 email_id values from user_email.

 This results in missing keys for email_id at the start, and id at the end
 The left contains values not in the right, and the right contains values not in the left (Source: SO)
We can use merge to establish the same relationships from our previous section, completing an inner and outer join as an intersection or union. Merge is quite useful when the columns names dont match but we still want to relate them together. In this case our matching keys are the id in the campaign and email_id of the inbox.
Intersection
To perform an intersection, we need 2 matching keys, and pass how=inner. To check our result by an additional parameter called indicator and set it to True.
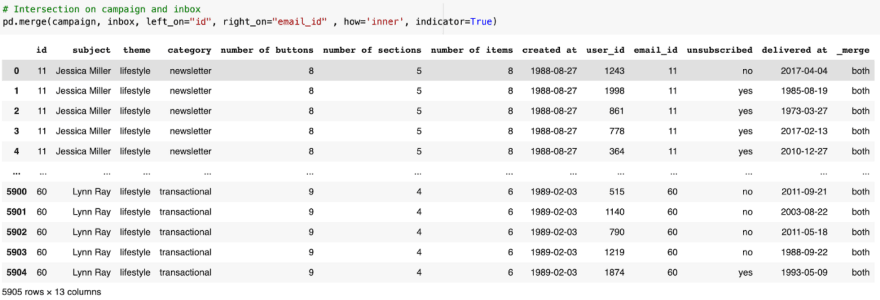 Areas where email_id and id have matching values 11 to 60.
This is the correct result as the only valid _merge value for an intersection is both.
Union
To perform a union, we repeat the process of matching keys, and pass how=outer.
This time well switch the order of the dataframes, choosing campaign on the left and inbox on the right. The results show the columns in the merge are displayed differently.
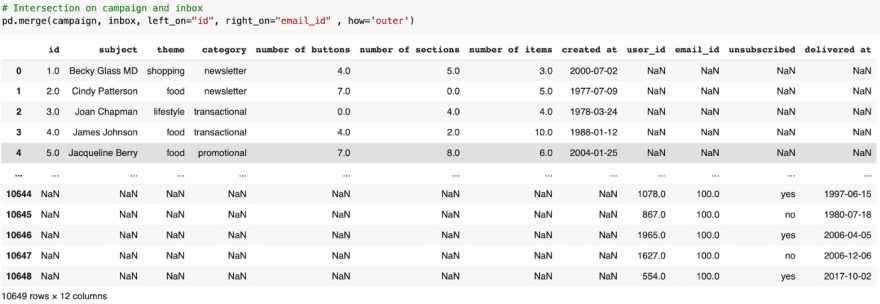 Include all values in both, id and email_id ranging from 1 to 100
But merge can do more than concat, it can also perform the relative joins. This is categorized as a left or right join and may be used to relate the datasets. One such relation is columns, or features for ML models. Another relation is to introduce more rows, or samples for ML models.
Left join
To start off, lets do a left join on the user_inbox dataframe with the email_content.
Since email content and user inbox share the email_id we choose that as our parameter.
For our matching values, we have id from email_content, and on the left we have email_id from user_inbox. Well add back the indicator to check our result.
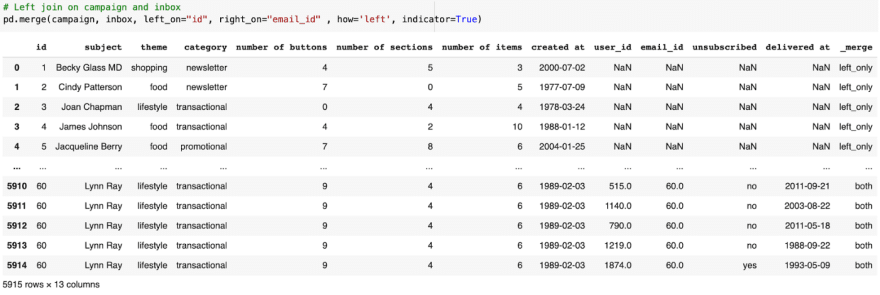 From the campaign dataset there are values for ids ranging from 1 to 60
As a check, note that the _merge column doesnt contain values for right_only.
Right join
To create the right join in Pandas, we merge and pass the on values, using how=right. We include the indicator to check once again.
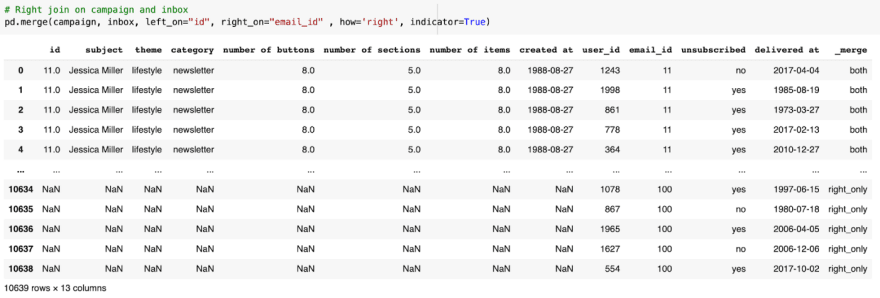 From the inbox dataset, the email_id ranges from 11 to 100.
A common misconception is that if we flip the order of the datasets, it will be the same as switching from left to right. This is wrong, because choosing which dataset is on the right and which dataset is on the left decides the column order as well.
Here we switch inbox and email, and perform another intersection.
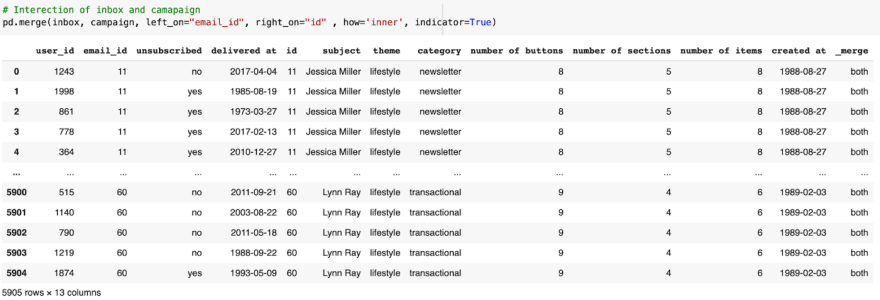 The dimensions match the 1st example, but the order of the columns are changed
Join dataframes
If you havent noticed, theres the 2 pesky identical columns problem. In part 1, our previous approach was to convert the dataframes using concat and drop_duplicates, but here we dont have a shared key. We can accomplish removing identical columns by applying the join and set_index method. This is a much better alternative, as its built-in functionality accomplishes it faster, looks cleaner, and with minimal effort or code.
Set index
Before we can call join, we need to tell it what the similarities are. By default, join uses the index to determine which values to join on. As a result, the set index function is used similarly to merges left_on=, and right_on=. By changing the column into an index, it removes the column entirely. This is reminiscent of using drop_duplicates. But if you want the columns to remain you can include drop=False to keep the columns.
Join
Join works just like merge, instead of providing a list, the caller will represent the left, and the argument will represent the right, set_index is used to specify the match.
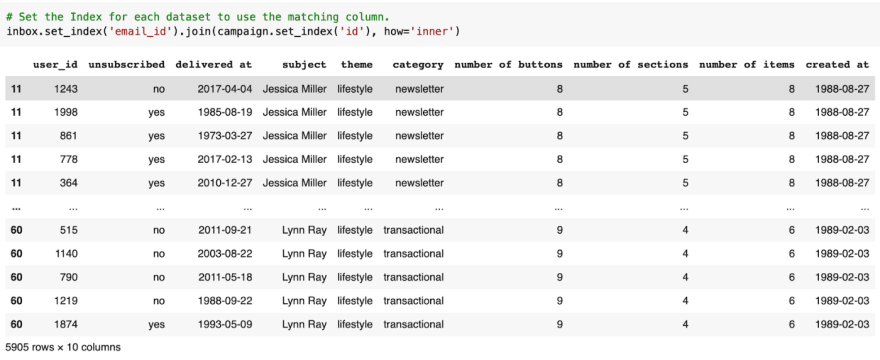 Notice how the index columns for id and email_id are gone now
With drop=False, the result is similar to merge.
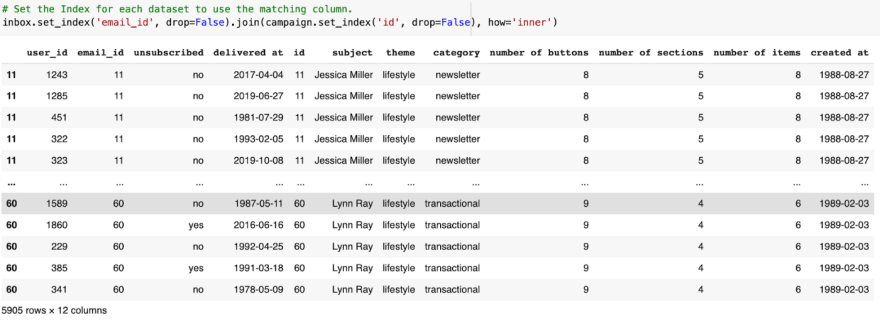
 Result is similar, but the index values differ. Merge keeps row number, join was overwritten.
Conclusion
Merge handles everything join and concat does, but each excels at different situations. In most cases, merge is more versatile and therefore used more. In the next part, well apply what weve learned to handle larger datasets, thus completing the entire marketing campaign featuring data on emails, the inbox, and user statistics.
Original Link: https://dev.to/mage_ai/product-developers-guide-to-customize-data-for-ai-part-2-join-merge-dataframes-2ghg
Dev To
More About this Source Visit Dev To