
An Interest In:
Web News this Week
- April 26, 2024
- April 25, 2024
- April 24, 2024
- April 23, 2024
- April 22, 2024
- April 21, 2024
- April 20, 2024
Some of Our Sources
- Slashdot
- TutsPlus - Code
- Team Treehouse
- Just Creative
- Pearsonified
- Vandelay Design
- Creative Curio
- Crazy Leaf Design
- Line 25
- Specky Boy
Help Webnuz
Referal links:
Optimize Node.js performance with clustering
Written by Geshan Manandhar
Node.js has gained a lot of popularity in the past few years. It is used by big names like LinkedIn, eBay, and Netflix, which proves it has been battle-tested well. In this tutorial, we will learn how to use clustering in Node.js to get great performance benefits by using all the available CPUs. Lets get going.
The need for clustering in Node.js
An instance of Node.js runs on a single thread (you can read more about threads in Node.js here). The official Node.js "About" page states: Node.js being designed without threads doesn't mean you can't take advantage of multiple cores in your environment. Thats where it points to the cluster module.
The cluster module doc adds: To take advantage of multi-core systems, the user will sometimes want to launch a cluster of Node.js processes to handle the load. So, to take advantage of the multiple processors on the system running Node.js, we should use the cluster module.
Exploiting the available cores to distribute the load between them gives our Node.js app a performance boost. As most modern systems have multiple cores, we should be using the cluster module in Node.js to get the most performance juice out of these newer machines.
How does the Node.js cluster module work?
In a nutshell, the Node.js cluster module acts as a load balancer to distribute the load to the child processes running simultaneously on a shared port. Node.js is not great with blocking code, meaning if there is only one processor and it is blocked by a heavy and CPU-intensive operation, other requests are just waiting in the queue for this operation to complete.
With multiple processes, if one process is busy with a relatively CPU-intensive operation, other processes can take up the other requests coming in, utilizing the other CPUs/cores available. This is the power of the cluster module where workers share the load and the app does not come to a stop due to high load.
The master process can distribute the load to the child process in two ways. The first (and default) is a round-robin fashion. The second way is the master process listens to a socket and sends the work to interested workers. The workers then process the incoming requests.
However, the second method is not super clear and easy to comprehend like the basic round-robin approach.
Enough of the theory, let's have a look at some prerequisites next before diving into the code.
Prerequisites
To follow this guide about clustering in Node.js, you should have the following:
- Node.js running on your machine
- Working knowledge of Node.js and Express
- Basic knowledge on how processes and threads work
- Working knowledge of Git and GitHub
Now lets move into the code of this tutorial.
Building a simple Express server without clustering
We will start by creating a simple Express server. This server will do a relatively heavy computational task which will deliberately block the event loop. Our first example will be without any clustering.
To get Express set up in a new project we can run the following on the CLI:
mkdir nodejs-clustercd nodejs-clusternpm init -ynpm install --save expressThen, we will create a file called no-cluster.js on the root of the project like below:

The contents of the no-cluster.js file will be as follows:
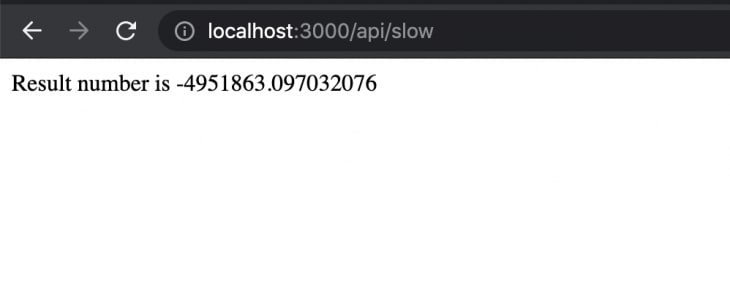
const express = require('express');const port = 3001;const app = express();console.log(`Worker ${process.pid} started`);app.get('/', (req, res) => { res.send('Hello World!');})app.get('/api/slow', function (req, res) { console.time('slowApi'); const baseNumber = 7; let result = 0; for (let i = Math.pow(baseNumber, 7); i >= 0; i--) { result += Math.atan(i) * Math.tan(i); }; console.timeEnd('slowApi'); console.log(`Result number is ${result} - on process ${process.pid}`); res.send(`Result number is ${result}`);});app.listen(port, () => { console.log(`App listening on port ${port}`);});Lets look at what the code is doing. We start off with a simple Express server that will run on port 3001. It has two URIs (/) that show Hello World! and another path /api/slow.
The slow API GET method has a long loop that loops 77, which is 823,543 times. In each loop, it does a math.atan(), or an arctangent (in radians) of a number, and a math.tan(), the tangent of a number. It adds these numbers to the result variable. After that, it logs and returns this number as the response.
Yes, it has been made deliberately time consuming and processor-intensive to see its effects with a cluster later. We can quickly test it out with node no-cluser.js and hit http://localhost:3001/api/slow which will give us the following output:

The CLI where the Node.js process is running looks like the screenshot below:

As seen above, the API took 37.432ms for 823,543 loops to finish as per our profiling added with console.time and console.timeEnd calls.
The code up to this point is accessible as a pull request for your reference. Next up, we will create another server that looks similar but has the cluster module in it.
Adding Node.js clustering to an Express server
We will add an index.js file that looks similar to the above no-cluster.js file, but it will use the cluster module in this example. The code for the index.js file looks like the below:
const express = require('express');const port = 3000;const cluster = require('cluster');const totalCPUs = require('os').cpus().length;if (cluster.isMaster) { console.log(`Number of CPUs is ${totalCPUs}`); console.log(`Master ${process.pid} is running`); // Fork workers. for (let i = 0; i < totalCPUs; i++) { cluster.fork(); } cluster.on('exit', (worker, code, signal) => { console.log(`worker ${worker.process.pid} died`); console.log("Let's fork another worker!"); cluster.fork(); });} else { startExpress();}function startExpress() { const app = express(); console.log(`Worker ${process.pid} started`); app.get('/', (req, res) => { res.send('Hello World!'); }); app.get('/api/slow', function (req, res) { console.time('slowApi'); const baseNumber = 7; let result = 0; for (let i = Math.pow(baseNumber, 7); i >= 0; i--) { result += Math.atan(i) * Math.tan(i); }; console.timeEnd('slowApi'); console.log(`Result number is ${result} - on process ${process.pid}`); res.send(`Result number is ${result}`); }); app.listen(port, () => { console.log(`App listening on port ${port}`); });}Lets look at what this code is doing. We first require the express module, then we require the cluster module. After that, we get the number of CPUs available with require('os').cpus().length. It was eight in my case on a Macbook Pro with Node.js 14 running.
Consequently, we check if the cluster is master. After a couple of console.logs we fork workers the same amount of times as the number of CPUs available. We just catch on the exit of a worker we log and fork another one.
If it is not the master process, it is the child process, and there we call the startExpress function. This function is the same as the Express server in the previous example without clustering.
When we run the above index.js file with node index.js we see the following output:

As we can see, all eight CPUs have eight relevant workers running ready to take up any requests coming in. If we hit http://localhost:3000/api/slow we will see the following output, identical to the output from the previous non-clustering server:
The code for the server with the cluster module is in this pull request. Next up, we will load test an Express server with and without clustering to evaluate the difference in response times and the number of requests per second (RPS) it can handle.
Load testing servers with and without clustering
To load test our Node.js servers with and without clustering, we will use the Vegeta load testing tool. Other options can be the loadtest npm package or the Apache benchmark tool as well. I find Vegeta easier to install and use because it is a Go binary, and the precompiled executables are seamless to install and get started.
After we have Vegeta running on our machine, we can run the following command to start the Node.js server without any clustering enabled:
node no-cluster.jsIn another CLI tab, we can run the following command to send 50 RPS for 30s with Vegeta:
echo "GET http://localhost:3001/api/slow" | vegeta attack -duration=30s -rate=50 | vegeta report --type=textIt will result in an output like below after around 30s. If you check the other tab with Node.js running, you will see lots of logs flowing:

Some quick insight from the above load test. A total of 1,500 (50*30) requests were sent and the server had a maximum good response of 27.04 RPS. The fastest response time was 96.998s and the slowest one was 21.745s. Similarly, only 1,104 requests came back with 200 response codes, meaning a 73.60 percent success rate without the cluster module.
Let's stop that server and run the other server with cluster module with:
node index.jsIf we run the same test of 50 RPS for 30s, in this second server we can see a difference. We can run the load test by running:
echo "GET http://localhost:3000/api/slow" | vegeta attack -duration=30s -rate=50 | vegeta report --type=textAfter 30s, the output will look something like this:

We can clearly see a big difference here as the server can exploit all the CPUs available, not only one. All 1,500 requests were successful, coming back with a 200 response code. The fastest response was in 31.608ms and the slowest was only 42.883ms compared to 21.745s without the cluster module.
The throughput was also 50, so this time the server had no issues handling 50 RPS for 30s. With all eight cores available to process, it can easily handle a higher load than the previous 27 RPS.
If you look at the CLI tab with the Node.js server with cluster, it should show something like this:

This tells us that at least two of the processors were used to serve up the requests. If we had tried with, say, 100 RPS, it would use up more of the CPUs and processes as per need. You can surely give it a try with 100 RPS for 30s and see how it fares. It maxed out at around 102 RPS on my machine.
From 27 RPS without cluster to 102 RPS with cluster, the cluster module has a response success rate nearly four times better. This is the advantage of using a cluster module to use all the available CPU resources.
Next steps
Using clustering on our own is beneficial for performance as seen above. For a production-grade system, it would be better to use battle-tested software like PM2. It has cluster mode built in, and includes other great features like process management and logs.
Similarly, for a production-level Node.js application running in containers on Kubernetes, the resource management part might be better handled by Kubernetes.
These are the decisions and tradeoffs you and your software engineering team will need to make to have a more scalable, performant, and resilient Node.js application running on a production environment.
Conclusion
In this article, we learned how to exploit the Node.js cluster modules to fully utilize the available CPU cores to extract better performance from our Node.js application. Amongst other things, clustering can be yet another useful tool in the Node.js arsenal to gain better throughput.
200s only Monitor failed and slow network requests in production
Deploying a Node-based web app or website is the easy part. Making sure your Node instance continues to serve resources to your app is where things get tougher. If youre interested in ensuring requests to the backend or third party services are successful, try LogRocket.
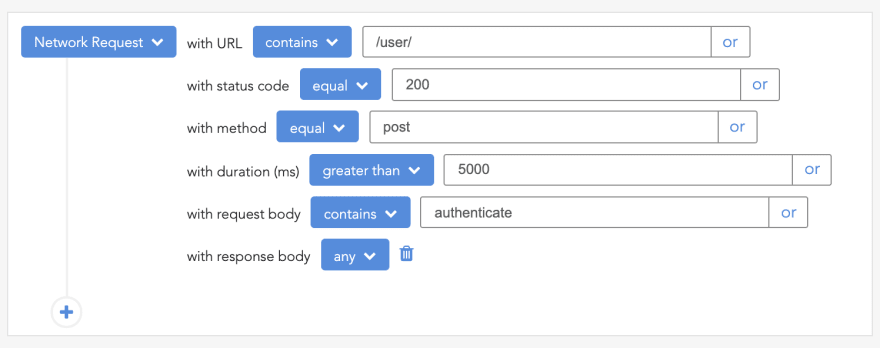
LogRocket is like a DVR for web apps, recording literally everything that happens on your site. Instead of guessing why problems happen, you can aggregate and report on problematic network requests to quickly understand the root cause.
LogRocket instruments your app to record baseline performance timings such as page load time, time to first byte, slow network requests, and also logs Redux, NgRx, and Vuex actions/state. Start monitoring for free.
Original Link: https://dev.to/logrocket/optimize-node-js-performance-with-clustering-7ki
Dev To
More About this Source Visit Dev To