
An Interest In:
Web News this Week
- April 26, 2024
- April 25, 2024
- April 24, 2024
- April 23, 2024
- April 22, 2024
- April 21, 2024
- April 20, 2024
Some of Our Sources
- Techcrunch
- Vandelay Design
- Creative Curio
- Fuel Your Creativity
- Line 25
- Stylized Web
- Spyre Studios
- Design Modo
- Android Headlines
- TechPowerUp
Help Webnuz
Referal links:
SERIES: React Native (Step by Step) - Auth Flow Navigation with Mock User Login
Preparations
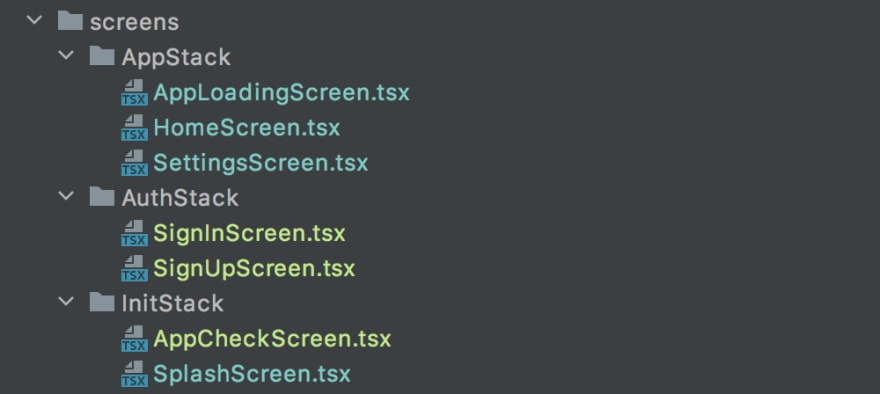
For our AuthFlow example, we need a few additional screens. For one we want to allow the user to both sign in (existing users) and sign up (new users) and in addition to the AppLoading screen (for loading / initialising user data) I've added an AppCheck screen where I will, later on, check for version updates in the app stores and such.
I went one step further and split them into AuthStack (sign in/sign up) and InitStack (splash screen, and a screen for the app to check version updates and such). We won't use this immediately but that way we won't have to reshuffle everything later on.
// File: src/routing/routes.tsimport { createStackNavigator } from '@react-navigation/stack'export enum MainRoutes { // Init Stack Splash = 'Splash', // display a logo or splash image AppCheck = 'AppCheck', // check vital stuff, forced app updates and such // Auth Stack SignIn = 'SignIn', // existing user entry point SignUp = 'SignUp', // new user entry point // App Stack AppLoading = 'AppLoading', // Load User Data for signed in users Home = 'Home', // The first "real" page of the app Settings = 'Settings', // Default Settings Page}export type MainStackParamList = { // Init Stack [MainRoutes.Splash]: undefined [MainRoutes.AppCheck]: undefined // Auth Stack [MainRoutes.SignIn]: undefined [MainRoutes.SignUp]: undefined // App Stack [MainRoutes.AppLoading]: undefined [MainRoutes.Home]: { update: boolean } | undefined // just an example, "update" will later be used for version checks [MainRoutes.Settings]: undefined}export const MainStack = createStackNavigator<MainStackParamList>()Here is a list of our old and new screen components, sorted by their stack. You can copy one of the existing screens, I copied the old SplashScreen as it already had the redux code we'll use later. For the AppCheckScreen I simply made a copy of our AppLoadingScreen from before.
Don't worry too much about this, we will address those later, one by one.
In our MainNavigation component, we add the new screens accordingly. The stacks separation I prepared above won't be represented here for now so Splash, AppCheck, SignIn and SignUp are all for the "not logged in" users.
// File: src/routing/MainNavigation.tsx// (partial)const MainNavigation = (): React.ReactElement => { const isLoggedIn = useReduxSelector(selectLogin) return ( <NavigationContainer> <MainStack.Navigator headerMode="none"> {isLoggedIn ? ( <> <MainStack.Screen name={MainRoutes.AppLoading} component={AppLoadingScreen} /> <MainStack.Screen name={MainRoutes.Home} component={HomeScreen} /> <MainStack.Screen name={MainRoutes.Settings} component={SettingsScreen} /> </> ) : ( <> <MainStack.Screen name={MainRoutes.Splash} component={SplashScreen} /> <MainStack.Screen name={MainRoutes.AppCheck} component={AppCheckScreen} /> <MainStack.Screen name={MainRoutes.SignIn} component={SignInScreen} /> <MainStack.Screen name={MainRoutes.SignUp} component={SignUpScreen} /> </> )} </MainStack.Navigator> </NavigationContainer> )}export default MainNavigationSkippable Splash Screen
Starting with the SplashScreen, we're building a small mechanism to trigger a navigation event after a few seconds or when the user taps the screen to trigger it manually. This is a common pattern you see in many apps.
Instead of the useEffect hook you are probably familiar with by now, we will be using the useFocusEffect() hook from react navigation because it will "mount" and "unmount" when the screen gains and loses focus. A common pitfall of Navigation stacks is that screens do not "unmount" when you navigate away within the same stack which means that your useEffect() cleanup will not be triggered.
On focus of this screen, we start a timeout and store the timeoutID in a const to use for the clean-up of the running timer when the user taps on the screen to navigate. As recommended by the docs, we are wrapping our code in a useCallback() hook to prevent running the code too often and do the same for the navigate() function that we use for timer and onPress event.
// File: src/screens/SplashScreen.tsx// (partial)const SplashScreen = ({ navigation }: SplashScreenProps): React.ReactElement => { const navigate = useCallback( () => navigation.navigate(MainRoutes.AppCheck), [navigation], ) useFocusEffect( useCallback(() => { const navigationTimer = setTimeout(() => { navigate() }, 3000) return (): void => clearTimeout(navigationTimer) }, [navigate]), ) return ( <TouchableWithoutFeedback onPress={() => navigate()}> /* skipped for brevity ... */ </TouchableWithoutFeedback> )}I had to bump my eslint for hooks from 4.0.0 to 4.0.3 to get rid of a false positive for useFocusEffect as the "Effect" suffix triggered a rule it should not. If you use my code from the last session, you might need to do that too.
Version bumped to this => "eslint-plugin-react-hooks": "^4.0.3"
At this point and to test our new pages and routes, our SignUp and SignIn screens will be mocked placeholders, simply using the redux action to mock a successful login. I've also added a small button to navigate between SignUp and SignIn.
// File: src/screens/SignInScreen.tsx |SignUpScreen.tsimport React from 'react'import { Text, View, StyleSheet, Button } from 'react-native'import { MainNavigationProp } from '../../routing/types'import { MainRoutes } from '../../routing/routes'import { useReduxDispatch } from '../../redux'import { setLogin } from '../../redux/ducks/user'type SignInScreenProps = { navigation: MainNavigationProp<MainRoutes.SignIn>}const SignInScreen = ({ navigation }: SignInScreenProps): React.ReactElement => { const dispatch = useReduxDispatch() const handleClick = (): void => { dispatch(setLogin(true)) } return ( <View style={styles.page}> <Text>Sign In</Text> <Button title="Continue" onPress={() => handleClick()} /> <Button title="Sign Up" onPress={() => navigation.navigate(MainRoutes.SignUp)} /> </View> )}const styles = StyleSheet.create({ page: { flex: 1, backgroundColor: '#fff', alignItems: 'center', justifyContent: 'center', },})export default SignInScreenMocking the login
I will briefly go over the mock login I'm using. To represent real server/api interaction, I've mocked a promise using a timeout that will return the expected mock values. I'm skipping the types I've used and advise you to simply copy the full file from GitHub as this is only a mock authentification and not the focus of this article.
const mockSuccess = (value: SuccessValue): Promise<SuccessValue> => { return new Promise(resolve => { setTimeout(() => resolve(value), 2000) })}const mockFailure = (value: FailureValue): Promise<FailureValue> => { return new Promise((resolve, reject) => { setTimeout(() => reject(value), 2000) })}We can now use this to create a simple login and register call. The fake login can be set to fail by supplying an additional boolean as a third parameter (useful for testing) but other than that will expect an email and password and tries to match those to our user array. All in plain text, as you would expect from a first class cheap mock api.
I've added a slight variation in form of a createAccount function as well for the SignUp. The response contains a token that would be saved and used in all following requests to pass as a logged-in user in a real application.
const mockCheckLoginData = (email: string, password: string): boolean => fakeUserData.filter(data => data.email === email && data.password === password).length > 0export const login = ( email: string, password: string, shouldFail = false,): Promise<mockRequestValue> => { if (shouldFail) { return mockFailure({ error: 500, message: 'Request failed successfully!' }) } if (!mockCheckLoginData(email, password)) { return mockFailure({ error: 401, message: 'Login failed, email or password did not match!', }) } return mockSuccess({ authToken: 'mock_token_value' })}export const createAccount = ( email: string, password: string, shouldFail = false,): Promise<mockRequestValue> => { if (shouldFail) { return mockFailure({ error: 500, message: 'Request failed successfully!' }) } return mockSuccess({ authToken: 'mock_token_value' })}Wiring up Redux and Mock API
We now need to do the real work, setting up the real redux code for users so our previous user.ts duck will now be rewritten completely.
Let's start with our annotations and initial state. The login will be a simple boolean, just as before but additionally we will keep track of the login state to make a differentiation between not logged in, logged out and failed to log in as well as loading during the login.
Also, we will store the user email, a message text and a flag to mark newly registered users. This way we can display login errors from our api or a message for a user that successfully logged out and perform additional things for new users that might not have been fully set up yet, depending on the app you are planning to build.
type LoginState = 'init' | 'loading' | 'denied' | 'loggedOut'type UserState = { login: boolean loginState?: LoginState email?: string newUser?: boolean message?: string}const initialState: UserState = { login: false, loginState: 'init',}Actions
We will use the setLogin action to store a logged-in user's info in our state. This action will no longer be called directly from the app. Instead, we will use if in the userMiddleware we are about to write.
The new setLogout action will contain the new loginState and message, again mainly to be used within our middleware.
export const setLogin = createAction('[USER] Set Login', (email: string, newUser: boolean) => ({ payload: { email, newUser, },}))export const setLogout = createAction( '[USER] Set Logout', (loginState?: LoginState, message?: string) => ({ payload: { loginState, message, }, }),)When the user tries to log in or sign up, he will only enter an email and password. We will do the rest in our middleware and reducer.
export const attemptLogin = createAction( '[USER] attempt Login', (email: string, password: string) => ({ payload: { email, password, }, }),)export const attemptSignUp = createAction( '[USER] attempt SignUp', (email: string, password: string) => ({ payload: { email, password, }, }),)Selectors
For easier access, we will set up a total of 3 selectors for different parts of our state to be used in the frontend. We know selectLogin already. Additionally, we now have a flag for isSubmitting during the api request and the loginMessage, to update the UI accordingly and provide useful feedback for user interactions.
export const selectLogin = (state: RootState): boolean => state.user.loginexport const selectIsSubmitting = (state: RootState): boolean => state.user.loginState === 'loading'export const selectLoginMessage = (state: RootState): string | undefined => state.user.messageMiddleware
In our middleware, we will listen to login and signup attempts, call our mock code and dispatch additional actions according to the results from the mock api.
As you see, we simply dispatch the setLogout action to pass on the new loginState and error message.
export const userMiddleware: Middleware = ({ dispatch }) => next => action => { next(action) if (attemptLogin.match(action)) { const { email, password } = action.payload login(email, password) .then(() => dispatch(setLogin(email, false))) .catch(err => dispatch(setLogout('denied', err.message))) } if (attemptSignUp.match(action)) { const { email, password } = action.payload createAccount(email, password) .then(() => dispatch(setLogin(email, true))) .catch(err => dispatch(setLogout('denied', err.message))) }}Reducer
The last bit is our Reducer code. This is where it all comes together. When the user attempts to log in, we update state and message to reflect this in the UI and then wait for updates via setLogin and setLogout.
const userReducer = createReducer(initialState, builder => { builder .addCase(attemptLogin, state => ({ ...state, loginState: 'loading', message: 'loading', })) .addCase(setLogin, (state, action) => { const { email, newUser } = action.payload return { login: true, email, newUser, } }) .addCase(setLogout, (state, action) => { const { loginState = 'loggedOut', message } = action.payload return { login: false, loginState, message, } })})A proper login form
On our SignIn and SignUp screens, we can now replace the mock button with a propper login form from a separate component file.
// File: src/components/demo/UserForm.tsximport React, { useState } from 'react'import { Button, StyleSheet, Text, TextInput, View } from 'react-native'import { useReduxSelector } from '../../redux'import { selectIsSubmitting, selectLoginMessage } from '../../redux/ducks/user'type UserFormProps = { submitHandler: (email: string, password: string) => void label: string}const UserForm = ({ submitHandler, label }: UserFormProps): React.ReactElement => { const [email, setEmail] = useState('[email protected]') const [password, setPassword] = useState('wiener') const isLoading = useReduxSelector(selectIsSubmitting) const loginMessage = useReduxSelector(selectLoginMessage) return ( <View> <TextInput style={styles.input} onChangeText={text => setEmail(text)} value={email} keyboardType="email-address" /> <TextInput style={styles.input} onChangeText={text => setPassword(text)} value={password} secureTextEntry /> <Button title={label} disabled={isLoading} onPress={() => submitHandler(email, password)} /> {loginMessage && <Text>{loginMessage}</Text>} </View> )}const styles = StyleSheet.create({ container: { flex: 1, alignItems: 'center', justifyContent: 'center', }, input: { height: 40, width: 300, borderColor: 'gray', borderWidth: 1, marginTop: 20, },})export default UserFormAaaaand we're done.
Next time we will look at nested navigations and other navigation patterns. Until then I hope you enjoyed this lesson and were able to abstract this pattern for your own projects.
Original Link: https://dev.to/allbitsequal/series-react-native-step-by-step-auth-flow-navigation-with-mock-user-login-105k
Dev To
More About this Source Visit Dev To