
An Interest In:
Web News this Week
- April 26, 2024
- April 25, 2024
- April 24, 2024
- April 23, 2024
- April 22, 2024
- April 21, 2024
- April 20, 2024
Some of Our Sources
- Slashdot
- BoingBoing
- Team Treehouse
- Abduzeedo
- Fuel Your Creativity
- Fudge Graphics
- Web Design Ledger
- 24 Ways
- Wal You
- Design Modo
Help Webnuz
Referal links:
Achieving Continuous Integration and Deployment with Jenkins
I had a tough first time working with Jenkins because most of the articles for setting and configuring it are out of date. So, Im writing this to ease someones work and make it so they dont have to go through what I went through to set this up.
So, here it goes...
First off, what even is Jenkins?
Jenkins is an open-source automation tool that is used to automate the building, testing and deployment of software, making continuous integration and continuous deployment easy for users.
In essence, this means that Jenkins (and a lot of other tools), allow you to automate the process of deploying or serving changes to your software to users immediately when those changes are ready. Imagine the convenience of users seeing your updated websites as soon as you merge a PR to master (or main) .
Why Jenkins?
It is free.
It has a strong community, so finding support is not a problem.
Jenkins can be easily configured and I hope to prove this with this article, so please, read on .
For this tutorial, we'll learn how to carry out CI/CD for a Node app with Jenkins. Lets start by highlighting all the steps well take and then explaining them in detail below:
- Create a GitHub repository for the node app
- Create a simple node app and push to GitHub
- Create a Heroku app for deployment
- Install Jenkins
- Add a GitHub webhook to push changes to Jenkins
- Configure app with Jenkins
- Adding GitHub plugins in Jenkins
- Configure Jenkins to deploy to Heroku on successful testing
Prerequisites
- A GitHub account. You can sign up here.
- An Ubuntu server. If you are a student and will be using Digital Ocean, you can get $100 credit using the GitHub student developer pack. Create the Ubuntu server using this tutorial. Set up the server by following this initial server setup for Ubuntu 20.04 tutorial, including a sudo-enabled non-root user, a firewall, and SSH access from your local machine.
- A Heroku account. You can sign up here.
Now, lets get started!
Step 1 Create a GitHub repository for the node app
Login to your GitHub account and create a new repository. You can give it a name of your choice, I will name mine jenkins-test. You can initialize with README and .gitignore for Node. Also, make sure your repository is set to public.

Step 2 Create a simple node app and push to GitHub
After creating the repository, clone the repository to your local machine using the following command:
git clone <repository_url>Make sure to change the repository_url with yours.
To create a package.json file, open up your terminal and cd into your project folder, then run npm init and follow the prompt. Ive added a screenshot to see the CLI interaction below.

You can remove or modify whats in the scripts block of your package.json file and add the following to start and test the app:
"start": "node index.js","test": "jest"Well be using express for our sample node app so go ahead and install it by running this command in the terminal:
npm install expressNext, create an index.js file which will serve as the entry point to our node app and add the following lines to it:
const express = require("express");const app = express();app.get("/", (req, res) => { res.status(200).json("Hello world");});module.exports = app.listen(process.env.PORT || 4000, () => console.log(`Running on http://localhost:4000`));Run npm start and visit http://localhost:4000/ on your browser to view the Node app, you should see Hello world displayed in the browser.
Next, well add a couple of tests to our app, afterall, with CI, we should make sure tests are available and are passing before merging changes.
So, go back to the terminal, make sure youre in the root directory of your project, and install jest and supertest packages using the following command:
npm install --save-dev jest supertestNext, in the projects root directory, create a folder and name it __test__ (two underscores, preceding and ending). Inside this __test__ folder, create an index.test.js file and add at least the following code to it (you can always make your tests more comprehensive).
const request = require("supertest");const app = require("../index");describe("Get route", () => { it("page should return hello world", async (done) => { const res = await request(app).get("/"); expect(res.statusCode).toEqual(200); expect(res.body).toEqual("Hello world"); done(); });});afterAll(async () => { await app.close();});Run npm test or npm run test in the terminal and you should see your test(s) pass:
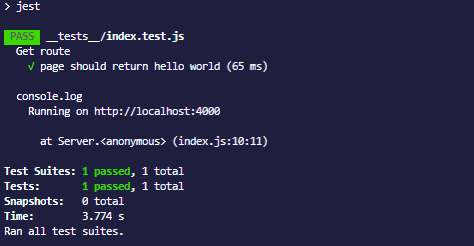
Now that our code is running and the tests are passing, we can commit the changes and push to GitHub.
git add .git commit -m initial commitgit pushStep 3 Create a heroku app for deployment
Log in to your Heroku dashboard.
Look to the upper right and click on New.
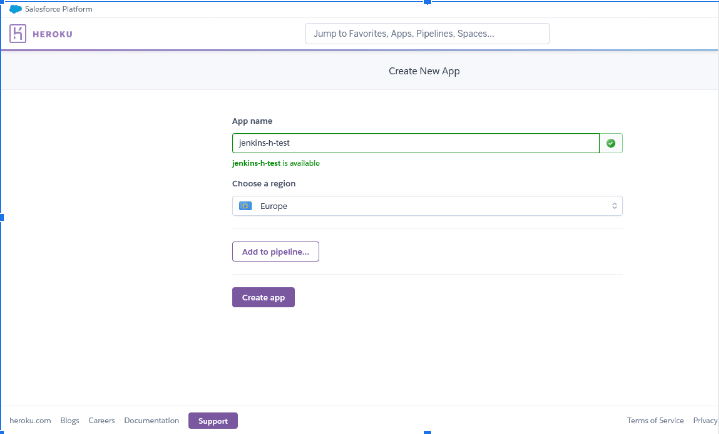
Select Create new app.
Add an App name of your choice and Choose a region close to you.
Click Create app.
Go back to your project terminal and login to Heroku using Heroku CLI. If you are yet to install the Heroku CLI, you can follow this article.
After that, add a remote to your local repository with:
heroku git:remote -a heroku-app-nameThen push the code using:
git push heroku <github-branch-name>This is done to make sure everything works correctly before automating it. You can click on open app on the Heroku app dashboard to check if it works correctly.

Step 4 Install Jenkins
Open a new terminal and login to your server with a non-root user account.
ssh username@droplet_ip_addressWith this, we can update the kernel with the following command:
sudo apt-get updateRun the following command to install java runtime:
sudo apt-get install default-jresudo apt-get install default-jdkRun following commands one after the other to install Jenkins.
wget -q -O - https://pkg.jenkins.io/debian-stable/jenkins.io.key | sudo apt-key add -sudo sh -c 'echo deb https://pkg.jenkins.io/debian-stable binary/ > \ /etc/apt/sources.list.d/jenkins.list'sudo apt-get updatesudo apt-get install jenkinsNow, that Jenkins and its dependencies are installed, we can start it using:
sudo systemctl start jenkinsYou can verify if Jenkins started successfully using:
sudo systemctl status jenkinsIt should show active:

Since Jenkins run on port 8080, lets open it using ufw:
sudo ufw allow 8080You can check the ufws status with:
sudo ufw statusNow visit the http://ip_address:8080 to set up Jenkins, you should see the Unlock Jenkins screen.
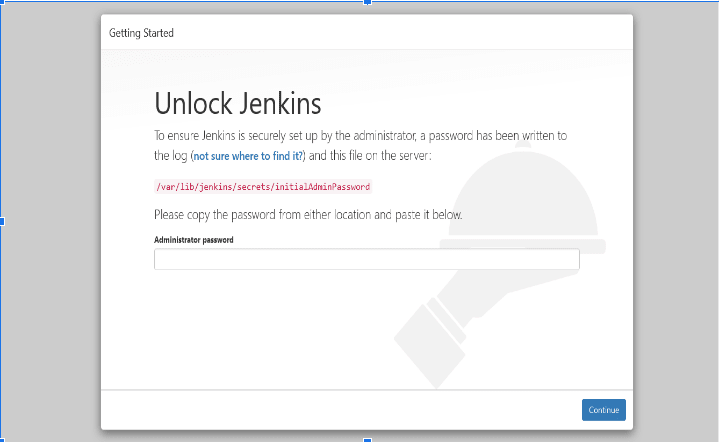
To unlock Jenkins, go back to the terminal, and enter the following command to display the password.
sudo cat /var/lib/jenkins/secrets/initialAdminPasswordCopy the password and paste it into the Administrator password field.
The next screen shows Customize Jenkins, click on Install suggested plugins.
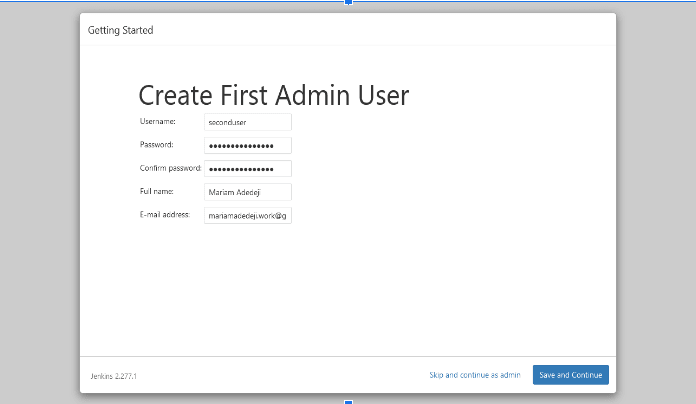
After the installation is complete, it takes us to Create First Admin User screen. Enter the Username, Password, Full name, and E-mail address for your user, then Save and Continue.
After that, enter the server IP address i.e http://ip_address:8080, then Save and Finish.
Yay Jenkins is Ready! Click on Start using Jenkins.
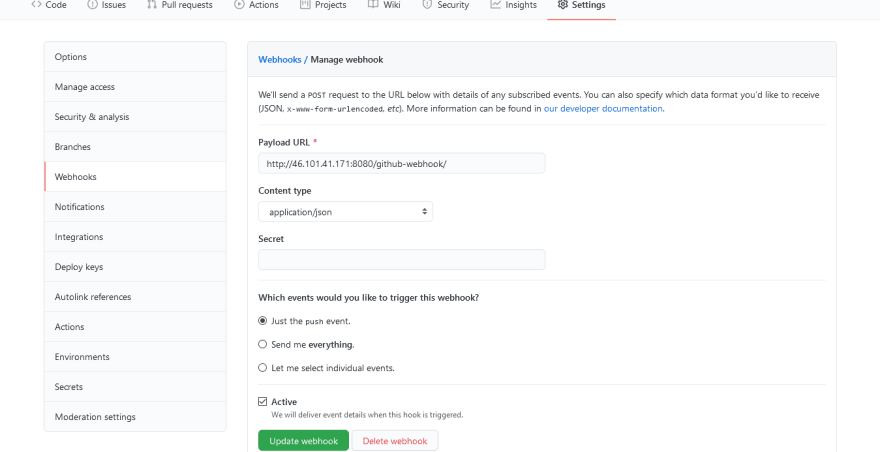
Step 5 Add a GitHub webhook to push changes to Jenkins
In the apps GitHub repository, go to Settings, then from the sidebar click on Webhooks. Click on Add webhooks and enter the Jenkins url with /github-webhook/ appended to it, into the Payload URL field.
Select application/json for Content-type.
Select Just the push event for the event to trigger the webhook.
Check Active and click Add webhook. Now, GitHub can push events to Jenkins successfully.
Step 6 Configure app with Jenkins
Open up a new terminal tab or window and login to your server with the same non-root user account.
ssh username@droplet_ip_addressIn that same terminal, enable root privileges using:
sudo suapt install npmAfter switching to the root user and installing npm, Jenkins automatically creates a new user after installation. Switch to it using this command.
su jenkinsGenerate a new SSH key with the following command:
ssh-keygen -t rsaPress enter for the location and do not type any password when requested, just hit enter.
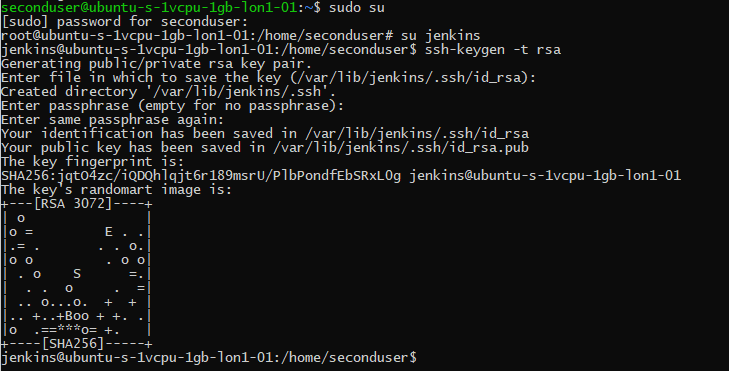
Once the process is completed, print the public key information using:
cat ~/.ssh/id_rsa.pubCopy the public key.
Now login back to the non-root user in a new terminal.
Open the authorized_keys with the following command:
sudo vim ~/.ssh/authorized_keysPaste in the id_rsa public key and exit.
In order to confirm if the keys are properly configured, switch to jenkins server terminal and try to login to the non-root user, using ssh. You would be logged in successfully if you follow the process accordingly.

Step 7 Adding GitHub plugins in Jenkins
In the Jenkins dashboard, go to Manage jenkins, and then click on Manage plugins.
From the Available tab, search for github and select Github Integration plugin.
Click on Install without restart and the plugin would be installed in a few seconds.
Step 8 Configure Jenkins to deploy to Heroku on successful testing
Now that GitHub is now connected to Jenkins, we can create a new project.
On the sidebar, click on New Item, select Freestyle project from the options, and click OK.

You should be directed to the configurations page next, but if not, you can open it up by clicking Configure on the left sidebar.
In the configuration page, under the general tab, check the Github project option and add Github project link (url for your project repo, without the .git extension).
Next, scroll down to the Source Code Management section, select Git and add the Repository URL with .git extension (same url youve used for cloning the repository).
You can change the master branch to main or any other branches you want for the deployment process.
Click on the Add repository button to add a second repository, pointing to your Heroku app.
To get the Heroku app repo link, go to the App settings on your Heroku dashboard and copy the link.
Go back to your Jenkins dashboard and paste this link to the Repository URL.
Well need new credentials, so click on Add, to create credentials for our Heroku app.
Select Jenkins from the list and you should see a popup window.
Make sure the Kind is Username with password and the Scope is global.
Type in a username of your choice, but best to make it something descriptive. I will use heroku as my username.
Next, well need to add the Heroku Api key into the Password field, and Save. To get your Heroku Api key, go to Heroku dashboard, click on Account Settings and scroll down to see the Api key. Copy this and paste it into the Password field.
You can add Description for this credential if you want to.
Click Add to finish creating the credential.

Now, make sure the new credential we just created is selected in the dropdown. If not, click on the dropdown and select it.
Next, click on advanced and add a Name to identify this repository among other remote repositories. Well need this name later. Ive named mine, jenkinsTest, because, simplicity.
Next, scroll down to the Build Triggers section and check GitHub hook trigger for GITScm polling option.
Under the Build section, Click on Add build step button and then click on Execute shell. Enter the following code into the shell:
#!/bin/bashssh non-root-username@<droplet_ip_address>alias proj="cd node-app-name"git pull origin mainnpm installnpm test || exit 1Click on Add post-build action, choose Git Publisher, and select Push Only If Build Succeeds option.
Click on Add Branch, enter the name of the branch to deploy inside the Branch to Push field, and add the Name used to identify the Heroku app repository into the Target remote name field (mine was jenkinsTest, if you remember, so add yours in here).
Then Save.

Go to the project dashboard, click on Build now on the left sidebar and watch gleefully as your code build successfully!

For an extra dopamine hit, make changes to your code and push to GitHub. Watch again as your code is deployed automatically to Heroku.
If you found this article helpful, please leave a heart or a comment. If you have any questions, please let me know in the comment section.
Also, dont forget to follow me for more articles. Thank you.
Original Link: https://dev.to/mariehposa/achieving-continuous-integration-and-deployment-with-jenkins-4d6k
Dev To
More About this Source Visit Dev To