
Some of Our Sources
- Slashdot
- Mashable
- Pearsonified
- Abduzeedo
- Naldz Graphics
- Crazy Leaf Design
- My Ink Blog
- Wal You
- Willems Lab
- TechPowerUp
Help Webnuz
Referal links:
How to Create 10 Different Useful Layer Style Text Effects in Adobe Photoshop
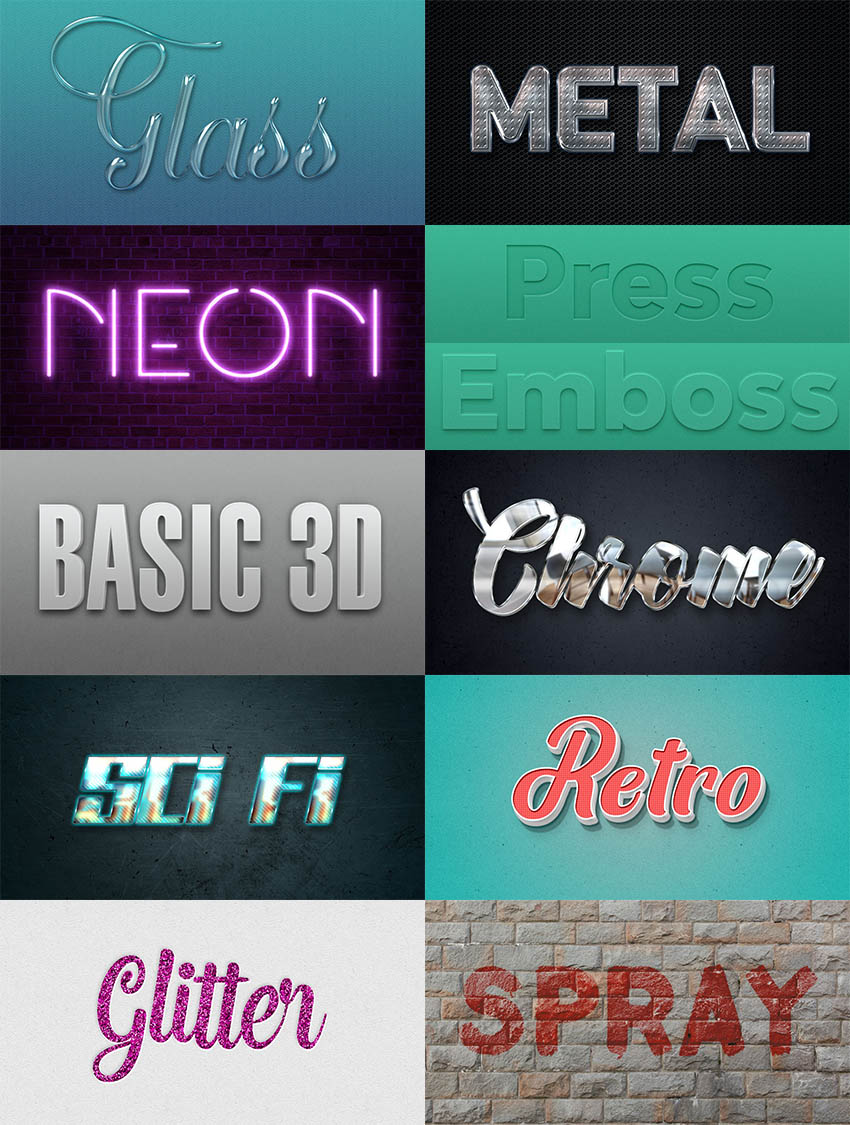
Layer styles are one of Photoshop's most powerful tools. Their many different settings and options can help you create endless effects pretty easily and quickly. This tutorial will show you how to use a bunch of layer styles, with some helpful tips and tricks, to create cool text effects in Photoshop. Let's get started!
These Photoshop layer effect tutorials were inspired by the many Layer Styles available on Envato Elements. Ditch adding layer styles by hand, and get detailed text effects with just a single click of a button!
Tutorial Assets
In order to complete these Photoshop text effects, you'll need the following resources:
Fonts
Cimochi font or Bolina font
Piximisa font
Montserrat font
MM Cruella font or Trench font
Gineva Script font or Ballpark Weiner font
SchmalfetteCP font or Bebas Neue font
Bhejeuct Gash font or Aero font
Mon Cheri font or Lobster font
Graun font or TT Masters font
Premier Script font or Mervale Script font
Patterns and Textures
Grilled Noise by Dertig Media
by Axertion
by jojo-ojoj
Diagonal Noise by Christopher Burton
BrickLargeBrown0025 (Image 1 - Small) by Textures.com
Old Wall by Bartosz Kaszubowski
Indoor Chairs by Pexels
Paper 3 by Atle Mo
by mslooten
Texturetastic Gray by Adam Pickering
20 Repeatable Pixel Patterns by Premium Pixels
BrickMedievalBlocks0129 (Image 3 - Medium) by Textures.com
Beige paper by Konstantin Ivanov
by wastedshame
8 Free Glitter Effect Patterns & Styles for Photoshop by Spoon Graphics
by Supertuts007 (Load the CHROMES.grd file)
To use the images as patterns, open each one of them in Photoshop, go to Edit > Define Pattern, and click OK.
Follow along with us over on our Envato Tuts+ YouTube channel where we go over our favourite 6 from this list.
1. How to Create Glass Photoshop Text Effects
Step 1
Create a new 1000 x 500 px document, click the Create new fill or adjustment layer icon at the bottom of the Layers panel, and choose Gradient.
Create the gradient fill using the Colors #3e6181 to the left and #46aaab to the right, and check the Dither box.

Step 2
Add a Pattern fill layer, set the Pattern to Grilled Noise, and change the layer's Blend Mode to Color Burn.

Step 3
Create the text using the font Cimochi, and change the Size to 350 pt.

Step 4
Change the text layer's Fill value to 0, and duplicate it.

Step 5
Double-click the original text layer to add layer styles in Photoshop:
Add a Bevel and Emboss with these settings:
Depth: 200
Size: 15- Uncheck the Use Global Light box
Angle: 40
Altitude: 50
Gloss Contour: Valley - Low- Check the Anti-aliased box
Highlight Mode: Linear Light
Opacity: 100%
Shadow Mode: Screen
Color:#888888
Opacity: 70%

Add a Stroke with these settings:
Size: 1
Opacity: 50%
Fill Type: Gradient
Style: Reflected- Use the steel s88 gradient fill

Add an Inner Shadow with these settings:
Blend Mode: Color Dodge
Color:#ffffff
Opacity: 40%- Uncheck the Use Global Light box
Angle: -108
Distance: 5
Size: 5

Add an Inner Glow with these settings:
Blend Mode: Linear Burn
Opacity: 50%
Color:#7b7b7b
Size: 10

Add a Gradient Overlay with these settings:
Blend Mode: Multiply
Opacity: 50%
Style: Reflected- Use the Aluminum 5 gradient fill

Add a Drop Shadow with these settings:
Opacity: 50%
Distance: 5
Size: 10

This will style the first layer.

Step 6
Double-click the copy text layer to apply the following layer style:
Add a Bevel and Emboss with these settings:
Size: 25- Uncheck the Use Global Light box
Angle: 117
Altitude: 69
Gloss Contour: Cone - Inverted- Check the Anti-aliased box
Highlight Mode: Linear Light
Opacity: 100%
Shadow Mode:
Opacity: 0%

Add a Stroke with these settings:
Size: 1
Position: Inside
Blend Mode: Overlay
Opacity: 50%
Fill Type: Gradient
Style: Reflected- Use the steel s88 gradient fill

Add an Inner Shadow with these settings:
Blend Mode: Overlay
Color:#ffffff
Opacity: 50%- Uncheck the Use Global Light box
Angle: 24
Distance: 5
Size: 5

Add an Inner Glow with these settings:
Blend Mode: Multiply
Opacity: 50%
Color:#9f9f9f
Size: 5

This will create a shiny glass effect.

Glass Photoshop Action

Get the same striking glass effect in seconds using the Glass Photoshop Action from Envato Elements! Create different colored glass, and dynamically edit the text just as you would normally, without the hassle of having to add each layer style one by one.
Cream Peach

Cream peach has the perfect combination of bold letters and script flourishes that make it an ideal match for a glass text effect! The long lines will show off the shiny glass reflections, while the bold type will highlight the see-through effect.
2. How to Create Metal Photoshop Text Effects
Step 1
Create a new 1000 x 500 px document, click the Create new fill or adjustment layer icon at the bottom of the Layers panel, and choose Gradient.
Create the gradient fill using the Colors #596267 to the left and #222831 to the right. Change the Style to Radial and the Scale to 200, and check the Dither box.

Step 2
Add a Pattern fill layer, set the Pattern to Hex Metal Mesh (from the Metal Mesh Patterns - Pack 1 pack), and change the layer's Blend Mode to Multiply.

Step 3
Create the text using the font Queen of Camelot, changing the Color to #2c2b2b and the Size to 250 pt.

Step 4
Double-click the text layer to add layer styles in Photoshop:
Add a Bevel and Emboss with these settings:
Technique: Chisel Hard
Depth: 250
Size: 5
Gloss Contour: Ring- Check the Anti-aliased box
Highlight Mode: Vivid Light
Opacity: 70%

Add a Contour with these settings:
Contour: Cone - Inverted- Check the Anti-aliased box.

Add a Texture with these settings:
Pattern: Side Slanting Mesh (from the Metal Mesh Patterns - Pack 1 pack)
Scale: 25%
Depth: 10%

Add a Stroke with these settings:
Size: 2
Fill Type: Gradient
Style: Reflected- Use the Riddle of Steel gradient fill

Add an Inner Shadow with these settings:
Blend Mode: Color Dodge
Color:#b67564
Opacity: 35%
Distance: 25
Size: 10

Add an Inner Glow with these settings:
Blend Mode: Hard Light
Opacity: 67%
Color:#c2ccd4
Technique: Precise
Source: Center
Size: 51
Contour: Rolling Slope - Descending

Add a Satin effect with these settings:
Blend Mode: Overlay
Color:#d6d6d6
Opacity: 58%
Angle: 60
Distance: 42
Size: 24
Contour: Linear- Check the Anti-aliased box
- Check the Invert box

Add a Gradient Overlay with these settings:
- Check the Dither box
Blend Mode: Overlay- Use the stove pipe 20 gradient fill

Add a Pattern Overlay with these settings:
Blend Mode: Overlay
Pattern: 9.jpg (from the Metal seamless textures pack)
Scale: 50%

Step 5
Add an Outer Glow with these settings:
Blend Mode: Linear Light
Opacity: 100%
Color:#67ade8
Size: 5

Add a Drop Shadow with these settings:
Opacity: 50%
Distance: 15
Spread: 25
Size: 15

This will style the text.

Black & Metal – PSD Mockups

Get the same industrial metal text effect in half the time with the Black & Metal text effect pack! You get a total of eight different text effect styles, all brutally metal of course.
Eternal Font

Eternal Font is both strong and classy, making it the perfect match to a strong and rugged metal text effect! It has bold type that will show off all of the metal textures and details.
3. How to Create Pressed and Embossed Text Effects
Step 1
If you are looking for simple text effects in Photoshop, then these two are perfect!
Create a new 1000 x 500 px document, click the Create new fill or adjustment layer icon at the bottom of the Layers panel, and choose Gradient.
Create the gradient fill using the Colors #3c9179 to the left and #57caaa to the right, and check the Dither box.

Step 2
Add a Pattern fill layer, set the Pattern to Diagonal Noise, and change the layer's Blend Mode to Color Burn.

Step 3
Create the text using the font Bw Modelica SS01 Extra Bold, and change the Size to 200 pt.

Step 4
Change the text layer's Fill value to 0.

Step 5
Double-click the text layer to add layer styles in Photoshop:
Add a Bevel and Emboss with these settings:
Style: Emboss
Size: 0- Uncheck the Use Global Light box
Angle: 90
Altitude: 60- Check the Anti-aliased box
Highlight Mode:
Opacity: 20%
Shadow Mode:
Opacity: 30%

Add an Inner Shadow with these settings:
Blend Mode: Soft Light
Opacity: 70%- Uncheck the Use Global Light box
Angle: 90
Distance: 3
Size: 3

Add an Inner Glow with these settings:
Blend Mode: Color Burn
Opacity: 10%
Color:#000000
Size: 10

Add a Gradient Overlay with these settings:
- Check the Dither box
Blend Mode: Soft Light
Opacity: 15%- Create a Transparent to Fill Color gradient fill using the Color
#000000on both sides, and change the transparent side's Opacity Stop's Opacity value to 50%.

Add a Drop Shadow with these settings:
Blend Mode: Soft Light
Color:#ffffff
Opacity: 75%- Uncheck the Use Global Light box
Angle: 90
Distance: 1
Spread: 5
Size: 3

This will create a pressed text effect.

Step 6
To create an embossed effect, create a new text layer, and make sure to change its Fill value to 0.

Step 7
Double-click the text layer to apply the following layer style:
Add a Bevel and Emboss with these settings:
Style: Outer Bevel
Size: 5- Uncheck the Use Global Light box
Angle: 100
Altitude: 25- Check the Anti-aliased box
Highlight Mode: Soft Light
Opacity: 50%
Shadow Mode:
Opacity: 15%

Add an Inner Shadow with these settings:
Blend Mode: Vivid Light
Color:#d0d0d0
Opacity: 50%- Uncheck the Use Global Light box
Angle: 90
Distance: 1
Size: 1

Add a Gradient Overlay with these settings:
- Check the Dither box
Blend Mode: Soft Light
Opacity: 20%- Create a Fill Color to Transparent gradient fill using the Color
#ffffffon both sides, and change the transparent side's Opacity Stop's Opacity value to 40%.

Add a Drop Shadow with these settings:
Blend Mode: Soft Light
Color:#000000
Opacity: 50%- Uncheck the Use Global Light box
Angle: 90
Distance: 7
Size: 10

This will create the embossed effect.

Leather Embossing Text Effect

A minimal raised text effect is perfect from everything to website designs to logo presentations. Elevate it even higher by adding a classy ultra-realistic leather texture! The leather texture is high resolution, and comes in both black and brown leather. Skip the layer styles and get the embossed text effect instantly!
Morton

Morton is a modern sans serif font that comes in multiple different font weights. Mix and match the font weights with both the embed and emboss font effects for a super modern and minimal look.
4. How to Create a Neon Text Effect
Step 1
Create a new 1000 x 500 px document, click the Create new fill or adjustment layer icon at the bottom of the Layers panel, and choose Gradient.
Create the gradient fill using the Colors #2e0d45 to the left and #0d0317 to the right, change the Style to Radial, the Scale to 200, and check the Dither box.

Step 2
Place the BrickLargeBrown0025 image on top of the Gradient layer, resize it as needed, and change its layer's Blend Mode to Overlay.

Step 3
Create the text using the font MM Cruella 100, and change the Color to #d87aff, the Size to 250 pt, and the Tracking value to 10.

Step 4
Change the text layer's Fill value to 0. You can increase the Fill value after applying the layer style to get a brighter effect if you like.

Step 5
Double-click the text layer to apply the following layer style.
Add a Bevel and Emboss with these settings:
Depth: 250
Size: 5
Soften: 2- Uncheck the Use Global Light box
Angle: 60
Altitude: 0
Gloss Contour: Ring - Double- Check the Anti-aliased box
Highlight Mode: Color Dodge
Color:#dcdcdc
Opacity: 50%
Shadow Mode: Vivid Light
Color:#e5e5e5
Opacity: 10%

Add a Contour with these settings:
Contour: Cone - Inverted- Check the Anti-aliased box.

Add an Inner Shadow with these settings:
Blend Mode: Linear Light
Color:#ebd5f3
Opacity: 100%- Uncheck the Use Global Light box
Angle: 90
Distance: 0
Size: 5

Add an Inner Glow with these settings:
Blend Mode: Linear Dodge (Add)
Opacity: 100%
Color:#ddbfff
Source: Center
Size: 5

Add a Satin effect with these settings:
Blend Mode: Vivid Light
Color:#e6a2ee
Opacity: 50%
Angle: 90
Distance: 10
Size: 35
Contour: Linear- Check the Anti-aliased box
- Check the Invert box

Add an Outer Glow with these settings:
Blend Mode: Linear Dodge (Add)
Opacity: 100%
Color:#c689ff
Size: 15
Range: 85%

Add a Drop Shadow with these settings:
Blend Mode: Screen
Color:#f227ff
Opacity: 85%- Uncheck the Use Global Light box
Angle: 90
Distance: 0
Size: 50

Add another Drop Shadow instance with these settings:
Blend Mode: Screen
Color:#f227ff
Opacity: 100%- Uncheck the Use Global Light box
Angle: 90
Distance: 0
Size: 60

Add a third Drop Shadow instance with these settings:
Opacity: 50%
Distance: 30
Size: 7

This will create a bright neon text effect.

Neon Layer Styles

Get the above text effect 70 different ways, 70 times as fast! This neon layer style pack contains a whopping 70 different layer styles that can be added to both fonts and shapes! It also comes with 15 backgrounds that perfectly match the dark neon aesthetic.
Avaneonz - Neon Font

Bring back the 80s with Avaneonz! A font face made to evoke not just the 80s but neon signs in general! It's obvious that Avaneonz and the above neon text effect were made for each other.
5. How to Create a Chrome Text Effect
Step 1
Open the Indoor Chairs image and go to Image > Image Size to change the Width value to 1000 px.

Step 2
Go to Filter > Blur > Gaussian Blur, and change the Radius value to 1.5.

Step 3
Go to Filter > Distort > Wave, and use these settings:
Number of Generators: 5
Wavelength:
Min. 228
Max. 241
Amplitude:
Min. 5
Max. 35
Scale:
Horiz. 100
Vert. 100
Type: Sine
Undefined Areas: Repeat Edge Pixels

Step 4
Go to Edit > Define Pattern, change the Name to Chrome Reflection, and click OK.
You can use any other image for this effect to get different results.

Step 5
Create a new 1000 x 500 px document, click the Create new fill or adjustment layer icon at the bottom of the Layers panel, and choose Gradient.
Create the gradient fill using the Colors #434a53 to the left and #121219 to the right, and change the Style to Radial, the Scale to 200, and check the Dither box.

Step 6
Add a Pattern fill layer, set the Pattern to Old Wall, and change the layer's Blend Mode to Color Burn.

Step 7
Create the text using the font Geneva, and change the Size to 200 pt.

Step 8
Duplicate the text layer and change the copy's Fill value to 0.

Step 9
Double-click the original text layer to apply the following layer style:
Add a Bevel and Emboss with these settings:
Size: 1
Gloss Contour: Rolling Slope - Descending- Check the Anti-aliased box
Highlight Mode: Linear Light
Color:#d6d6d6
Opacity: 75%
Shadow Mode:
Color:#4c4c4c
Opacity: 75%

Add a Contour with these settings:
Contour: Log- Check the Anti-aliased box.

Add an Inner Shadow with these settings:
Blend Mode: Color Dodge
Color:#4d4d4d
Opacity: 35%
Distance: 3
Size: 10

Add an Inner Glow with these settings:
Blend Mode: Soft Light
Opacity: 35%
Color:#ffffff
Size: 7

Add a Gradient Overlay with these settings:
- Check the Dither box
Blend Mode: Soft Light- Use the faucet 140 gradient fill

Add a Pattern Overlay with these settings:
Pattern: Chrome Reflection
You can click the Snap to Origin button to reset the texture's position inside the text.

Add a Drop Shadow with these settings:
Opacity: 75%
Distance: 15
Spread: 20
Size: 25

This will style the text.

Step 10
Double-click the copy text layer to apply the following layer style:
Add a Bevel and Emboss with these settings:
Style: Stroke Emboss
Size: 15- Uncheck the Use Global Light box
Angle: 119
Altitude: 21
Gloss Contour: Cone - Inverted- Check the Anti-aliased box

Add a Contour with these settings:
Contour: Ring- Check the Anti-aliased box.

Add a Stroke with these settings:
Size: 3
Fill Type: Gradient
Style: Reflected- Use the faucet 30 gradient fill

Add an Inner Shadow with these settings:
Opacity: 15%
Distance: 2
Size: 7

Add an Inner Glow with these settings:
Blend Mode: Soft Light
Opacity: 25%
Color:#ffffff
Size: 5

Add a Satin instance with these settings:
Blend Mode: Soft Light
Color:#939393
Opacity: 20%
Angle: -20
Distance: 190
Size: 15
Contour: Rolling Slope - Descending- Check the Anti-aliased box
- Check the Invert box

Add a Gradient Overlay with these settings:
- Blend Mode:
- Use the Stainless Steel 25jar gradient fill

This will add the stroke.

New 80s Text Effects

Get an even more detailed effect and take the chrome look back into the 80s with this set of 80s Text Effects. They're all chromed out in vibrant colors and sleek textures, so all you have to do is insert your own text and the PSD will do the rest. No fussing around with added textures or styles!
Zenzero Sans

Zenzero Grotesk Sans is an industrial-based font that pairs perfectly with a chrome text effect. It has ample surface area to show off the chrome text, as well as interesting shapes.
6. How to Create a 3D Text Effect in Photoshop
Step 1
Next, we are going to create a 3D text effect in Photoshop, without using any 3D features!
First, create a new 1000 x 500 px document, click the Create new fill or adjustment layer icon at the bottom of the Layers panel, and choose Gradient.
Create the gradient fill using the Colors #6a6a6a to the left and #b1b3b2 to the right, and check the Dither box.

Step 2
Add a Pattern fill layer, set the Pattern to Paper 3, and change the layer's Blend Mode to Color Burn.

Step 3
Create the text using the font SchmalfetteCP, change the Color to #d9d9d9, the Size to 300 pt, and the Tracking value to 10.
Duplicate the text layer.

Step 4
Change the original text Color to Red, and press Command-T to enter Free Transform Mode.
Press-hold the Option key, and click-drag the bounding box's right side slightly to shrink the text horizontally a little bit, making sure that no gaps are created between both pieces of text.
Hit the Return key to commit the changes.

Step 5
Change the original text layer's Fill value to 0.

Step 6
Double-click the original text layer to apply the following layer style:
Add a Bevel and Emboss with these settings:
Technique: Chisel Hard
Size: 75
Soften: 5- Uncheck the Use Global Light box
Angle: 34
Altitude: 32
Highlight Mode:
Opacity: 0%
Shadow Mode:
Opacity: 40%

Add a Contour with these settings:
Contour: Cove - Deep- Check the Anti-aliased box.

Add an Inner Shadow with these settings:
Opacity: 50%
Distance: 0
Choke: 5
Size: 15

Add a Color Overlay with these settings:
Color:#f2f2f2

Add an Outer Glow with these settings:
Blend Mode: Multiply
Opacity: 10%
Color:#000000
Size: 25

Add a Drop Shadow with these settings:
Opacity: 30%- Uncheck the Use Global Light box
Angle: 90
Distance: 2
Size: 10

This will style the 3D part.

Step 7
Double-click the copy text layer to apply the following layer style:
Add a Bevel and Emboss with these settings:
Depth: 200
Size: 1
Highlight Mode:
Opacity: 80%
Shadow Mode:
Opacity: 0%

Add a Contour with the default settings:

Add an Inner Shadow with these settings:
Opacity: 10%
Distance: 3
Size: 3

Add an Inner Glow with these settings:
Blend Mode: Vivid Light
Opacity: 10%
Color:#ddebee
Size: 5

Add a Gradient Overlay with these settings:
- Check the Dither box.
- Create the Gradient fill using the Colors
#a6a6a6to the left and#e7e8e9to the right.

Add an Outer Glow with these settings:
Blend Mode: Normal
Opacity: 10%
Color:#ffffff
Size: 5

Add a Drop Shadow with these settings:
Opacity: 50%- Uncheck the Use Global Light box
Angle: 90
Distance: 10
Size: 15

This will finish off the 3D effect.

3D Text Effects

Get the above text effect, along with six other 3D text effects, with this PSD pack! It's professionally designed and ultra-realistic, so ditch the work and get the 3D look instantly! It's not only quicker, but boasts more realistic shadows as well!
Branden - Casual Sans Serif Font

Branden is a modern sans serif font family that would pair perfectly with a 3D text effect! Bold and clean, Branden fits in any design easily.
7. How to Create a Sci-Fi Text Effect
Step 1
Create a new 1000 x 500 px document, click the Create new fill or adjustment layer icon at the bottom of the Layers panel, and choose Gradient.
Create the gradient fill using the Colors #5b7177 to the left and #0a252b to the right, and change the Style to Radial, the Scale to 200, and check the Dither box.

Step 2
Add a Pattern fill layer, set the Pattern to 9.jpg (from the Metal seamless textures pack), and change the layer's Blend Mode to Multiply.

Step 3
Create the text using the font Bhejeuct Gash, and change the Color to #283032 and the Size to 250 pt.

Step 4
Double-click the text layer to apply the following layer style:
Add a Bevel and Emboss with these settings:
Depth: 200
Size: 15- Uncheck the Use Global Light box
Angle: 157
Altitude: 16
Gloss Contour: Valley - Low- Check the Anti-aliased box
Highlight Mode: Linear Light
Color:#e99d89
Opacity: 100%
Shadow Mode: Color Burn
Color:#c7c7c7
Opacity: 70%

Add a Contour with these settings:
Contour: Cone - Inverted- Check the Anti-aliased box.
Range: 100%

Add a Texture with these settings:
Pattern: Diagonal lines medium (from the 30 Simple Patterns pack)

Add a Stroke with these settings:
Size: 2
Blend Mode: Linear Dodge (Add)
Fill Type: Gradient
Style: Reflected- Use the Riddle of Steel gradient fill

Add an Inner Shadow with these settings:
Blend Mode: Lighter Color
Color:#42f4ff
Opacity: 75%
Distance: 15
Size: 20
Contour: Cone - Asymmetrical

Add an Inner Glow with these settings:
Blend Mode: Linear Dodge (Add)
Opacity: 100%
Color:#b76c3e
Source: Center
Size: 15

Add a Satin style with these settings:
Blend Mode: Linear Light
Color:#9afff0
Opacity: 58%
Angle: 60
Distance: 50
Size: 8
Contour: Linear- Check the Anti-aliased box
- Check the Invert box

Add a Gradient Overlay with these settings:
- Check the Dither box
- Blend Mode:
- Click the Gradient box to create the gradient with these values:
Color - Location
#000000- 0%#11637e- 34%#25abdd- 71%#ffffff- 100%

Add an Outer Glow with these settings:
Blend Mode: Linear Light
Opacity: 100%
Color:#67e5e8
Size: 10

Add a Drop Shadow with these settings:
Opacity: 35%
Distance: 15
Spread: 25
Size: 18

This will style the text.

Hologram Text Effects

Looking to add several different hologram sci-fi text effects to your toolbox? Well, this pack comes with eight different styles! Add an instant hologram effect to both text and shapes, without having to stick to just one style like the effect above.
Dreamscape

Dreamscape is a font that is inspired by both a sci-fi and futuristic style, making it the perfect font to use with the above sci-fi text effect. It features interesting shapes and bold letters to show off the hologram textures.
8. How to Create a Retro Text Effect
Step 1
Create a new 1000 x 500 px document, click the Create new fill or adjustment layer icon at the bottom of the Layers panel, and choose Gradient.
Create the gradient fill using the Colors #aad1cf to the left and #3accc7 to the right. Change the Style to Radial and the Scale to 200, and check the Dither box.

Step 2
Add a Pattern fill layer, set the Pattern to texturetastic gray, and change the layer's Blend Mode to Linear Burn.

Step 3
Create the text using the font Mon Cheri, and change the Color to #f65252 and the Size to 250 pt.
Duplicate the text layer.

Step 4
Double-click the original text layer to apply a Drop Shadow effect with these settings:
Add a Drop Shadow with these settings:
Blend Mode: Normal
Opacity: 100%
Distance: 10
Spread: 100
Size: 5

Step 5
Right-click the styled layer and choose Convert to Smart Object. This will basically create the 3D extrusion layer.

Step 6
Double-click the Smart Object layer to apply the following layer style:
Add a Bevel and Emboss with these settings:
Technique: Chisel Hard
Size: 18- Uncheck the Use Global Light box
Angle: 149
Altitude: 58- Check the Anti-aliased box

Add a Contour with these settings:
Contour: Log- Check the Anti-aliased box.
Range: 100%

Add an Inner Shadow with these settings:
Blend Mode: Linear Burn
Color:#383838
Opacity: 15%- Uncheck the Use Global Light box
Angle: -77
Distance: 10
Size: 1

Add an Inner Glow with these settings:
Blend Mode: Soft Light
Opacity: 100%
Color:#ffffff
Technique: Precise
Source: Center
Size: 16

Add a Color Overlay with these settings:
Color:#d8d8d8

Add a Drop Shadow with these settings:
Blend Mode: Linear Burn
Color:#010101
Opacity: 15%
Distance: 5
Size: 3

Add another Drop Shadow instance with these settings:
Color:#010101
Opacity: 25%
Distance: 15
Size: 1

Add a third Drop Shadow instance with these settings:
Color:#010101
Opacity: 10%
Distance: 25
Size: 20

This will style the 3D part.

Step 7
Double-click the copy text layer to apply the following layer style:
Add a Stroke with these settings:
Size: 3
Color:#ffffff

Add an Inner Shadow with these settings:
Blend Mode: Linear Burn
Color:#383838
Opacity: 50%
Distance: 2
Choke: 50
Size: 1

Add a Pattern Overlay with these settings:
Blend Mode: Divide
Pattern: Pattern 11 (from the 20 Repeatable Pixel Patterns pack)

This will style the main text.

Retro Text Effects V2

Why settle on one retro text effect when you can have ten? Retro Text Effects V2 over on Envato Elements is a pack of authentic retro text effects, all inspired by the 1920s through to the 1950s. Including shadows and textures!
Retro Bordeaux Duos

Retro Bordeaux has all of the charm of a retro rustic font, but still remains modern and fresh. Pair it with the colors in the above 1940s retro text effect or add more earthy tones to create a 1970s-inspired text effect.
9. How to Create a Spray Paint Text Effect
Step 1
Next are some super simple text effects for Photoshop that will give you a spray-painted effect.
Create a new 1000 x 500 px document, place the BrickMedievalBlocks0129 image on top of the Background layer, and resize it as needed.

Step 2
Create the text using the font Graun, and change the Color to #ff4c3e and the Size to 250 pt.

Step 3
Change the text layer's Blend Mode to Multiply.

Step 4
Double-click the text layer to access the Blending Options settings.
Under the Blend If section, you'll find two bars. We will be working with the Underlying Layer one.
Press-hold the Option key, and click-drag the left slider to split it. As you move the slider's ends, you'll notice how the text starts to blend with the background image.
What this slider does is protect the darker areas of the image from being affected by the text.

Step 5
If you do the same with the right slider, you'll control the lighter areas you want to protect or prevent the text from affecting.

Step 6
Keep adjusting the sliders until you like the result.

Step 7
Next, we will add two more effects to enhance the outcome:
Add an Inner Shadow with these settings:
Color:#010101
Opacity: 15%
Distance: 0
Size: 5

Add an Outer Glow with these settings:
Blend Mode: Multiply
Opacity: 100%
Noise: 80%
Color:#ff4c3e
Size: 1
Range: 100%

This will enhance the edges.

Spray Stencil Layer Style

Take your spray paint effect to the next level with the Spray Stencil Layer Style pack! Simple shapes, complex logos, and of course any font you can think of can all be changed into a spray-painted effect in just a matter of minutes. No messing with Blend If or layer settings required—just press play to spray!
Stencil Autobahn

Autobahn is a bold display stencil typeface that, when paired with the above spray-paint text effect, creates an ultra-realistic painted wall effect quickly and easily!
10. How to Create a Glitter Text Effect
Step 1
Create a new 1000 x 500 px document, click the Create new fill or adjustment layer icon at the bottom of the Layers panel, choose Pattern, and set the Pattern to Beige paper.

Step 2
Create the text using the font Premier Script, and change the Color to #b1b1b1 and the Size to 300 pt.

Step 3
Double-click the text layer to apply the following layer style:
Add a Bevel and Emboss with these settings:
Technique: Chisel Hard
Size: 5
Gloss Contour: Ring - Double- Check the Anti-aliased box
Highlight Mode: Vivid Light
Opacity: 100%

Add a Texture with these settings:
Pattern: glitter-pink (from the Wastedshame Free Glitter Patterns pack)

Add a Pattern Overlay with these settings:
Pattern: Pink Glitter (from the 8 Free Glitter Effect Patterns & Styles for Photoshop pack)
Scale: 50%

Add a Drop Shadow with these settings:
Blend Mode: Vivid Light
Color:#ffffff
Opacity: 100%
Distance: 2
Size: 2
Noise: 5

Add a Drop Shadow with these settings:
Opacity: 20%- Uncheck the Use Global Light box
Angle: -45
Distance: 3
Size: 8
Noise: 5

This will create the final effect. You can try using different glitter textures to get different results as well.

Golden Era for Adobe Photoshop

What goes better with a glitter effect than gold? Not much! And with the Golden Era for Adobe Photoshop layer style pack, you get a whole group of 76 layer styles full of shine and glitz! And while the above effect may get you glitter, this gets you both glitter and gold!
Cherries

Cherries is a cheerful hand-drawn font face that is a great sans serif alternative to the script font above. Cute yet modern, Cherries has more than enough surface space to show off all of that pretty glitter texture.
Awesome Work, You're Done!
And that is all there is to creating ten cool text effects in Photoshop! Please feel free to leave your comments, suggestions, and outcomes below.

Want even more Photoshop layer effect tutorials? Check out the options below!
 Text EffectsHow to Create a Hot Concrete Text Effect in Adobe Photoshop
 Text EffectsHow to Create an Easy Digital Glitch Text Effect in Adobe Photoshop
 Text EffectsHow to Rotate Text in Photoshop
 Photoshop ActionsHow to Create a Cloud Effect in Photoshop
 Adobe PhotoshopHow to Create an Ink Brush in Photoshop
 Text EffectsHow to Create a Cartoon Gradient Text Effect in Adobe Photoshop
Original Link: https://design.tutsplus.com/tutorials/10-useful-layer-style-text-effects--cms-29372
TutsPlus - Design
More About this Source Visit TutsPlus - Design