
An Interest In:
Web News this Week
- April 4, 2024
- April 3, 2024
- April 2, 2024
- April 1, 2024
- March 31, 2024
- March 30, 2024
- March 29, 2024
Some of Our Sources
- Slashdot
- Mashable
- Simplebits
- Smashing Apps
- Vandelay Design
- Fuel Your Creativity
- FanExtra - PSD
- Fudge Graphics
- Codrops
- Daily Now
Help Webnuz
Referal links:
Deploying Fake Back-End Server & DataBase Using JSON-SERVER, GitHub, and Heroku.
In this article, we will create and host a fake server that we can deal with it as a normal Back-End Server and use all the CRUD Operations using HTTP requests.
1.Creating the Fake Server.
You can download the final result HERE, Or follow along with me.
- Create a folder and name it
fake-server. - Open the terminal and init npm, and make the entry point
server.js
npm init - install json-server.
npm i json-server- Add a
startscript.
package.json
{ "name": "fake-server", "version": "1.0.0", "description": "fake server with fake database", "main": "server.js", "scripts": { // <=== "start": "node server.js" // <=== }, "author": "Youssef Zidan", "license": "ISC", "dependencies": { "json-server": "^0.16.3" }}- create
.gitignorefile and addnode_modules..gitignore
node_modules- Create
server.jsfile and paste the following
const jsonServer = require('json-server');const server = jsonServer.create();const router = jsonServer.router('db.json'); // <== Will be created laterconst middlewares = jsonServer.defaults();const port = process.env.PORT || 3200; // <== You can change the portserver.use(middlewares);server.use(router);server.listen(port);- init git and publish your repo to GitHub
git initgit remote add origin https://github.com/<YourName>/<Repo-Name>.gitgit add .git push --set-upstream origin masterDownload the final Repo from HERE
2. Creating the DataBase
- Create
db.jsonfile - Fill in any data you like, I use Mockaroo which is a great and easy way to generate dummy data.
db.json
{ "users": [ { "id": 1, "first_name": "Justina", "last_name": "Ginglell", "email": "[email protected]", "gender": "Female" }, { "id": 2, "first_name": "Marion", "last_name": "Jenman", "email": "[email protected]", "gender": "Male" }, { "id": 3, "first_name": "Alfy", "last_name": "Begin", "email": "[email protected]", "gender": "Female" }, { "id": 4, "first_name": "Karney", "last_name": "Zanussii", "email": "[email protected]", "gender": "Male" }, { "id": 5, "first_name": "Reid", "last_name": "Schapero", "email": "[email protected]", "gender": "Male" }, { "id": 6, "first_name": "Dorine", "last_name": "Braybrookes", "email": "[email protected]", "gender": "Female" }, { "id": 7, "first_name": "Sarena", "last_name": "Frape", "email": "[email protected]", "gender": "Female" }, { "id": 8, "first_name": "Malva", "last_name": "Pierse", "email": "[email protected]", "gender": "Female" }, { "id": 9, "first_name": "Rania", "last_name": "Dablin", "email": "[email protected]", "gender": "Female" }, { "id": 10, "first_name": "Ingrim", "last_name": "Offen", "email": "[email protected]", "gender": "Male" } ]}- Push your work
git add .git commit -m "creating the database"git push3. Creating the server
- Create account on Heroku
- Install the Heroku CLI on your computer
- Open the terminal and log in then follow the instructions
heroku login- Create a project
heroku create fake-server-app- Push your app to Heroku
git push heroku master- Open your created app
heroku openYou will see something like this:

Now, You can access and modify resources via any HTTP methodGET POST PUT PATCH DELETE OPTIONS
4. Creating a Pipeline.
A pipeline is simply a connection between your GitHub repo and your Heroku Project.
So, Whenever you update your db.json for example and push your changes to a specific branch Heroku will be listening to this branch and build your app with the updated database.
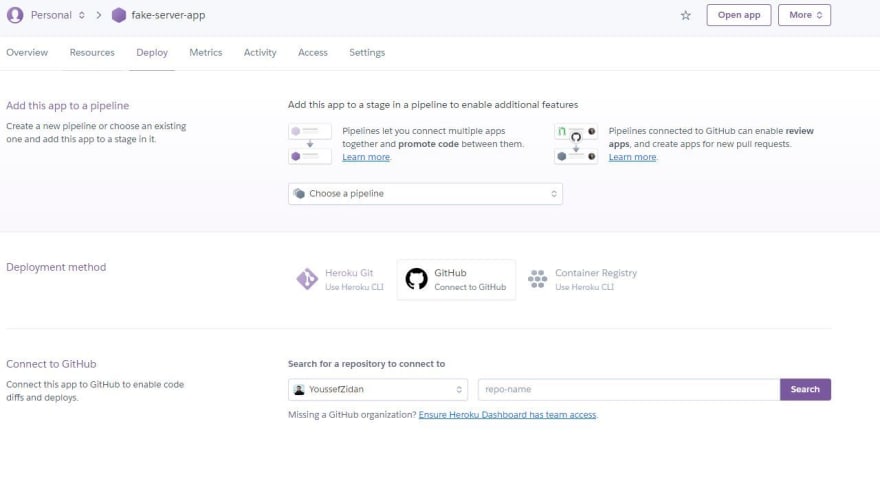
Open your dashboard on Heroku and choose your app.

Navigate to
Deploytap and create a pipeline, Connect your GitHub with the fake-server repo
- Configure auto-deploy and choose the branch of the Pipeline

Now whenever you push the changes to the selected branch, the database will be updated and can be accessed via the same base API.
Original Link: https://dev.to/youssefzidan/deploying-fake-back-end-server-database-using-json-server-github-and-heroku-1lm4
Dev To
More About this Source Visit Dev To