
An Interest In:
Web News this Week
- April 27, 2024
- April 26, 2024
- April 25, 2024
- April 24, 2024
- April 23, 2024
- April 22, 2024
- April 21, 2024
Some of Our Sources
- Slashdot
- Technology Review
- Web Designer Wall
- Smashing Magazine
- Six Revisions
- Fuel Your Creativity
- Noupe
- Wal You
- Codrops
- Hashedout
Help Webnuz
Referal links:
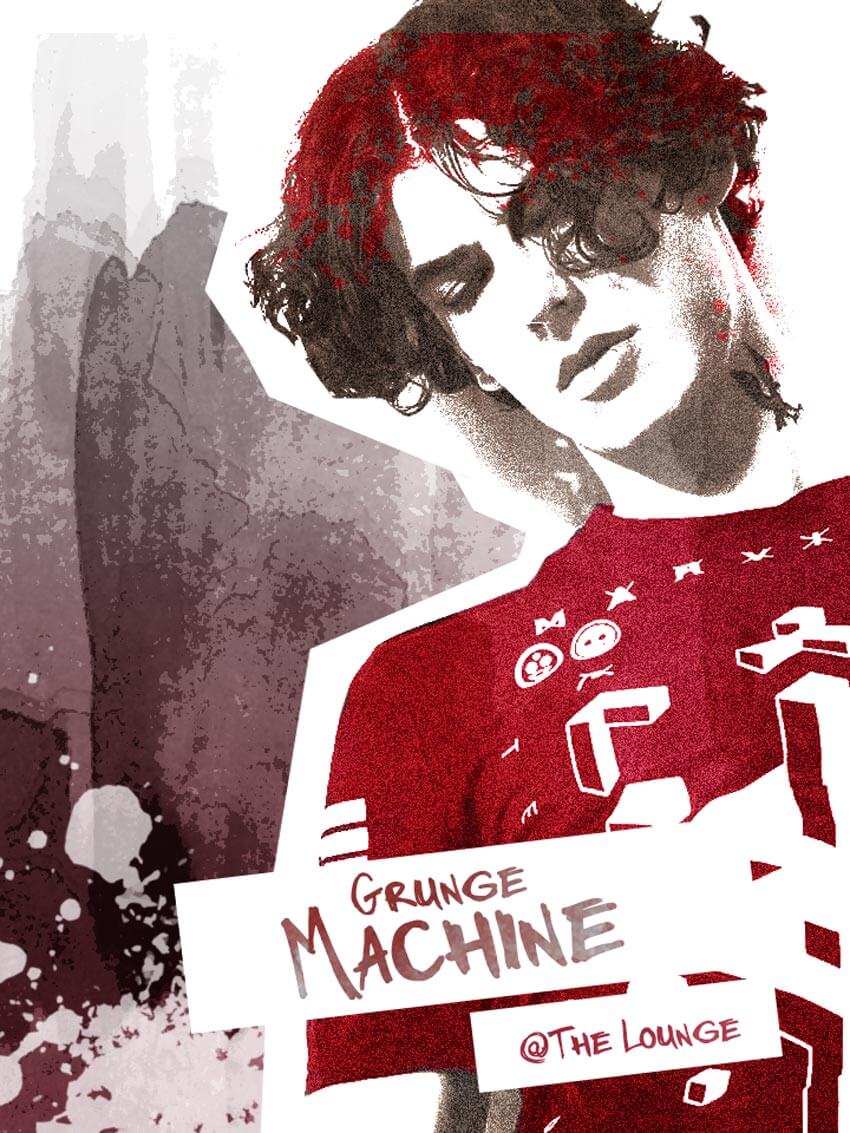
How to Create a Retro 90s Grunge Photo Effect in Adobe Photoshop

Nineties grunge was an explosive era in American culture, filled with the sounds of
punk rock, heavy metal, and electric guitars. If you need to create an eye-catching grunge flyer to revive the 1990s aesthetic, keep reading. In this tutorial, you'll learn how to make a grunge photo effect in Photoshop for a flyer template.
And don't worry if you don't have the software installed on your computer. Scroll down after this grunge photo effect Photoshop tutorial and learn how to make a grunge flyer template in your browser, with Placeit.
What You Will Learn in This Grunge Photo Effect Tutorial
- How to make a grunge photo effect in Photoshop
- How to make a picture look 90s
- How to make grunge photos using multiple assets
- How to apply a 1990s aesthetic to a flyer design
- How to make a grunge poster design without Photoshop
Follow along with us over on our Envato Tuts+ YouTube channel:
Tutorial Assets
The following assets were used during the production of this grunge photo effect Photoshop tutorial:
1. How to Create the Background
Step 1
Let's begin the 90s grunge Photoshop template. Open the Watercolor stock in Photoshop. Go to Image > Image Rotate > 90 Degrees Clockwise to turn the stock from a landscape to a portrait orientation.

Step 2
This watercolor image will serve as our 90s grunge background, so let's desaturate it a bit. Select the layer and go to Image > Adjustments > Hue and Saturation and lower the Saturation to -100 to turn the photo black and white. Use the Move Tool (V) to lower the stock and show a peek of the white background underneath.

Step 3
Now go to the bottom of your Layers panel and select the New Adjustment Layer for Posterize. Set the Levels to 8 for a nice grunge effect.

Step 4
Now create another New Adjustment Layer, this time for a Gradient. Create a Linear Gradient that goes from a dark red color #901026 to white. When you're finished, set the Layer Blend Mode to Soft Light to apply the gradient to the grunge background.

2. How to Manipulate the Subject
Step 1
Now for the next step in learning how to make a picture look 90s. Open the stock of your Rocker into Photoshop and use the Magnetic Lasso Tool (L) to create a rough selection around the person. Copy and Paste the rocker on top of the grunge background layers.

Step 2
Your Photoshop template is looking better. Create a New Layer underneath your subject. Use the Polygonal Lasso Tool (L) to create a cutout shape behind him with rough edges. Fill the shape with white using the Paint Bucket Tool (G) when you're finished.

Step 3
To add some grunge to your subject in the Photoshop flyer template, we'll need a filter. Select the Rocker layer and go to Filter > Filter Gallery > Artistic > Film Grain, and add the following settings:
- Grain: 0
- Highlight Area: 5
Intensity: 10

The first pass of this filter allowed us to create more contrast and intensity. Now go to the same Film Grain filter again and apply a slight grain with the following settings:
- Grain: 7
- Highlight Area: 3
- Intensity: 3

3. How to Colorize the Subject
Step 1
We're almost done with your Photoshop flyer template. Let's add some color. Right-click and select the Blending Options for your subject's layer. Create a shiny, copper-like Linear Gradient Overlay with the following settings, making sure to set the Blend Mode to Overlay so that it colorizes your subject.


Step 2
To tie in the red from the background, create a New Layer and set the Layer Blend Mode to Color. Right-click to set the layer as a Clipping Mask to your subject and use a Hard Round Brush to paint bright red #d14456 all over his T-shirt.

Right-click to select the Blending Options for the Red layer. To make the color look better on his shirt, create a transparent to black Linear Gradient Overlay with the following settings.

Step 3
Bump up the intensity of this effect, by setting a New Adjustment Layer of Levels as a Clipping Mask to your subject. Adjust the RGB Channel with the following settings:

4. How to Add Finishing Touches
Step 1
Now that the base of our grunge effect is complete, let's add some finishing touches to the Photoshop template. First, open your Splatter Reference in Photoshop. Select it using the Rectangular Marquee Tool (M) and go to Edit > Define Brush Preset to create your own brush. Feel free to also use different splatter brushes from Envato Market.

Step 2
Use the splatter brush you created to add some splatter onto your 90s grunge effect. First, select the Red layer and paint some splatter on his hair using the same color as before. Then create a New Layer underneath your subject and paint a white splatter in the bottom left corner.

Step 3
Finish this effect with some text! Use the Rectangle Tool (U) to create two white rectangles in the bottom right corner of the image.

Add whatever text you would like to the rectangles using this free Marker Twins font or by using a selection of great grunge fonts from Envato Market.
Duplicate the original black and white watercolor stock twice, and then set one of the copies as a Clipping Mask to the larger text. Set the Layer Blend Mode to Lighten to apply the grunge look.

Finish off the effect by dragging the second copy of the watercolor effect above all the other layers and setting the Layer Blend Mode to Soft Light. This helps to make everything look a little more "grungy."

Your Grunge Poster Design Is Done!
You can get a lot of inspiration for your designs by looking at different eras in culture. I hope you enjoyed this grunge photo effect Photoshop tutorial. Have fun creating your own unique 90s grunge effect for your next flyer template, and feel free to show us your results in the comments below!
How to Create a Grunge Flyer Template Without Photoshop
I hope you liked the grunge photo effect Photoshop tutorial, and you feel inspired to create a Photoshop flyer template.
But what if you don't have Photoshop? Well, I'll tell you how to make grunge photos without any design software installed.
You can make a grunge flyer in your browser with Placeit, an online flyer maker that's really easy to use.
Check out our grunge poster designs below, edit them to your heart's content, and buy your high-resolution grunge flyer!
1. Music Festival Grunge Flyer Template

If you're designing a grunge flyer for a music event, this is a really nice option. See the 1990s aesthetic in the design and how the band's picture is the center of attention.
2. Underground Music Festival Grunge Flyer

This flyer template is another example of the cool 1990s aesthetic. You can create a professional grunge poster design with endless customization possibilities.
3. Music Battle Grunge Flyer Template

This is a very cool way to present a music battle in a grunge flyer template. You can change the fonts, colors, and images, and create your own grunge music battle flyer.
4. Grunge Concert Flyer Template

This grunge poster design is simple and effective. Let the performer's picture take all the focus in this flyer template.
5. Punk Vibe Grunge Flyer Template

The grunge aesthetic often uses a darker color scheme than this, but why not try something different? Or if pink and green are not the vibe you're going for, it's easy to switch up the colors in your browser using this simple online flyer maker.
Discover More 90s Design Inspiration
You've learned how to make a picture look 90s and how to create amazing grunge flyer templates with our online flyer maker.
Now, I'm sure you're hungry for more 90s design inspiration! Check out these cool resources below:
 Poster DesignHow to Create a 90s Abstract Rave Poster in Adobe Photoshop
 Typography90s Graphic Design Trends: From Aesthetic Fonts to Grunge Patterns and Rave Flyers
 TrendsTrend Watch: Retro 90s Design
 AestheticsAesthetic Design: From Vaporwave Design to the Grunge Aesthetic
 HalloweenHow to Draw in a Creepy 90s Cartoon Style
 Effects50 Dirty, Filthy Grunge Photoshop Effects
 Poster DesignHow to Use the Wind Blast Effect in Adobe Photoshop
 Flyers27 Best Flyer Design Ideas Using a Flyer Maker (With Photo)
 Flyers31 Best New Event Flyers for 2020
Original Link: https://design.tutsplus.com/tutorials/how-to-create-a-retro-90s-grunge-photo-effect-in-adobe-photoshop--cms-26971
TutsPlus - Design
More About this Source Visit TutsPlus - Design