
An Interest In:
Web News this Week
- April 27, 2024
- April 26, 2024
- April 25, 2024
- April 24, 2024
- April 23, 2024
- April 22, 2024
- April 21, 2024
Some of Our Sources
- Techcrunch
- Simplebits
- Joshua Blankenship
- Pearsonified
- Abduzeedo
- Noupe
- Specky Boy
- Willems Lab
- Daily Now
- The Verge
Help Webnuz
Referal links:
Deploy Machine Learning models using Flask into Heroku
This post will help you understand how to deploy a machine learning model on the web using Flask. I have used heroku to deploy the ML model.
What is Heroku ?
Heroku is a multi-language cloud application platform that enables developers to deploy, scale, and manage their applications. Heroku is elegant, flexible, and easy to use, offering developers the simplest path to getting their apps to market. Salesforce acquired Heroku in 2010, spending $212 million on the cloud computing outfit.
Following steps need to be followed
- Train ML model
- Create a web app using Flask
- Commit the code to GitHub
- Connect GitHub to Heroku
- Deploy the model
Train the Machine Learning model
I am using logistic regression as the classification algorithm. I have used Framingham Heart study dataset to predict the risk of developing a heart disease. The objective of the Framingham Study is to study the incidence and prevalence of cardiovascular disease (CVD) and its risk factors.
import pandas as pdimport numpy as npimport picklefrom sklearn.linear_model import LogisticRegressionfrom sklearn.model_selection import train_test_split# Reading dataframe and dropping rows with na valuesdata = pd.read_csv("framingham.csv")data.dropna(inplace=True) # Consists 3658 records# Computing Correlationcorr_matrix = data.corr().abs()high_corr_var = np.where(corr_matrix > 0.35)high_corr_var = [(corr_matrix.index[x], corr_matrix.columns[y]) for x, y in zip(*high_corr_var) if x != y and x < y]"""Variables to considerage: Age of a person (Input a number)smoker: Yes or NoCigs per day: (Input a number)diabaties: Yes or Nobmi: weight(Kg) and height(meters) calculateBP: input a number"""def bmi(weight, height): return round(float(weight) / (float(height) * float(height)), 2)X_cols = ['male', 'age', 'currentSmoker', 'cigsPerDay', 'diabetes', 'sysBP', 'BMI']Y_col = ['TenYearCHD']X_vars = data[X_cols]Y_var = data[Y_col]# Renaming ColumnsX_vars.columns = ['Gender', 'Age', 'Smoker', 'Cigarettes_Per_Day', 'Diabetic', 'BP', 'BMI']Y_var.columns = ['Chances_of_hear_disease']# Splitting dataX_train, X_test, y_train, y_test = train_test_split(X_vars, Y_var, test_size=0.25, random_state=0)# Initiate the Modellogreg = LogisticRegression()# fit the model with datalogreg.fit(X_train, y_train)pickle.dump(logreg, open('model.pkl', 'wb'))I have used pickle library, which basically helps you to dump your model in the form character stream. The idea is that this character stream contains all the information necessary to reconstruct the object in another python script. This will create model.pkl file in write bytes mode which will later be used to deploy the model.
Create a web app using Flask
Below I have defined the app routes and completing the app.py file. I have created a Index.html which will serve as the home page, where we will have all the field required to run the model.
First step is to setup a secret key which is needed to keep the client-side sessions secure. When working with sessions in Flask you need to create a secret_key comprised of random bytes represented in hexadecimal.
# Set the secret key to some random bytes. # Keep this really secret!app.secret_key = b'_5#y2L"F4Q8z\n\xec]/'Dataform class is defining the structure of the page comprising of radio buttons, checkboxes and labels. This will help us to capture the data in proper manner. The last step is to render the index.html template and take inputs from the user. When the user submits the inputs, index function will be triggered and the app will start computing the final output.
import osimport picklefrom flask_wtf import FlaskFormfrom flask import Flask, render_templatefrom wtforms.validators import DataRequiredfrom wtforms import IntegerField, BooleanField, FloatField, SubmitField, RadioFieldclass Config(object): SECRET_KEY = os.environ.get('SECRET_KEY') or 'you-will-never-guess' APP_PATH = os.path.dirname(__file__)app = Flask(__name__)app.config.from_object(Config)class DataForm(FlaskForm): gender = RadioField('Gender', validators=[DataRequired()], choices=['Male', 'Female']) age = IntegerField('Age', validators=[DataRequired()]) diabetic = BooleanField('Are you Diabetic?') smoker = BooleanField('Do you smoke? ') cig_count = FloatField('How many cigarettes do you smoke per day ?', default=0) weight = FloatField('Weight (Kg)', validators=[DataRequired()]) height = FloatField('Height (cm)', validators=[DataRequired()]) bp = IntegerField('Blood Pressure (mmHg) Normal range : (90-120)/(60-80)', validators=[DataRequired()]) submit = SubmitField('Submit')@app.route('/')@app.route('/index', methods=['GET', 'POST'])def index(): form = DataForm() if form.validate_on_submit(): li = ['age', 'gender', 'cig_count', 'diabetic', 'height', 'weight', 'smoker', 'bp'] data = {} for ele in li: data[ele] = eval('form.' + ele + '.data') gender = 1 if data['gender'] == 'Male' else 0 smoker = 1 if data['smoker'] else 0 diabetic = 1 if data['diabetic'] else 0 filename = os.path.join(app.config['APP_PATH'], 'model.pkl') with open(filename, 'rb') as f: model = pickle.load(f) value = model.predict([[gender, data['age'], smoker, data['cig_count'], diabetic, data['bp'], bmi(data['weight'], data['height'])]]) data = ['done', value[0]] return render_template('index.html', value=data, form=form, data=data) return render_template('/index.html', form=form)def bmi(weight, height): return round(float(weight) / (float(height / 100) * float(height / 100)), 2)if __name__ == '__main__': app.run(debug=True)Most important thing is to create a Procfile and requirement.txt, which handles the configuration part in order to deploy the model into heroku server. web: gunicorn is the fixed command, after that the first parameter is app.py file i.e the file which will be executed first. Provide the first parameter without the file extension. Second parameter is the flask app name.
Requirements consists of all the libraries that has to get installed in heroku environment.
web: gunicorn app:app
click==7.1.2Flask==1.1.2Flask-WTF==0.14.3gunicorn==20.0.4itsdangerous==1.1.0Jinja2==2.11.2joblib==0.16.0MarkupSafe==1.1.1numpy==1.19.1pandas==1.1.0python-dateutil==2.8.1python-dotenv==0.14.0pytz==2020.1scikit-learn==0.23.2scipy==1.5.2six==1.15.0sklearn==0.0threadpoolctl==2.1.0Werkzeug==1.0.1WTForms==2.3.3Commit your code GitHub and connect Heroku to GitHub
Create a app name in heroku and connect your github repository as shown below.
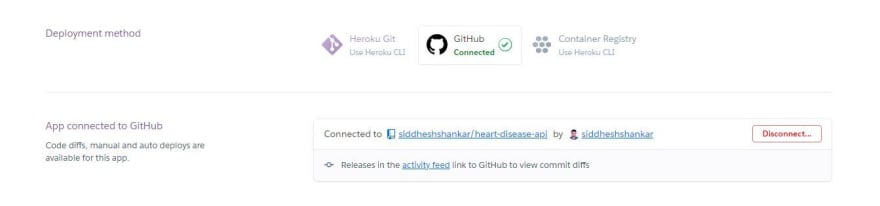
After you connect, there are 2 ways to deploy your app. You could either choose automatic deploy or manual deploy. Automatic deployment will take place whenever you commit anything into your github repository. Automatically the build will start. I have deployed it using manual deploy.
Just by selecting the branch and clicking on deploy, build will start. After successful deployment, deployment tab should look as shown below:
Final app
After successful deployment, app will be created. Click on the view and your app should open. A new url will be created.
Checkout my app: https://heart-disease-predictor-api.herokuapp.com/
I hope you found this post useful. This will help end-users to interact with our ML models without any external dependency.
Done!
Octocat will take you to my GitHub repository...
Original Link: https://dev.to/siddheshshankar/deploy-machine-learning-models-using-flask-into-heroku-4b54
Dev To
More About this Source Visit Dev To