
An Interest In:
Web News this Week
- April 1, 2024
- March 31, 2024
- March 30, 2024
- March 29, 2024
- March 28, 2024
- March 27, 2024
- March 26, 2024
Some of Our Sources
- BoingBoing
- TutsPlus - Code
- Just Creative
- Smashing Magazine
- Vandelay Design
- FanExtra - PSD
- Crazy Leaf Design
- Reencoded
- Stylized Web
- Design Modo
Help Webnuz
Referal links:
Build an amazing Job Search App using React
In this article, we will build a beautiful Job search app using Github Jobs API
By building this App, you will learn:
- How to lazy load images in React
- How to use React Context API for sharing data between components
- Why React will not render the HTML used in JSX Expression and how to get it displayed correctly when required
- How to display an alternate loading image while the actual image is downloading
- How to create your own version of a loader using React Portal
- How to add Load More functionality
And much more.
You can see the live demo of the application HERE
Lets get started
Create a new project using create-react-app
create-react-app github-jobs-react-appOnce the project is created, delete all files from the src folder and create index.js file inside the src folder. Also create actions,components, context,css, custom-hooks, images,reducers, router, store and utils folders inside the src folder.
Install the necessary dependencies
yarn add axios@0.19.2 bootstrap@4.5.0 lodash@4.17.15 moment@2.27.0 node-sass@4.14.1 prop-types@15.7.2 react-bootstrap@1.0.1 react-redux@7.2.0 redux@4.0.5 redux-thunk@2.3.0Create a new folder with the name server outside the src folder and execute the following command from server folder
yarn init -yThis will create a package.json file inside the server folder.
Install the required dependencies from server folder
yarn add axios@0.19.2 express@4.17.1 cors@2.8.5 nodemon@2.0.4Create a new file with name .gitignore inside server folder and add the following line inside it so node_modules folder will not be version controlled
node_modulesNow, Create a new file styles.scss inside src/css folder and add content from HERE inside it.
Create a new file jobs.js inside src/reducers folder with the following content
const jobsReducer = (state = [], action) => { switch (action.type) { case 'SET_JOBS': return action.jobs; case 'LOAD_MORE_JOBS': return [...state, ...action.jobs]; default: return state; }};export default jobsReducer;In this file, we are adding the new jobs data coming from API in redux using SET_JOBS action and using LOAD_MORE_JOBS action we are getting more jobs and adding it to already existing jobs array using the spread operator.
[...state, ...action.jobs]Create a new file errors.js inside src/reducers folder with the following content
const errorsReducer = (state = {}, action) => { switch (action.type) { case 'SET_ERRORS': return { error: action.error }; case 'RESET_ERRORS': return {}; default: return state; }};export default errorsReducer;In this file, we are adding the API error if any into the redux store by dispatching SET_ERRORS action and removing the error object from redux store if there is no error while getting a response from API by dispatching RESET_ERRORS action.
Create a new file store.js inside src folder with the following content
import { createStore, combineReducers, applyMiddleware, compose } from 'redux';import thunk from 'redux-thunk';import jobsReducer from '../reducers/jobs';import errorsReducer from '../reducers/errors';const composeEnhancers = window.__REDUX_DEVTOOLS_EXTENSION_COMPOSE__ || compose;const store = createStore( combineReducers({ jobs: jobsReducer, errors: errorsReducer }), composeEnhancers(applyMiddleware(thunk)));console.log(store.getState());export default store;In this file, we are creating a redux store that uses combineReducers and added thunk from redux-thunk as a middleware for managing the Asynchronous API handling.
We also added the redux devtool configuration using composeEnhandlers.
If you are new to redux-thunk and redux devtool configuration, check out my previous article HERE to understand how to use it.
Now, inside src/index.js file add the following content
import React from 'react';import ReactDOM from 'react-dom';import { Provider } from 'react-redux';import store from './store/store';import HomePage from './components/HomePage';import 'bootstrap/dist/css/bootstrap.min.css';import './css/styles.scss';ReactDOM.render( <Provider store={store}> <HomePage /> </Provider>, document.getElementById('root'));In this file, we are using Provider component from react-redux which will allow us to share the store data to HomePage and all its child components.
Now, Create a new file HomePage.js inside src/components folder with the following content.
import React from 'react';const HomePage = () => { return <div className="container">Home Page</div>;};export default HomePage;Now, open public/index.html and change
<title>React App</title>To
<title>Github Job Search</title>Now start the React application by running following command from github-jobs-react-app folder
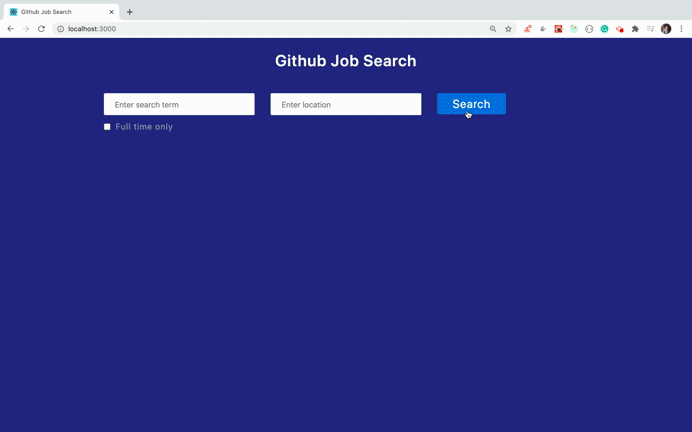
yarn startYou will see the application with Home Page text displayed

Now, create a new file Header.js inside components folder with the following content
import React from 'react';const Header = () => ( <header className="header"> <div className="title">Github Job Search</div> </header>);export default Header;Create a new file Search.js inside components folder with the following content
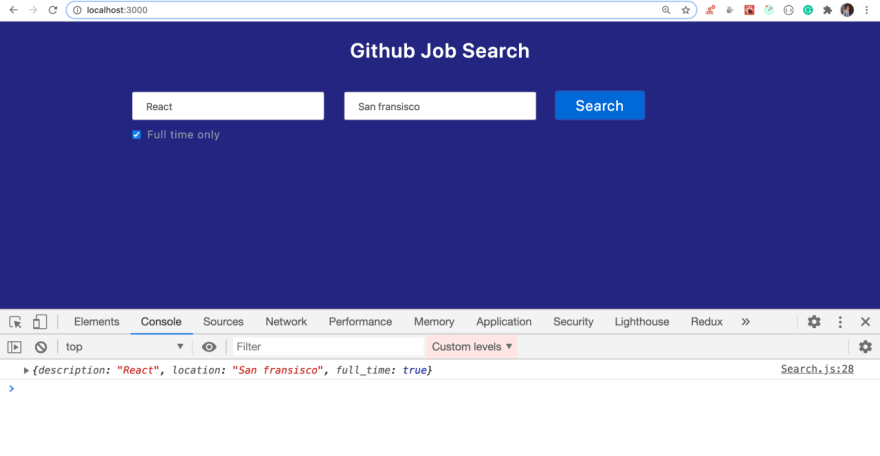
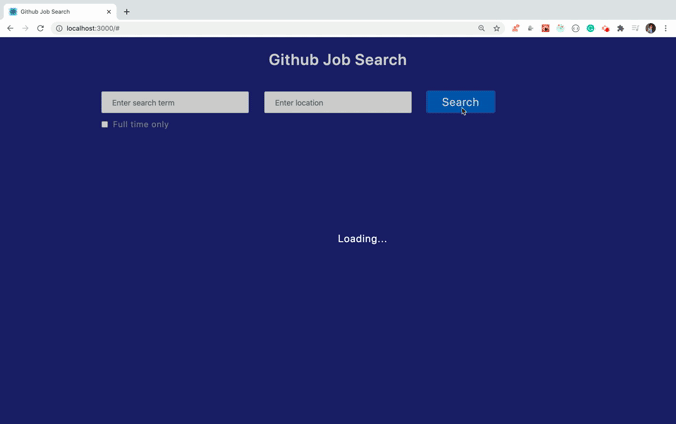
import React, { useState } from 'react';import { Form, Button, Row, Col } from 'react-bootstrap';const Search = (props) => { const [state, setState] = useState({ description: '', location: '', full_time: false }); const handleInputChange = (event) => { const { name, value } = event.target; if (name === 'full_time') { setState((prevState) => ({ ...state, [name]: !prevState.full_time })); } else { setState({ ...state, [name]: value }); } }; const handleSearch = (event) => { event.preventDefault(); console.log(state); }; return ( <div className="search-section"> <Form className="search-form" onSubmit={handleSearch}> <Row> <Col> <Form.Group controlId="description"> <Form.Control type="text" name="description" value={state.description || ''} placeholder="Enter search term" onChange={handleInputChange} /> </Form.Group> </Col> <Col> <Form.Group controlId="location"> <Form.Control type="text" name="location" value={state.location || ''} placeholder="Enter location" onChange={handleInputChange} /> </Form.Group> </Col> <Col> <Button variant="primary" type="submit" className="btn-search"> Search </Button> </Col> </Row> <div className="filters"> <Form.Group controlId="full_time"> <Form.Check type="checkbox" name="full_time" className="full-time-checkbox" label="Full time only" checked={state.full_time} onChange={handleInputChange} /> </Form.Group> </div> </Form> </div> );};export default Search;In this file, we have added two input text fields to get the description and location from the user and added a checkbox to get only full-time jobs.
We also added an onChange handler to each input field to update the state value.
Now, open HomePage.js and replace it with the following content
import React from 'react';import Header from './Header';import Search from './Search';const HomePage = () => { return ( <div> <Header /> <Search /> </div> );};export default HomePage;Now, If you enter the values in input fields and click on Search button, you will see the entered data displayed in the console
Now, create errors.js inside src/actions folder with the following content
export const setErrors = (error) => ({ type: 'SET_ERRORS', error});export const resetErrors = () => ({ type: 'RESET_ERRORS'});In this file, we have added action creator functions which we will call to dispatch actions to the reducer.
Create a new file constants.js inside utils folder with the following content
export const BASE_API_URL = 'http://localhost:5000';Create a new file jobs.js inside src/actions folder with the following content
import axios from 'axios';import moment from 'moment';import { BASE_API_URL } from '../utils/constants';import { setErrors } from './errors';export const initiateGetJobs = (data) => { return async (dispatch) => { try { let { description, full_time, location, page } = data; description = description ? encodeURIComponent(description) : ''; location = location ? encodeURIComponent(location) : ''; full_time = full_time ? '&full_time=true' : ''; if (page) { page = parseInt(page); page = isNaN(page) ? '' : `&page=${page}`; } const jobs = await axios.get( `${BASE_API_URL}/jobs?description=${description}&location=${location}${full_time}${page}` ); const sortedJobs = jobs.data.sort( (a, b) => moment(new Date(b.created_at)) - moment(new Date(a.created_at)) ); return dispatch(setJobs(sortedJobs)); } catch (error) { error.response && dispatch(setErrors(error.response.data)); } };};export const setJobs = (jobs) => ({ type: 'SET_JOBS', jobs});export const setLoadMoreJobs = (jobs) => ({ type: 'LOAD_MORE_JOBS', jobs});In this file, we have added an initiateGetJobs function which will get the JSON data by making an API call to the Express server in Node.js and once the data is received, SET_JOBS action is dispatched which will add all the jobs data into the redux store by executing the SET_JOBS switch case from reducers/jobs.js file.
Now, create a new fileserver.js inside server folder with the following content
const path = require('path');const axios = require('axios');const cors = require('cors');const express = require('express');const app = express();const PORT = process.env.PORT || 5000;const buildPath = path.join(__dirname, '..', 'build');app.use(express.static(buildPath));app.use(cors());app.get('/jobs', async (req, res) => { try { let { description = '', full_time, location = '', page = 1 } = req.query; description = description ? encodeURIComponent(description) : ''; location = location ? encodeURIComponent(location) : ''; full_time = full_time === 'true' ? '&full_time=true' : ''; if (page) { page = parseInt(page); page = isNaN(page) ? '' : `&page=${page}`; } const query = `https://jobs.github.com/positions.json?description=${description}&location=${location}${full_time}${page}`; const result = await axios.get(query); res.send(result.data); } catch (error) { res.status(400).send('Error while getting list of jobs.Try again later.'); }});app.listen(PORT, () => { console.log(`server started on port ${PORT}`);});In this file, we have created a /jobs get API using Express server.
Here, we are calling the Github Jobs API to get the list of available jobs by passing the description and location.
By default, the API gives a list of the latest 50 jobs only but we can get more jobs by sending page query parameter with values 1, 2, 3, etc.
So we are validating the page query parameter by the following code
if (page) { page = parseInt(page); page = isNaN(page) ? '' : `&page=${page}`;}If we want to only the full-time jobs then we need to add an additional full_time parameter to query string with the value of true
full_time = full_time === 'true' ? '&full_time=true' : '';Then finally we are creating the API URL by combining all parameter values.
`https://jobs.github.com/positions.json?description=${description}&location=${location}${full_time}${page}`;The reason for adding encodeURIComponent for each input field is to convert special characters if any like space to %20.
If you noticed, we have added the same parsing code in initiateGetJobs function also which is inside actions/jobs.js file.
The reason for including it in server code also is that we can also directly access the /jobs get API without any application for just for the additional check we added the conditions.
Now, create a new file JobItem.js inside the components folder with the following content
import React from 'react';import moment from 'moment';const JobItem = (props) => { const { id, type, created_at, company, location, title, company_logo, index } = props; return ( <div className="job-item" index={index + 1}> <div className="company-logo"> <img src={company_logo} alt={company} width="100" height="100" /> </div> <div className="job-info"> <div className="job-title">{title}</div> <div className="job-location"> {location} | {type} </div> <div className="company-name">{company}</div> </div> <div className="post-info"> <div className="post-time"> Posted {moment(new Date(created_at)).fromNow()} </div> </div> </div> );};export default JobItem;In this file, we are displaying the data coming from API
Create a new file Results.js inside components folder with the following content
import React from 'react';import JobItem from './JobItem';const Results = ({ results }) => { return ( <div className="search-results"> {results.map((job, index) => ( <JobItem key={job.id} {...job} index={index} /> ))} </div> );};export default Results;In this file, we are looping through each job object from results array and we are passing the individual job data to display in JobItem component created previously.
Now, open components/HomePage.js file and replace it with the following content
import React, { useState, useEffect } from 'react';import _ from 'lodash';import { connect } from 'react-redux';import { initiateGetJobs } from '../actions/jobs';import { resetErrors } from '../actions/errors';import Header from './Header';import Search from './Search';import Results from './Results';const HomePage = (props) => { const [results, setResults] = useState([]); const [errors, setErrors] = useState(null); const [isLoading, setIsLoading] = useState(false); useEffect(() => { setResults(props.jobs); }, [props.jobs]); useEffect(() => { setErrors(props.errors); }, [props.errors]); const loadJobs = (selection) => { const { dispatch } = props; const { description, location, full_time, page = 1 } = selection; dispatch(resetErrors()); setIsLoading(true); dispatch(initiateGetJobs({ description, location, full_time, page })) .then(() => { setIsLoading(false); }) .catch(() => setIsLoading(false)); }; const handleSearch = (selection) => { loadJobs(selection); }; return ( <div> <Header /> <Search onSearch={handleSearch} /> {!_.isEmpty(errors) && ( <div className="errorMsg"> <p>{errors.error}</p> </div> )} <Results results={results} /> {isLoading && <p className="loading">Loading...</p>} </div> );};const mapStateToProps = (state) => ({ jobs: state.jobs, errors: state.errors});export default connect(mapStateToProps)(HomePage);In this file, we are starting to use React Hooks now. If you are new to React Hooks check out my previous article for an introduction to Hooks HERE
Lets understand the code from the HomePage component.
Initially, we declared state variables using useState hook to store the result from API in an array and a flag for showing the loading and object for an error indication.
const [results, setResults] = useState([]);const [errors, setErrors] = useState(null);const [isLoading, setIsLoading] = useState(false);Then we call the useEffect Hook to get the list of jobs and error if any
useEffect(() => { setResults(props.jobs);}, [props.jobs]);useEffect(() => { setErrors(props.errors);}, [props.errors]);We implement the componentDidUpdate lifecycle method of class components using the useEffect hook by passing the dependency array as the second argument. So each of these useEffect hooks will be executed only when their dependency changes For ex. when props.jobs changes or props.errors changes. The data is available in props because we have added a mapStateToProps method at the end of the file
const mapStateToProps = (state) => ({ jobs: state.jobs, errors: state.errors});and passed it to connect the method of react-redux library.
export default connect(mapStateToProps)(HomePage);Then, we are passing the onSearch prop to the Search component whose value is the handleSearch function.
<Search onSearch={handleSearch} />From inside this function, we are calling the loadJobs function which is calling the initiateGetJobs action creator function to make an API call to the Express server.
We are passing the onSearch prop to the Search component, but we are not using it yet, so lets use it first.
Open Search.js component and change
const handleSearch = (event) => { event.preventDefault(); console.log(state);};to
const handleSearch = (event) => { event.preventDefault(); console.log(state); props.onSearch(state);};So now, when we click the Search button, we are calling onSearch function passed as a prop to the Search component from the HomePage component.
Now, lets run the application. Before running it, we need to make some changes.
Open server/package.json file and add start script inside it
"start": "nodemon server.js"So the package.json from server folder will look like this
{ "name": "server", "version": "1.0.0", "main": "index.js", "license": "MIT", "scripts": { "start": "nodemon server.js" }, "dependencies": { "axios": "0.19.2", "cors": "2.8.5", "express": "4.17.1", "nodemon": "^2.0.4", }}Now, execute start command from server folder
yarn run startThis will start the Express server.
Open another terminal and from github-jobs-react-app folder, execute yarn run start command. This will start your React application.
The description and location are optional parameters to the Github Jobs API so If you dont enter any value and click on the Search button, you will get all the available jobs displayed on the screen sorted by the posted date

The data is sorted by creation date in initiateGetJobs function inside the actions/jobs.js file
const sortedJobs = jobs.data.sort( (a, b) => moment(new Date(b.created_at)) - moment(new Date(a.created_at)));You can find source code until this point HERE
Now, lets get the details of the Job when we click on any of the Job from the
Create a new file JobDetails.js inside components folder with the following content
import React from 'react';const JobDetails = ({ details, onResetPage }) => { const { type, title, description, location, company, company_url, company_logo, how_to_apply } = details; return ( <div className="job-details"> <div className="back-link"> <a href="/#" onClick={onResetPage}> << Back to results </a> </div> <div> {type} / {location} </div> <div className="main-section"> <div className="left-section"> <div className="title">{title}</div> <hr /> <div className="job-description">{description}</div> </div> <div className="right-section"> <div className="company-details"> <h3>About company</h3> <img src={company_logo} alt={company} className="company-logo" /> <div className="company-name">{company}</div> <a className="company-url" href={company_url}> {company_url} </a> </div> <div className="how-to-apply"> <h3>How to apply</h3> <div>{how_to_apply}</div> </div> </div> </div> </div> );};export default JobDetails;Here, we are displaying the description of the job details.
Now, we need a flag that will decide when to display the details page and when to display the list of jobs.
So create a new state variable inside HomePage.js file with a default value of home and a variable to track id of the job clicked
const [jobId, setJobId] = useState(-1);const [page, setPage] = useState('home');Open HomePage.js file and replace it with the following content
import React, { useState, useEffect } from 'react';import _ from 'lodash';import { connect } from 'react-redux';import { initiateGetJobs } from '../actions/jobs';import { resetErrors } from '../actions/errors';import Header from './Header';import Search from './Search';import Results from './Results';import JobDetails from './JobDetails';const HomePage = (props) => { const [results, setResults] = useState([]); const [errors, setErrors] = useState(null); const [isLoading, setIsLoading] = useState(false); const [jobId, setJobId] = useState(-1); const [page, setPage] = useState('home'); useEffect(() => { setResults(props.jobs); }, [props.jobs]); useEffect(() => { setErrors(props.errors); }, [props.errors]); const loadJobs = (selection) => { const { dispatch } = props; const { description, location, full_time, page = 1 } = selection; dispatch(resetErrors()); setIsLoading(true); dispatch(initiateGetJobs({ description, location, full_time, page })) .then(() => { setIsLoading(false); }) .catch(() => setIsLoading(false)); }; const handleSearch = (selection) => { loadJobs(selection); }; const handleItemClick = (jobId) => { setPage('details'); setJobId(jobId); }; const handleResetPage = () => { setPage('home'); }; let jobDetails = {}; if (page === 'details') { jobDetails = results.find((job) => job.id === jobId); } return ( <div> <div className={`${page === 'details' && 'hide'}`}> <Header /> <Search onSearch={handleSearch} /> {!_.isEmpty(errors) && ( <div className="errorMsg"> <p>{errors.error}</p> </div> )} {isLoading && <p className="loading">Loading...</p>} <div> <Results results={results} onItemClick={handleItemClick} /> </div> </div> <div className={`${page === 'home' && 'hide'}`}> <JobDetails details={jobDetails} onResetPage={handleResetPage} /> </div> </div> );};const mapStateToProps = (state) => ({ jobs: state.jobs, errors: state.errors});export default connect(mapStateToProps)(HomePage);In this file, we have added handleItemClick and handleResetPage functions.
Also when we click on the details page, we filter out the job from the results array
let jobDetails = {};if (page === 'details') { jobDetails = results.find((job) => job.id === jobId);}and pass it to JobDetails component
<JobDetails details={jobDetails} onResetPage={handleResetPage} />If the page value is home, we are displaying the Header, Search and the Results components and if the value is details, we are displaying the JobDetails page as we are adding the hide CSS class to display respective components
Note, we also passed onItemClick prop to Results component.
<Results results={results} onItemClick={handleItemClick} />and from Results component, we are passing it down to JobItem component and inside that component we have added that handler to the topmost div
<div className="job-item" index={index + 1} onClick={() => onItemClick(id)}>where we are destructuring the id from props and passing it to onItemClick function
Now, restart your React application and Express server by running yarn run start command and verify the changes

So now, when we click on any job, we can see the details of the job but if you noticed the details page, you can see that the HTML of the details page is displayed as it is which means the
tag is displayed as static text instead of rendering the paragraph.
This because by default React does not directly display the HTML content when used inside the JSX Expression to avoid the Cross Site Scripting (XSS) attacks. React escapes all the html content provided in the JSX Expression which is written in curly brackets so it will be printed as it is.

If you check the above API response, you can see that the description field contains the HTML content and we are printing the description in JobDetails.js file as
<div className="job-description">{description}</div>Also, in the how to apply section
<div>{how_to_apply}</div>To display the HTML content if its the requirement as in our case, we need to use a special prop called dangerouslySetInnerHTML and pass it the HTML in the __html field as shown below
<div className="job-description" dangerouslySetInnerHTML={{ __html: description }}></div>and
<div dangerouslySetInnerHTML={{ __html: how_to_apply }}></div>So make these changes in JobDetails.js file and check the application now, You will see the HTML rendered correctly

Awesome!
Just one more thing, while building application, it's not good to keep sending requests to the actual server every time we are testing so create a new file jobs.json inside public folder by saving the response of API from HERE and in actions/jobs.js file add a comment for the following line
const jobs = await axios.get( `${BASE_API_URL}/jobs?description=${description}&location=${location}${full_time}${page}`);and add the following code below it.
const jobs = await axios.get('./jobs.json');
So now, whenever we click on the Search button, we will take data from the JSON file stored in public folder which will give a faster response and will also not increase the number of requests to the actual Github API.
If you are using some other APIs, they might be limited to a specific number of requests and might charge you if you exceed the limit.
Note: Github Jobs API is free and will not charge you for the number of requests but still its good to use a cached response and only when you need to handle proper scenarios, use the actual API instead of cached one.
You can find code until this point HERE
Now, if you check the HomePage component, we are passing the onItemClick function to Results component and Results component passes it down to JobItem component without using it So to avoid this prop drilling and to make the JSX returned from HomePage component a lot simpler we can use React Context API here.
If you are not familiar with React Context API, check out my previous article HERE
Inside src/context folder, create a new file jobs.js with the following content
import React from 'react';const JobsContext = React.createContext();export default JobsContext;Here, we are just creating a Context which we can use to access data in other components
In the HomePage.js file, import this context at the top of the file
import JobsContext from '../context/jobs';and just before returning the JSX, create a value object with the data we want to access in other components
const value = { results, details: jobDetails, onSearch: handleSearch, onItemClick: handleItemClick, onResetPage: handleResetPage};Change the returned JSX from
return ( <div> <div className={`${page === 'details' && 'hide'}`}> <Header /> <Search onSearch={handleSearch} /> {!_.isEmpty(errors) && ( <div className="errorMsg"> <p>{errors.error}</p> </div> )} {isLoading && <p className="loading">Loading...</p>} <Results results={results} onItemClick={handleItemClick} /> </div> <div className={`${page === 'home' && 'hide'}`}> <JobDetails details={jobDetails} onResetPage={handleResetPage} /> </div> </div>);to
return ( <JobsContext.Provider value={value}> <div className={`${page === 'details' && 'hide'}`}> <Header /> <Search /> {!_.isEmpty(errors) && ( <div className="errorMsg"> <p>{errors.error}</p> </div> )} {isLoading && <p className="loading">Loading...</p>} <Results /> </div> <div className={`${page === 'home' && 'hide'}`}> <JobDetails /> </div> </JobsContext.Provider>);As you can see, we have removed all the props passed to Search, Results and JobDetails component and we are using
<JobsContext.Provider value={value}>to pass all of those values because Provider component requires a value prop and now all the components in between the opening and closing JobsContext.Provider tag can access any value from the value object passed as prop.
Now, open Search.js file and add the import for the context at the top. Also import the useContext hook at the top
import React, { useState, useContext } from 'react';Now, to access the data from value object add the following code inside Search component
const { onSearch } = useContext(JobsContext);Now, you can remove the props parameter passed to the component and inside handleSearch function, change
props.onSearch(state);to just
onSearch(state);Now, your Search component will look like this
import React, { useState, useContext } from 'react';import { Form, Button, Row, Col } from 'react-bootstrap';import JobsContext from '../context/jobs';const Search = () => { const { onSearch } = useContext(JobsContext); const [state, setState] = useState({ description: '', location: '', full_time: false }); const handleInputChange = (event) => { const { name, value } = event.target; if (name === 'full_time') { setState((prevState) => ({ ...state, [name]: !prevState.full_time })); } else { setState({ ...state, [name]: value }); } }; const handleSearch = (event) => { event.preventDefault(); console.log(state); onSearch(state); }; return ( <div className="search-section"> <Form className="search-form" onSubmit={handleSearch}> <Row> <Col> <Form.Group controlId="description"> <Form.Control type="text" name="description" value={state.description || ''} placeholder="Enter search term" onChange={handleInputChange} /> </Form.Group> </Col> <Col> <Form.Group controlId="location"> <Form.Control type="text" name="location" value={state.location || ''} placeholder="Enter location" onChange={handleInputChange} /> </Form.Group> </Col> <Col> <Button variant="primary" type="submit" className="btn-search"> Search </Button> </Col> </Row> <div className="filters"> <Form.Group controlId="full_time"> <Form.Check type="checkbox" name="full_time" className="full-time-checkbox" label="Full time only" checked={state.full_time} onChange={handleInputChange} /> </Form.Group> </div> </Form> </div> );};export default Search;Now, lets use the context in Results component
Remove both the props passed to the component
Import context at the top of the file
import JobsContext from '../context/jobs';Take the required values out of the context
const { results } = useContext(JobsContext);Now, you can remove the onItemClick prop passed to JobItem component
import React, { useContext } from 'react';import JobItem from './JobItem';import JobsContext from '../context/jobs';const Results = () => { const { results } = useContext(JobsContext); return ( <div className="search-results"> {results.map((job, index) => ( <JobItem key={job.id} {...job} index={index} /> ))} </div> );};export default Results;Now, lets refactor the JobDetails component
Import context at the top of the file
import JobsContext from '../context/jobs';Take the required values out of the context
const { details, onResetPage } = useContext(JobsContext);Now, your JobDetails.js file will look like this
import React, { useContext } from 'react';import JobsContext from '../context/jobs';const JobDetails = () => { const { details, onResetPage } = useContext(JobsContext); const { type, title, description, location, company, company_url, company_logo, how_to_apply } = details; return ( <div className="job-details"> <div className="back-link"> <a href="/#" onClick={onResetPage}> << Back to results </a> </div> <div> {type} / {location} </div> <div className="main-section"> <div className="left-section"> <div className="title">{title}</div> <hr /> <div className="job-description" dangerouslySetInnerHTML={{ __html: description }} ></div> </div> <div className="right-section"> <div className="company-details"> <h3>About company</h3> <img src={company_logo} alt={company} className="company-logo" /> <div className="company-name">{company}</div> <a className="company-url" href={company_url}> {company_url} </a> </div> <div className="how-to-apply"> <h3>How to apply</h3> <div dangerouslySetInnerHTML={{ __html: how_to_apply }}></div> </div> </div> </div> </div> );};export default JobDetails;Now, lets refactor the JobItem component
Import context at the top of the file
import JobsContext from '../context/jobs';Take the required values out of the context
const { onItemClick } = useContext(JobsContext);Now, your JobItem.js file will look like this
import React, { useContext } from 'react';import moment from 'moment';import JobsContext from '../context/jobs';const JobItem = (props) => { const { onItemClick } = useContext(JobsContext); const { id, type, created_at, company, location, title, company_logo, index } = props; return ( <div className="job-item" index={index + 1} onClick={() => onItemClick(id)}> <div className="company-logo"> <img src={company_logo} alt={company} width="100" height="100" /> </div> <div className="job-info"> <div className="job-title">{title}</div> <div className="job-location"> {location} | {type} </div> <div className="company-name">{company}</div> </div> <div className="post-info"> <div className="post-time"> Posted {moment(new Date(created_at)).fromNow()} </div> </div> </div> );};export default JobItem;Now, check your application and you can see that application works the same as previously but now we have avoided the unnecessary prop drilling and made code easier to understand
You can find code until this point HERE
One thing you might have noticed is that, when we scroll down a bit on the jobs list and click on any of the job, the page scroll remains at the same place and we see the bottom of the page instead of the top
This is because we are just adding hide class to components that are not needed when we click on any job so the scroll position does not change.
To fix this, open JobDetail.js file and add following code
useEffect(() => { window.scrollTo(0, 0);}, []);So now, when the JobDetails component is displayed, we are automatically displayed top of the page.
The empty array specifies that this code should be executed only when the component is mounted (similar to componentDidMount lifecycle method) and never again.
We also need to make sure that, the JobDetails component is only loaded when we click on any of the job so open HomePage.js file and change
<div className={`${page === 'home' && 'hide'}`}> <JobDetails /></div>to
<div className={`${page === 'home' && 'hide'}`}> {page === 'details' && <JobDetails />}</div>Now, if you check the application, you can see that the top of the page is displayed when clicked on any job.
As we already know, we are getting only the latest 50 jobs when we hit the Github Jobs API, to get more jobs, we need to pass the page query parameter with an incremented number so lets implement the load more functionality into our application.
Let's create a pageNumber state variable in HomePage.js with an initial value of 1 and selection state variable
const [pageNumber, setPageNumber] = useState(1);const [selection, setSelection] = useState(null);Add the code to show the load more button in HomePage.js file
{ results.length > 0 && _.isEmpty(errors) && ( <div className="load-more" onClick={isLoading ? null : handleLoadMore}> <button disabled={isLoading} className={`${isLoading ? 'disabled' : ''}`}> Load More Jobs </button> </div> );}Also, move the loading condition from before the to after it
So your JSX returned form HomePage.js will look like this
return ( <JobsContext.Provider value={value}> <div className={`${page === 'details' && 'hide'}`}> <Header /> <Search /> {!_.isEmpty(errors) && ( <div className="errorMsg"> <p>{errors.error}</p> </div> )} <Results /> {isLoading && <p className="loading">Loading...</p>} {results.length > 0 && _.isEmpty(errors) && ( <div className="load-more" onClick={isLoading ? null : handleLoadMore}> <button disabled={isLoading} className={`${isLoading ? 'disabled' : ''}`} > Load More Jobs </button> </div> )} </div> <div className={`${page === 'home' && 'hide'}`}> {page === 'details' && <JobDetails />} </div> </JobsContext.Provider>);In the add more button div above, we are disabling the button once the user clicks on it by adding the disabled class and disabled attribute
className={`${isLoading ? 'disabled' : ''}`}We are also making sure that the handleLoadMore function will not be executed when button is disabled so it's disabled by returning null from the onClick handler. This is useful in case the user removes the disabled attribute by editing it in dev tool.
Now add the handleLoadMore function inside the HomePage component
const handleLoadMore = () => { loadJobs({ ...selection, page: pageNumber + 1 }); setPageNumber(pageNumber + 1);};Now, we are passing the incremented page number to loadJobs function but we need to further pass it to our action dispatcher function so inside the loadJobs function just before dispatch(resetErrors()); add the following code
let isLoadMore = false;if (selection.hasOwnProperty('page')) { isLoadMore = true;}and pass the isLoadMore as the last parameter to initiateGetJobs function.
So your loadJobs function will look like this
const loadJobs = (selection) => { const { dispatch } = props; const { description, location, full_time, page = 1 } = selection; let isLoadMore = false; if (selection.hasOwnProperty('page')) { isLoadMore = true; } dispatch(resetErrors()); setIsLoading(true); dispatch( initiateGetJobs({ description, location, full_time, page }, isLoadMore) ) .then(() => { setIsLoading(false); }) .catch(() => setIsLoading(false));};and inside the function handleSearchction, call the setSelection function for setting the state
const handleSearch = (selection) => { loadJobs(selection); setSelection(selection);};Now, open actions/jobs.js file and accept the isLoadMore as the second parameter
export const initiateGetJobs = (data, isLoadMore) => {and change
return dispatch(setJobs(sortedJobs));to
if (isLoadMore) { return dispatch(setLoadMoreJobs(sortedJobs));} else { return dispatch(setJobs(sortedJobs));}In this code, If the load more button is clicked then we are calling setLoadMoreJobs function to add new jobs to already existing results array.
If isLoadMore is false means we clicked on the Search button on the page then we are calling setJobs function to add the results in a new array.
Now, restart the React application by running yarn run start command and you can see that load more functionality is working as expected.

You can find code until this point HERE
But one thing you will notice is that we have moved the loading message to above the load more button so if we are entering some values in description and location fields when the results are already displayed and we click on Search button, we will not see the loading message because, for that, we need to scroll the page. This is not good user experience.
Also even though loading message is displayed, the user can click on any of the job even when loading is going on, which is also not expected.
So lets create our own loader using React Portal to display the overlay so the user will not be able to click on any of the job when loading and we will also see a clear indication of loading.
If you are not aware of React Portal, check out my previous article HERE
Create a new file Loader.js inside components folder with the following content
import { useState, useEffect } from 'react';import ReactDOM from 'react-dom';const Loader = (props) => { const [node] = useState(document.createElement('div')); const loader = document.querySelector('#loader'); useEffect(() => { loader.appendChild(node).classList.add('message'); }, [loader, node]); useEffect(() => { if (props.show) { loader.classList.remove('hide'); document.body.classList.add('loader-open'); } else { loader.classList.add('hide'); document.body.classList.remove('loader-open'); } }, [loader, props.show]); return ReactDOM.createPortal(props.children, node);};export default Loader;Now open public/index.html and alongside the div with id root add another div with id loader
<div id="root"></div><div id="loader"></div>The ReactDOM.createPortal method which we have used in Loader.js will create a loader inside the div with id loader so it will be outside out React application DOM hierarchy and hence we can use it to provide an overlay for our entire application. This is the primary reason for using the React Portal for creating a loader.
So even if we will include the Loader component in HomePage.js file, it will be rendered outside all the divs but inside the div with id loader.
In the Loader.js file, we have first created a div where will add a loader message
const [node] = useState(document.createElement('div'));Then, we are adding the message class to that div and adding that div to the div added in index.html
document.querySelector('#loader').appendChild(node).classList.add('message');and based on the show prop passed from the HomePage component, we will add or remove the hide class and then finally we will render the Loader component using
ReactDOM.createPortal(props.children, node);Then we add or remove the loader-open class to the body tag of the page which will disable or enable the scrolling of the page
document.body.classList.add('loader-open');document.body.classList.remove('loader-open');Here, the data we will pass in between the opening and closing Loader tag will be available inside props.children so we can display a simple loading message or we can include an image to be shown as a loader.
Now, lets use this component
Open HomePage.js file and after the <JobsContext.Provider value={value}> line add the Loader component
<Loader show={isLoading}>Loading...</Loader>Also, import the Loader at the top of the file
import Loader from './Loader';Now, you can remove the previously used below line
{ isLoading && <p className="loading">Loading...</p>;}Now, when we will stop loading more items?
Obviously when there are no more items.
The Github Jobs API returns an empty array [] in response when there are no more jobs which you can check by passing larger page number to the API HERE
So to handle that open HomePage.js file and in loadJobs function, inside .then handler add following code
if (response && response.jobs.length === 0) { setHideLoadMore(true);} else { setHideLoadMore(false);}setIsLoading(false);So your loadJobs function will look like this
const loadJobs = (selection) => { const { dispatch } = props; const { description, location, full_time, page = 1 } = selection; let isLoadMore = false; if (selection.hasOwnProperty('page')) { isLoadMore = true; } dispatch(resetErrors()); setIsLoading(true); dispatch( initiateGetJobs({ description, location, full_time, page }, isLoadMore) ) .then((response) => { if (response && response.jobs.length === 0) { setHideLoadMore(true); } else { setHideLoadMore(false); } setIsLoading(false); }) .catch(() => setIsLoading(false));};Add another state variable
const [hideLoadMore, setHideLoadMore] = useState(false);and for the load more button code, change
{results.length > 0 && _.isEmpty(errors) && (to
{results.length > 0 && _.isEmpty(errors) && !hideLoadMore && (So we just added an extra !hideLoadMore condition and now, if there are no more jobs coming from the response, we will hide the load more jobs button.
Now, if you check your application, you can see that, Load More Jobs button will not be displayed if there are no more jobs to load when we click on it. The beauty of including data to display in between the opening and closing Loader tag like this
<Loader show={isLoading}>Loading...</Loader>is that, we can include anything in between the tags even an image and that image will get displayed instead of the Loading text because we are using props.children to display inside the loader div using
ReactDOM.createPortal(props.children, node);You can find code until this point HERE
As you are aware now, when we are requesting from Jobs API, we are getting a list of 50 jobs initially and as we are showing the company logo on the list page, the browser has to download those 50 images which may take time so you might see the blank area sometimes before the image is fully loaded.

Also if you are browsing the application on a mobile device and you are using a slow network connection, it may take more time to download the images and those much MB of unnecessary images browser may download even if you are not scrolling the page to see other jobs listing which is not good user experience.
If you check the current functionality until this point when we click the Search button without entering any value, For me there are a total of 99 requests which took around 2MB of data.
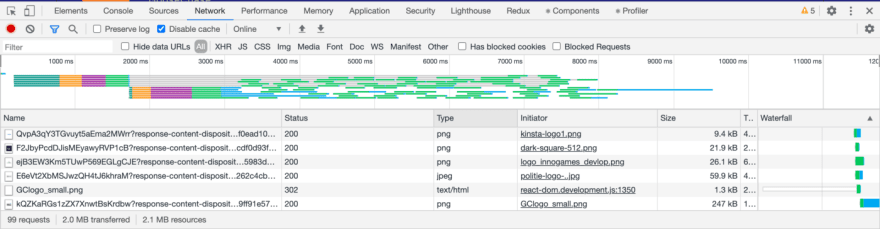
We can fix this by lazy loading the images. So until the user does not scroll to the job in the list, the image will not be downloaded which is more efficient.
So lets start with it.
Create a new file observer.js inside custom-hooks folder with the following content
import { useEffect, useState } from 'react';const useObserver = (targetRef) => { const [isVisible, setIsVisible] = useState(false); useEffect(() => { const observer = new IntersectionObserver((entries, observer) => { entries.forEach((entry) => { if (entry.isIntersecting) { if (!isVisible) { setIsVisible(true); } observer.unobserve(entry.target); } else { setIsVisible(false); } }); }); const current = targetRef.current; observer.observe(current); return () => { observer.unobserve(current); }; }, [isVisible, targetRef]); return [isVisible];};export default useObserver;In this file, we are using Intersection Observer API to identify which area of the page is currently displayed and only images in that area will be downloaded.
If you are not aware of the Intersection Observer, check out my previous article HERE which explains how to do lazy loading, sliding animation and play/pause video on a scroll in JavaScript in detail.
So in the observer.js file, we are taking a ref and adding that ref to be observed to the observer
observer.observe(current);If the image with added ref is displayed on screen then we are calling setIsVisible(true); and we are returning theisVisible value from this custom hook and based on theisVisible flag we can decide if we want to display the image or not.
So open JobItem.js file and add an import for the custom hook we created just now
import useObserver from '../custom-hooks/observer';Import useRef hook at the top of the file
import React, { useRef } from 'react';Create a ref which we can assign to the image
const imageRef = useRef();call the custom hook and get the isVisible value
const [isVisible] = useObserver(imageRef);change
<div className="company-logo"> <img src={company_logo} alt={company} width="100" height="100" /></div>to
<div className="company-logo" ref={imageRef}> {isVisible && ( <img src={company_logo} alt={company} width="100" height="100" /> )}</div>Now, restart your React application by running yarn run start and check the lazy loading functionality.

As you can see initially only 5 requests are sent and only two logo images are downloaded and as you scroll the page, the next displayed images will be downloaded.
This is much better than the previous experience of downloading all the images at once. This will also load the page faster and save internet bandwidth.
You can find code until this point HERE
If you noticed, even if we are loading the images lazily, initially you will see blank area instead of the image until the image is fully loaded.
We can fix this by providing an alternative image and replace it with the original image once it's completely downloaded.
This way we can avoid the empty space and is a widely used way of not showing the empty image area.
Download the loader image from HERE and add it Inside the src/images folder
The website used for creating the image is THIS.
You can specify the width, height, and text of the image you want.
The URL used to generate that loading image is this
https://via.placeholder.com/100x100?text=LoadingCreate a new file Image.js inside components folder with the following content
import React from 'react';import { useState } from 'react';import loading from '../images/loading.png';/* https://via.placeholder.com/100x100?text=Loading */const Image = ({ src, alt, ...props }) => { const [isVisible, setIsVisible] = useState(false); const changeVisibility = () => { setIsVisible(true); }; return ( <React.Fragment> <img src={loading} alt={alt} width="100" height="100" style={{ display: isVisible ? 'none' : 'inline' }} {...props} /> <img src={src} alt={alt} width="100" height="100" onLoad={changeVisibility} style={{ display: isVisible ? 'inline' : 'none' }} {...props} /> </React.Fragment> );};export default Image;In this file, we are initially displaying the loading image instead of the actual image.
The img tag has onLoad handler added which will be triggered when the image is completely loaded where we set the isVisible flag to true and once it's true we are displaying that image and hiding the previous loading image by using display CSS property.
Now open JobItem.js file and change
{ isVisible && ( <img src={company_logo} alt={company} width="100" height="100" /> );}to
{ isVisible && ( <Image src={company_logo} alt={company} width="100" height="100" /> );}Also, import Image component at the top of the file
import Image from './Image';Notice we have just changed img to Image and we are accessing the additional props in Image component as
const Image = ({ src, alt, ...props }) => {So except src and alt all other props like width, height will be stored in an array with the name props and then we are passing those props to the actual image by spreading the props array {...props} We can add the same functionality for the company logo on the details page.
Open JobDetails.js file and change
<img src={company_logo} alt={company} className="company-logo" />to
<Image src={company_logo} alt={company} className="company-logo" />Also, import the Image component at the top of the file
import Image from './Image';Now, restart your React application by running yarn run start and check it out
That's it about this article.
You can find complete Github source code for this application HERE and live demo HERE
Original Link: https://dev.to/myogeshchavan97/build-an-amazing-job-search-app-using-react-42p
Dev To
More About this Source Visit Dev To