
An Interest In:
Web News this Week
- March 30, 2024
- March 29, 2024
- March 28, 2024
- March 27, 2024
- March 26, 2024
- March 25, 2024
- March 24, 2024
Some of Our Sources
- Techcrunch
- Joshua Blankenship
- Abduzeedo
- TutsPlus - Design
- Web Design Ledger
- Reencoded
- Line 25
- CSS Tricks
- Design Modo
- Daily Now
Help Webnuz
Referal links:
Beginner's focus on Ruby on Rails - Part 1 (Installation - Windows)
I started exploring ruby recently and I'm marveled on what I could accomplish with ruby and its web framework (Ruby on Rails). This tutorial is created for the sole purpose of upcoming ruby on rails workshop for Nsukka women in tech Group.
I won't seize to throw a shoutout to the Ruby Together Foundation for their continuous support so far in my journey of becoming an opensource rockstar with Ruby, Ruby on Rails, etc through the RubyMe program
Rubyme program is a paid mentorship program for early-career Ruby developers. This aims to help early-career developers build up professional development experience by contributing to open source projects with the help of a mentor.
I and my mentor contribute to If-Me opensource project on GitHub.
Introduction
Before I start listing the tools we will be needing, let me brief you on what ruby, ruby on rails is and what you can achieve with them.
Ruby
Ruby is dynamically typed and garbage-collected. It supports multiple programming paradigms, including procedural, object-oriented, and functional programming. Read more here.
Want to dive into Ruby? I'd recommend this tutorial here.
Ruby on Rails
This is a web framework for Ruby. You can build a website with it and APIs too.
Want to know more see this doc.
Before you can create a new Ruby on Rails app, you are required to have the following tools installed in your local machine (Windows).
So in order to install Rails, we have to install Ruby first, to download Ruby visit this link, install any of the version under WITH DEVKIT.
- Click on the downloaded Ruby package,
- open it
- Select the I accept the license
- Check to add Ruby to a path.
- Check associate .rb, .rbw files with this Ruby installation.
- Hit install
- Follow the instruction promptly and finish the installation
This is going to install Ruby and DevKit (development kit) to your local machine.
When the installation is done, hit the finish and it will prompt the terminal to come up, just hit enter, it will install all the needed packages.
To confirm if Ruby is successfully installed, open the terminal and type ruby --version
To see the list of gem packages installed... type gem list
Now that we have confirmed that we have ruby installed on our machine, let quickly go ahead and install Rails (Ruby Web Framework).
To install Rails, follow the instructions below:
- Open your terminal and type
gem install rails --no-document
no-document means that we don't want to install the Rails documentation on the system.
NB: This is going to install almost 40 gems
To check if everything is in order ---
open your terminal
Check Ruby --- type ruby --version
Check Bundler --- type bundler --version
Check Rails --- type rails --version
Let's create a rails project to confirm our installation.
cd to the desktop --- cd desktop
make a directory --- mkdir rails-project
cd to the rails-project --- cd rails-project
Create a rails application --- rails new test
NB: If you encounter an error with a sqlite problem.... kindly go through this page to solve it link
To fix the issue :
open the project in your code editor,
Go to gemfile and add this
Search for gem sqlite3, then replace it with the command below
gem 'sqlite3', git: "https://github.com/larskanis/sqlite3-ruby", branch: "add-gemspec"
now in your terminal:
cd to the test project --- cd test
type bundle install
Everything should be fine now.
Yay! we have successfully installed Ruby, Rails
on our machine and we also created rails app.
To run the app...
type rails s or rails server
Open your browser and type localhost:3000
if you see the image below
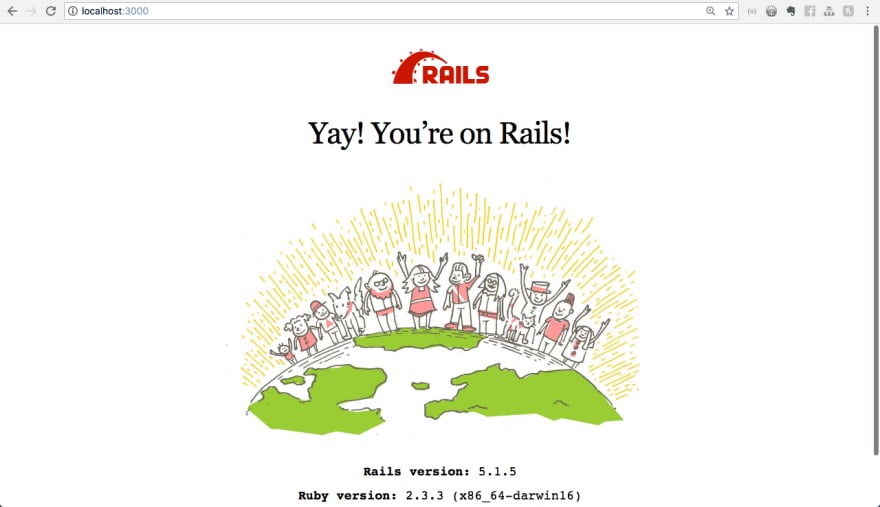
Congratulations to you. You made it to the end.
Original Link: https://dev.to/iphytech/beginner-s-focus-on-ruby-on-rails-part-1-installation-windows-fd1
Dev To
More About this Source Visit Dev To