
An Interest In:
Web News this Week
- May 1, 2024
- April 30, 2024
- April 29, 2024
- April 28, 2024
- April 27, 2024
- April 26, 2024
- April 25, 2024
Some of Our Sources
- Smashing Apps
- Abduzeedo
- Fuel Your Creativity
- Naldz Graphics
- My Ink Blog
- Reencoded
- Line 25
- Spyre Studios
- Willems Lab
- Hashedout
Help Webnuz
Referal links:
How to Make a Star Wars Inspired Movie Poster in Photoshop
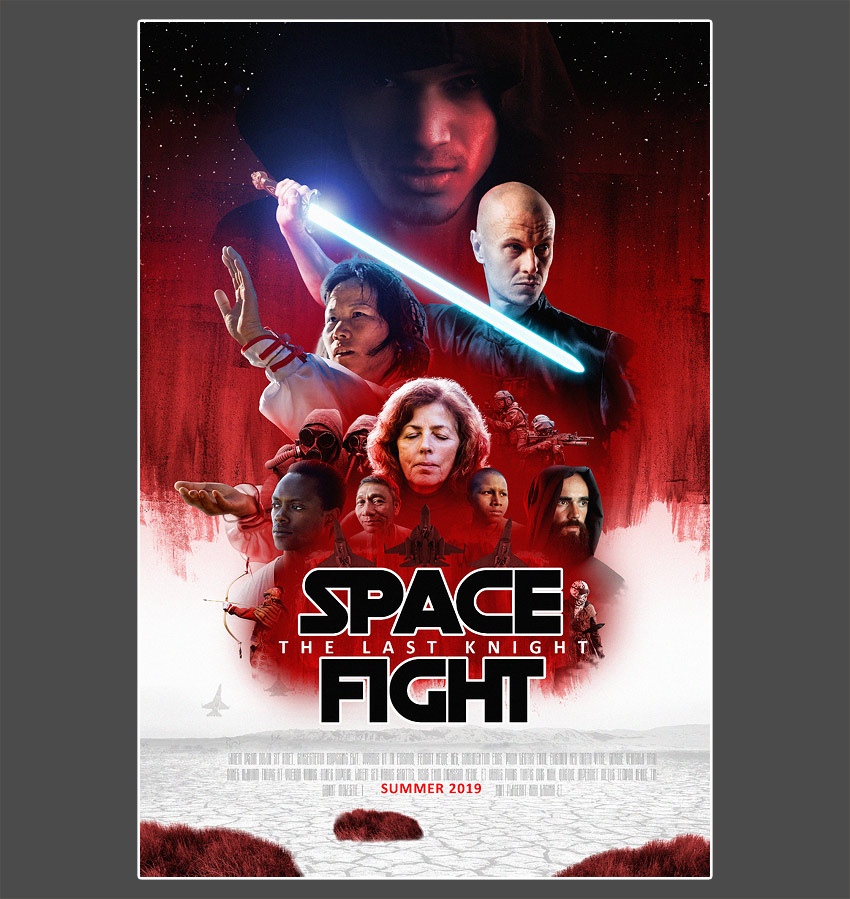
If you want to learn how to make a movie poster, it's good to try to replicate the work of a professional. This way, you can learn about the trends and techniques with a clear goal in mind. In this tutorial, I'll show you how to create a movie poster in Adobe Photoshop, inspired by Star Wars: The Last Jedi.
If you need a movie poster template, you can use our movie poster maker, Placeit. Create your own movie poster by choosing a template and customizing it!
What You Will Need
You don't have to use the same photos as me to create this movie poster. Feel free to use photos of your friends as the characters!
Main characters:
- A serious looking person in a hood
- A person with a sword in a fighting pose
- A person in a martial arts pose
- A contemplative person with eyes closed
- A medieval monk
- A person looking away
Secondary characters:
- A Buddhist monk
- An old person
- An armored archer
- Soldiers with guns
- People in post-apocalyptic costumes
- A person in post-apocalyptic costume
Background:
Fonts:
Textures:
1. How to Start Creating a Movie Poster
Step 1
First, we need to cut the characters out of their backgrounds. I'll show you how to do it on one example.
Open one of the files in Photoshop. Use any selection tool (I used the Pen Tool (P)) to select the outline of the character. Select only the part that you intend to use in your poster. Don't try to outline the individual hairs—instead, outline just the visible "masses" of hair.

Step 2
Go to Select > Refine Edge. Check Smart Radius and increase the Radius to soften the edge. Use the brush to paint over the stray hairs outside of the main outline. Photoshop should intelligently add them to the selection. When you're done, change Output to New Layer and click OK.
Do the same with all the photos of the characters.

Step 3
Create a New File. These dimensions are the most typical for a movie poster:
- Width: 24 Inches
- Height: 36 Inches
- Resolution: 150 Pixels/Inch

Step 4
To create a movie poster, first you need to plan its composition. Go to View > Show > Grid. Add the Rulers (Control-R) and drag some guides from them to plan the layout of your movie poster. Your grid doesn't have to look exactly like mine, but make sure that it's not random.
Add the title in your chosen spot. I used the Death Star font with a big distance between the lines (press Control-T to open the Character panel).


Step 5
Create a New Layer below and fill it with any color using the Paint Bucket Tool (G). Double-click the layer to open the Layer Style panel. Check Gradient Overlay and add a gradient to quickly create a simple background.


Step 6
Double-click the text layer. Check Stroke and add a white stroke to the letters, just like in the original poster.


Step 7
Add another text layer. Type between the words of the title to add the subtitle. You can use a classic font here. I used Calibri Bold, with very big spaces between the letters.

Step 8
Finally, copy and paste your characters into the poster. Resize them by pressing Control-T, and change their orientation by going to Edit > Transform > Flip Horizontal. First, place the main characters, and then fill the spaces between them with the secondary characters.

2. How to Create a Background for a Movie Poster
Step 1
Open your texture set. Pick one of the textures that you want to use in the background, and open it in Photoshop.

Step 2
Go to the Channels tab. Hold Control and click the thumbnail of the Gray channel. Then go back to the Layers tab and go to Select > Inverse. Copy the selection.

Step 3
Paste your selected texture under the characters. You can duplicate it to make it more opaque. Group the textures (Control-G).

Step 4
Add a Hue/Saturation adjustment.

Clip it to the layer below (the group of textures) and check Colorize. Drag the sliders to change the colors as you wish.

Step 5
Add more textures to the group—they all will be colored automatically.

Step 6
Use the same method to create a background for the title.

Step 7
Create a New Layer over the background, but under the characters. Fill it with black using the Paint Bucket Tool (G). Go to Filter > Noise > Add Noise and add some monochromatic noise.

Step 8
Go to Filter > Filter Gallery > Artistic > Sponge. Adjust the settings to turn the noise into stars.

Step 9
Add a Layer Mask to this layer. Select the mask and use the Gradient Tool (G) to add a black-and-white gradient on top. The black part of the gradient will make the layer transparent.


Step 10
Adjust the gradient in the background to keep the reddish tint right under the brush strokes.

Step 11
Paste the dry soil photo. Use the Free Transform Tool (Control-T) to resize it; hold Control to drag the corners separately.

Step 12
Add a Hue/Saturation adjustment to desaturate the soil.

Step 13
Add the Exposure adjustment to give the image less contrast.


Step 14
Paste the mountains panorama photo over the ground. Resize it. Add a Hue/Saturation adjustment to make the mountains colored more like the ground.


Step 15
Use a Layer Mask to merge the mountains with the background and remove the grey sky.

Step 16
Paste the grass image and resize it.

Step 17
Colorize the grass with a Hue/Saturation adjustment.


Step 18
Add more grass with the same technique.

3. How to Add Consistent Lighting to the Characters
Step 1
To blend the characters with their background, add Layer Masks to them and clean up their edges. You can use a soft brush, and then a textured brush for a more interesting effect.

Step 2
Put a New Layer between all the characters. Paint on those with a soft brush to separate the characters with a red fog.

Step 3
Some of the photos have visibly different lighting. You can fix it by adding a Curves adjustment.


Step 4
Because there's so much red around, it should affect the characters. Add a Hue/Saturation adjustment to one of them and colorize the character to red.


Step 5
Hold Alt and drag the adjustment to duplicate it. Add it to every character. Don't forget to clip it (Control-Alt-G)!

Step 6
Paint on the mask of each adjustment layer to reveal a part of the face that's not affected by the red light.

Step 7
Let's add some stronger rim light. Use the Hue/Saturation adjustment again.


Step 8
Double-click the adjustment and change its Blending Options. Hold Alt to split the lower black marker. This will make the effect transparent over the darkest areas. Then paint on the Layer Mask to keep the effect on the edge only.


Apply the same effect to all the characters.

Step 9
In the original movie poster, there's some white rim light as well. Add it with a Hue/Saturation adjustment, Blending Options, and Layer Masks.


4. How to Create a Light Saber
Step 1
Select the blade of the sword with any tool. Create a New Layer and fill it with white. Place it over the characters.

Step 2
Double-click the layer. Check Satin and make it blue, creating a soft streak of bright blue inside the blade.

Step 3
Check Outer Glow. Make it blue.

Step 4
Check Drop Shadow and turn it into another type of glow by changing its Blend Mode to Screen. Make it blue as well.


Step 5
Create a New Layer. Fill it with black. Go to Filter > Render > Lens Flare. Select the type that you like and adjust its brightness.

Step 6
Change its Blend Mode to Screen to remove the black areas. Then add a Hue/Saturation adjustment to make it more blue. Drag it and place it over the blade.


Step 7
Because we introduced a new light source to the scene, we need to add some light to the characters as well. Do it the same way as before, this time colorizing them to blue.


5. How to Finish the Movie Poster
Step 1
We're almost done, so now it's time to take care of the details. Take a look at all of the characters. Do any of them look out of place? Add an adjustment to fix it. I decided to darken the character in the hood to make him more mysterious.

Step 2
Add the jets to decorate the text.

Step 3
Add the jets to the background as well.

Step 4
Add some Lorem Ipsum text with the Ultra Condensed font.

Step 5
Add a white glow to the text to make it more visible.

Step 6
Show the guides again and see how the whole composition looks. It may be necessary to move the elements to make it more symmetrical.

Step 7
Add a Levels adjustment on top. Use it to add more contrast to the picture.


Step 8
Paint on top of the mask to reveal the darkest part.

Step 9
When you're done, copy the whole image to a new file, or flatten it. Go to Filter > Noise > Add Noise.

Step 10
Duplicate (Control-J) the layer. Go to Filter > Other > High Pass. Drag the Radius to show only the edges.

Step 11
Change the Blend Mode to Linear Light. This layer will sharpen the details.

May the Force Be With You!
Good job! Now you know how to make a movie poster in Photoshop. If you're interested in poster design, you may enjoy these tutorials as well:
 Poster DesignHow to Make a Movie Poster in Photoshop
 Poster DesignHow to Make a Movie Poster Online With a Poster Creator
 RetroHow to Create a Vintage Soviet Space Travel Poster in Adobe InDesign
If you want to see how your poster looks, you can use a mockup generator, Placeit.


Original Link: https://design.tutsplus.com/tutorials/how-to-make-a-star-wars-inspired-movie-poster-in-photoshop--cms-33033
TutsPlus - Design
More About this Source Visit TutsPlus - Design