
An Interest In:
Web News this Week
- April 25, 2024
- April 24, 2024
- April 23, 2024
- April 22, 2024
- April 21, 2024
- April 20, 2024
- April 19, 2024
Some of Our Sources
- BoingBoing
- Technology Review
- TutsPlus - Code
- Just Creative
- The Logo Smith
- Six Revisions
- Noupe
- Reencoded
- CSS Tricks
- Design Modo
Help Webnuz
Referal links:
How to Make a Brochure From an InDesign Template

In Adobe InDesign CC, you have access to hundreds of ready-made templates, which you can adapt with your own text and images. This is a quick and easy way to create a professional-standard layout with minimum fuss and time.
If you're looking for moreInDesign brochure templates, make sure to check out the wide selection onEnvato Elements.
Here, we’ll walk through the steps of selecting and customizing a free InDesign template for a trifold brochure.

What You’ll Need to Create Your Brochure
To edit the template pictured, you’ll need a subscription to Adobe Creative Cloud and the InDesign CC app installed on your computer.
If you don't have access to InDesign CC, you can find a wide range of similar trifold brochure templates on Envato Elements and GraphicRiver.
To recreate the ‘Pet Vacay’ design pictured here, you’ll also need to download the following fonts and images from Envato Elements:
- Maxim Sans font
- Bergen Mono font
- French bulldog
- French bulldog looking up
- Jack russell terrier
- Dachshund
- French bulldog and kitten
- Spanish dog
- British longhair kitten
Install the fonts on your computer, and you’re ready to get started.
1. How to Load Your Template in InDesign
Step 1
Make sure you’re logged in to Creative Cloud and connected to the internet. Open InDesign CC and go to File > New > Document.
In the New Document window, click on Print at the top. You’ll see a selection of presets at the top, with a selection of templates below this.

Step 2
Scroll down the page to browse the range of templates on offer. Here we’re going to use the template called ‘Pop Brochure Layout’.

You can click on See Preview to look at a mockup of the design in detail. Click Download, and then Open.

Step 3
You may have a warning window that alerts you to missing fonts. In this case, we’re going to be changing the fonts anyway, so it’s nothing to worry about.
Otherwise, you can click Sync Fonts to sync the fonts over from Adobe Fonts.

Step 4
Some templates will contain handy tips for how to use the template.
In this case, you’re instructed to go to the Pages panel (Window > Pages) and, from the main menu, choose View Pages > By Alternate Layout.

There are two layouts contained in this template—one for a US Letter version of the brochure, and the other for an A4 size. We’re going to work on the Letter-sized version only, so click on the arrow to the right of ‘A4’ and choose Delete Pages.


Step 5
Expand the Layers panel (Window > Layers) to look at the layers that have been set up in the template.
In this case, the top TIPS layer has been locked.

Switch off the visibility of the TIPS layer.

Step 6
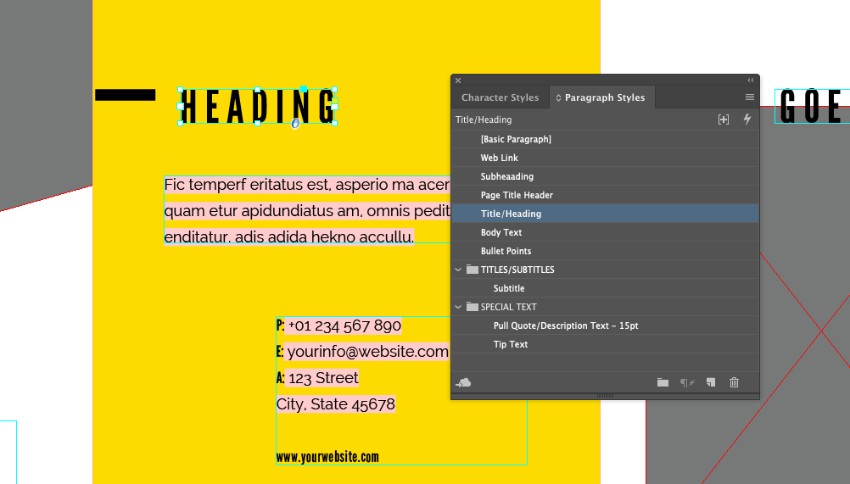
There may also be type styles set up in your template. To view these, go to Window > Styles > Character Styles / Paragraph Styles.
In this template, there are four character styles...

... and 11 paragraph styles.

If you click on a text frame on the layout, one of the paragraph styles will be highlighted, showing that the text has that style applied to it.
As we format the text, we can redefine these styles to apply the formatting across all instances of the style.
2. How to Reformat the Typography on Your Template
Switching up the look of the typography on your template is a great way of giving the layout an instant fresh look. Here’s how to do it.
Step 1
Working on Page 1 of the template, select the ‘HEADING’ text frame on the central third of the page.
From the top Controls panel or the Character panel (Window > Type & Tables > Character),change the Font to Maxim Sans Bold, Size 24 pt.

Step 2
In the Paragraph Styles panel,Right-Click on the highlighted ‘Title/Heading+’ style and choose Redefine Style.

This will apply the revised formatting to all the headers on the template.

Step 3
Select the body text frame at the bottom-left of Page 1 and adjust the Font to Bergen Sans Mono Regular, Size 8 pt.

Choose Redefine Style from the Paragraph Styles panel, as before, to reset the look of all the body text on the brochure.

Repeat the process for all other instances of text on the brochure, resetting the Font to either Maxim Sans or Bergen Sans Mono, and redefining the style for each.


3. How to Customize Color and Graphics on Your Template
Giving your template a color makeover is another technique for giving the design a unique spin.
Step 1
From the Swatches panel (Window > Color > Swatches), choose New Color Swatch from the panel’s main menu.
Create a CMYK swatch, with the values C=2 M=10 Y=100 K=0. Click Add and Done.
Repeat to create a second swatch, C=92 M=89 Y=41 K=35.
Apply the yellow swatch, C=2 M=10 Y=100 K=0, to the Fill Color of the central rectangle shape on Page 1, sitting on the Graphic/Design Elements layer.
Apply the blue swatch, C=92 M=89 Y=41 K=35, to the Font Color of all the text on Page 1.

Scroll down to Page 2, and apply the blue swatch to the Font Color of all the text on this page too.

Step 2
Scroll back up to Page 1 and select the image frame at the top-left corner of the page, which is on the Placeholders layer.

Go to File > Place and choose the dachshund image, before clicking Open.

Double-click inside the image frame to select the image directly and rotate the image a little, so that the dog’s paws are lined up with the bottom edge of the image frame.
Adjust the Fill Color of the placeholder image frame to [Paper].

Step 3
Select the circular shape at the bottom of Page 1, and go to File > Place, choosing the French bulldog looking up image. Open it.

From the top Controls panel, check the Auto-Fit box.

Hold Shift and drag to scale the circle up a little. The image will resize inside accordingly.

Directly select the bulldog image inside the frame, and Right-Click > Transform > Flip Horizontal.


Step 4
File > Place the other French bulldog imageinto the image frame on the far-right section of Page 1.

Step 5
Head down to Page 2 of the document, and File > Place the Spanish dogimage into the frame on the far-right section.
Place the jack russell terrierphoto into the central frame.

Place the British longhair kittenimage into the circular frame on the left side.

Step 6
Back on Page 1, select the yellow shape in the center of the page and Edit > Copy, Edit > Paste it, moving this over to fit the left-hand section. Extend the left edge so that it reaches the edge of the bleed on the left side.

Adjust the Fill Color of the shape to your dark blue swatch, and the Font Color of the text in the body text frame to yellow. Move the ‘HEADING’ frame down, and switch the Font Color to [Paper].

Step 7
Scroll down to Page 2 and Edit > Paste the yellow shape onto the page, positioning it over on the right third of the layout.

Paste again, moving this shape over onto the central section and changing the Fill Color to dark blue.

Adjust the color of the text and line elements above this to yellow, for contrast.

Paste a final shape onto Page 2, moving it over onto the left-hand section.

Step 8
You can now adjust the text content of your brochure. Manually type in the text, or Copy and Paste text over from a Word document.

You can tweak the size and position of text as you work. Make sure to redefine the Paragraph Styles to maintain consistency.

4. How to Export Your Brochure
With your brochure artwork finished, you’re ready to export it to a print-ready format.
Step 1
First, make sure to do a spell check (Edit > Spelling > Check Spelling). Then File > Save your work.
Go to File > Export. Name your file, and choose PDF (Print) from the Format menu, before clicking Save.
In the Export Adobe PDF window that opens, choose [Press Quality] from the Adobe PDF Preset menu at the top.

Step 2
Click on Marks and Bleeds in the window’s left-hand menu.
Check All Printer’s Marks and Use Document Bleed Settings. Then click Export.

Awesome work! You can send this press-ready PDF straight off to the printers.
Conclusion: Your Finished Brochure
If you want to show your brochure design to others before you commit to printing, why not drop your design into a Photoshop mockup, like this one?
If you're looking for more InDesign brochure templates, make sure to check out these top picks from Envato Elements:
Creative Agency Brochure Template
This dramatic and moody brochure template would make a great fit for start-ups or creative agencies. With 40+ pages, there's plenty of scope for building a comprehensive brochure for your business.

Nomad Trifold Brochure Template
A trifold brochure is simple, versatile and cheap to print. This trifold brochure template has a simple, modern design which would suit a variety of purposes.

Landscape Brochure Template
Landscape brochures are compact and allow you to create layouts that are wider, making them a great pick for photo-heavy designs. This brochure template comes in three colorways, giving you lots of flexibility with the look of the brochure.

Corporate Brochure Template
Looking for a brochure with a more formal look? This corporate brochure template has a polished, professional style which would suit law firms and financial businesses.

Minimal Brochure Template
The pared-back, Scandinavian-inspired design of this landscape brochure template is simple and stylish. Perfect for creative agencies, freelancers, or retail brands.

Original Link: https://design.tutsplus.com/tutorials/how-to-make-a-brochure-from-an-indesign-template--cms-32242
TutsPlus - Design
More About this Source Visit TutsPlus - Design