
An Interest In:
Web News this Week
- April 30, 2024
- April 29, 2024
- April 28, 2024
- April 27, 2024
- April 26, 2024
- April 25, 2024
- April 24, 2024
Some of Our Sources
- TutsPlus - Code
- Joshua Blankenship
- The Logo Smith
- Spoon Graphics
- Smashing Apps
- TutsPlus - Design
- Vandelay Design
- Crazy Leaf Design
- Wal You
- Daily Now
Help Webnuz
Referal links:
How to Draw a Duck

A duck is a common name for a large number of species—there are over 120 of them. In this tutorial, we’ll focus on drawing a mallard, which is a common and widespread species.
Mallards can live in almost any wetland habitat, natural or artificial. Chances are, you’ll find them in a near park; they feel themselves at home around lakes, ponds, rivers, marshes, and coastlines.
Also, mallards are the ancestors of almost all domestic ducks we keep today.
Let's take a closer look at these amazing birds; we’ll explore the difference between the colouring of male and female mallards and learn about their distinctive features. The drawing journey begins!
You may also be interested in these drawing tutorials:
 DrawingHow to Draw Animals: Birds, Their Anatomy and How to Draw Them
 DrawingHow to Draw a Bird Step by Step
 AnimalsHow to Draw an Owl
What You Will Need
In order to complete this project, you’ll need the following equipment:
- an HB graphite pencil
- a 3B graphite pencil
- an eraser
- drawing paper

1. How to Draw a Female Duck
Step 1
I outline the rough shape of the duck's head, using the HB pencil. I keep the lines light, so it will be easy to make changes in the future.

I add the shape of the beak; it is relatively long and narrow at the tip.
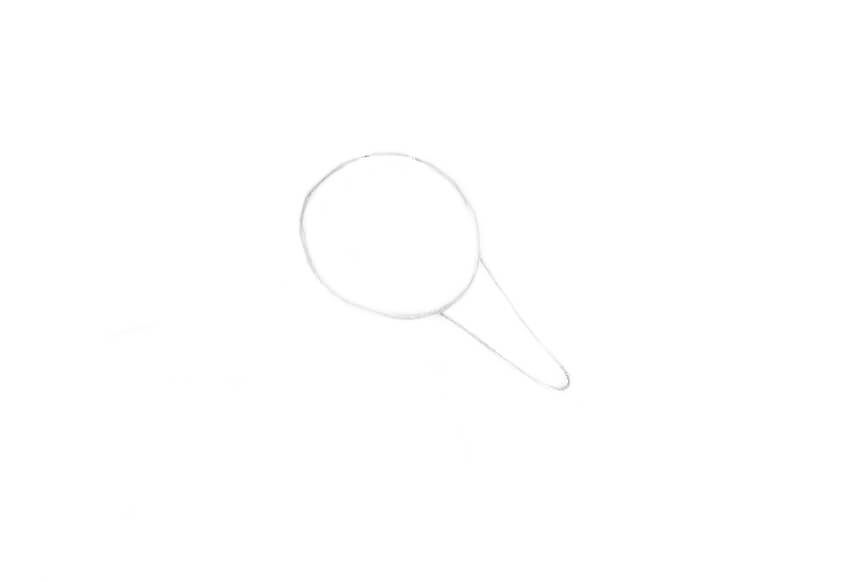
Step 2
I draw the oblong shape of the duck’s hefty body.

Step 3
I draw the core line of the duck’s neck, joining the head and body.

Step 4
Let’s add the framework of the feet. The feet of a duck are short and have three front webbed toes. I construct them, using small circles and lines.
I start with the foot that is closer to the viewer…

… then add another foot.

Step 5
I outline the contours of the bird’s wing.

Step 6
Let’s refine the head and add some distinctive features.
The beak has a small curve in the upper part; I also draw a nostril and darken the tip of the bill.
The eye is relatively small. A thin stripe goes through the eye area, from the beak to the back of the head; this feature is typical for females.

Step 7
I draw the contours of the duck’s neck. This position of the neck and body is also typical for swimming.

Step 8
I refine the foot, giving it thickness and volume. It’s important to include the small back toe and create a hint of webs that are joining the front toes.

I work on the second foot in the same manner.

Step 9
The wing of a duck may look non-uniform, as if it consists of layers or segments with their own relief. I create a pattern that imitates layers.

I refine the bottom segment of the wing, adding a new element called a speculum. It is an area of white-bordered black or iridescent blue feathers; both sexes have this feature.
A speculum is prominent in flight or at rest but temporarily shed during the annual summer molt. However, sometimes these bright feathers aren’t visible when the wing is folded.
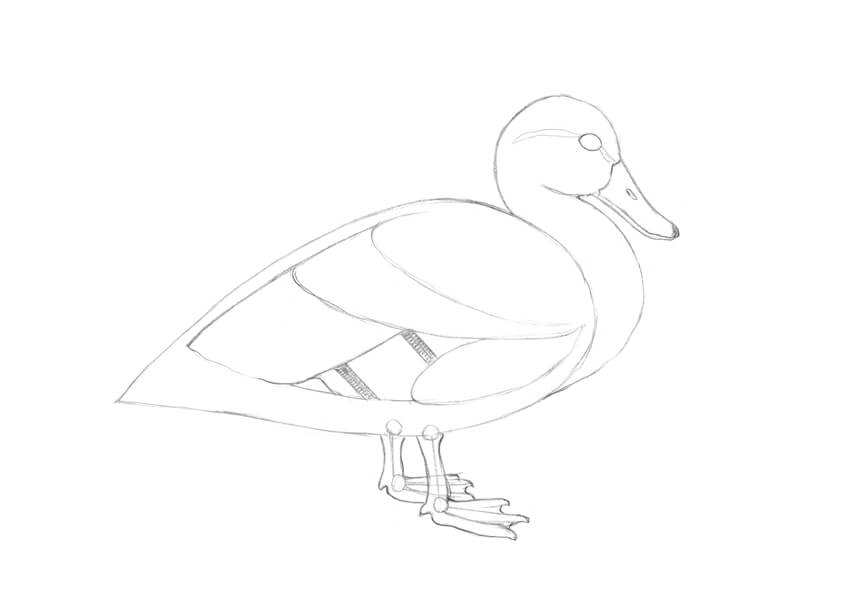
Step 10
I refine the contours of the wing layers, creating an illusion of volume. The wings may look more fluffy or smooth, depending on a variety of factors; the patterns and coloring can be slightly different, too.
By the way, all ducks have waterproof feathers!

Step 11
The female mallard is predominantly mottled. The individual feathers often demonstrate sharp contrast from dark yellow to very dark brown. I imitate this pattern, using the HB pencil.
I also shade the eye, leaving a small highlight, and create a drop shadow. The back and top of the head are relatively dark. Please remember about the stripe near the eye—it is dark, too

Step 12
I increase the contrast in my drawing, applying another layer of hatching to the darker areas, using the 3B pencil.
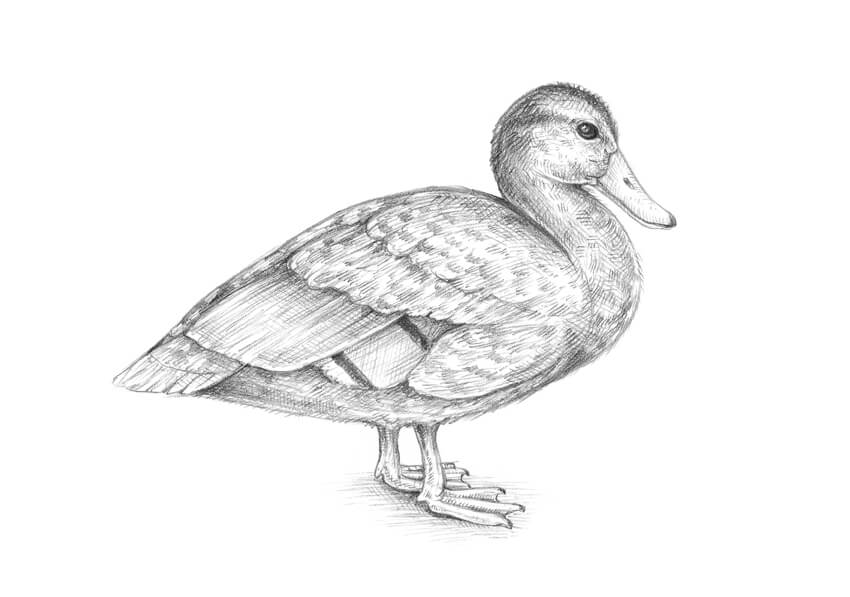
Step 13
You may be wondering how this female mallard would look in color. I’ve painted on top of this sketch digitally, just to show you an example.
As you can see, the colors change from beige, yellow, and orange to darker browns.

2. How to Draw a Male Duck
Step 1
The process of drawing a male mallard, or a drake, is similar to drawing a female duck. However, the coloring of feathers is significantly different.
I draw the shape of the small rounded head, and then add the beak, using the HB graphite pencil.

Step 2
I draw the body; it is relatively large compared to the head.

Step 3
I add the core line of the neck. The position of the neck is different from the example of the previous drawing, and this decision is intentional—I’d like to add some versatility to the resulting image.

Step 4
I add the framework of the feet.

Step 5
I refine the contours of the head and the beak, and then add the eye and nostril.

Step 6
I draw the neck of the duck, connecting the head and the body. The male mallards have a thin white collar that demarcates the head from the greyish brown breast.

Step 7
I outline the contours of the mallard’s feet, based on the knowledge we already have.

Step 8
I draw the wing. This position is slightly different from our previous example; sometimes, ducks keep their wings lifted at the top of the body.

Step 9
I divide the shape of the wing into segments to create a set of layers.

I add the speculum to the bottom part of the wing.

Step 10
I add some decorative stripes to vary the pattern of the wing; however, the upper part remains light and solid.
There are no absolute rules on how a drake’s wing should look in detail, so a creative approach is welcome.

Step 11
With the HB pencil, I apply some graphite hatching to the drawing, darkening the bottom part of the body, the tail feathers, and the head.

Step 12
With the 3B pencil, I increase the contrast in the drawing. The head of the mallard is the darkest area.

Step 13
A male mallard has a glossy green head (there may be an inclusion of blue color), grey-brown wings, and a pale grey belly. The bill of the drake is a yellowish-orange, tipped with black.
The brightly colored feet and bills of mallards are caused by changes in hormone levels during late fall and winter while the birds are pairing. The brightness of orange color suggests that a male duck is healthy and well fed, which makes him a great candidate for breeding in the eyes of female ducks.

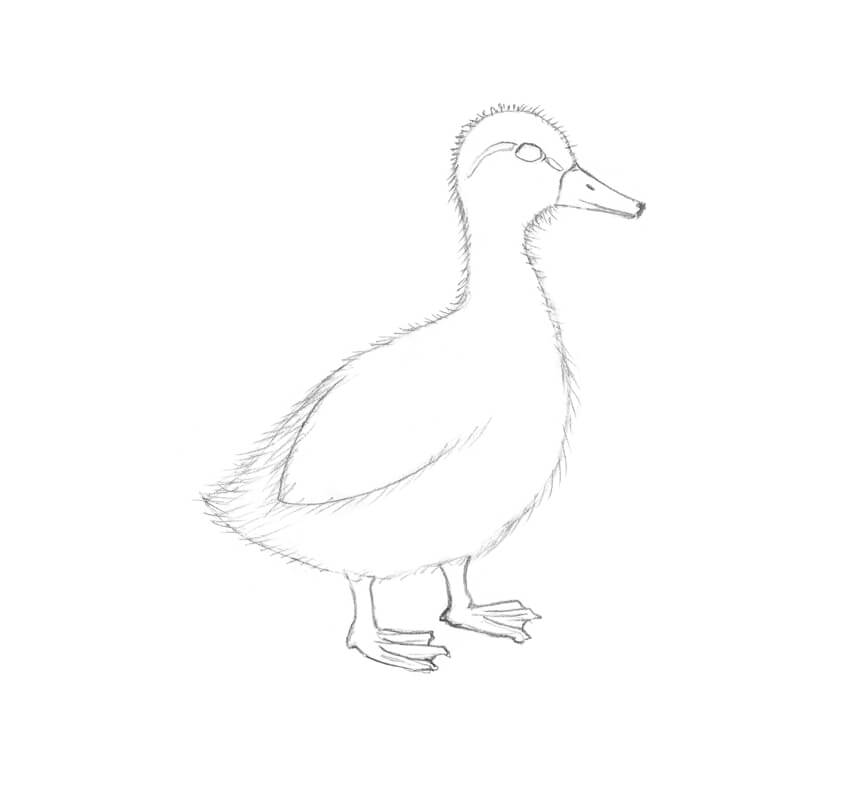
3. How to Draw a Mallard Chick
Step 1
I draw the shape of the chick’s head and beak.

Step 2
I draw the general shape of the duckling’s body; it is quite small, compared to the head (and adult ducks have larger, longer bodies).

Step 3
I draw the neck, presenting it as a shape.

Step 4
I draw the framework of the short feet, trying to make their position feel slightly unsteady or clumsy—this duckling is very young!

Step 5
I draw the wing of a chick; it is small.
The wings of a duckling are fully developed for flight between three and four months of age, which can be confirmed by the sight of purple speculum feathers.

Step 6
I add the details to the head, including a mark for the dark stripe near the eye.

Step 7
I refine the feet of the chick.

Step 8
I change the contours of the body, narrowing the neck and tail areas.

Step 9
I transform the uniform contour line into a set of shorter lines that imitate the fluffy covering of the duckling’s body.
Step 10
With the HB pencil, I mark the darker places of the chick’s body, such as the eye and back, including the upper part of the tail.

Step 11
I accentuate the darker spots using the 3B pencil. The coloring of a duckling should have plenty of contrast.

Step 12
It’s time to demonstrate the coloring!
The plumage of the duckling is yellow on the underside and face, with streaks by the eyes, and black on the back with some yellow spots all the way to the top and back of the head. Its legs and bill are also dark, of dark grey or black color.

Your Drawings Are Complete
Congratulations! You’ve created three beautiful artworks; I hope you enjoyed both the process and the result.
I wish you much success in drawing with graphite pencils. Have fun capturing the unique charm of the wonderful world of nature!

Original Link:
TutsPlus - Design
More About this Source Visit TutsPlus - Design