
An Interest In:
Web News this Week
- April 27, 2024
- April 26, 2024
- April 25, 2024
- April 24, 2024
- April 23, 2024
- April 22, 2024
- April 21, 2024
Some of Our Sources
- Techcrunch
- Pearsonified
- The Logo Smith
- Spoon Graphics
- Abduzeedo
- TutsPlus - Design
- Creative Curio
- Web Designer Depot
- My Ink Blog
- 24 Ways
Help Webnuz
Referal links:
How to Draw a Giraffe and a Giraffe Pattern

If you want to learn how to draw a giraffe, you've come to the right place! In this tutorial I will show you how to draw these amazing animals from scratch: first by establishing the guidelines of the skeleton, then by adding simplified muscle masses, and then by adding all the necessary details.
Even if you're a beginner at drawing, you can draw a realistic giraffe with me! And if you want something simpler, I will also show you how to draw the characteristic giraffe pattern.
This is a simple step-by-step tutorial on how to draw a giraffe in a single pose. If you want to learn more about drawing giraffes, especially about their anatomy, try this tutorial instead:

1. How to Draw a Giraffe's Body
Step 1
The main body of a giraffe has a characteristic shape—the shoulders are much higher than the hips, and the whole torso is quite short. Sketch this shape to create a basic outline of the body.

Step 2
Divide this shape into thirds.

Step 3
Draw a circle in the first two thirds. This will help us see the ribcage.

Step 4
Add two circles in the front for the shoulder, and a tilted oval in the back for the hips.

Step 5
We'll need more details to use these pieces of anatomy. Add the front of the shoulder, the front of the ribcage, and tips of the hips—all drawn as simple circles.

Step 6
Draw the sacrum right over the hips.

Step 7
Add the tail.

Step 8
Outline the silhouette of the body as the guidelines suggest.

2. How to Draw a Giraffe's Legs
Step 1
Giraffes have very long legs—but how long, exactly? It's all about proportions. Measure the torso in the middle, and then add twice this length below, plus some extra space for the hooves.

Step 2
Sketch basic curves for the front and hind legs.

Step 3
Legs can only be legs if they have joints in the correct places. Here's how you can find them:

Step 4
Let's add some depth to the drawing by adding another pair of legs slightly in the background. Draw the line of the ground above the previous one...

... and draw another pair of legs here.

Step 5
Mark their joints, too.

Step 6
The joints have a special shape that is very visible on these skinny legs. First, draw circles to create the joints over the hooves.

Step 7
Now, add semicircles for the "wrists" and "ankles".

Step 8
Finish these joints by adding more shapes.

Step 9
Finally, the arm and the knee.

Step 10
Draw the top of the hooves by "cutting" the line right over them.

Step 11
Outline the hooves. They should be quite flat.

Step 12
Add some muscle masses.


Step 13
Outline the whole legs.

3. How to Draw a Giraffe's Neck and Head
Step 1
To find the proper length for the giraffe's neck, use the length of the front limbs (without the hooves). You don't have to use a ruler—these lengths just need to be visually similar.

Step 2
To give this neck the proper volume, draw three ovals across it.

Step 3
Outline the neck, merging it gently with the torso.

Step 4
Add an oval for the head. It should be quite small.

Step 5
The simplest way to quickly set the proportions of the head is to draw a cross made of the eye line and a line going along the whole head. This cross must be adjusted to the perspective.

Step 6
Add the muzzle in the front.

Step 7
Add the cheeks.

Step 8
Add the "eye sockets". If you draw them bigger than the intended eyes, you get a better visual idea of where they should be placed.

Step 9
Draw the top of the muzzle.

Step 10
Add the long nostrils.

Step 11
Add the ears.

Step 12
Some giraffes have a bump on their forehead—this is where males store additional calcium.

Step 13
Sketch the two little horns.

Step 14
Draw the oval lines.

Step 15
Draw the bump over the eyes.

Step 16
Draw the long upper lip of the giraffe.

Step 17
Finish the shape of the head by connecting some of the guidelines.

4. How to Finish the Drawing of a Giraffe
Step 1
The guidelines are all done, so it's time to draw the final lines over them. You can use a darker tool now, erase the sketch to an extent, or put a new sheet of paper over it—it's up to you.
Outline the body as the guidelines suggest.

Step 2
Outline the head and all its details.

Step 3
Add some details to the body.

Step 4
Some elements should be darker—the eyes, the nostrils, the mane, the tail, and the hooves.

Step 5
To better show the 3D form of the body, shade it in a simple way.


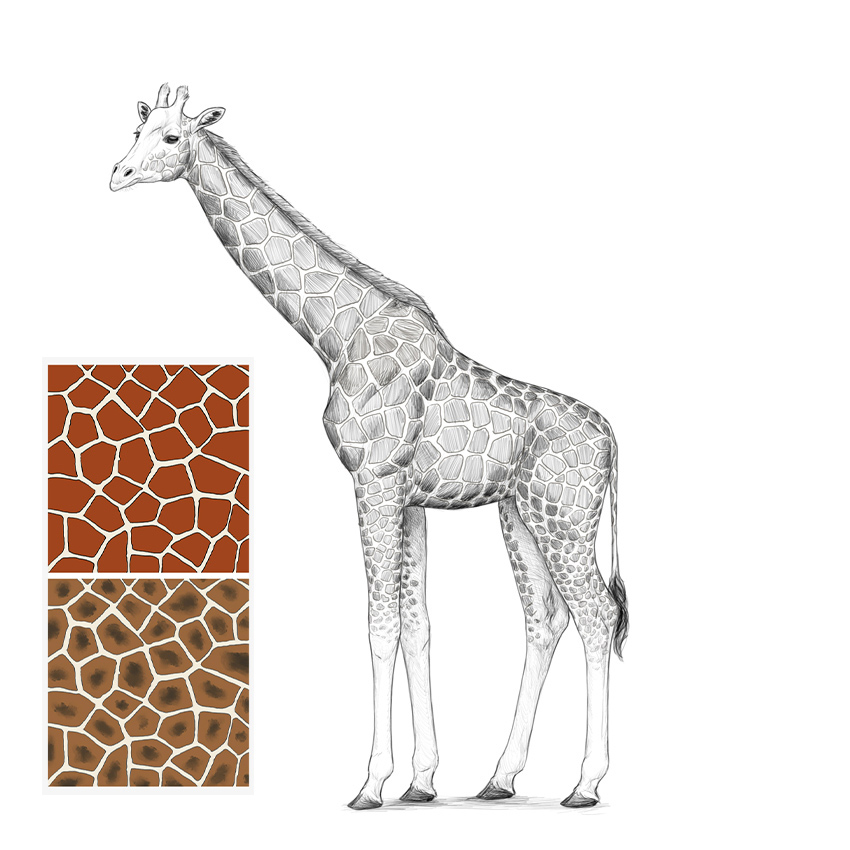
5. How to Draw a Giraffe Pattern
Step 1
Let's practice it on the side first. The pattern is pretty chaotic, but it has a special rhythm we have to follow. You can simulate it by drawing a lot of ovals/circles of similar size.

Step 2
Now you need to create borders between these ovals. First with long curves...

... then with simple lines, wherever necessary. Your goal is to keep all the ovals separate.

Step 3
Clean up these borders to create a regular mesh of polygons.

Step 4
Finally, draw patches inside the polygons, creating some distance between them. Make the lines a little wobbly to create a more natural shape.

Step 5
Various species of giraffe have slightly different patterns and colors, so don't forget to check out some references to finish your pattern correctly!

Step 6
Back to our drawing. Let's use the same process: fill the whole body with ovals. Remember to adjust them to the 3D form of the giraffe's body!

Step 7
Now the sketch of the borders...


Step 8
And the clean plan of the borders:

Step 9
Finally, draw the patches.

Step 10
Darken the patches to create a proper contrast between them and the rest of the skin.

Step 11
Finally, shade the patches to fit the rest of the lighting, and add some final touches.

Beautiful Job!
Now you know how to draw a giraffe and a giraffe pattern! Are you interested in other giraffe-related tutorials? Check these out:
 Photo EffectsUndress a Giraffe in Photoshop
 Photo ManipulationHow to Create a Surreal Giraffe Photo Manipulation With Adobe Photoshop
And if you want to keep drawing, here are some other animal drawing tutorials. You'll like the cow, especially—it's very similar to a giraffe!


Original Link:
TutsPlus - Design
More About this Source Visit TutsPlus - Design