
Some of Our Sources
- Simplebits
- Web Designer Wall
- Joshua Blankenship
- Smashing Magazine
- You The Designer
- Inspiredology
- Noupe
- 24 Ways
- Specky Boy
- CSS Tricks
Help Webnuz
Referal links:
Teach the CLI to Talk Back
Anna Debenham sets out to humanise our interactions with the command line to put more of the user into the user interface. Like an injured hedgehog in the winter snow, sometimes we can all benefit from interacting with a human.
If youve ever interacted with Slacks Slackbot to set a reminder or ask a question, youre basically using a command line interface, but it feels more like having a conversation. (My favourite Slack app is Lunch Train which helps with the thankless task of herding colleagues to a particular lunch venue on time.)
Same goes with voice-operated assistants like Alexa, Siri and Google Home. There are even games, like Lifeline, where you interact with a stranded astronaut via pseudo SMS, and KOMRAD where you chat with a Soviet AI.
Im not aiming to build an AI here my aspirations are a little more down to earth. What Id like is to make the CLI a friendlier, more forgiving, and more intuitive tool for new or reluctant users. I want to teach it to talk back.
Interactive command lines in the wild
If youve used dev tools in the command line, youve probably already used an interactive prompt something that asks you questions and responds based on your answers. Here are some examples:
Yeoman
If you have Yeoman globally installed, running yo will start a command prompt.
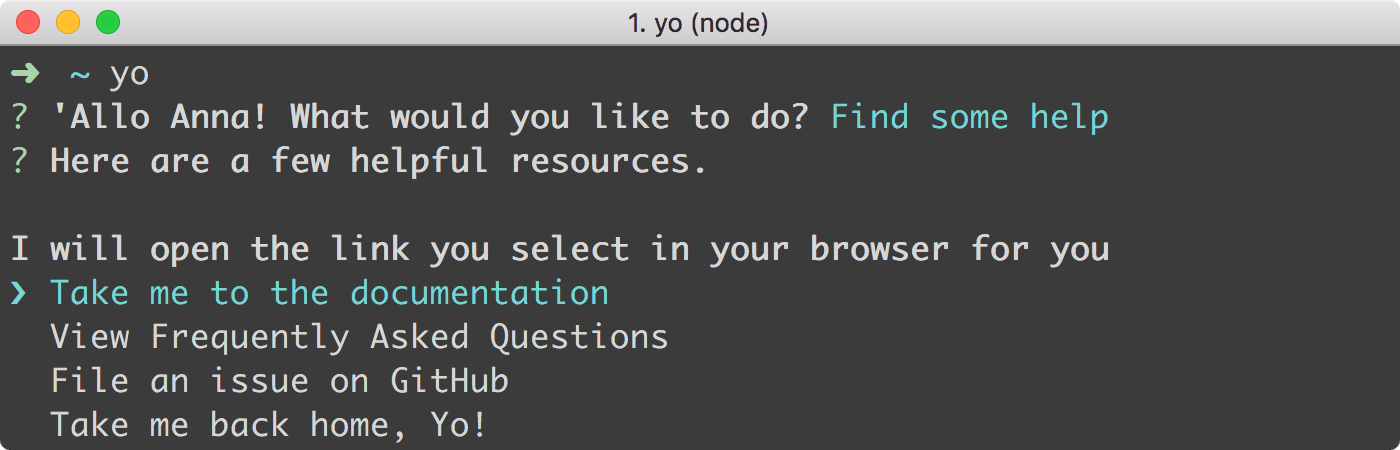
The prompt asks you what youd like to do, and gives you options with how to proceed. Seasoned users will run specific commands for these options rather than go through this prompt, but its a nice way to start someone off with using the tool.
npm
If youre a Node.js developer, youre probably familiar with typing npm init to initialise a project. This brings up prompts that will populate a package.json manifest file for that project.
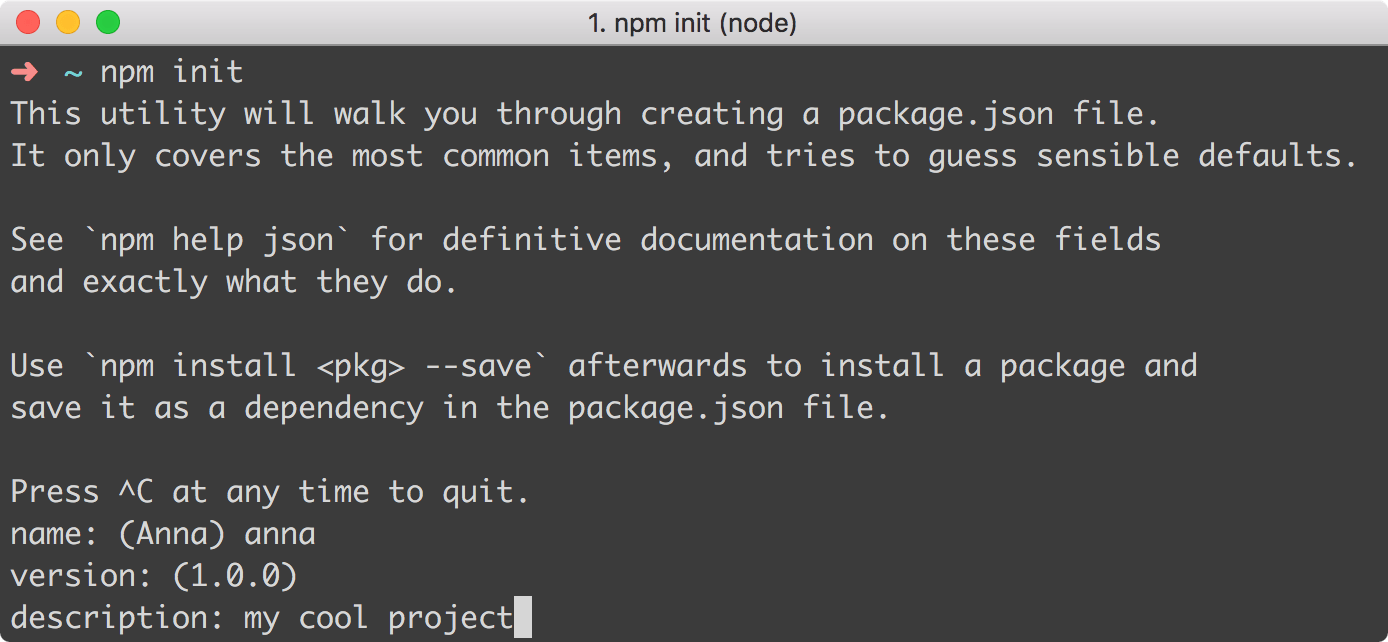
The alternative would be to expect the user to craft their own package.json, which is more error-prone since its in JSON format, so something as trivial as an extraneous comma can throw an error.
Snyk
Snyk is a dev tool that checks for known vulnerabilities in your dependencies. Running snyk wizard in the CLI brings up a list of all the known vulnerabilities, and gives you options on how to deal with it such as patching the issue, applying a fix by upgrading the problematic dependency, or ignoring the issue (you are then prompted for a reason).

These decisions get mapped to the manifest and a .snyk file, and committed into the repo so that the settings are the same for everyone who uses that project.
I work at Snyk, and running the wizard is what made me think about building my own personal assistant in the command line to help me with some boring, repetitive tasks.
Writing your own
Something I do a lot is add bookmarks to styleguides.io I pull down the entire repo, copy and paste a template YAML file, and edit to contents. Sometimes I get it wrong and break the site. So Ive been putting together a tool to help me add bookmarks.
Its called bookmarkbot its a personal assistant squirrel called Mark who will collect and bury your bookmarks for safekeeping.*

*Fortunately, this metaphor also gives me a charming excuse for any situation where bookmarks sometimes get lost its not my poorly-written code, honest, its just being realistic because sometimes squirrels forget where they buried things!
When you run bookmarkbot, it will ask you for some information, and save that information as a Markdown file in YAML format.
For this demo, Im going to use a Node.js package called inquirer, which is a well supported tool for creating command line prompts. I like it because it has a bunch of different question types; from input, which asks for some text back, confirm which expects a yes/no response, or a list which gives you a set of options to choose from. You can even nest questions, Choose Your Own Adventure style.
Prerequisites
- Node.js
- npm
- RubyGems (Only if you want to go as far as serving a static site for your bookmarks, and you want to use Jekyll for it)
Disclaimer
Bear in mind that this is a really simplified walkthrough. It doesnt have any error states, and it doesnt handle the situation where we save a file with the same name. But it gets you in a good place to start building out your tool.
Lets go!
Create a new folder wherever you keep your projects, and give it an awesome name (Ive called mine bookmarks and put it in the Sites directory because Im unimaginative). Now cd to that directory.
cd Sites/bookmarksLets use that example I gave earlier, the trusty npm init.
npm initPop in the information youd like to provide, or hit ENTER to skip through and save the defaults. Your directory should now have a package.json file in it. Now lets install some of the dependencies well need.
npm install --save inquirernpm install --save slugifyNext, add the following snippet to your package.json to tell it to run this file when you run npm start.
"scripts": { "start": "node index.js"}That index.js file doesnt exist yet, so lets create it in the root of our folder, and add the following:
// Packages we needvar fs = require('fs'); // Creates our file (part of Node.js so doesn't need installing)var inquirer = require('inquirer'); // The engine for our questions promptvar slugify = require('slugify'); // Will turn a string into a usable filename// The questionsvar questions = [ { type: 'input', name: 'name', message: 'What is your name?', },];// The questions promptfunction askQuestions() { // Ask questions inquirer.prompt(questions).then(answers => { // Things we'll need to generate the output var name = answers.name; // Finished asking questions, show the output console.log('Hello ' + name + '!'); });}// Kick off the questions promptaskQuestions();This is just some barebones where were including the inquirer package we installed earlier. Ive stored the questions in a variable, and the askQuestions function will prompt the user for their name, and then print Hello <your name> in the console.
Enough setup, lets see some magic. Save the file, go back to the command line and run npm start.

Extending what weve learnt
At the moment, were just saving a name to a file, which isnt really achieving our goal of saving bookmarks. We dont want our tool to forget our information every time we talk to it we need to save it somewhere. So Im going to add a little function to write the output to a file.
Saving to a file
Create a folder in your projects directory called _bookmarks. This is where the bookmarks will be saved.
Ive replaced my questions array, and instead of asking for a name, Ive extended out the questions, asking to be provided with a link and title (as a regular input type), a list of tags (using inquirers checkbox type), and finally a description, again, using the input type.
So this is how my code looks now:
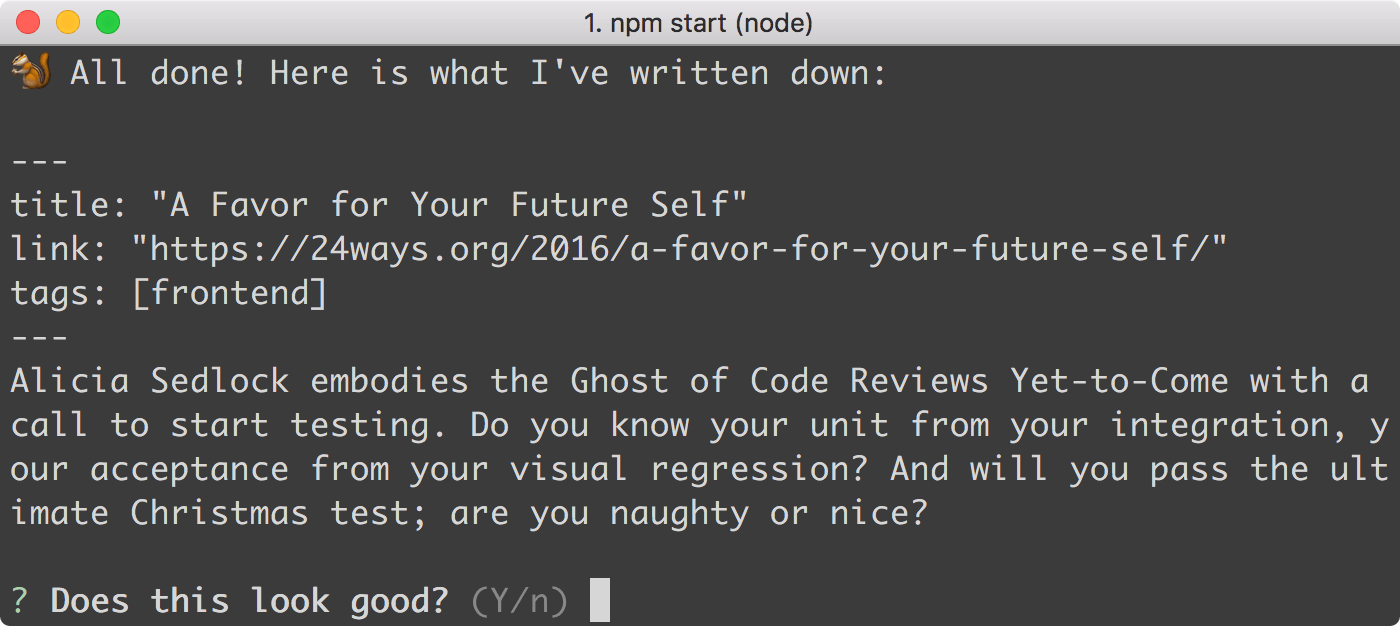
// Packages we needvar fs = require('fs'); // Creates our filevar inquirer = require('inquirer'); // The engine for our questions promptvar slugify = require('slugify'); // Will turn a string into a usable filename// The questionsvar questions = [ { type: 'input', name: 'link', message: 'What is the url?', }, { type: 'input', name: 'title', message: 'What is the title?', }, { type: 'checkbox', name: 'tags', message: 'Would you like me to add any tags?', choices: [ { name: 'frontend' }, { name: 'backend' }, { name: 'security' }, { name: 'design' }, { name: 'process' }, { name: 'business' }, ], }, { type: 'input', name: 'description', message: 'How about a description?', },];// The questions promptfunction askQuestions() { // Say hello console.log(' Oh, hello! Found something you want me to bookmark?\n'); // Ask questions inquirer.prompt(questions).then((answers) => { // Things we'll need to generate the output var title = answers.title; var link = answers.link; var tags = answers.tags + ''; var description = answers.description; var output = '---\n' + 'title: "' + title + '"\n' + 'link: "' + link + '"\n' + 'tags: [' + tags + ']\n' + '---\n' + description + '\n'; // Finished asking questions, show the output console.log('\n All done! Here is what I\'ve written down:\n'); console.log(output); // Things we'll need to generate the filename var slug = slugify(title); var filename = '_bookmarks/' + slug + '.md'; // Write the file fs.writeFile(filename, output, function () { console.log('\n Great! I have saved your bookmark to ' + filename); }); });}// Kick off the questions promptaskQuestions();The output is formatted into YAML metadata as a Markdown file, which will allow us to turn it into a static HTML file using a build tool later. Run npm start again and have a look at the file it outputs.

Getting confirmation
Before the user makes critical changes, its good to verify those changes first. Were going to add a confirmation step to our tool, before writing the file. More seasoned CLI users may favour speed over a hey, can you wait a sec and just check this is all ok step, but I always think its worth adding one so you can occasionally save someones butt.
So, underneath our questions array, lets add a confirmation array.
// Packages we need// The questions// Confirmation questionsvar confirm = [ { type: 'confirm', name: 'confirm', message: 'Does this look good?', },];// The questions promptAs were adding the confirm step before the file gets written, well need to add the following inside the askQuestions function:
// The questions promptfunction askQuestions() { // Say hello // Ask questions inquirer.prompt(questions).then((answers) => { // Things we'll need to generate the output // Finished asking questions, show the output // Confirm output is correct inquirer.prompt(confirm).then(answers => { // Things we'll need to generate the filename var slug = slugify(title); var filename = '_bookmarks/' + slug + '.md'; if (answers.confirm) { // Save output into file fs.writeFile(filename, output, function () { console.log('\n Great! I have saved your bookmark to ' + filename); }); } else { // Ask the questions again console.log('\n Oops, let\'s try again!\n'); askQuestions(); } }); });}// Kick off the questions promptaskQuestions();Now run npm start and give it a go!
Typing y will write the file, and n will take you back to the start. Ideally, Id store the answers already given as defaults so the user doesnt have to start from scratch, but I want to keep this demo simple.
Serving the files
Now that your bookmarking tool is successfully saving formatted Markdown files to a folder, the next step is to serve those files in a way that lets you share them online. The easiest way to do this is to use a static-site generator to convert your YAML files into HTML, and pop them all on one page. Now, youve got a few options here and I dont want to force you down any particular path, as there are plenty out there its just a case of using the one youre most comfortable with.
I personally favour Jekyll because of its tight integration with GitHub Pages I dont want to mess around with hosting and deployment, so its really handy to have my bookmarks publish themselves on my site as soon as I commit and push them using Git.
Ill give you a very brief run-through of how Im doing this with bookmarkbot, but I recommend you read my Get Started With GitHub Pages (Plus Bonus Jekyll) guide if youre unfamiliar with them, because Ill be glossing over some bits that are already covered in there.
Setting up a build tool
If you havent already, install Jekyll and Bundler globally through RubyGems. Jekyll is our static-site generator, and Bundler is what we use to install Ruby dependencies.
gem install jekyll bundlerIn my project folder, Im going to run the following which will install the Jekyll files well need to build our listing page. Im using --force, otherwise it will complain that the directory isnt empty.
jekyll new . --forceIf you check your project folder, youll see a bunch of new files. Now run the following to start the server:
bundle exec jekyll serveThis will build a new directory called _site. This is where your static HTML files have been generated. Dont touch anything in this folder because it will get overwritten the next time you build.
Now that serve is running, go to https://127.0.0.1:4000/ and youll see the default Jekyll page and know that things are set up right. Now, instead, we want to see our list of bookmarks that are saved in the _bookmarks directory (make sure youve got a few saved). So lets get that set up next.
Open up the _config.yml file that Jekyll added earlier. In here, were going to tell it about our bookmarks. Replace everything in your _config.yml file with the following:
title: My Bookmarksdescription: These are some of my favourite articles about the web.markdown: kramdownbaseurl: /bookmarks # This needs to be the same name as whatever you call your repo on GitHub.collections: - bookmarksThis will make Jekyll aware of our _bookmarks folder so that we can call it later. Next, create a new directory and file at _layouts/home.html and paste in the following.
<!doctype html><html lang="en"><head> <meta charset="UTF-8" /> <title>{{site.title}}</title> <meta name="description" content="{{site.description}}"></head><body> <h1>{{site.title}}</h1> <p>{{site.description}}</p> <ul> {% for bookmark in site.bookmarks %} <li> <a href="{{bookmark.link}}"> <h2>{{bookmark.title}}</h2> </a> {{bookmark.content}} {% if bookmark.tags %} <ul> {% for tags in bookmark.tags %}<li>{{tags}}</li>{% endfor %} </ul> {% endif %} </li> {% endfor %} </ul></body></html>Restart Jekyll for your config changes to kick in, and go to the url it provides you (probably https://127.0.0.1:4000/bookmarks, unless you gave something different as your baseurl).
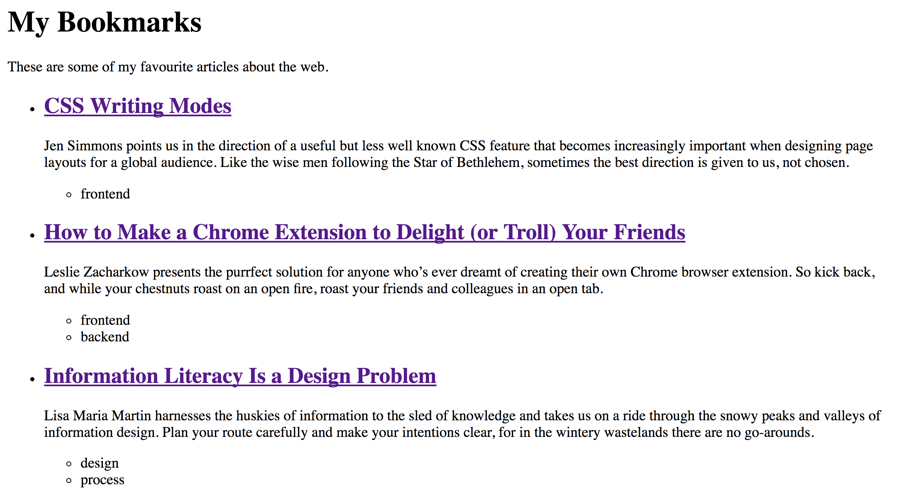
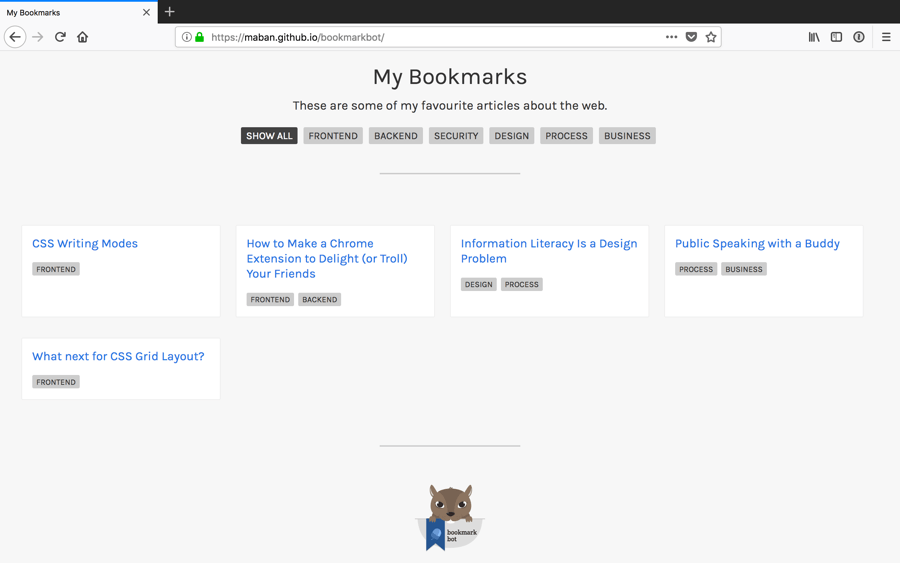
Its a decent start theres a lot more we can do in this area but now weve got a nice list of all our bookmarks, lets get it online!
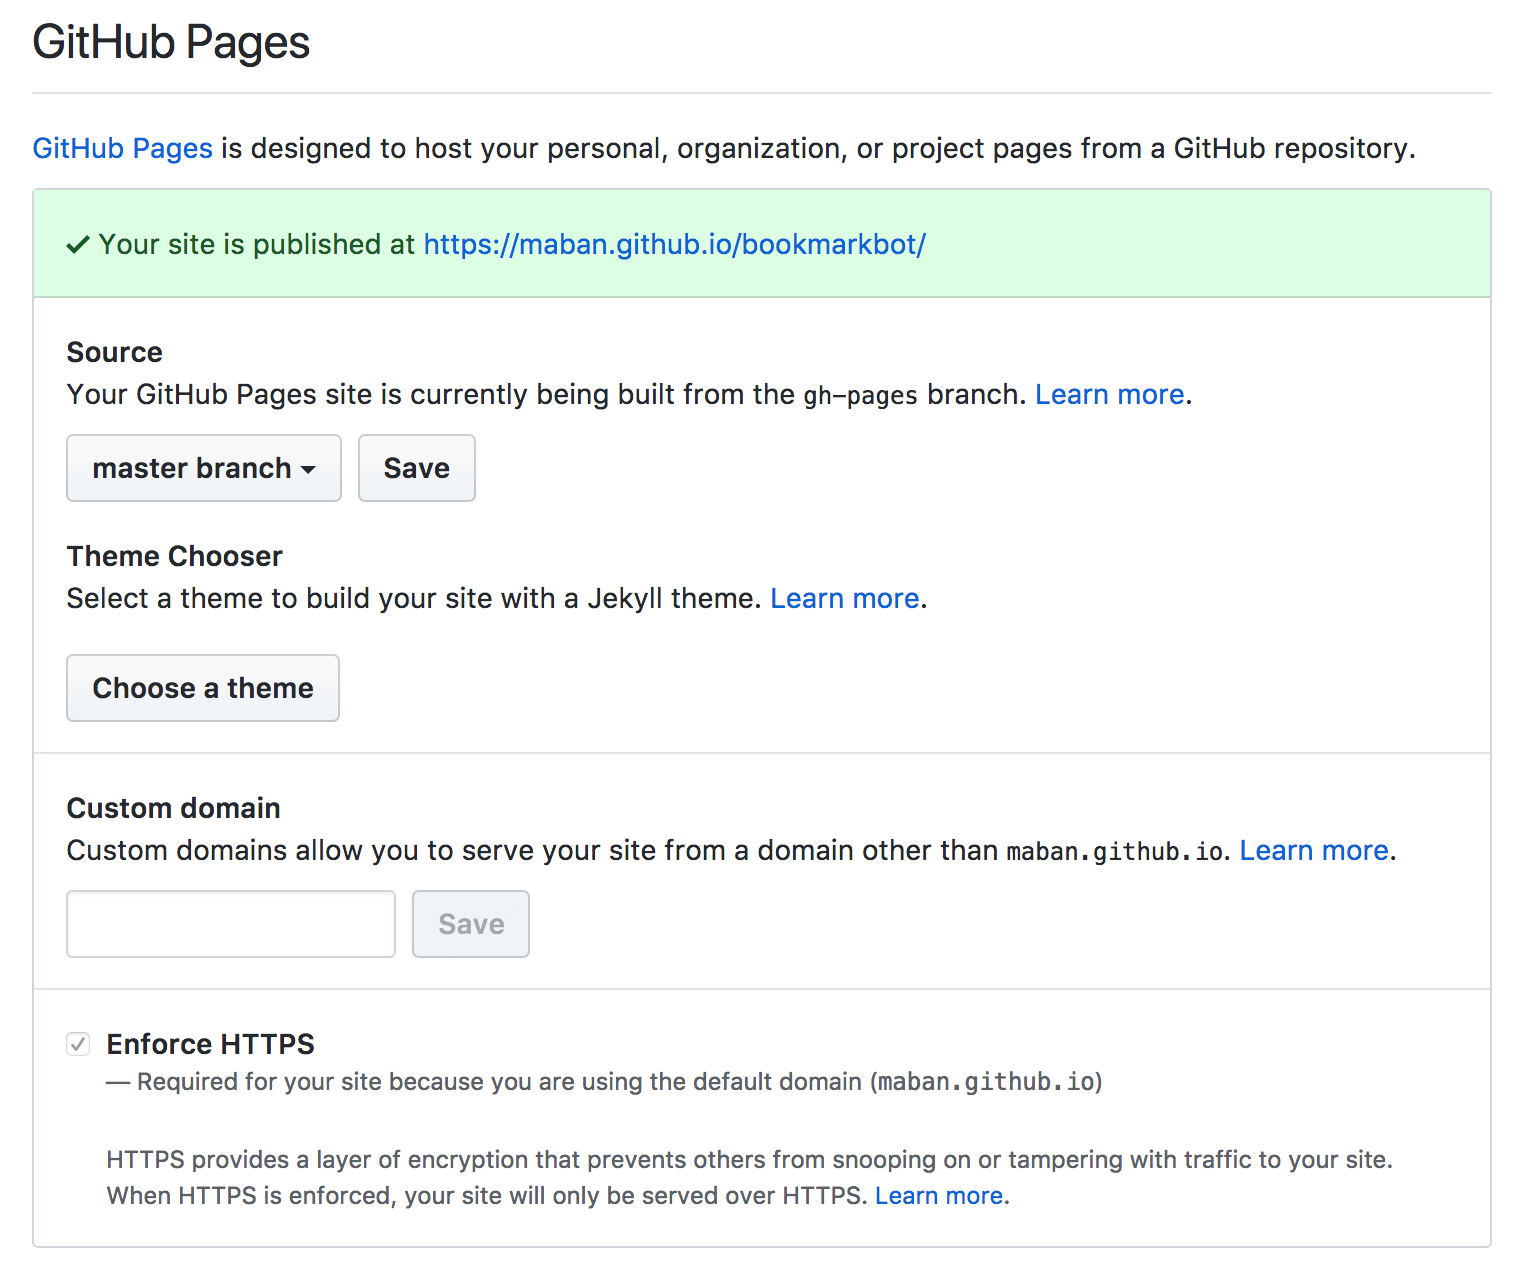
If you want to use GitHub Pages to host your files, your first step is to push your project to GitHub. Go to your repository and click settings. Scroll down to the section labelled GitHub Pages, and from here you can enable it. Select your master branch, and it will provide you with a url to view your published pages.
What next?
Now that youve got a framework in place for publishing bookmarks, you can really go to town on your listing page and make it your own. First thing youll probably want to do is add some CSS, then when youve added a bunch of bookmarks, youll probably want to have some filtering in place for the tags, perhaps extend the types of questions that you ask to include an image (if youre feeling extra-fancy, you could just ask for a url and pull in metadata from the site itself). Maybe youve got an idea that doesnt involve bookmarks at all.
You could use what youve learnt to build a place where you can share quotes, a list of your favourite restaurants, or even Christmas gift ideas.
Heres one I made earlier
My demo, bookmarkbot, is on GitHub, and Ive reused a lot of the code from styleguides.io. Feel free to grab bits of code from there, and do share what you end up making!
About the author
Anna Debenham lives in London and is Snyks Lead Front-End Developer.
She’s the author of Front-end Style Guides, and when she’s not playing on them, she’s testing as many game console browsers as she can get her hands on.
Original Link: http://feedproxy.google.com/~r/24ways/~3/lLFkDto3Yks/
24 Ways
More About this Source Visit 24 Ways