
An Interest In:
Web News this Week
- April 23, 2024
- April 22, 2024
- April 21, 2024
- April 20, 2024
- April 19, 2024
- April 18, 2024
- April 17, 2024
Some of Our Sources
- Mashable
- Techcrunch
- Six Revisions
- FanExtra - PSD
- Specky Boy
- CSS Tricks
- Android Headlines
- Willems Lab
- Daily Now
- TechPowerUp
Help Webnuz
Referal links:
How to Draw a Shark Step by Step

This tutorial is dedicated to selachophobia—the fear or extreme dislike of sharks.
This cultural phenomenon is quite common; you can find references to it in many articles on the most frequent phobias.
The fear of sharks may be an exaggerated form of an instinctive response. It’s completely understandable: sharks have razor-sharp teeth and, owing to the popular movies, a bad reputation as evil creatures.
But, in reality, only 30 species of sharks are actually dangerous or have been known to attack humans. The chances of becoming the victim of an unprovoked shark encounter are lower than the chances of being struck by lightning, injured in a car or bicycle accident, or even attacked by a domestic dog.
Usually, sharks aren't trying to hurt people; they are just curious!
Sharks may be dangerous in certain conditions (they are wild animals after all), but they also are wonderful creatures with an inherent natural beauty and a long, impressive lineage.
One of the ways to overcome a fear is to face the object that causes it. I invite you on a drawing adventure, and this journey into the underwater world will be totally safe!
You may also find useful this great in-depth article on fish anatomy, and this tutorial on drawing with black and grey ink liners.
What You Will Need
- a graphite pencil
- an eraser
- ink liners number 0.1 and 0.05 (grey color)
- ink liners number 0.2, 0.1, and 0.05 (black color)

1.How to Draw a Shark With a Graphite Pencil
Step 1
Let’s create a pencil sketch; it will help us to ink the drawing with confidence.
I draw a curved core line of the shark’s body and mark the side borders.

Step 2
I draw the narrowed shape of the shark’s head.
Then I add two rough segments of its body; drawing in parts is easier than trying to outline the whole figure at once.

Step 3
I add the shape of the tail and the caudal (tail) fin.

Step 4
I mark a subsidiary line where the eyes are located, and add the eyes.
I also draw the shape of the open mouth. By the way, sharks use their gaping jaws as a way to communicate with each other!

Step 5
It’s time to refine the shape of the shark’s head.

Step 6
The lines of a shark’s body are in general smooth and slightly curved. I define this shape more precisely.
Feel free to erase the reference lines of the segments as you go.

Step 7
I refine the shape of the tail and draw the caudal fin. The upper part of the tail fin is a bit bigger than the lower part and has a distinctive prominence.

Step 8
I draw the front dorsal fin, also marking a small spine at the beginning of this fin.

Step 9
I draw a pair of pectoral fins, using the rounded subsidiary lines as a reference. It’s important to remember that we are creating an illusion of three-dimensionality in our drawing!

Step 10
I add the remaining fins: back dorsal, ventral, and anal.

Step 11
I mark five gill openings on the shark’s body. You can draw two reference lines to create the borders of the gills.

Step 12
I add the nostrils, using a reference line to preserve the symmetry.
Then I draw the teeth; great white sharks have three rows of them. Just draw some of the front teeth, and later we’ll create an illusion of greater detail.
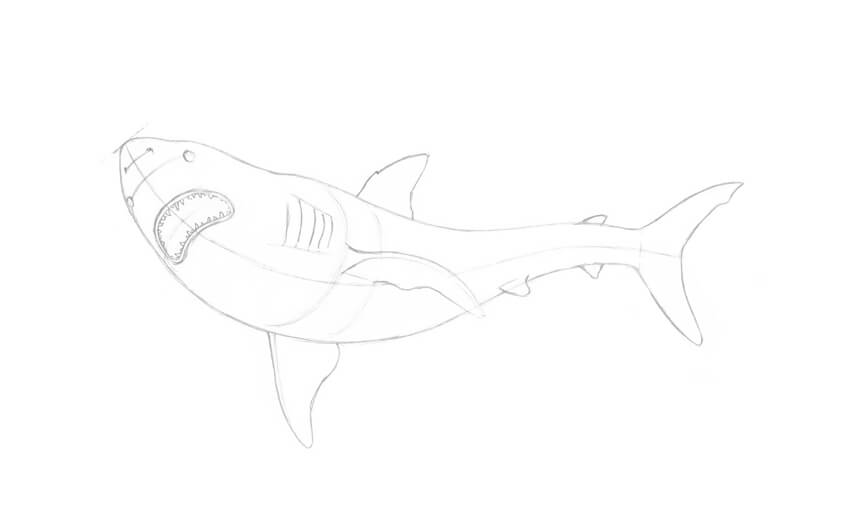
Step 13
I add a line that creates a border between the white underside and a grey dorsal area.

Step 14
To make this composition more interesting, I add a shape of a small fish.

Step 15
I draw the fins of the small fish.
To achieve an illusion of three-dimensionality, I imagine that I’m looking at a real fish from below. This simple trick helps to design any object and make it look more realistic.

Step 16
I erase all the subsidiary lines to prepare this sketch for inking. You can also create a clean copy of this drawing, using a window glass during the day or a light table.

2.How to Draw a Shark With Black and Grey Ink Liners
Step 1
With the 0.05 grey liner, I mark the shadows on the shark’s body. I also add hatches to the shape of the small fish.
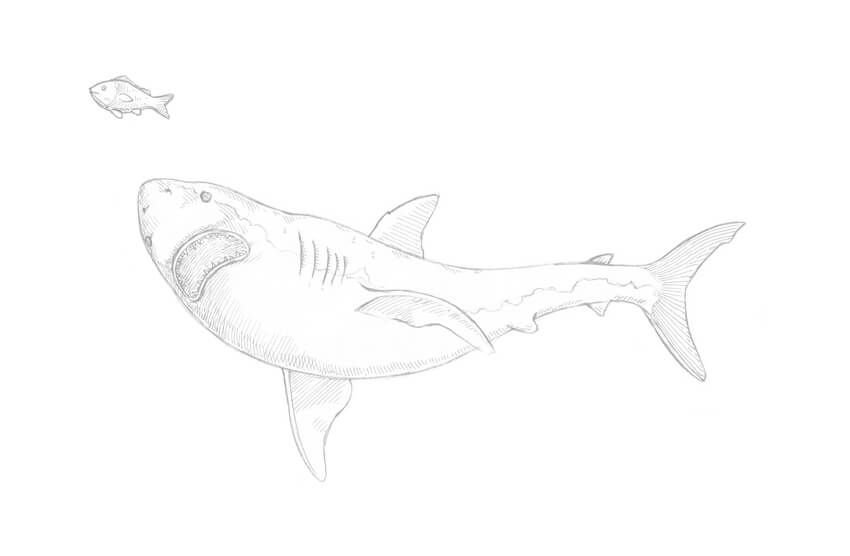
Step 2
I add more hatches to the darker areas of my drawing, using the 0.1 grey ink liner.
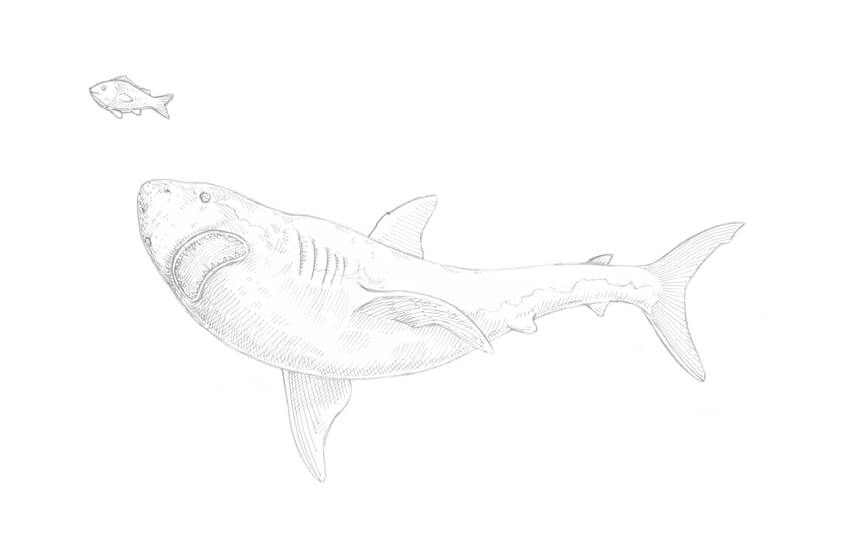
Step 3
With the 0.05 black liner, I add hatches to the sides of the shark and draw the eyes.

Step 4
I add dots and short hatches to the head of the shark, using the 0.1 black liner. I also create a partial outline of the figure.

Step 5
I continue working on the shark’s body, as we did in the previous lesson. Dots are an excellent choice for creating a natural texture in this case.

Step 6
I finish the work on the remaining parts of the shark’s body, using the 0.1 black liner.

Step 7
I add dots and short hatches to the shape of the small fish, using the 0.1 black liner. I also create its outline.

Step 8
With the 0.05 grey liner, I work on the mouth, adding thin hatches and dots.
The goal is to create an illusion of depth; avoid making the opening just a flat shape with equal value.
An additional layer of dots in the area of teeth is an excellent option to achieve the result we need.

Step 9
With the 0.2 black ink liner, I add dots to the shark’s dorsal area. The allocation of dots is non-uniform; I’m creating a pattern of the reflected light.

Step 10
I add long hatches to the sides to the shark, using the 0.1 grey liner. You can make occasional breaks in the lines to emphasize the pattern of the reflected light.

Step 11
I add the hatching to the sides of the small fish, using the 0.1 grey liner.

Step 12
With the 0.05 black liner, I add dots to the underside of the shark to make this figure more contrasting and three-dimensional.
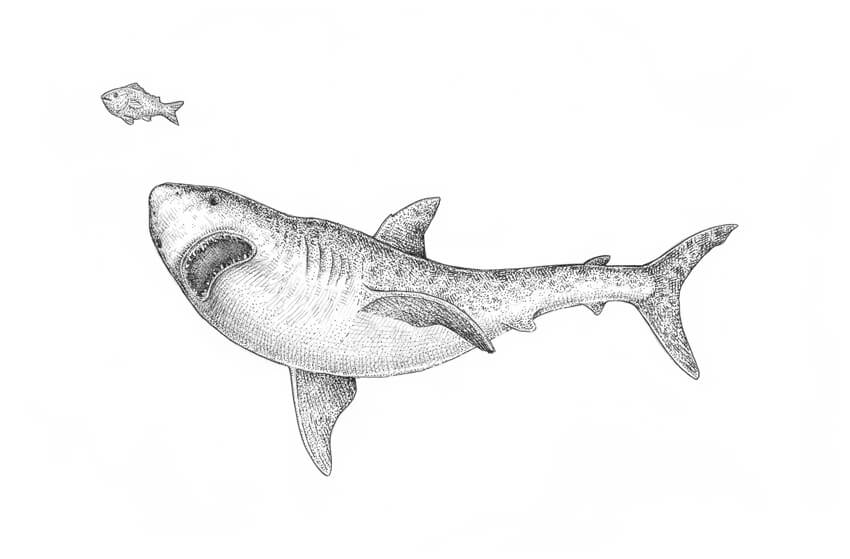
Step 13
As a finishing touch, I add lines and the groups of dots with the 0.05 grey liner to create an illusion of the underwater environment.

Your Artwork Is Complete
Congratulations! You finished this drawing. I hope you’ve discovered the beauty of sharks and enjoyed the process of drawing one of them.
Thanks for your attention! I wish you much joy, new experiences, and many amazing artworks on your way!

Original Link:
TutsPlus - Design
More About this Source Visit TutsPlus - Design