
An Interest In:
Web News this Week
- April 30, 2024
- April 29, 2024
- April 28, 2024
- April 27, 2024
- April 26, 2024
- April 25, 2024
- April 24, 2024
Some of Our Sources
- Mashable
- Just Creative
- Spoon Graphics
- Six Revisions
- TutsPlus - Design
- Crazy Leaf Design
- 24 Ways
- Specky Boy
- Design Modo
- The Verge
Help Webnuz
Referal links:
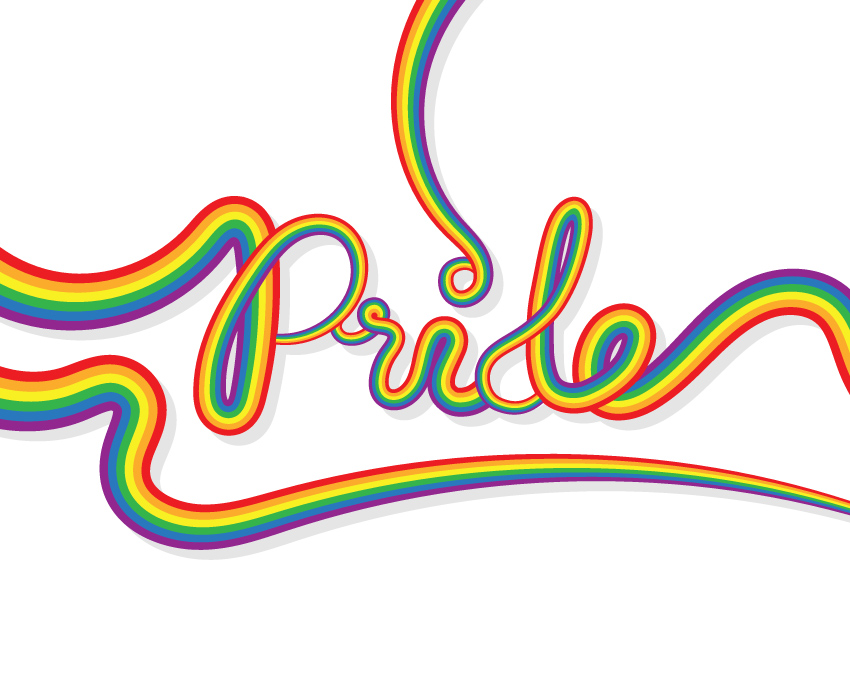
How to Create a Rainbow Text Effect in Adobe Illustrator

In the following steps you will learn how to create a rainbow text effect in Adobe Illustrator.
For starters, you will learn how to create a simple square and how to easily multiply it using the Transform effect. Moving on, you will learn how to turn this set of squares into a pattern brush.
Using a simple piece of text and your own pattern brush along with the Width Tool, you will learn how to create the rainbow text effect. Finally, you will learn how to apply an easy Drop Shadow effect and a flat, white background.
For more inspiration on how to adjust or improve your final text effect, you can find plenty of resources atGraphicRiver.
1. How to Create Your Own Pattern Brush
Step 1
Hit Control-N to create a new document. Select Pixels from the Units drop-down menu, enter 850 in the width box and 680 in the height box, and then click that More Settings button. Select RGB for the Color Mode, set the Raster Effects to Screen (72 ppi), and then click that Create Document button.

Step 2
Pick the Rectangle Tool (M) and focus on your Toolbar. Remove the color from the stroke and then select the fill and set its color to R=236 G=29 B=35. Simply click on your artboard to open the Rectangle window. Set both width and height to 5 px and then click that OK button to create your 5 px square.

Step 3
Make sure that your square is selected and go to Effect > Distort & Transform > Transform. Drag the Move-Vertical slider to 5 px, enter 5 in that Copies box, and then click that OK button.

Step 4
With your red square still selected, go to Object > Expand Appearance. Make sure that the resulting group of shapes is selected and hit Shift-Control-G twice to Ungroup it.

Step 5
Skip the top square and then select the rest of those shapes one by one and replace the existing fill color with the ones shown in the following image.

Step 6
Select all your squares, open the Brushes panel (Window > Brushes) and click that New Brush button. Check the Pattern Brush box and then click that OK button to open the Pattern Brush Options window. Pick a name for your brush, enter all the attributes shown in the following image, and then click that OK button.

2. How to Create a Piece of Text
Step 1
Pick the Type Tool (T) and open the Character panel (Window > Type > Character). Select the Stardust Adventure font and set the size to 350 px. Simply click on your artboard and add the "Pride" piece of text. Make it black and lower its Opacity to around 20%.

Step 2
Using the Pen Tool (P) or the Brush Tool (B) and that piece of text as a rough reference, draw some smooth paths about as shown in the following image. Add a simple black stroke for these paths, for now. Once you're happy with your paths, you can delete the text.

3. How to Apply Your Pattern Brush and Adjust It
Step 1
Select one of your paths and simply replace the black stroke with your pattern brush from the Brushes panel.

Step 2
Make sure that your path with the pattern brush is still selected and focus on the left end point. Pick the Width Tool (Shift-W), click that anchor point, and simply drag to the outside to enlarge your brush.

Step 3
Make sure that your path with the pattern brush is still selected, and this time focus on the right end point. Select the Width Tool (Shift-W), click that anchor point, and simply drag to the inside to squeeze your brush.

Step 4
Apply your pattern brush to the rest of the paths and use the Width Tool (Shift-W) to adjust the size as shown in the following image.

4. How to Add a Subtle Shadow and a Simple Background
Step 1
Select all your paths and Group them (Control-G). Make sure that your new group is selected and go to Effect > Stylize > Drop Shadow. Enter the attributes shown in the following image and then click that OK button.

Step 2
Pick the Rectangle Tool (M) and create an 870 x 700 px shape. Fill it with white (R=255 G=255 B=255), send it back (Shift-Control-[), and make sure that it covers your entire artboard.

Congratulations! You're Done!
Here is how it should look. I hope you've enjoyed this tutorial and can apply these techniques in your future projects. Don't hesitate to share your final result in the comments section.
Feel free to adjust the final design and make it your own. You can find some great sources of inspiration atGraphicRiver,with interesting solutions to improve your design.
Original Link:
TutsPlus - Design
More About this Source Visit TutsPlus - Design