
An Interest In:
Web News this Week
- April 28, 2024
- April 27, 2024
- April 26, 2024
- April 25, 2024
- April 24, 2024
- April 23, 2024
- April 22, 2024
Some of Our Sources
- TutsPlus - Code
- Spoon Graphics
- Creative Curio
- Naldz Graphics
- Noupe
- My Ink Blog
- Web Resource Source
- Android Headlines
- Willems Lab
- Hashedout
Help Webnuz
Referal links:
How to Create a Gold Foil Logo Mockup in Adobe Photoshop

Learn the process to build a photorealistic logo mockup, from the right perspective to multiple layer styles. And you'll get a final bonus tip about how to get a trendy rose gold tint! In this tutorial, I will guide you through the steps to create a photorealistic Gold Foil Logo mockup with Adobe Photoshop.
We'll use a vector badge for the purpose, so you also need to have Adobe Illustrator installed on your computer.
If you're looking for a professional logo mockup, why not try this photorealistic logo mockup pack, available on Envato Elements.

Tutorial Assets
The following assets were used during the production of this tutorial:
1.How to Prepare the Paper Texture
Step 1
Download the paper texture and open it with Photoshop.
In the top menu, choose Layer > New > Layer From Background. Type the name "Paper Texture" and press OK.

Step 2
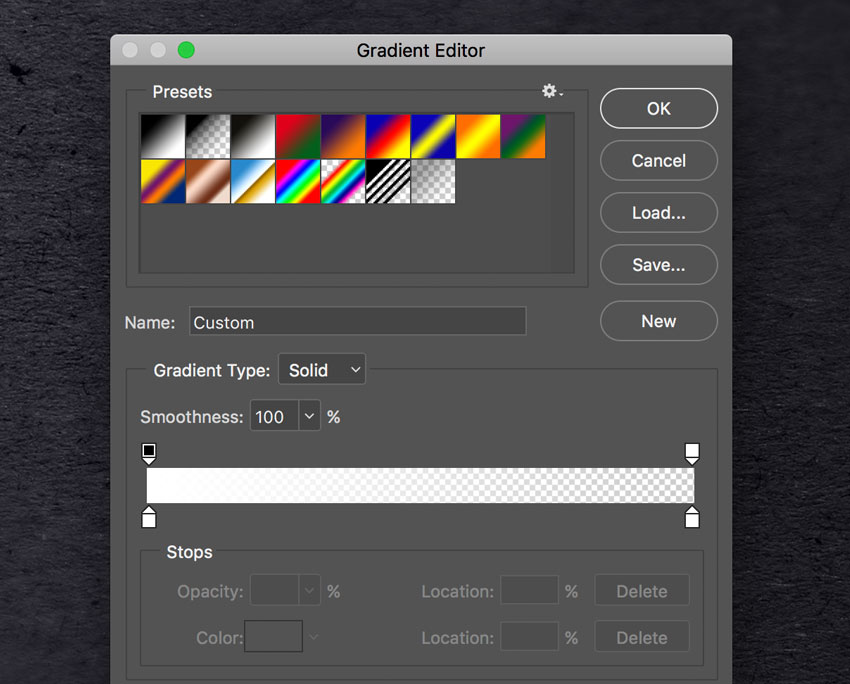
Open the Layer Style panel for the "Paper Texture" layer just created and add a new Gradient Overlay effect. Set the options as shown in the image below:

Click on the small gradient window to edit the gradient. Set the color for the two color stops to white and set the left opacity stop to 100% and the right to 0%.
2. How to Prepare the Smart Object
Step 1
Download thePerspective Imageand open it with Photoshop.

Choose, in the top menu, Select > All, and then choose Edit > Copy to copy the selection to the clipboard.
Go back to the paper texture document and choose, in the top menu, Edit > Pasteto paste the perspective image over the paper texture.
Rename the layer bydouble-clickingdirectly on the layer's name in theLayerspanel and changing it to"Perspective".
Step 2
Set the foreground color to blue (any color different from black is good).
Then choose theRectangle Tool,move the cursor over the canvas, and click. You’ll open a small dialog box that allows you to enter precise dimensions for your new shape. Type1099 x 791 pxand clickOK.
Rename the layer bydouble-clickingdirectly on the layer's name in theLayerspanel and changing it to"Smart Object".
With the layer "Smart Object" selected, choose, in the top menu,Layer > Smart Object > Convert to Smart Object.
Now you should have a rectangle (no matter the color) over the perspective image:

What we're going to do now is distort the blue rectangle to fit the same shape of the black perspective rectangle.
Step 3
ChooseEdit > Transform > Scale.
In this step it's extremely important that we transform the blue rectangle using only the handles at the corners of the bounding box.
Move the mouse cursor over the handle on the top right corner, press and hold theCommandbutton on your keyboard (the cursor will change to a small white arrow), and then click and drag the handle until you touch the top-right corner of the black perspective square with your mouse cursor:

Keep dragging the handles to cover the whole black area with the blue rectangle:

Now you can remove the "Perspective" layer by selecting it in theLayerspanel and choosingLayer > Delete > Layer.
3.How to Arrange the Badge With Illustrator
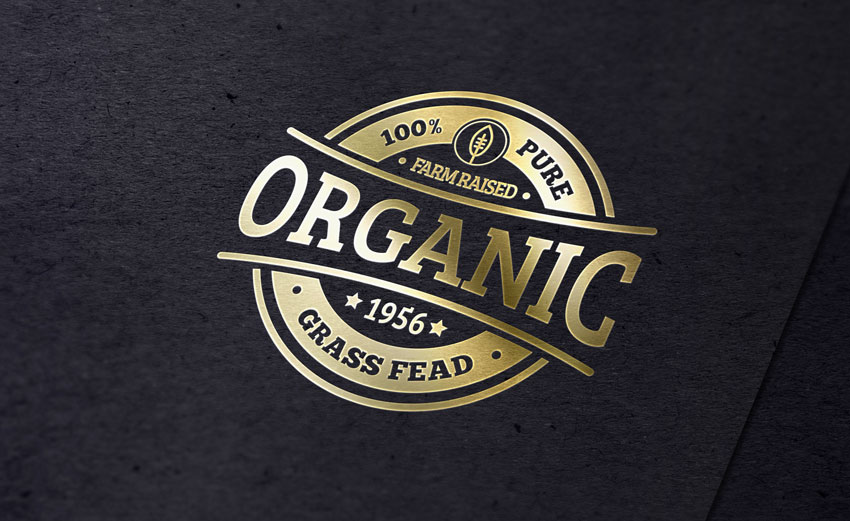
We need a logo or badge to complete the scene. This badge will be a prominent element that later will be stamped on the paper texture.
Fortunately,Envato Elementsoffers a wide range of high-quality badges and vector elements ready for use.Subscribe to unlock unlimited, high-quality badges, templates, photos and more for one monthly fee!
In this tutorial we'll use a badge that comes from a great collection of30 Vintage Style Badges and Logos:

Step 1
Open the vector .ai file withAdobe Illustrator. While you open the file, a window may pop up alerting you that the document uses fonts that are currently not available on your computer. No worries about that—all the fonts are free for use, and you can find a text file inside the folder with all the references and links to download each font.

For the purpose of this tutorial, I replaced the commercial fonts used in this badge with two free fonts:
Step 2
Once you're done with fonts, choose theSelection Tool(V).

Now select the "Organic" badge (or whatever badge you like). Copy the badge by going toEdit > Copyor pressingCommand-C.
Create a new350 x 350 pxdocument inAdobe Illustrator. Now paste the badge just copied by choosingEdit > Pasteor pressingCommand-V.
Step 3
With theSelection Tool(V), move the badge over the grey area, out of the white canvas.

If the badge is not selected, select it by clicking on it using theSelection Tool(V).
In the top menu, chooseObject > Expand Appearance. Again, chooseObject > Expand. A dialog window will appear; selectObjectandFilland pressOK:

Step 4
Locate thePathfinderpanel. If you can't see the panel, open it by choosingWindow > Pathfinder. Click on theTrim button.

Step 5
To remove the white areas, choose theMagic Wand Tool:

Move the cursor over a white area and click to select all the white areas of the badge:

If you need to,magnify the canvas using theZoom Tool(Z).
Now that all the white areas of the badge are selected, remove them by choosing, in the top menu,Edit > Cut.
Now the badge is ready to be imported into the Photoshop scene!
4.How to Include the Badge in the Scene
Step 1
We're still in the Adobe Illustrator workspace. Copy the badge by going toEdit > Copyor pressingCommand-C.

Step 2
Go back to Photoshop, select theSmart Objectfrom theLayerspanel, andDouble-clickon theSmart Objectsthumbnail.
When you edit aSmart Object, the source content is opened in a new window ofPhotoshop. Here you can make any changes you like and, once you're satisfied, all you need to do is save the file and the Photoshop Smart Object will be updated when you return to it.
In the Layers panel, deactivate the visibility for the blue rectangle layer,and paste the badge just copied by choosingEdit > Pasteor pressingCommand-V.
From the dialog box, chooseSmart Objectand pressOK.

Locate the top options bar and set the badge's position to744 x 536 pxand its dimension to771%for bothWidthandHeightfields. When you're done, pressEnteron your keyboard:

Step 3
Save the document by choosingFile > Saveor using the keyboard shortcutCommand-S.
Go back to the main document and you'll notice that the smart object is now updated with the last changes. The badge, in fact, has taken the perspective of the smart object.

5.How to Add the Gold Foil Effect
It's time to add some significant effects to the badge to give it a 3D feel, consistent with the scene.
Step 1
Select the "Smart Object" layer and set theFillto0%. Duplicate the "Smart Object" three times by going to Layer > New > Layer Via Copy.
Now look at the Layers panel, and you should be in a situation like this:

Rename the layers as shown in the image below, and then group the three effect layers:

From now on, when you need to replace the badge in your smart object, you can use this layer, by clicking on it and editing the content.
Step 2
Let's start adding some layer styles to the "Effect 1" layer. Open the Layers Style panel and add a new Inner Shadoweffect and set it as shown in the image below:

The color for the Blend Mode Color is White #ffffff.
Step 3
Add a newColor Overlayeffect and set it as shown in the image below:

The color for theBlend Mode Coloris #967a2f.
Step 4
Add a newGradient Overlayeffect and set it as shown in the image below:

Click on the small gradient window to edit the gradient.
Set the first color stop to Location 0% and Color to #343434, and then set the second color stop to Location 45% and Color to #343434.
Set the first opacity stop to Opacity 75% and Location 0%, and then set the second opacity stop to Opacity 0% and Location 45%.

PressOKto confirm and close theLayer Stylepanel.
Step 5
Now let's add some layer styles to the "Effect 2" layer. Open theLayers Stylepanel and add a new Gradient Overlayeffect and set it as shown in the image below:

Click on the small gradient window to edit the gradient. Here you need to set up seven color stops as follows:
- 1# color stop: Color
#bdbbb6, Location 0% - 2# color stop: Color
#ffffff, Location 18% - 3# color stop: Color
#85816f, Location 33% - 4# color stop: Color
#ffffff, Location 46% - 5# color stop: Color
#716d54, Location 54% - 6# color stop: Color
#ffffff, Location 66% - 7# color stop: Color
#65625a, Location 82%

Step 6
Add a newDrop Shadoweffect and set it as shown in the image below:

The color for the Blend Mode Color is White#ffffff.
Press OK to confirm and close the Layer Style panel.
Step 7
Finally add some layer style to the "Effect 3" layer. Open theLayers Stylepanel and add a newGradient Overlayeffect and set it as shown in the image below:

Click on the small gradient window to edit the gradient. Here you need to set up seven color stops as follows:

Click on the small gradient window to edit the gradient. Here you need to set up seven color stops as follows:
- 1# color stop: Color
#e9e7d9,Location 0% - 2# color stop:Color
#fffdf0,Location 20% - 3# color stop:Color
#8e8366,Location 61% - 4# color stop:Color
#9e9475,Location 67% - 5# color stop:Color
#cec7b2,Location 78% - 6# color stop:Color
#69604c,Location 95%
Step 8
Add a newDrop Shadoweffect and set it as shown in the image below:

The color for theBlend Mode Coloris Black#000000.
PressOKto confirm and close theLayer Stylepanel.
You're done!
6. Bonus Tip: How to Get the Rose Gold Tint
In case you haven’t noticed, rose gold is everywhere right now. From holiday decorations to engagement rings to the new iPhone, this pretty metallic is kicking traditional gold to the curb.
If you'd like to apply this trendy tint to your new Gold Foil Logo Mockup, just do the following:
Step 1
Select the "Effect" folder in the Layers panel, and then click on the small icon at the bottom of the panel and select Solid Color. See the image below for reference:

In the Color Picker dialog, set the HEX color to #eeb5ef and press OK to confirm.

Step 2
Right click on the Color Fill layer just created and choose Create Clipping Mask.
Change theBlend ModetoMultiplyand the Opacity to 90%.

Your Rose Gold Foil Logo Mockup is ready!

Congratulations, You're Done!
In this tutorial we learned how to create a realistic Gold Foil Logo Mockup with Adobe Photoshop!
I hope that you've enjoyed my tutorial and learned something new.Please feel free to leave your comments, suggestions, and outcomes below.
Original Link:
TutsPlus - Design
More About this Source Visit TutsPlus - Design