
An Interest In:
Web News this Week
- April 27, 2024
- April 26, 2024
- April 25, 2024
- April 24, 2024
- April 23, 2024
- April 22, 2024
- April 21, 2024
Some of Our Sources
- BoingBoing
- Web Designer Wall
- Team Treehouse
- TutsPlus - Design
- Inspiredology
- Naldz Graphics
- FanExtra - PSD
- Web Design Ledger
- Reencoded
- Hashedout
Help Webnuz
Referal links:
How to Paint Fluffy, Stormy, and Wispy Clouds in Photoshop

Love to stare up at the sky? Recreate beautiful, realistic clouds with this Photoshop tutorial.
Today, I'll teach you how to paint fluffy, stormy, and wispy clouds using a mix of quality art brushes. I'll explain some of my favorite tools and techniques for creating incredible, realistic effects.
Need more references? These paintings are inspired by the amazing cloud stocks available on Envato Elements. Dive into their selection for more quality stocks.
Tutorial Assets
The following assets were used in the production of this tutorial:
How to Work With Nearly Any Cloud Photo
Many people are against references out of fear that they'll create laziness. But that's a bit outdated.
We definitely need to know what we're looking at!
Most of what we paint emulates what already exists. And for this tutorial, it's important to realize that you can imitate the general vibe of any photo or composition for your digital paintings. Try to recreate special moments that you can twist for your own cool result.
You can also refer to this great tutorial for more cloud drawing tips:

I'll be using several stock photos from Envato Elements. Feel free to gather more references if needed.

The first I used very loosely, while the other two helped me assess the different lighting/color schemes. This is another great reason to keep stocks nearby.
Arrange Your Workspace
Next, set up your workspace for easy referencing.
Go to Window > Arrange > 2-Up Vertical.

Great if you like to keep your references in a separate file, this setup helps you study photos better for more realistic details.
Now let's paint!
1. How to Paint a Basic, Fluffy Cloud
Step 1
Let's start with the background!
Create a New Document in Photoshop at 900 x 450 pixels at 300 dpi. Small documents are better for general practice.
Click on the background layer to make a New Layer. Go to Blending Options and create a sky-blue (using colors: #b3d0dd, #90dcff, and #68c1f0) Linear Gradient Overlay with the following settings:

Here's the result.

You will need a graphics tablet for the next steps.
Then, using a large Soft Round Brush, paint a soft blue #3a6997 spot for a bit of shadow in the middle. This will help the cloud pop against it.

Step 2
On a New Layer:
Use a Hard Round Brush (100% Hardness and Opacity) to paint a solid, off-white #adb7c0 cloud shape. Start with a simple cloud shape before moving on to difficult ones.
This cloud will be similar to the voluminous Cumulonimbus cloud. Study different cloud types to learn more about their characteristics. According to the link above, this one will be fluffy and full of moisture.

Begin shading the cloud with subtle shadows.
Clip a New Layer to the original cloud shape and set it to Multiply. Use the same off-white color from before to paint shadow onto the cloud. The Clipping Mask will also keep the shadows in place.
Start with 100% Hardness and 100% Opacity, and then lower both as you try to blend the shadow.
Need help with blending? Check this out:


Step 3
Set up the base textures.
Using brushes from the Supreme Acrylic & Gouache Photoshop Brush Pack, paint subtle curved peaks onto the cloud. Use white and light gray #94a8bc to help establish the lighting scheme right away.

Incorporate some of the blue color from the background, and then Merge the clipped layers together with the original cloud shape.

Lightly erase the harsh edges using the Eraser Tool (E) at 20-40% Opacity.

Step 4
Now that we have this little funky base, we can push forward!
Just like before, start to paint more shadow onto the cloud. Zoom in at 200% to paint textural lines for more depth. Make sure the Pen Pressure for Opacity option is checked.
Switch over to the Hard Round Pressure Opacity Brush from your normal preset list. Use this brush to carve little areas where the cloud might blend into the blue sky.

Clouds have pockets of light and shadow (see below). So as you continue to paint, plan out the areas where you want to create depth and movement. Add bits of gray for a realistic transition.

Step 5
Allow the cloud to evolve naturally. Pay attention to references, but don't allow them to distract you.
Use a Soft Round Brush with 0% Hardness to surround the cloud with a soft fog.

Step 6
Let's adjust the colors using Adjustment Layers.
First, add a new light blue (using colors #c6cbd4 and #b4cbdc) Linear Gradient Map and set it to Color Burn.

Create a new Levels Adjustment Layer with the following settings. It'll instantly bring out the definition we need for this look.

Step 7
Now that we have the right intensity, we can proceed with painting more details. First, let's balance out the sky.
One quick way to paint the sky is to just use another New Layer. Use a Soft Round Brush at 50-100% Opacity to paint a lighter blue onto the bottom.
Vary the Opacity regularly, and don't worry about it looking messy!

A soft brush is better for wispy clouds, while a crisp edge helps define more details.
Continue blending the background while adding smaller clouds in the distance. Create a sense of depth by creating a circle of mist and atmosphere around the cloud.

Step 8
Now that we have the right colors, we can focus on finalizing our cloud.
Add New Layers to try out different shapes and swirls often. Switch to a Chalk Brush to make your clouds appear more realistic. Any bit of extra texture will instantly add more realism.

Finally, incorporate some yellow to show that the sun is affecting the cloud and sky.
Here's the final result!

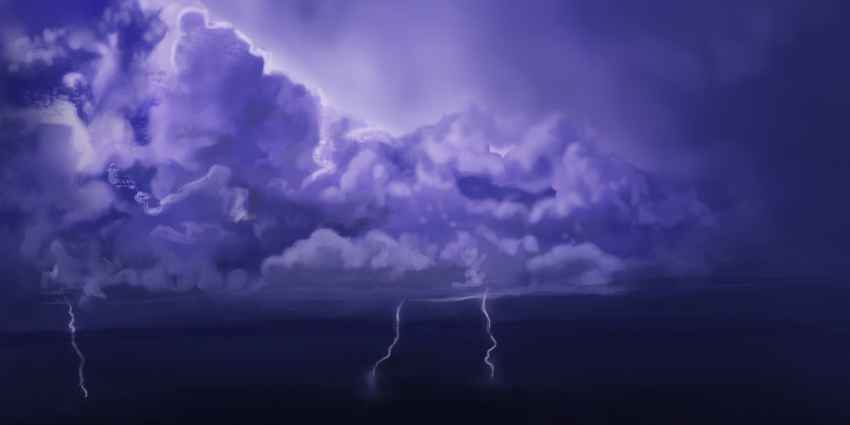
2. How to Paint a Stormy Cloud
Step 1
To paint a stormy cloud, we need to change the overall lighting scheme.
Let's start with the sky. Use the same dimensions as before. Right-click the first layer and go to Blending Options.
Create a purple Linear Gradient Overlay, using the colors #373984 and #6364ad.

Here is the result.

Step 2
I didn't feel the need to draw a sketch in any of these scenarios. The best start for me was creating a New Layer dedicated to these flat purple #5354a6 cloud shapes.

Just like before, I set a Clipping Mask to each individual cloud shape to paint the first layer of shadow and light.
For this part, set the Brush Tool (B) to a Soft Round Brush with 0% Hardness and 50% Opacity.
Paint it how you see it. Paint dark #33367f round bumps for the shadow and whiter soft spots for the highlights. It will totally look weird at first, but Clipping Masks will really help strengthen your skills.

Create a New Layer underneath the clouds. Use this layer to add a white, soft (1-40% Opacity) spotlight behind the cloud because it's currently too dark.

Step 3
Paint more background elements. Start with dark, fluffy clouds, and then add shadow at the bottom for the city. Use the Eyedropper Tool (E) to pick up nearby colors. Paint with what's already on the canvas.
Dedicate new layers to the lightning bolts as well.
Go with your gut. Notice that this painting changes quite a lot as I continuously tweak the original composition.

Now blend, blend, blend!
Lower the Hardness to 0% and use New Layers to soften the sky. Use big, sweeping motions as well as circular swirls to create realistic clouds.

Continuously edit your piece. Strive for a softer look before moving on to more details. It's harder to blend background elements later, when the best parts of your foreground elements are already set in place.
You can also edit the upper left corner for more character. Play with different shapes until you like what you see.

Step 4
Grab the Gradient Tool (G) and set it to a black to transparent Linear Gradient.
Use the tool to paint a deep shadow that fades upward. Adjust the Opacity if needed. This will represent the city. Draw lightning bolts to mark where you want them to hit.

Add a New Color Lookup Adjustment Layer. Set the 3DLUT File to Fuji F125 Kodak 2393.

Then bump up the intensity with a Brightness/Contrast Adjustment Layer.

Step 5
Pick up a Soft Round Brush for the fluffier cloud forms. Storm clouds are really dense, so we'll need to paint many layers.
Experiment with Opacity for the best result. Higher opacities are great for crisp details, while lower ones help blend nearby colors.
If you're pressing too hard on the pen tablet, your Opacity is too low. This can create a lot of unnecessary discomfort—trust me, I know firsthand!

Continue to edit your work. Study the light as it moves through the clouds.
Deepen the city and paint bright, crisp lines for the lightning bolts.
Step 6
If you feel as if you're painting looks a little dull, brighten it up!
Use a Brightness/Contrast Adjustment Layer with the following settings:

Step 7
Set a New Layer to Linear Dodge (Add).
Paint a soft purple over the lightning bolts to make them shine. Zoom into your painting and add specks of red, green, and white to the bottom. This will give the impression of a small city for even more impact.
Remember to reference the original too!

Colors too intense? Change them with an Adjustment Layer.
Add a Color Lookup Layer with a 2Strip.look 3DLUT File. Lower the Opacity to 47%.

As always, continue to edit until you're happy with your stormy result. I decided to also paint tiny white dots for a starry night sky.
Little details like this can really create impressive effects, so don't forget them!
Here's my final stormy cloud.

3. How to Paint Wispy Clouds
Step 1
Now for the last painting!
Wispy clouds are mysterious. They are a mixture of soft gentle shapes followed up by crisp highlights. I suggest doing this part with a normal color scheme. This sunset look is nice, but it may complicate the lesson if the colors are too confusing.
However, if you feel a little daring, let's proceed.
Start with the background, using the same dimensions as before. Go to Blending Options, and create a Gradient Overlay with colors #334b82 and #b5c1dc.

Here's the result.

Step 2
Using a Hard Round Brush at 100% Hardness, help ground the composition with some brown land.

So as not to distract you any further with the thought of painting land, concentrate on the wispy clouds for now.
Build rich, sunset-like colors (#ffa466, #ce6764) using the acrylic texture brushes from before.

Step 3
Let's make the sky pop!
Create a New Layer set to Overlay. Use the Paint Bucket Tool (G) to create a blue #335f8e to transparent gradient. Now the sky looks better!

Step 4
Use a Soft Round Brush to create silky textures for a lovely, blended look. Bounce around the composition so you don't stay in one spot too long.

Incorporate lighter yellows and blues. There's a little teal that's hiding in there too! Zoom in at 200% and make sure your shading looks fluid. This is when it's important to use your reference.
Continue blending even when you think the sky is ready for more clouds.

Step 5
Add a New Curves Adjustment Layer.
Create a high curve for the RGB channel to bump up the contrast.

Take this opportunity to use what we've learned from the previous lessons.
Wispy clouds are very relaxed. It's important to paint swirls in different flowy directions for more character and movement.
Continue to refine the sky, painting bright orange hues towards the ground to show that the sun is setting/rising. Adjust the lighting on the ground so that it complements the composition too.

Use a New Layer set to Multiply to paint the ground green.
Lower the Size of your brush, but increase the Opacity. Paint tiny bits of grass and nature for more details.

Then set a New Layer to Overlay. Paint with bold yellow and orange colors for a beautiful sunlight effect.

Digital painting is about time and patience. No matter how many hours pass, keep pushing through.
For the last steps, Zoom into the painting and clean up the details. Use a Hard Round Brush at 100% Hardness to get rid of any blurry parts. Feel free to play with more Adjustment Layers for sharp results.

Here's the last cloud painting. Check them all out below!

All Done!
Make sure you bookmark this tutorial to help you with future paintings!
Painting nature is one of the best ways you can grow. Study your references and be smart about your workflow choices for the best result.
I hope you enjoyed this process! For more digital paintings, check out these links:
 Digital PaintingHow to Paint Water, Waves, and the Ocean in Adobe Photoshop
 Digital PaintingHow to Create a Sign Language Digital Painting in Adobe Photoshop

Original Link:
TutsPlus - Design
More About this Source Visit TutsPlus - Design