
An Interest In:
Web News this Week
- April 28, 2024
- April 27, 2024
- April 26, 2024
- April 25, 2024
- April 24, 2024
- April 23, 2024
- April 22, 2024
Some of Our Sources
- Mashable
- Joshua Blankenship
- The Logo Smith
- Smashing Magazine
- Smashing Apps
- Fuel Your Creativity
- Crazy Leaf Design
- Specky Boy
- Android Headlines
- Dev To
Help Webnuz
Referal links:
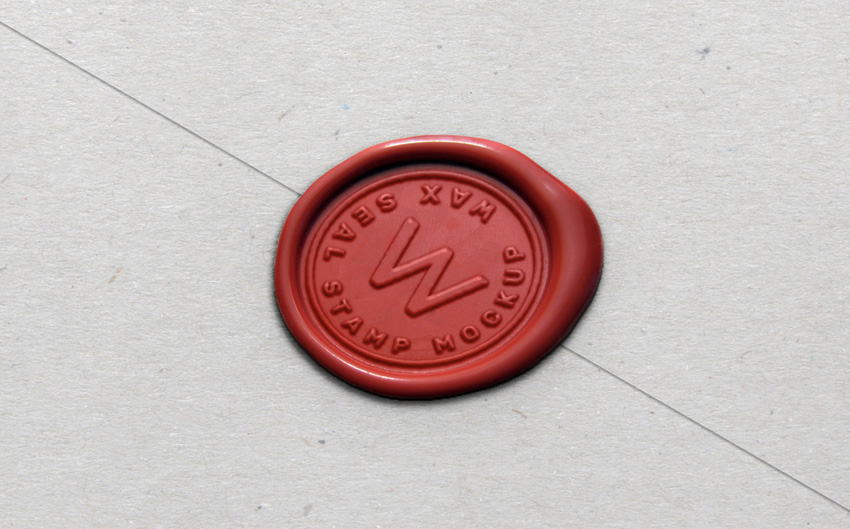
How to Create a Photo-Realistic Wax Seal Mockup With Adobe Photoshop

In this tutorial I will show you how to create a realistic wax seal stamp mockup. Thanks to the smart object we'll be using, you can easily replace the stamp design with your own logo and reuse it every time you need!
In a rush and need it right now? Check out myWaxSeal Logo Mockup.My mockup is ready to use—just replace with your design and customize the wax seal with one click!

Tutorial Assets
For this tutorial, you'll need the following resources:
1.How to Remove the White Background From the Wax Seal
Step 1
Download the wax seal image and open it with Photoshop.

Step 2
First, pressCommand-Jon the keyboard to create a copy of the image. If you look in theLayerspanel, you'll see that you now have two layers, each containing the same image. The original photo will remain safe on the "Background" layer, and all of the editing work we're about to do will be done to the copy of the image.Rename the new layer bydouble-clickingdirectly on the layer's name in theLayerspanel and changing it to"Wax Seal".

Step 3
What we're going to do is select and remove the entire background with theQuick Selection Tool. Select it by clicking on its icon in theToolspanel, or press the letterWon your keyboard to select it with the shortcut.

To begin theselection, move theQuick Selection Tool's cursor near the top left corner of the image and click and drag over the area you need to select as if you were painting with a brush. As you drag, Photoshop continuously analyzes the area, comparing color, tone and texture, and does its best to figure out what it is you're trying to select, often with amazing results.

If you look in the Options Bar along the top of the screen, you'll see a series of three icons which let us switch between the tool's three selection modes (from left to right:New selection,Add to selection, andSubtract from selection). TheAdd to selectionoption (the middle one) is already chosen for us, since the whole point of theQuick Selection Toolis to continue adding to the selection until you've selected everything you need:

Then keep "brushing" close to the edges of the bottle until you select all of the white background:

Step 4
Once you've selected the background, remove it by choosingEdit > Cutin the top menu.
Remember to deselect the selection by choosingSelect > Deselector pressingCommand-D.
Be sure to deactivate the visibility for the "Background" layer to appreciate the result.


2.How to Add a Paper Background
Step 1
On the top menu, click Image > Canvas Size.

Set the canvas size to 2000 x 1400 px.

Step 2
Download the paper textureand open it with Photoshop. Unlock the layer by choosing Layer > New > Layer from Backgroundand press OK.

Select the texture by choosing Select > All or pressing Command-A. Now copy the layer content by going to Edit > Copy or pressing Command-C.
Step 3
Go back to the wax seal file by clicking on the proper tab and selecting the "Background" layer. Now paste the paper texture just copied by choosing Edit > Paste or pressing Command-V.
The texture is actually too large for our canvas, so choose Edit> Free Transform or press Command-T and drag a handle to resize the paper. Press Shift as you drag a corner handle to scale proportionately.

Rename the paper layer bydouble-clickingdirectly on the layer's name in theLayerspanel and changing it to"Envelope".
Step 4
Duplicate the "Envelope" layer by selecting it and choosing Layer > New > Layer Via Copy or pressing Command-J, andthen rename this new layer bydouble-clickingdirectly on the layer's name in theLayerspanel and changing it to"Flap".
Select the Polygonal Lasso Tool.By default, the Polygonal Lasso Tool is hiding behind the standard Lasso Tool in the Tools panel. To get to it, click on the Lasso Tool, and then hold your mouse button down until a fly-out menu appears showing you the additional tools that are available. Select the Polygonal Lasso Tool from the list:

Begin by clicking on the top-left of the canvas, and then release your mouse button. This adds a point, commonly called an anchor point, to the document. As you move the Polygonal Lasso Tool away from the point, you'll see a thin straight line extending out from your mouse cursor with the other end of the line attached to the anchor point. Click again to add new points until you create a triangular shape like this:

Complete the selection by clicking once again on the initial point you added. Photoshop will convert all of the straight lines into a selection outline. Choose Edit > Cut to remove the selected area.
Step 5
Double-clickon the "Flap" layer to open theLayer Stylepanel. Add a newInner Shadowby clicking the related tab.
Set the Blend Mode to Normal, Color White, Opacity 52%, Angle -90°, Distance 1 px, Choke 100% and Size 0 px.

Add a newDrop Shadowby clicking the related tab. Set the Blend Mode to Multiply, Color Black, Opacity 30%, Angle 101°, Distance 5 px, Spread 1% andSize 4 px.

Step 6
Click on the small icon at the bottom of the Layers panel and choose Gradient.

Press D on your keyboard to set the foreground and background colors to black and white. Click on the small gradient window to edit the gradient.

Click on the small gear and choose Reset Gradientsto reset all the gradient presets. Now choose the second preset named Foreground to Transparent and press OK.

Locate the Layers panel and rename the layer just created bydouble-clickingdirectly on the layer's name in theLayerspanel and changing it to"Shadow", and then set the Opacity to 5%.
Select the layers "Shadow", "Flap", and "Envelope". To select multiple contiguous layers, click the first layer and thenShift-clickthe last layer.With aright-clickof the mouse, selectGroup from layers,and name the group "Envelope". PressOKto confirm.
3.How to Add Shadow Effects to the Wax Seal (Only Photoshop CC 2015 or Higher)
Starting withPhotoshop CC 2015, we have ability to apply multiple layer effects (Stroke,Drop Shadow...) from a single Layer Style dialog. If you're using Photoshop CC 2015 or higher, keep reading this section. Otherwise, jump to Section 4.
Step 1
Select the "Wax Seal" layer andDouble-clickthe layer, outside the layer name or thumbnail, to open theLayer Stylepanel.
Add a new Inner Shadow, setting the Blend Mode to Normal, Color Black, Opacity 100%, Distance 4 px, Choke 0%, Size 0 px.

Step 2
Add a new Drop Shadow, setting the Blend Mode to Overlay,Color Black, Opacity 39%, Angle 66°, Distance 7 px, Spread 7% and Size 13 px.

Step 3
Next to the Drop Shadow effect, you will see aplussign (+). Add one more Drop Shadow effect by clicking on the plus sign.
Set theBlend ModetoOverlay,Color Black,Opacity 58%,Angle 66°,Distance 7 px,Spread 7%andSize 13 px.

Step 4
Add one more Drop Shadow effect by clicking on the plus sign. Set theBlend ModetoMultiply, Color Black,Opacity 27%,Angle 86°,Distance 11 px,Spread 6%andSize 18 px.

Step 5
Add the last one Drop Shadow effect by clicking on the plus sign. Set theBlend ModetoNormal,Color Black,Opacity 10%,Angle 86°,Distance 27 px,Spread 6%andSize 101 px.

4.How to Add Shadow Effects to the Wax Seal (Only Photoshop CS4, CS5, or CS6)
For CS4, CS or CS6 users, read the following steps.
We need to add multiple Drop Shadow effects to the Wax Seal layer.Older versions of Photoshop only let you apply a layer style once to a given layer. For example, you can only add a Drop Shadow effect to a layer. As of Photoshop CC, however, this limitation has been removed so that you can add the same layer style to a single layer multiple times. My advice then is to update your Photoshop to the latest version.
Anyway, if you're using a Photoshop version prior to CC, there's a workaround for you. Here's how:
Duplicate the "Wax Seal" layer three times by choosing Layer > New > Layer Via Copy. In the Layers panel, select the three new layers just created and set the Fill to 0%.

Apply to the "Wax Seal" Layer the effects described inStep 1and2of the previoussection.
Now apply to the residual 3 "Wax Seal copy" layers the effects described in Step 3, 4 and 5 of the previous section.
5.How to Create the Stamp Design
Step 1
Create a600x 600 pxNew Documentin Photoshop.
Select theEllipse Tool.By default, theEllipse Toolis hiding behind the standardRectangle Toolin theToolspanel. To get to it, click on theRectangleTool, and then hold your mouse button down until a fly-out menu appears showing you the additional tools that are available. Select theEllipse Toolfrom the list:

Now click in thetop-left corner of the canvas (do not release the mouse button), press and hold the Shift button of your keyboard, and drag your mouse to the bottom-right corner. When you're very close to the corner, you will see the cursor become hooked to the canvas. At this point, release Shift and the mouse button. The result should be similar to this:

Step 2
Locate the Properties panel. If you can't see the panel, open it by choosing Window > Properties.
In the Shape Details section, set the Shape Fill Type to Transparent, the Shape Stroke Type to Black,and the Shape Stroke Width to 15 px. Be sure that the size is exactly 600 x 600 px and the position is 0 for both X and Y axis.

Now the result should be similar to this:

Step 3
With the "Ellipse" layer selected, choose Layer > New > Shape Layer Via Copyto duplicate the layer. Rename the new layer bydouble-clickingdirectly on the layer's name in theLayerspanel and changing it to"Path".
Locate the Properties panel. In theBounding Box section, set width and height to 516 px, X and Y axis to 42 px, and then change the Shape Stroke Type to Transparent.

Step 4
Download Rubik font, a font that's free for commercial use. Install the font on your computer; we'll need it a while.
With our path drawn, we're ready to add our text. Select theHorizontal Type Toolfrom the Tools panel:

In the top options bar, choose Rubik Bold set to 62 px withText Alignmentoption set toLeftand Type Colorset to Black.

Also, set the tracking for the character to 500 in the Character panel. If you can't see the Character panel, open it by choosing Window > Character.

Step 5
Move theHorizontal Type Toolover the edge of the path. The pointer changes to an I-beam with a dotted wavy linethrough it. Click on the shape border in the spot where you want to start adding text.

The spot you click on is where the text will begin, and as you continue typing, the text follows the direction of the path.
Type the text "WAX SEAL STAMP MOCKUP".When you're done adding your text, press ENTER on your keyboard.

Step 6
Now we need toreposition our text along the path. Choose thePath Selection Toolfrom the Tools panel:

Move the Path Selection Tool's cursor anywhere over the top of your text. You'll see the cursor change from a black arrow into anI-beam with a small arrowon the side of it pointing left or right.

Simply click on your text and drag it slightly down across the path to flip the text inside the shape and reverse it.

Step 7
Select theHorizontal Type Toolfrom theToolspanel. Move the mouse cursor to the top left corner of the canvas. You we'll see the cursor change to an I-beam with a dotted square around it. Click and type the letter "W".

In the Properties panel, choose Rubik Regular andset its size to 383 px. Then set the position to 136 px for X and 68 px for Y axis. Be sure to set the fill color to Black.

Now your wax seal stamp design should be similar to this:

Step 8
In the Layers panel, select the four layers.To select multiple contiguous layers, click the first layer and thenShift-clickthe last layer.
Move the mouse cursor over one of the levels and with aright-clickof the mouse, chooseConvert to Smart Object.
Now grab theMove Tool(V), click and hold the stamp design in the document window(not theLayerspanel, just on the image itself), drag your cursor to the title of the previous document tab (the one with the red wax seal), and wait until the document view changes (don't release left mouse button yet). Then move your mouse cursor into the document window and release the left mouse button (hold downShiftto place the layer in the center of the document).
Rename this new layer bydouble-clickingdirectly on the layer's name in theLayerspanel and changing it to"Smart Object Effect 01".

6.How to Transform the Stamp Design
Now that our stamp design is ready, it's time to include it in the wax seal. You should be in this situation:

Step 1
Choose Edit > Transform > Rotate. In the top option bar, set the rotation to 33°. Do not press Enteryet to confirm since we still need to transform the design.

Step 2
If we look closely, a thin bounding box appears around the stamp design. We can also see a small square in the top center, bottom center, left center, and right center, as well as a square in each of the four corners. These little squares are called "handles", and we can transform whatever is inside the bounding box simply by dragging these handles around.
In this step it's extremely important that we transform the stamp design using only the handles at the center of each side of the bounding box. In the image below, the handles that we can use to transform the stamp design are indicated by arrows.

Firstly, move the mouse cursor over the handle on the right side, press and hold the Command button on your keyboard (the cursor will change to a small white arrow), and then click and drag the handle to move the right side of the black circle of the stamp inside the wax seal room:

Keep dragging the handles to fit the stamp design into the wax seal (remember: do not use the corner handles!). Be sure to leave an equal space all around the stamp design, between it and the inner edge of the wax seal:

When you're satisfied with the transformation, press Enter. The final result should be similar to this:

7.How to Apply a 3D Effect to the Stamp Design
Step 1
Select the layer "Smart Object Effect 01", and then in the Layers panel, set the fill to 0%. Duplicate the layer "Smart Object Effect 01" by selecting it in the Layers panel and choosingLayer > New > Layer Via Copy. Rename this new layer bydouble-clickingdirectly on the layer's name in theLayerspanel and changing it to"Smart Object Effect 02".

Step 2
Select the layer "Smart Object Effect 01" and then double-clickthe layer, outside the layer name or thumbnail, to open theLayer Stylepanel.
Add a newBevel & Emboss style. Be sure to set the effect exactly like the image below:

Use the Hex Code#440303for Highlight Mode color and #7b0000 for Shadow Mode color.
Add a new Drop Shadow style. Be sure to set the effect exactly like the image below. Use theHex Code#5e2831forBlend Modecolor. PressOKto confirm the changes and close theLayer Stylepanel.

Step 3
Choose Filter > Distort > Ripple and set the effect like the image below:

PressOKto confirm the changes and close thepanel.
Choose Filter > Blur > Gaussian Blur and set the Radius to 0.6 px.PressOKto confirm the changes and close theLayer Stylepanel.

Step 4
Select the layer "Smart Object Effect 02" and then double-clickthe layer, outside the layer name or thumbnail, to open theLayer Stylepanel.
Add a newBevel & Embossstyle. Be sure to set the effect exactly like the image below:

Use the color white#fffffffor theHighlight Mode and black#000000for theShadow Mode.
Add a newDrop Shadowstyle. Be sure to set the effect exactly like the image below. Use theHex Code#602532forBlend Modecolor. PressOKto confirm the changes and close theLayer Stylepanel.

Step 5
ChooseFilter > Distort > Rippleand set the Amount to -20% and Size Medium. PressOKto confirm the changes and close thepanel.
ChooseFilter > Blur > Gaussian Blurand set theRadiusto0.8 px. PressOKto confirm the changes and close thepanel.
Congratulations, You're Done!
In this tutorial we learned how to make a realistic wax seal logo mock up using a smart object and the layer styles.
I hope that you've enjoyed my tutorial and learned something new.Please feel free to leave your comments, suggestions, and outcomes below.
Don't forget to check myWaxSeal Logo Mock Up!It's a premium-quality wax seal perfect for showcasing your brand with style and professionalism! It includes two wax seal shapes and a detailed help file.
Original Link:
TutsPlus - Design
More About this Source Visit TutsPlus - Design