
Some of Our Sources
- Simplebits
- Just Creative
- Joshua Blankenship
- Pearsonified
- You The Designer
- Web Designer Depot
- Crazy Leaf Design
- Stylized Web
- The Verge
- TechPowerUp
Help Webnuz
Referal links:
How to Create a Modern Business Card Using Adobe Photoshop

A business card is arguably the most powerful networking tool you can have in your pocket. It's the very first impression of you and the business you're representing.Although we'rein this digital age where social media dominates, a physical business card is still highly relevant as it forms a real humanconnection between you and your peers, where social media isunfortunately lacking.
In this tutorial, I will be using Adobe Photoshop CS6 to guide you on a step-by-step basis on howto create a professionalbusiness card using basic shapes, custom shapes,simple text formatting, and neat positioning.
This business card we are about to create is part of the 4-in-1Business Card Bundlefrom my portfolio onGraphicRiver. Feel free to check out my extensive business cards collectionfor ideas andinspirations as well.

Tutorial Assets
Before we begin, download and install the following assets:
1.How to Install or LoadPhotoshop Custom Shapes
Go toEdit > Presetsand selectPreset Manager.In thePreset Typedrop-down menu,selectCustom ShapesandpressLoad.Now browse to the location where you've unzipped the file and selectTutorial-Shapes.csh. PressLoadand you're done.

2.How to Set Up aNew Document for a Business Card
Go toFile > Newand enter the following:
- Name:Business-Card-Front
- Width:3.25 Inches
- Height:1.75 Inches
- Resolution300 Pixels/Inch
- Color Mode:CMYK Color 8bit
- Background Contents:White
Now pressOK tocreate the document.

3.How to Create Safe, Trim and Boundary Guidelines for a Business Card
Step 1
Before we start,make sure the following options are enabled. If there is a check next to the option, it's already enabled, and you may skip to the next step.
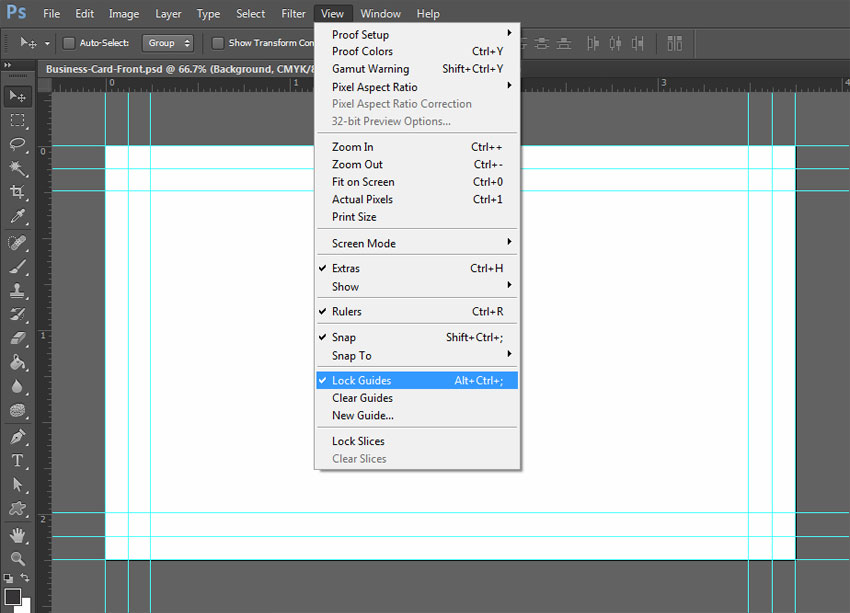
Press Control-Ror go to View > Rulers to showRulers. Next, go toView and checkSnap.Finally, go toView > Snap To and check Guides,Layers andDocument Bounds.

Step 2
Let's begin with the Safe Area guidelines, within whichall important images and text should be kept. Simplyclickon the Ruler and Draga guideline to all four sides of the document. It should snap into position easily.

Step 3
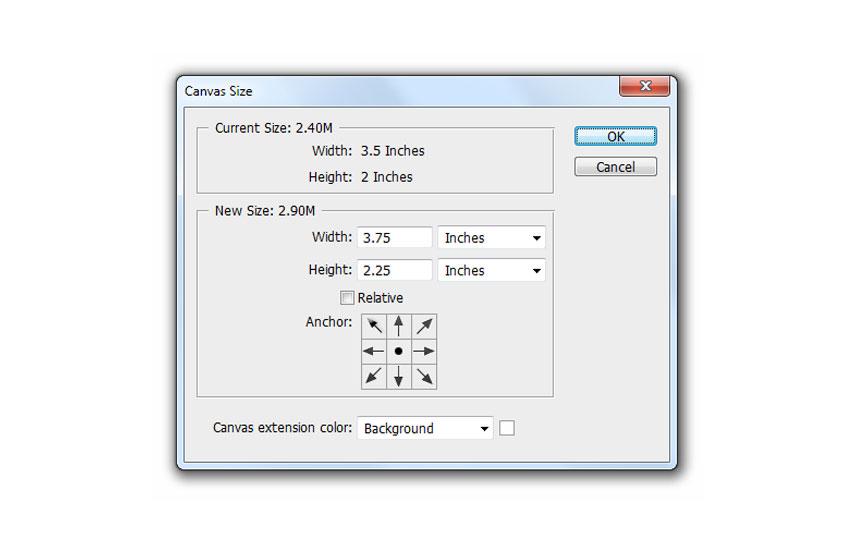
Now let's increase the canvas size to 3.5 x 2 inches. Go toImage > Canvas Size and set the Width: 3.5 inchesfollowed byHeight: 2 inches. PressOK.

Step4
Next, we will create the Trim guidelines. Anything beyond this guideline will be trimmed away after printing. Now clickontheRulerandDraga guideline to all four sides of the document.

Step5
Increase the canvas size one last time. Go toImage > Canvas Size and set Width: 3.75 inchesfollowed byHeight: 2.25 inches.Press OK to apply the changes.
Step6
Create theBoundaryguidelines. Although not necessary, having this guideline will definitely help when aligning objects to the edge. SimplyclickontheRulerandDraga guideline to all four sides of the document.

Step7
Now that it's done, let's go ahead and lock the guidelines in their currentposition. Goto View and checkLock Guides.
4. How to Create a Background for the Address
Step 1
SelectRounded Rectangle Toolfrom the Toolbar and click anywhere on the canvas. Set Width: 820 px,Height: 80 px,Radius: 15 px and press OK.

Step 2
Go toLayer > Rename Layer.Name this layerAddress Bgand press Enter.

Step 3
Double-clickon the LayerThumbnail.EnterC:0 M:20 Y:80 K:0andpressOK.

Step 4
Press Control-T or go toEdit > Free Transform Path and set theHorizontal Skew toH: -20.PressEnter twiceto confirm.

Step 5
PressControl-Tor go toEdit > Free Transform Path.Set theHorizontal PositiontoX: 337 pxandVertical PositiontoY: 540 px.PressEntertwiceto confirm.

Step 6
Selectthe Rectangle Tool (U). Press Path Operations and select Subtract Front Shape.Nowdraw a rectangle overlapping the excess shapeas shown in the image below.

Step 7
To complete the trim, pressPath Operationsand selectMerge Shape Components.

5.How to Create a Background for theTagline
Step 1
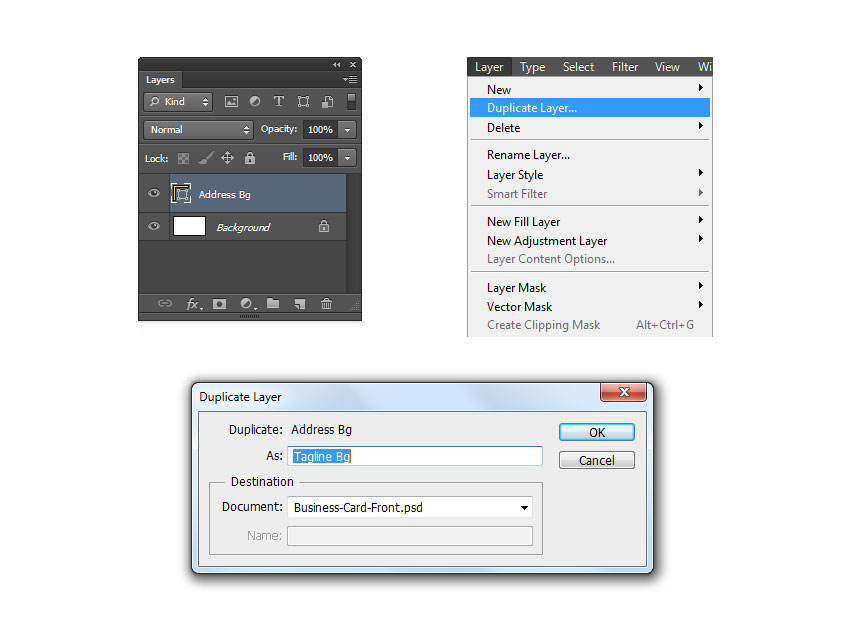
SelectAddress Bgfrom theLayers panel. Go toLayer > Duplicate Layerand name this layer Tagline Bg. PressOK.
Step 2
Double-clickon the Layer Thumbnail.EnterC:0 M:0 Y:0 K:95and pressOK.

Step 3
Now let's Rotate this layer. Go toEdit > Transform Path > Rotate 180 Degrees.

Step 4
Press Control-T or go toEdit > Free Transform Path.Set the Horizontal PositiontoX: 1126.5 px andVertical Position toY: 540 px.Press Enter twiceto confirm.

Step 5
Select theRectangle Tool (U)and thenpressPath Operationsand selectSubtract Front Shape.Draw arectangleoverlapping theexcess shape.

Step 6
PressPath Operationsand selectMerge Shape Components.

6.How to Create a RectangleSeparator
Step 1
Go toLayer > New > Groupand name this groupSeparator.

Step 2
Select theRectangle Tool (U)and click anywhere on the canvas.Set theWidth to530 px and Height to 8 px, andthen press OK.

Step 3
Double-clickontheLayer Thumbnailand enterC:0 M:0 Y:0 K:18. PressOK.

Step 4
PressControl-Torgo toEdit > Free Transform Path.Set theHorizontal PositiontoX: 370 pxandVertical PositiontoY: 286 px.PressEntertwiceto confirm.

Step 5
Go toLayer > Rename Layer. Name this layerLeftand press Enter.

Step 6
Go toLayer > Duplicate Layer. Name this layerRight and press OK.

Step 7
Select theRectangle Tool (U).Set theWidth toW: 80 pxand press Enter.

Step 8
Double-clickonLayer Thumbnail. EnterC:0 M:20 Y:80 K:0and pressOK.

Step 9
PressControl-Torgo toEdit > Free Transform Path.Set theHorizontal PositiontoX: 675 pxandVertical PositiontoY: 286 px.PressEntertwiceto confirm.

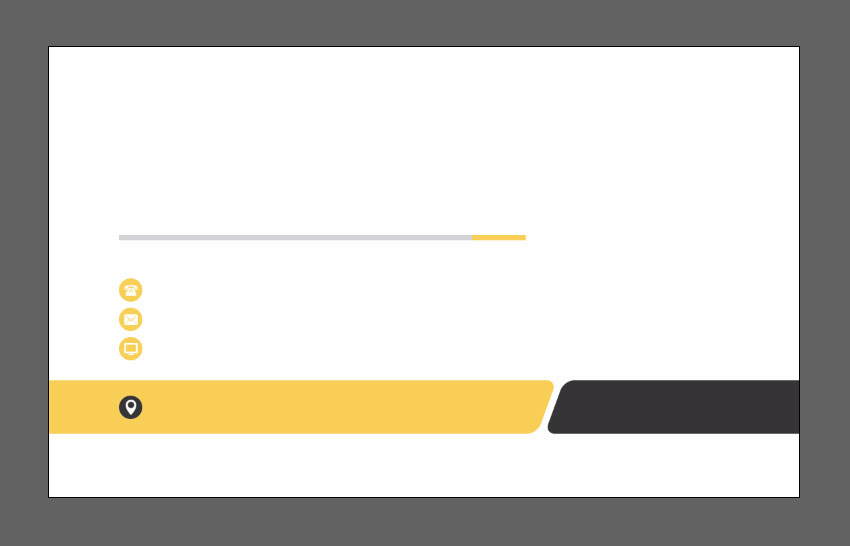
7.How to Create a Background for the Contact Icon
Step 1
Go toLayer > New > Group.Name thisgroupIcons Bgand press OK.
Step 2
SelectEllipse Toolfrom the Toolbar and click anywhere in the canvas. EnterWidth: 35 px, Height: 35 pxand pressOK.

Step 3
Double-clickonLayer Thumbnail.EnterC:0 M:0 Y:0 K:95and pressOK.

Step 4
PressControl-Torgo toEdit > Free Transform Path.Set theHorizontal PositiontoX: 122.5 pxandVertical PositiontoY: 541 px.PressEntertwiceto confirm.

Step 5
Go toLayer > Rename Layer.Name this layerAddress and press Enter.

Step 6
Go toLayer > Duplicate Layer. Name this layerWebsiteand pressOK.

Step 7
PressControl-Torgo toEdit > Free Transform Path.Set theHorizontal PositiontoX: 122.5 pxandVertical PositiontoY: 453 px.PressEntertwiceto confirm.

Step 8
Double-clickonLayer Thumbnail. EnterC:0 M:20 Y:80 K:0andpressOK.

Step 9
Go toLayer > Duplicate Layer. Name this layerEmailandpress OK.

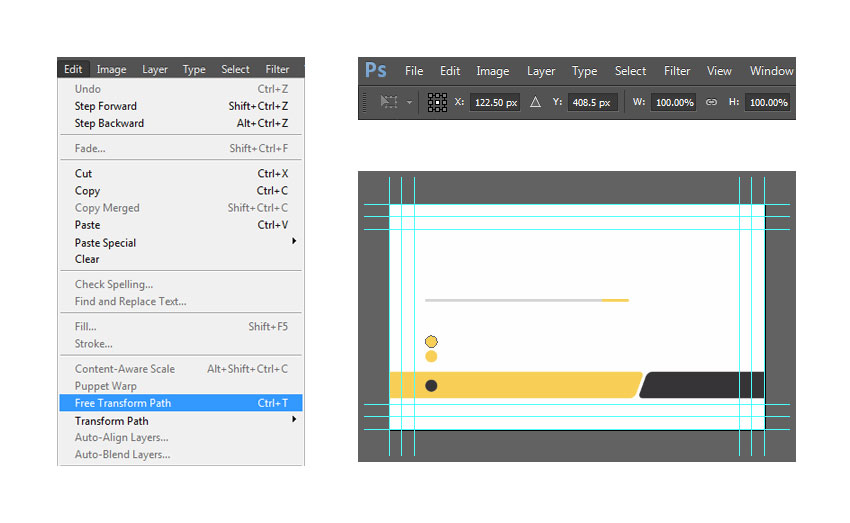
Step 10
PressControl-Torgo toEdit > Free Transform Path.Set theHorizontal PositiontoX: 122.5 pxandVertical PositiontoY: 408.5 px.PressEntertwiceto confirm.
Step 11
Go toLayer > Duplicate Layer. Name this layerPhoneandpress OK.

Step 12
PressControl-Torgo toEdit > Free Transform Path.Set theHorizontal PositiontoX: 122.5 pxandVertical PositiontoY: 364.5 px.PressEntertwiceto confirm.

8. How to Create Contact Icons Using Custom Shapes
Step 1
Now that we've completed the icon's background, let's move on to create the icons. Go toLayer > New > Group.Name this groupContact Iconsandpress OK.
Step 2
Let's start by creating the address icon. SelectCustom Shape Toolfrom theToolbar.Press Custom Shape Pickerand select theAddress Icon.

Step 3
Clickanywhere on the canvas. CheckPreserve Proportions,enterWidth: 16 pxandpressOK.
Step 4
Go toLayer > Rename Layer. Name this layerAddressandpress Enter.

Step 5
Double-clickon theLayer Thumbnail.EnterC:0 M:0 Y:0 K:0and press OK.
Step 6
PressControl-Torgo toEdit > Free Transform Path.Set theHorizontal PositiontoX: 123 pxandVertical PositiontoY: 540.5 px.PressEntertwiceto confirm.
Step 7
Now we move on to create the website icon. SelectCustom Shape Toolfrom theToolbar. PressCustom Shape Pickerand selectWebsiteIcon.

Step8
Click anywhere on the canvas. CheckPreserve Proportions, enterWidth: 20 px andpress OK.
Step 9
Go toLayer > Rename Layer. Name this layerWebsiteandpress Enter

Step10
PressControl-Torgo toEdit > Free Transform Path.Set theHorizontal PositiontoX: 123 pxandVertical PositiontoY: 453 px.PressEntertwiceto confirm.
Step11
Create the email icon. SelectCustom Shape Toolfrom the Toolbar. PressCustom Shape Pickerand selectEmail Icon.

Step12
Click anywhere on the canvas. CheckPreserve Proportions,enterWidth: 20 px, andpressOK.
Step 13
Go toLayer > Rename Layer. Name this layerEmailandpress OK.

Step14
PressControl-Torgo toEdit > Free Transform Path.Set theHorizontal PositiontoX: 123 pxandVertical PositiontoY: 409 px.PressEntertwiceto confirm.
Step15
Now let's create the phone icon. SelectCustom Shape Toolfrom the Toolbar.PressCustom Shape Pickerand selectPhone Icon.

Step16
Click anywhere on the canvas. CheckPreserve Proportions,enterWidth: 20 px,and press OK.
Step 17
Go toLayer > Rename Layer. Name this layerPhoneandpressOK.

Step18
PressControl-Torgo toEdit > Free Transform Path.Set theHorizontal PositiontoX: 123 pxandVertical PositiontoY: 365 px.PressEntertwiceto confirm.
9. How to Create the Background Group
Step 1
First we need tounlock the Background layer, indicated with a lock icon.Double-clickonBackgroundLayer and name the layerBackground. Press OK.

Step 2
Make sureBackground Layerwhich you just unlocked is still selected. Hold Shiftandclick on the Contact Icons group.

Step 3
Now that all layers and groups are selected, go toLayer > New and select Group from Layers. Name this groupBackgroundandpress OK.

The background of the front of the cardis now complete.
Before we move on to insert the text and logo, here's how it should look at this point.
10.How to Create a Tagline Text Layer
Step 1
Make sure theCharacter and Paragraph panels are enabled before we continue. Skip this step and proceed to Step 2 if they're already enabled by default.
SelectHorizontalType Tool(T) from theToolbar and press theCharacter and Paragraph panels button.

Step 2
Select Right Align Layer in the Paragraph panel. In the Character panel, set the Font toLato,Font StyletoBlack,Font Sizeto6 pt andColortoC: 0 M:0 Y:0 K:0

Step 3
Nowclickon theTagline Background shapeand typeVISUAL EYE CANDYinto the text box. PressControl-Enter.

Step 4
We will need to changethe color and styling for the wordVISUALonly. Let's start by selecting that particular word. Make sure theHorizontal Type Tool (T)is still selected, position your cursor right on top of the wordVISUAL, andthendouble-clickto select.

Step 5
In the Character panel, set Font Style toRegular and ColortoC:0 M:20 Y:80 K:0.Press Control-Enter to apply changes.

Step 6
PressControl-Torgo toEdit > Free Transform Path.Set theHorizontal PositiontoX: 934 pxandVertical PositiontoY: 541 px.PressEntertwiceto confirm.

11.How to Create the Address Text Layer
Step 1
Go toLayer > New > Layer.Name this layerAddressandpress OK.

Step 2
In theParagraph panel, select Left align text.While in the Character panel, change the Font Style toBold Italic and set theColor toC:0 M:0 Y:0 K:95.

Step 3
Selectthe Horizontal Type Tool(T)andclickon theAddressBackgroundshape.Type777 Seventh Avenue New York NY 54321into the text box and press Control-Enter when you're done.

Step 4
PressControl-Torgo toEdit > Free Transform Path.Set theHorizontal PositiontoX: 373 pxandVertical PositiontoY: 542 px.PressEntertwiceto confirm.

12.How to Create the Phone, Email and Website Text Layer
Step 1
Go toLayer > New > Layer.Name this layerPhone/Email/Websiteandpress OK.

Step 2
In the Characterpanel, change the Font Style to Regular and set the Leading to 10.5 pt.

Step 3
SelectHorizontal Type Tool(T)andclickon an empty area next to theContact Icons. Now type "000 1234 5678, [email protected]" and"www.website.com",eachon a separate line. To do so, press Enterafter each entry to create a new line. Press Control-Enter when you're done.

Step 4
PressControl-Torgo toEdit > Free Transform Path.Set theHorizontal PositiontoX: 269 pxandVertical PositiontoY: 409 px.PressEntertwiceto confirm.

Step 5
Hold Controland select both theAddressandPhone/Email/Website layers.Go toLayer > New > Group from Layersand name this groupContact.PressOK.

13.How to Create the Name and Job Title Text Layer
Step1
Let's begin with the job title. Go toLayer > New > Layer.Name the layerJob Titleand pressOK.

Step2
In theCharacter panel, setthe Font Style toBold Italic,set the LeadingtoAuto and theColor toC:0 M:20 Y:80 K:0,and pressOK.

Step3
Selectthe Horizontal Type Tool(T)andclickon an empty space above the separator. Now typeGraphic Designerinto the text box andpress Control-Enter to confirm.

Step4
PressControl-Torgo toEdit > Free Transform Path.Set theHorizontal PositiontoX: 194 pxandVertical PositiontoY: 224 px.PressEntertwiceto confirm.

Step5
Let's create the namelayer. Go toLayer > New > Layer.Name this layerNameandpressOK.

Step6
In theCharacter panel, setFont StyletoLight,Font Sizeto10 pt,andColorto C:0 M:0 Y:0 K:95,and then press OK.

Step7
SelectHorizontal Type Tool(T)andclickslightly above the Job Title.Now typeSTEVE MADISONinto the text box andpressControl-Enter.

Step8
Let's assign aheavier font style for STEVEonly. Position your cursor on top ofSTEVEanddouble-clickto select. In the Characterpanel, setFont Style toBlackandpress Control-Enterto confirm the changes.

Step9
PressControl-Torgo toEdit > Free Transform Path.Set theHorizontal PositiontoX: 268 pxandVertical PositiontoY: 188px.PressEntertwiceto confirm.

Step10
Let'skeep the layers organizedby grouping Name and Job Title layertogether.Hold Controland select both theNameandJob Titlelayers.Go toLayer > New and selectGroup from Layers.Name this groupName & Job TitleandpressOK.

14.How to Create the Logo
Step 1
Go toLayer > New > Group.Name this groupLogoand pressOK.
Step 2
In theParagraph panel, selectCenter Text. While intheCharacterpanel, set Font styletoLight,Font size to6 pt, Leading to 6.5 pt, andColortoC:0 M:0 Y:0 K:95,and press OK.

Step 3
SelectHorizontal Type Tool(T)and click anywhereon the canvas. TypeCREATIVEINSPIRATIONSinto the text box andpress Control-Enterto confirm.

Step4
Let's set a different style for the wordCREATIVEonly. Position your cursor on top ofCREATIVEanddouble-clickto select. In the Character panel, set FontStyle toBlack followed byFont Size to12 pt and press Control-Enter to apply changes.

Step 5
PressControl-Torgo toEdit > Free Transform Path.Set theHorizontal PositiontoX: 902 pxandVertical PositiontoY: 306 px.PressEntertwiceto confirm.

Step6
SelectCustom Shape Toolfrom the Toolbar. Press Custom Shape Pickerand selectLogo Shape.
Step7
Clickright above Company Name. Now checkPreserve Proportionsand setWidth: 110 px.Press OK.
Step8
Go toLayer > Rename Layer. Name this layerLogoandpressENTER.
Step9
Double-clickon theLayer Thumbnail.Set the color toC:0 M:20 Y:80 K:0and press OK.
Step10
PressControl-Torgo toEdit > Free Transform Path.Set theHorizontal PositiontoX: 902 pxandVertical PositiontoY: 210 px.PressEntertwiceto confirm.
15.How to Create theDetails Group
Step1
Let's select the layers needed to form this group. First, select theVISUAL EYE CANDY textlayer. Now hold Shiftand select theLogo group.

Step2
Now that you've selected the necessary layers and groups, go toLayer > New > Group from Layers.Name this groupDetailsandpressOK.

Great! The front part of the business card isnow complete.
It's important to save your progressbefore moving onto create the back portion. Go toFile > Saveorpress Control-Son your keyboard.

16.How to Set Up the Document for the Back Part of the Business Card
Step 1
We won't be creating a new document this time. Instead, we will be duplicating the front part to save the hassle of setting up the document again. Go toImage > Duplicate.Name this new documentBusiness-Card-BackandpressOK.

Step2
In theLayerspanel, click theTriangle iconbesideDetailsandBackgroundto reveal grouped content. Nowhold Controland select the following Groups and Layers:
- Name & Job Title
- Contact
- Visual Eye Candy
- Contact Icons
- Icons Bg
- Separator

Step 3
Now removethe selectedgroups and layers we no longer need. Go toLayer > Delete > LayerandpressYes to confirm.

17.How to Set the Logo Position
Select theLogo groupin theLayerspanel. PressControl-Torgo toEdit > Free Transform Path.Set theHorizontal PositiontoX: 562.5 pxandVertical PositiontoY: 338 px.PressEntertwiceto confirm.
18.How to Create theWebsite Background
Step1
First, select the Tagline Bg layer in the Layers panel. PressControl-Torgo toEdit > Free Transform Path.Set theHorizontal PositiontoX: 464.5 pxandVertical PositiontoY: 540 px.PressEntertwiceto confirm.

Step2
Go toLayer > Duplicate Layer. Name thislayerWebsite BgandpressOK.

Step3
Go toEdit > Transform Path and select Flip Horizontal.

Step4
PressControl-Torgo toEdit > Free Transform Path.Set theHorizontal PositiontoX: 660.5 pxandVertical PositiontoY: 540 px.PressEntertwiceto confirm.

Step5
Select bothWebsite BgandAddress Bgin theLayers panel. Press Control-E or go to Layer and selectMerge Shapes.

Step6
Now selectRectangle Tool(U). PressPath Operations and selectMerge Shape Components.

19.How to Create Decorative Backgrounds
Step1
SelectAddressBg layerin the Layers panel and go toLayer > Rename Layer. Name this layerLeftandpressEnter.

Step2
PressControl-Torgo toEdit > Free Transform Path.Set theHorizontal PositiontoX: -94pxandVertical PositiontoY: 540 px.PressEntertwiceto confirm.

Step3
Select theRectangle Tool (U). PressPath Operationsand selectSubtract Front Shape.Now draw arectangleoverlapping theexcess shape.

Step4
WiththeRectangle Tool(U) still selected,pressPath Operationsand selectMerge Shape Components to complete the trim.

Step5
Go toLayer > Duplicate Layer. Name this layerRightandpressOK.

Step6
Go toEdit > Transform Path and select Flip Horizontal.

Step7
Select the Move Tool(V) from the Toolbar. Hold Controland select bothRightandBackgroundlayer in theLayerspanel. NowpressAlign right edgeson theOptions Toolbar.

20.How to Create the Website Text Layer
Step 1
We will be creating a new text layer within the Details group. First let's selectDetails GroupintheLayerspanel.

Step 2
Next, select Center Textin theParagraph panel. In the Characterpanel, set Font toLato,Font StyletoRegular,Font Sizeto6 pt, LeadingtoAuto,ColortoC:0 M:0 Y:0 K:0and press OK.

Step 3
Select theHorizontalType Tool (T). Clickon theWebsiteBackground shapeand type www.website.cominto the text box. PressControl-Enter to confirm.

Step 4
Let's set a different stylingfor the wordwebsiteonly. Select theHorizontalType Tool (T).Position your cursor right on top ofwebsiteanddouble-clickto select. In the Character panel, set Font StyletoBlack,Colorto C:0 M:20 Y:80 K:0andpressOK.PressControl-Enterto apply the changes.

Step 5
PressControl-Torgo toEdit > Free Transform Path.Set theHorizontal PositiontoX: 563 pxandVertical Position
Original Link:
TutsPlus - Design
More About this Source Visit TutsPlus - Design