
An Interest In:
Web News this Week
- April 29, 2024
- April 28, 2024
- April 27, 2024
- April 26, 2024
- April 25, 2024
- April 24, 2024
- April 23, 2024
Some of Our Sources
- Web Designer Wall
- Team Treehouse
- Joshua Blankenship
- Abduzeedo
- Vandelay Design
- Inspiredology
- Web Designer Depot
- Spyre Studios
- Codrops
- Android Headlines
Help Webnuz
Referal links:
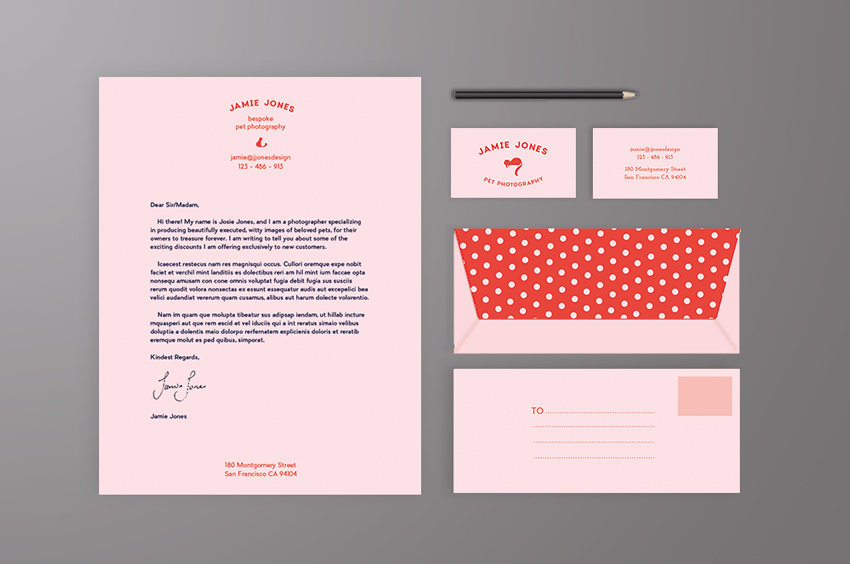
How to Create a Millennial Pink Stationery Set in Adobe InDesign

Have you had the feeling recently that almost everything around you has turned pink? You wouldn’t be imagining things—‘Millennial Pink’ describes the pretty, sugary hue that designers and marketers are embracing wholeheartedly across fashion, technology, and graphic design at the moment.
Pay tribute to the trend with this millennial pink stationery set. It’ll be sure to make the recipient swoon!
On the hunt for more awesome stationery sets? Find your perfect easy-to-customise set over onGraphicRiverorEnvato Elements.
What Exactly Is ‘Millennial Pink’?
Millennial pink refers to a group of related shades of pink which have been applied to products aimed at the millennial market. Sitting somewhere between more neutral nudes and sugary pastel pinks, there’s no one definite shade which absolutely defines millennial pink.
The Pantone swatch ‘Pale Dogwood’ has been name-dropped by some designers as the perfect embodiment of millennial pink, but you can channel the look using a related shade, which has either cooler or warmer tones, to suit your design.

In this tutorial we’ll be putting together a stationery set which uses a pale shade of pink, C=0 M=17 Y=6 K=0, which looks great teamed with a punchy red.
To create the letterhead and business card, you’ll need access to Adobe InDesign. To create the template for the envelope, we’ll be using Adobe Illustrator.
Ready to ‘think pink’? Awesome, let’s go...
What You’ll Need to Create Your Stationery Set
As well as access to InDesign and Illustrator, you’ll also need to download and install the following font files:
* This is a glyph font used to create the cat icons on the letterhead and business card. You can swap these for your own logo or glyphs if you prefer.
1. How to Create the Letterhead in InDesign
Step 1
Open up Adobe InDesign and go to File > New > Document.
Uncheck Facing Pages and choose Letter from the Page Size drop-down menu (8.5 by 11 inches). Add Margins of 0.5 in and a Bleed of 0.125 in. Click OK to create the new document.

Step 2
Expand the Layers panel (Window > Layers) and double-click the Layer 1 name. In the Options window, rename the layerBackground.
Click on the Create New Layer button and rename the new layer Typography. Create a final new layer, naming it YOUR TEXT HERE.

Lock the YOUR TEXT HERE and Typography layers, clicking on the Background layer to activate it.

Step 3
Expand the Swatches panel (Window > Color > Swatches) and click on the New Swatch button at the bottom of the panel. Name the swatch Millennial Pink and set the CMYK levels to C=0 M=17 Y=6 K=0. Click Add and thenOK.

Take the Rectangle Tool (M) and drag across the whole page, extending the shape up to the edge of the bleed on all sides. From the Swatches panel, set the Fill Color to Millennial Pink.

Step 4
Head back to the Layers panel and lock the Background layer. Unlock the layer above, Typography. Create a new CMYK swatch, C=0 M=84 Y=75 K=0, and name it Red.

Take the Ellipse Tool (L) and create a rough oval shape towards the top-center of the page.

Select the Type on a Path Tool (Shift-T) and click once on the top-left corner of the oval shape. Now you can type in your name or the name of the business. From either the Controls panel at the top of the workspace or the Character panel (Window > Type & Tables > Character), set the Font to Charlevoix Pro Bold. From the Swatches panel, switch the Font Color to Red.
You can adjust the position of the text by pulling the vertical line which crosses the edge of the oval shape when in Normal (W) view mode. Make sure to set the Stroke Color of the oval shape to [None] once you’re happy with the result, to create a seamless curved text effect.

Step 5
Use the Type Tool (T) to create two new text frames below, with a small gap between the two. Set the Font to Pier Sans Regular, Font Color to Red, and the text to Align Center.
The top text frame allows space for a subheading, while the bottom frame would be a good spot to place contact details.

Step 6
Create another text frame, positioning it in the center of the two subheading text frames you created in the last step. Place your type cursor into the frame and set the Font to Kitten Dingcats.
Go to Window > Type & Tables > Glyphs. Double-click on a glyph of your choice to enter it into the text frame. You can now highlight this and format the graphic in the same way as you would text.

I’ve set the Font Color to Red, and set the glyph to Align Center.

Step 7
Use the Type Tool (T) to add a text frame at the bottom of the page, typing in an address and setting the Font to Pier Sans Regular.

Step 8
Your letterhead template is complete—now you can lock the Typography layer and unlock the top layer, YOUR TEXT HERE, to be able to type up the content of your letter. Here I’ve set the Font of the body text to Pier Sans Regular, and added a PNG image of a signature using the Rectangle Frame Tool (F) and the File > Place function.


When you’re ready, you can go to File > Export to export your letterhead as a PDF (choose Adobe PDF (Print) for professional printing), JPEG, or PNG image.
2. How to Create the Business Card in InDesign
Step 1
File > Save As your letterhead document and keep the window open.
Go to File > New > Document, and deselect Facing Pages. Choose US Business Card (3.5 by 2 in) for the Page Size. Set the Margins to 0.25 in and add a 0.125 in Bleed, before clicking OK.

Step 2
Rename Layer 1 as Background and create a new layer above, naming it Typography. Lock the Typography layer for now.

Head back to your letterhead document and select the pink rectangle sitting on the Background layer, and Edit > Copy.
Go back to the business card document and Edit > Paste. Adjust the size of the shape to match the dimensions of the page, ensuring the color runs to the edge of the bleed.

Step 3
Lock the Background layer and unlock the Typography layer. Head over briefly to your letterhead again and this time, select and Copy the oval shape at the top of the page.
Edit > Paste it onto your business card, positioning towards the bottom-center of the page.
Edit > Paste again, moving the second oval down to the top-center of the layout. Adjust the text to read a subheading in a smaller Font Size, and pull the vertical line crossing the oval’s edge to pull the text to the inside of the oval.

Step 4
From the Glyphs panel, choose one of the Kitten Dingcats symbols to add to a new text frame in the center of the card, setting the Font Color to Red.

Expand the Pages panel (Window > Pages) and drag the Page 1 icon down onto the Create New Page button at the bottom of the panel, to duplicate the page.
Now working on Page 2, select and delete the elements sitting on the Typography layer.
Create a couple of new text frames and type in contact details, setting the Font to Pier Sans Regular.

Go to File > Export to export your business card as a PDF (choose Adobe PDF (Print) for professional printing), JPEG, or PNG.

3. How to Create a Matching Envelope in Illustrator
Creating a matching envelope for your letterhead will really give your stationery that extra professional touch. Here, we’ll create an envelope 9.5 in by 4.125 in, which is perfect for a Letter-sized insert.
Step 1
Keep your InDesign documents open, but minimize the window for now. Open up Adobe Illustrator and go to File > New.
Set the Width of the artboard to 11.73 in and Height to 9.34 in. Add a Bleed of 0.5 in, before clicking OK.

Step 2
Right-Click and Save this image to your computer.

Back in Illustrator, go to File > Place to drop the image onto the page, scaling it so that the outline fills the artboard.
Go to Window > Image Trace and use the trace function to trace the placed image. When you’re happy with the result, exit the Image Trace window and go to Object > Image Trace > Expand to create a vector image. Right-Click > Ungroup and then select and delete the white background, leaving just the traced outline.
Expand the Layers panel (Window > Layers) and rename the current layer toOUTLINE - DO NOT PRINT. We’ll use this later as the die line for cutting out the envelope; for now, it acts as a helpful guide for positioning the design elements on the envelope.

Step 3
Use the Rectangle Tool (M) to connect the four innermost corners of the envelope outline, creating a rectangle in the center of the image. This will form the shape of your envelope once it’s printed and folded.

Select the rectangle shape and, in the Stroke panel (Window > Stroke), check the Dashed Line box, marking these out as fold lines.

Step 4
Create a new layer, naming it Background Color. Drag it to sit below the OUTLINE layer in the Layers panel. Lock the OUTLINE layer.
Head back over to one of your InDesign documents briefly and select a pink rectangle sitting on the Background layer, and Edit > Copy.
Back in Illustrator, Edit > Paste this onto the envelope template. Adjust the size so that it covers the top two-thirds of the page, ending at the bottom fold line.

Step 5
Expand the Swatches panel (Window > Swatches) and select New Swatch from the panel’s drop-down menu. Create a new CMYK swatch called Red, C=0 M=84 Y=75 K=0.
Apply the Red swatch to the Fill of a new rectangle shape, positioned below the pink rectangle, as shown below.

Step 6
Return to the Layers panel and lock the Background Color layer. Create a new layer above, sandwiched between Background Color and OUTLINE above, naming it Typography.
Create a new swatch, C=0 M=50 Y=45 K=0, and name it Dark Pink.

Use the Line Segment Tool (\) to create a horizontal line in the center of the artboard. This will be one of the address lines on the front of the envelope. From the Stroke panel, check Dashed Line and set the Dash value to 1 pt and Gap to 5 pt, to create a dotted effect.

Copy and Paste the dotted line three times, positioning the lines in a central group. Reduce the length of the bottom line to the right side a little, to allow space for a text frame.

Use the Type Tool (T) to create a small frame, typing in ‘TO’ and setting the Font to Pier Sans Regular and Font Color to Red.
Right-Click > Transform > Rotate the frame 180 degrees. This is because the bottom of the artboard will form the top flap of the envelope.


Step 7
Select the Ellipse Tool (L) and, holding Shift, drag onto the page to create a small circle, about 0.2 in in diameter. Set the Fill to Millennial Pink, and position it on the red envelope flap.
Copy and Paste the circle repeatedly, creating a diagonal row of polka dots.

Select groups of dots and Copy and Paste, arranging them into a complete pattern which extends across the whole envelope flap.

Step 8
Before we export our envelope design for print, we need to prepare the outline for die cutting. To do this, we first need to move the fold lines into a separate layer, as this is only for our own guidance and not for cutting or printing.
First, create a new layer at the top of the sequence, naming it FOLDS - DO NOT PRINT.
Then, unlock the OUTLINE layer and click on the small arrow next to the layer’s name to expand the layer view. Select the fold line rectangle and drag this up, dropping it into the FOLDS layer.

Lock the FOLDS layer and head back to the OUTLINE layer.
Step 9
Create a new swatch, choosing Spot Color for the Color Type and setting the levels to 100% Magenta. Apply this swatch to the outline of the envelope, marking it out as a die line.

Go to Window > Attributes and, with the magenta outline selected, check the Overprint Stroke box.

Step 10
To export your envelope artwork for printing, first switch off the visibility of the FOLDS layer. Then go to File > Save As. Choose Adobe PDF (pdf) from the Format drop-down menu, and click Save.
In the Save Adobe PDF window that opens, choose [PDFX1a 2001] from the Preset menu at the top.

Click on Marks and Bleeds in the left-hand menu and check both the All Printer’s Marks and Use Document Bleed Settings boxes, before clicking Save PDF.

Great work—you can send this exported PDF straight off to the printers!

Conclusion: Your Finished Stationery Set
You’ve finished your letterhead, business card and envelope, and they’re looking fantastic—awesome job!
As well as learning to love all things Millennial Pink, you’ve also picked up some handy print design skills over the course of this tutorial. Let’s take a quick recap. You now know how to:
- Prepare simple print design templates for letterheads and business cards in InDesign.
- Set up a vector design for an envelope template in Illustrator.
- Apply on-trend color, typography and glyphs confidently to your artwork.
- Export your artwork ready for professional printing and die cutting.
Looking for more great stationery sets? Check out the range of easy-to-edit branded stationery on GraphicRiver and Envato Elements.
Original Link:
TutsPlus - Design
More About this Source Visit TutsPlus - Design