
An Interest In:
Web News this Week
- April 29, 2024
- April 28, 2024
- April 27, 2024
- April 26, 2024
- April 25, 2024
- April 24, 2024
- April 23, 2024
Some of Our Sources
- Mashable
- Techcrunch
- Team Treehouse
- Pearsonified
- Smashing Magazine
- Fudge Graphics
- 24 Ways
- Stylized Web
- Design Modo
- Web Resource Source
Help Webnuz
Referal links:
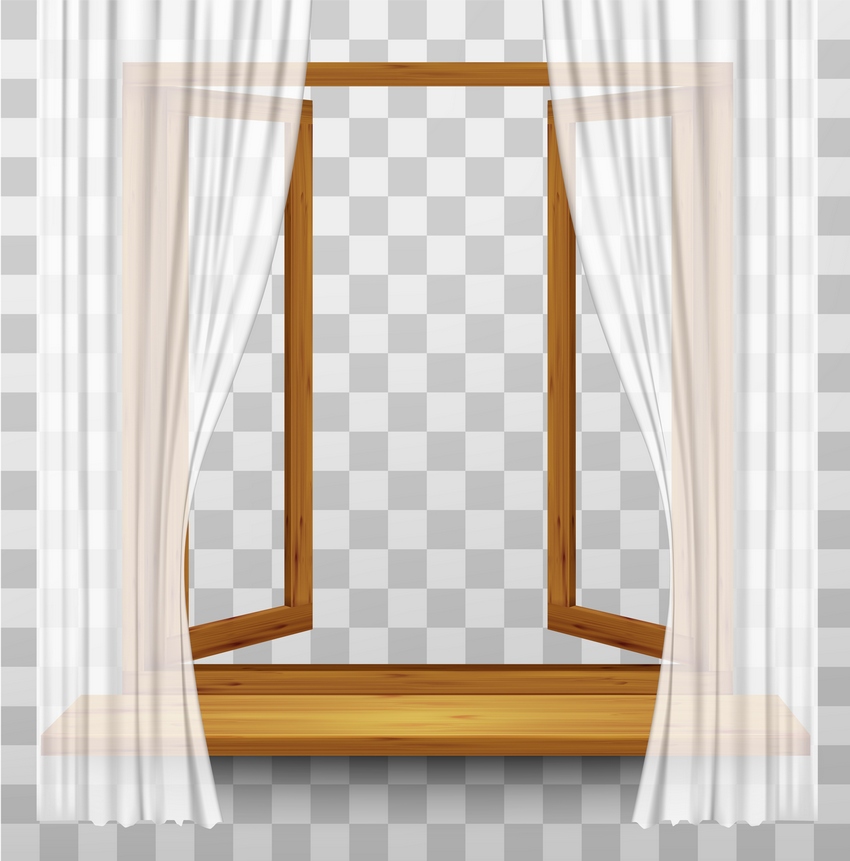
How to Create a Wooden Window Frame With Curtains in Adobe Illustrator

In this tutorial, you will learn how to use the Mesh Tool and the Mesh Tormentor plugin in Adobe Illustrator to create a vector wooden window with curtains!
If you want to skip the tutorial and just use this shirt with lots of other awesome designs, purchase the Wooden Window Frame with Curtains from GraphicRiver!
Before starting this tutorial, you should install the Mesh Tormentor plugin. Go to the Mesh Tormentor site
and download the free Mesh Tormentor plugin that corresponds with your
Illustrator version. Then unzip the received archive, close Adobe
Illustrator, and
copy the .aip file into the "Extensions" folder on your
local installation disk. (For example, it is the C:\Program Files\Adobe\Adobe Illustrator CS6\Plug-ins\Extensions
folder on my computer.)
Open Adobe Illustrator again and go to Window
> Mesh Tormentor.
1. How to Draw the Curtains
Step 1
We will begin with a simple Mesh!
Draw a long, narrow, white rectangle (about 160 px wide and 7 px tall). Then grab the Mesh Tool (U), and, by clicking on the top edge of the shape, create a row where indicated.
Create two more nodes so the mesh grid is identical to the one in our first substep. Next, select the two nodes of the middle row and color them both with #E7E7E7.
Continue similarly. The hex color code is always above the nodes that need to be colored!
You will need these colors:
#E7E7E7#AFAFAF#E7E7E7#C9C9C9#AFAFAF#BDBDBD#DADADA#C3C3C3

Step 2
Now that the Mesh base of our curtain is done, simply stretch it downwards to create a full-sized curtain (about 670 px in height).
Next, grab the Warp Tool (Shift-R) and double-click on it to bring up the Options. Set them accordingly:
- Width: 150px
- Height: 450px
- Angle: 0°
- Intensity: 50%
- Detail: 2
- Simplify: 50
Now, using the Warp Tool, bend the bottom part of the curtain to the left.

Step 3
Use the same options, only changing the height of the brush to 650 px, and stretch the top part of the curtain to the left.

Step 4
Set the Opacity of the curtain to 80%.

Step 5
Create a mirror copy of our curtain (Object > Transform > Reflect).

2. How to Create the Wooden Texture
Step 1
For this step, download the attachment in the sidebar of the tutorial and open plank.jpg in Adobe Illustrator. Create a copy of the raster image.
Grab one of the copies, go to Window > Image Trace, and trace the texture of the wood with these settings:
- Mode: Black and White
- Threshold: 95
- Paths: 50%
- Corners: 75%
- Noise: 25px
- Create: Fills
- Options: Ignore White, Snap Curves to Lines
Select the result and go to Object > Expand Appearance.

Step 2
Change the color of the texture to #5B350C, its Blending Mode to Multiply, and Opacity to 20%.

Step 3
Create a rectangle with the same size as the raster. Go to Object > Create Gradient Mesh and use the following settings:
- Rows: 30
Columns: 4

Step 4
Here's where Mesh Tormentor comes into play. If you haven't already, install it (consult the beginning of the tutorial) and open it through Window > Mesh Tormentor.
Put the Mesh grid on top of the raster image. Select both objects and click on the "Mona Lisa" icon in the Mesh Tormentor panel to color our Mesh like the plank.

Step 5
Grab the Warp Tool (Shift-R) again, using these settings:
- Width: 150px
- Height: 50px
- Angle: 0°
- Intensity: 30%
- Detail: 2
- Simplify: 7
Move the lines of Mesh to warp them a bit, just like in the picture.

Step 6
To create knots in the wood, grab some Mesh nodes and drag them to the left (they are selected in the screenshot below), and then color them all with #89521C.

Step 7
Now grab the texture we made in Step 2 and place it on top of the plank!

3. How to Create the Window
Step 1
Now that our wooden plank is done, stretch it in length, and create a window frame out of four planks!

Step 2
Grab a copy of one of the planks and shrink its width. Then, draw a shape identical in size. Color it with #5B350C, and change its Blending Mode to Multiply and Opacity to 70%.
Finally, place the new shape on top of the plank to darken it. I recommend Grouping both objects by selecting them and pressing Control-G.

Step 3
Now, draw a slightly smaller shape with slanted edges on top and bottom. Move it over the plank and, selecting both objects, right-click. Choose Make Clipping Mask in the drop-down menu.

Step 4
Create the inner frame of the window out of the small planks.

Step 5
Place the inner planks into the frame—stretch and resize them if necessary to fit.

Step 6
For the next plank, we will need to draw a Mesh to overlay it. You will need these colors:
#BAA5A1#FFFFFF#D4C7C5#947770

Step 7
Set the object's Blending Mode to Multiply and Opacity to 70%.

Step 8
Shrink the plank's height slightly, and then overlay the Mesh on top of it. This is going to be Plank 1.

Step 9
Create Plank 2 by simply shrinking the height of the original plank.

Step 10
Similarly, create Plank 3.

Step 11
To begin working on Plank 4, severely shrink it in size.

Step 12
Create an identical shape to overlay (#876D5B color, 70% Opacity, Multiply) and place it on top. Then draw a shape with slightly slanted edges and apply a Clipping mask to the plank.

Step 13
Let's draw Plank 5!
Grab the original piece of wood and resize it, as indicated below. Then rotate it a little bit. Next, draw a slanted outline and apply it as a Clipping mask.

Step 14
Grab an identical shape, fill it with #D6BFB9, and color its top left corner white. Change its Blending Mode to Multiply, and overlay it on top of Plank 5.

Step 15
For Plank 6, follow the same instructions as in Step 13, just use a different shape.

Step 16
Finish Plank 6 in a similar fashion as the previous one.

Step 17
Begin making Plank 7 by taking a long piece of wood and creating another overlay, this time colored with #CEA365 and using Multiply and 60% Opacity.

Step 18
Rotate this plank, and apply a Clipping mask using a slanted outline.

Step 19
Now you can create a window frame! Assemble the object by the numbers. Resize the planks as necessary.

Step 20
Finally, create another window frame by using Object > Transform > Reflect with the original.

Step 21
Fit both windows inside the big frame!

4. How to Create the Windowsill
Step 1
Last but not least, let's create a windowsill to go with our window!
Grab the original plank and double its width by first Reflecting it Horizontally, and then joining both pieces together.

Step 2
Create a windowsill outline for our newly joined plank and apply it as a Clipping Mask.

Step 3
Now, let's do a highlight! We will need two shapes of the same size—one filled with a Radial white to black Gradient, and another filled with #F7F7F7.

Step 4
Place the Gradient over top the grey circle.
Then open up the Transparency panel (Window > Transparency) and, after selecting both shapes, press Make Mask in the panel.

Step 5
If the result doesn't look like mine (I've placed it on a grey background for visibility), take the tick off Invert Mask in the panel.

Step 6
Release the Clipping Mask on the windowsill, place the highlight under the outline, and apply the Clipping Mask again!

Step 7
Create the edge of the windowsill out of a copy of Plank 1 by making it longer and narrower.

Step 8
Complete the windowsill!

Step 9
The only thing left is the shadow! Draw two shapes, one colored with #545454, and the other white. Place the grey shape on top and change the white shape's Opacity to 0%.

Step 10
Go to Object > Blend > Blend Options and select Specified Steps, 30.
Then, select both shapes and use Object > Blend > Make.

Step 11
Place the windowsill and the shadow.

Step 12
Attach the curtains on top.

Step 13
If you want to put a scene behind the window, you can go to this tutorial of mine:

After you complete the background, simply "cut out" the part you want to show by using a Clipping Mask.

Awesome Work, You're Now Done!
What now? You can try any of my other tutorials from my profile, or check out my portfolio on GraphicRiver, as well as the original vector we recreated in this tutorial.
I hope you enjoyed the tutorial and will be super happy to see any results in the comments below!
Original Link:
TutsPlus - Design
More About this Source Visit TutsPlus - Design