
Some of Our Sources
- Techcrunch
- Web Designer Wall
- The Logo Smith
- Creative Curio
- Inspiredology
- Web Design Ledger
- Reencoded
- Line 25
- Wal You
- Android Headlines
Help Webnuz
Referal links:
How to Draw an Orchid With Pastel Pencils

In this tutorial, I’ll show you how to draw an orchid. We will be using pastel pencils and black paper; this extraordinary combination of art supplies provides a broad space for experiments.
Orchids are wonderful, but drawing these flowers may seem challenging. I’ll show you an easy way to draw an orchid from scratch.
Our goal is to create a beautiful, expressive and emotional drawing, and have fun exploring the principles of making pastel sketches!
What You Will Need
Pastel pencils of different colors:
- White
- Light yellow
- Light rosy
- Pink
- Dark violet
- Blue
- Light green
- Medium green
- Dark green
- Brown
- Grey
- Black
And additional supplies:
- Black pastel paper (smooth or with a subtle texture)
- A graphite pencil
- An eraser
A sharpener

1. How to Draw an Orchid With a Graphite Pencil
Step 1
In this part of the tutorial, I’ll show you how to draw an orchid from scratch, using a graphite pencil.
I mark the center of the flower with a small circle and add five divergent lines for the petal shapes. Then I draw a curved line to mark the core of the twig.

Step 2
In the central part of the flower, I draw two small vertical shapes that look like narrow petals.
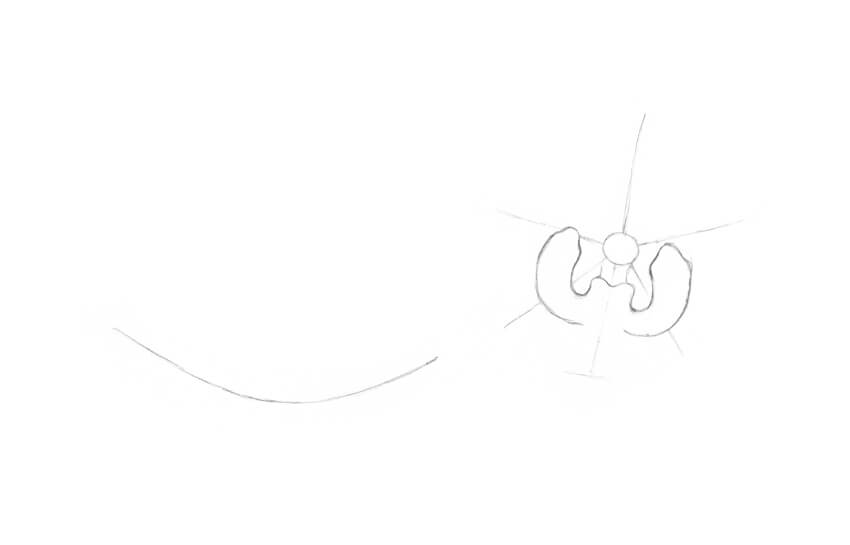
Step 3
I add the lower petal of the orchid; it is also called a lip.

Step 4
It’s time to add details. I refine the central structure of the orchid (known as a column) and add two tendril-like elements to the lip of the flower.
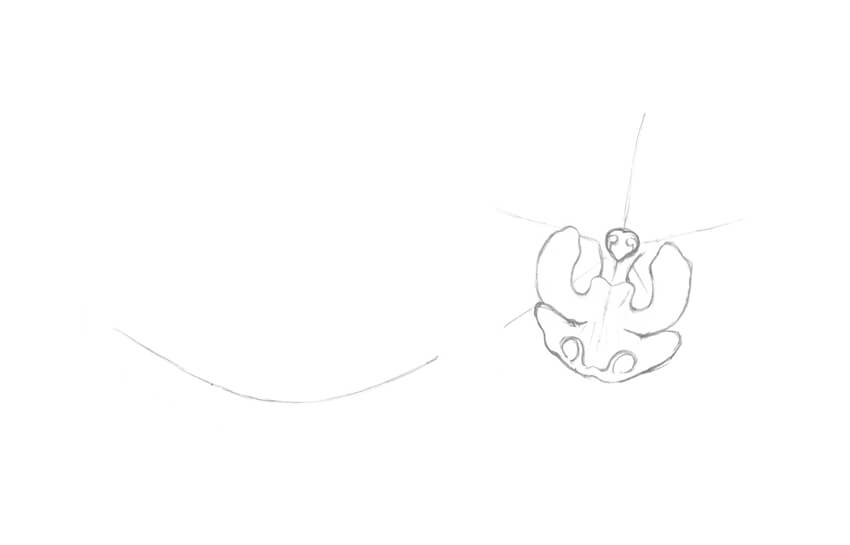
Step 5
I add two large petals. The lines are slightly irregular; this way of drawing lines helps to emphasize the organic nature of the object.

Step 6
I mark the sepals, which are three petal-like structures of approximately equal size.

Step 7
I refine the twig, making it wider and adding the rough shapes of the buds.

Step 8
I outline the buds. They are facing in slightly different directions; this simple trick makes the floral composition more interesting.

Step 9
I draw a pattern of small circles on the orchid, and then add thin lines that mark the direction from the central point of the flower to the periphery. The flowerlooks more realistic now.

Step 10
I create a value sketch, marking the places in my drawing that I consider the darkest: under the top petals, between the details of the flowers, and at the sides of the buds.
With regard to working on black paper in future steps, this action becomes especially important. When we are drawing on a dark surface, we have to pay the most attention to the lightest and brightest areas of the drawing. That is why we need to know where they are beforehand.
2.How to Draw With Pastel Pencils
Step 1
It’s time to try our tools and observe how the pastel pencils and black paper work together.
I draw small hatches and dots. As you can see, the strokes look uneven and spontaneous; it’s a perfect fit for the expressive floral sketch.

Step 2
I create a basic hatching, varying the line width and the tilt of the pencil.

Step 3
I incline the pencil and cover the paper with a layer of color. Just relax your hand and make a continuous line with soft rubbing movements.
My paper has a subtle texture, so the result of applying pencil strokes looks fascinating.

Step 4
I draw the same type of a stroke that we’ve tried in the previous step and shade it with my finger. The colors of the pencil and the paper sheet are blending with a blurry effect.
You can also use additional supplies, such as special shading stumps or just an ordinary cotton bud. The choice is entirely up to you.

3.How to Draw an Orchid Twig With Pastel Pencils
Step 1
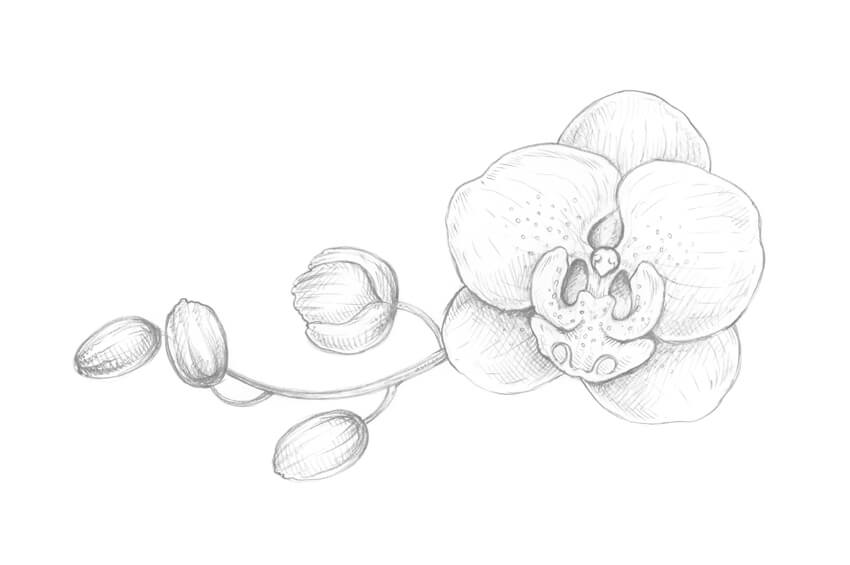
I outline the main contours of my drawing, trying to keep it visually close to the pencil sketch that I’m using as a reference. I leave very light lines with the grey pastel pencil.
In this step, you can change some elements of your composition if you wish to make your pastel drawing slightly different from the graphite pencil sketch.

Step 2
I apply soft strokes with the white pastel pencil to the orchid flower and buds. The lines are going from the center of the flower to the edges of its petals.

Step 3
I shade the white strokes with my finger. Avoid going outside the contours of the shapes because this will cause a messy effect.

Step 4
I add another layer of long hatches, using thewhitepencil.
Now we have a base for applying bright colors and creating the pattern of the flower.

Step 5
I add lines with thelight rosypastel pencil to the flower and buds.

Step 6
With thepinkpastel pencil, I add more bright hatches and dots to reveal the pattern of the flower.

Step 7
To make the flower and the buds more contrasting, I add more hatches with thewhitecolor.
It's important to work on your drawing gradually and press on the pencils lightly because pastel paper can hold only a limited amount of the color pigment.

Step 8
I mark the twig with thebrownpastel pencil. To keep the color unity of the artwork, I also add brown strokes to the central part of the flower and the buds.

Step 9
I add dots and short hatches to the twig with thedark greenpencil.
It is also a good idea to leave just a couple of hatches of this color within the buds’ shapes.

Step 10
I intensify the brightness of the orchid, using the pencil of thedark violetcolor.
The lines are visually blending with the existing pink and light rosy strokes, so the result looks vivid and colorful.

Step 11
It’s time to vary the coloring of the drawing. I add dots and hatches with thelight yellowpencil.
The goal of this step is to set up the light accents and emphasize the pattern of the flower.

Step 12
I add more bright, illuminated spots, applying thelight greencolor.
You may notice that the light colors of the pastel pencils look closer to the white color when you are drawing on a dark surface.

Step 13
To make the drawing feel aerial, I add strokes and outline the contours with thebluepencil.
Such nuances of a cool color work great in shady areas of the drawing.

Step 14
Using theblackpastel pencil, I make the borders between the elements in my drawing more accurate.
I also strengthen the shadows in the area of the flower buds, giving the objects more volume and contrast.
Step 15
I use thewhitepencil once again to accent the details, especially in the central part of the orchid.

Step 16
I add bright nuances with the pencil of themedium greencolor, slightly touching the contours of the flower and the buds.
Such tiny details always help to make the drawing more vivid.

Step 17
I add more hatches with the light rosy pencil.

Step 18
I evaluate my drawing and accent the tips of the petals even more, using the white pencil.

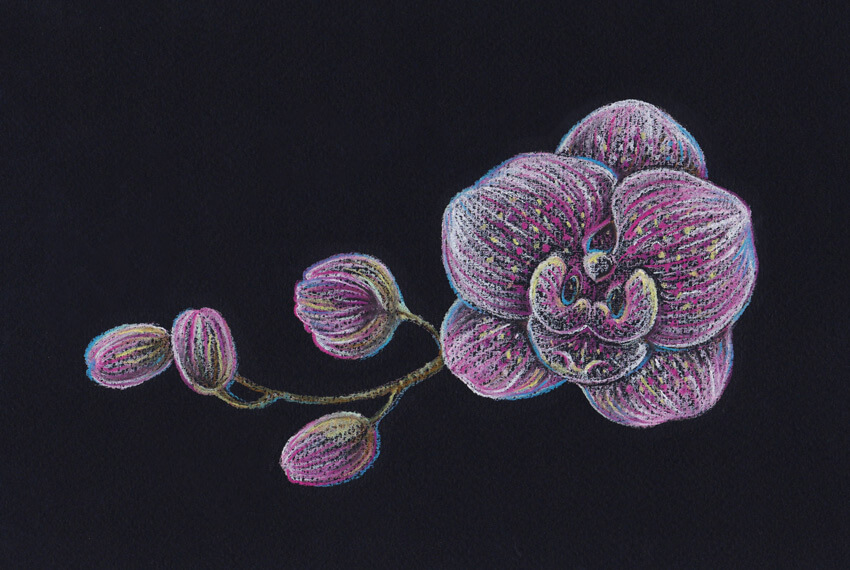
Your Drawing Is Complete
Congratulations—you’ve created a beautiful artwork! I hope you've enjoyed the process of working with pastel pencils and black paper.
I wish you much success with this wonderful technique and your creative projects!
Original Link:
TutsPlus - Design
More About this Source Visit TutsPlus - Design