
Some of Our Sources
- Technology Review
- Simplebits
- Pearsonified
- The Logo Smith
- Smashing Apps
- Six Revisions
- Creative Curio
- My Ink Blog
- Reencoded
- Hashedout
Help Webnuz
Referal links:
How to Create an Energetic Paint Splashing Effect in Adobe Photoshop

Shoe advertisements are an incredible source of design inspiration. Inspired by the energetic movement and power behind these ads, I've created a fun paint splashing effect you can recreate in no time!
Learn how to create this effect in Adobe Photoshop using resources from Envato Market.
Tutorial Assets
The following assets were used in the production of this tutorial:
1. Create the Background
Step 1
Create a New Document in Photoshop at 960 x 638 px. Use the Paint Bucket Tool (G) to Fill the background layer with a dark blue color #1f222a.
Copy and paste your Watercolor Reference onto the canvas, adjusting the size to fit the background by holding Control-T to Free Transform. When you're finished, set the Layer Blend Mode of the watercolor layer to Divide.

Step 2
Next, copy and paste your second paint reference, the Acrylic paint stock, onto the canvas. Set the Layer Blend Mode to Luminosity.

2. Manipulate the Shoe
Step 1
Let's move on to the shoe. Extract the shoe from its white background using the Magic Wand Tool (W) and Cut and Paste it onto the canvas. Flip the shoe by going to Edit > Transform > Flip Horizontal. Then use the Free Transform Tool (Control-T) to rotate the shoe at an angle.

Step 2
Create a New Adjustment Layer of Curves and Right-click to set it as a Clipping Mask to the shoe. Adjust the colors of the shoe slightly with the following settings for the RGB, Blue, and Green Channels:


Step 3
In order to create a powerful splash effect, we'll need to separate the top part of the shoe from its sole. Merge the shoe and Curves layer together. Use the Polygonal Lasso Tool (L) to create a selection on the lower part of the shoe.
Once it's selected, Right-click to go to Layer via Cut to separate the lower half onto its own layer. Use the Free Transform Tool (Control-T) to Rotate both parts of the shoe to create an opening on the right side.

3. Add the Splashes
Step 1
You can incorporate the paint splashes at their current color or adjust them to fit your needs. Open the Paint Splash 1 in Photoshop and use the Magic Wand Tool (W) to select and then delete the white background. Go to Image > Adjustments > Brightness & Contrast, adjusting the Brightness to -14 and the Contrast to 60.

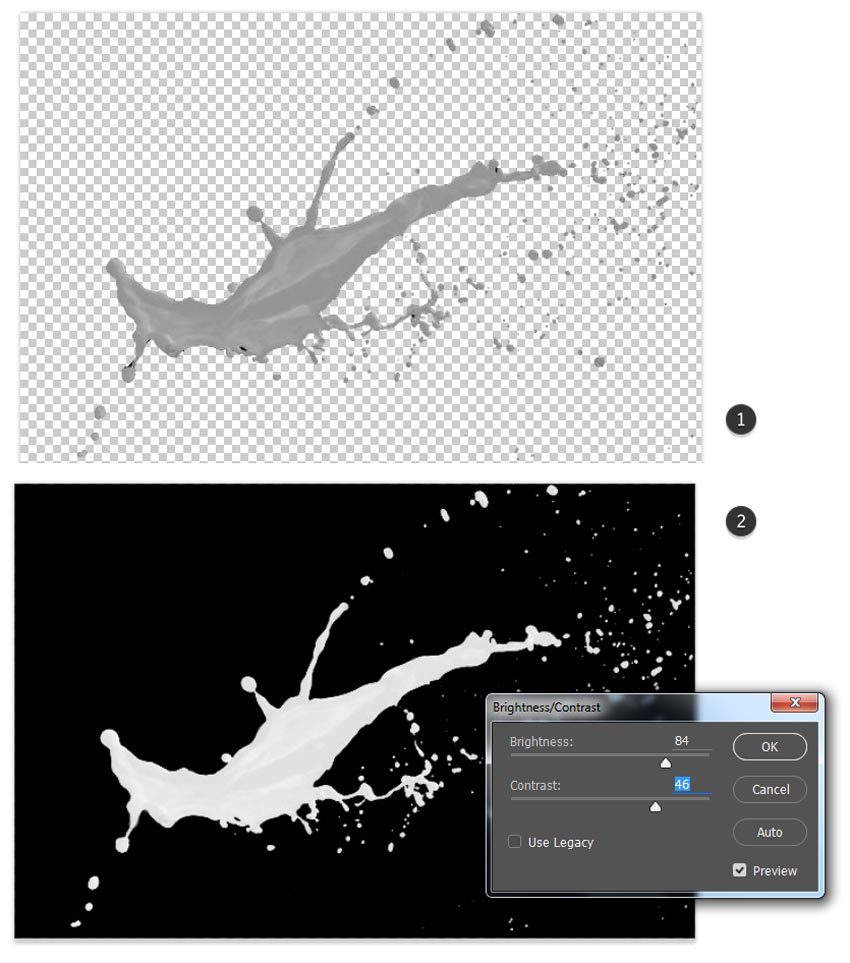
Feel free to skip this next step if you have a white paint splash you like. Since I couldn't find one, I decided to use a blue splash that I just changed to white. To do this, first select and delete the white background with the Magic Wand Tool (W). Go to Image > Adjustments > Hue & Saturation and desaturate the splash to -100 Saturation.

Hold Control-I to Invert the grayscale splash, and then boost the whiteness by going to Image > Adjustments > Brightness & Contrast and changing the Brightness to 84 and the Contrast to 46.
Step 2
Now that we have the splashes adjusted, we can add them to the scene. Copy and Paste both paint splashes onto the canvas and Rotate them to fit against the shoe with the Free Transform Tool (Control-T). Feel free to take advantage of the Warp option to adjust the splashes even further.

Now add Layer Masks to both parts of the shoe, as well as the two splashes. Hide the Visibility of the white paint. Use the Brush Tool (B) and a Soft Round Brush to paint black onto the Layer Mask of the blue paint in order to help it blend into the sneaker more.

Do the same for the white paint splash. Paint black on the Layer Mask for the shoe as well to hide any parts you don't want to show through.

4. Color the Paint Splashes
Step 1
Once you have both paint splashes seamlessly blended onto the shoe, select each Layer Mask and Right-click to Apply Layer Mask. To color the blue paint just like the bright pink parts of the sneaker, use the Polygonal Lasso Tool (L) to make selections along the paint at the same width as those pink details.
With the blue paint layer selected, go to Image > Adjustments > Hue & Saturation, adjusting the Hue to 107, the Saturation to 100, and the Lightness to 19.

Repeat this process for the bottom part of sneaker and clean up any harsh areas with a Hard Round Brush (B).

Step 2
Let's show a quick reflection of the white paint onto the blue. Control-J to Duplicate the white paint layer and Move it onto the blue paint area. Adjust the Layer Opacity to 25% and use the Eraser Tool (E) to erase any overlapping areas.

5.Add the Finishing Touches
Step 1
Merge all the shoe layers together, keeping the background layers separate. To add some shadow on the background and texture on the shoe, Right-click the shoe and go to Blending Options. Add a Drop Shadow and a Satin effect with the following settings:

Step 2
Now set a New Adjustment Layer of Color Lookup as a Clipping Mask to the shoe to tweak the colors a bit more. Here we want to deepen the colors, so adjust the settings as follows:

Step 3
Add a New Layer and set it to Overlay. Use the Brush Tool (B) to paint soft white highlights onto the top portion of the scene. Make sure that some of the highlights hit the shoe as well.

Intensify the scene some more. Fill a New Layer with a light gray color and set it to Overlay. Use the Dodge Tool (O) at 40% exposure to create stronger highlights along the tip and sides of the shoe.

Step 4
Feel free to continue to play around with your effect. Add a quickNew Adjustment Layer of Curves for added contrast on the RGB Channel. Below is the final result.

Good Luck!
Play around with different colors and shapes to explore this effect even further! You can also try this look on other objects like my alternative version below.

I hope you've enjoyed this tutorial. Feel free to leave any questions in the comments, and good luck with your designs!

Original Link:
TutsPlus - Design
More About this Source Visit TutsPlus - Design