
Some of Our Sources
- Team Treehouse
- Just Creative
- Joshua Blankenship
- Vandelay Design
- You The Designer
- Fuel Your Creativity
- Noupe
- Spyre Studios
- Web Resource Source
- Daily Now
Help Webnuz
Referal links:
Back to School: Design for Self-Publishing

Becoming a self-published author is no mean feat. On top of coming up with a great idea, creating an engaging plot and inventing memorable characters, you also have to think about putting the actual book together, either in a printed or digital (EPUB) format. If you want to self-publish or have been asked to design a book, this is your essential guide for getting started with all things publishing design.
Complete beginners will find this guide to be a helpful overview of all aspects of designing books, from understanding the self-publishing process to creating a market-friendly ‘look’ for your books. If you already have some experience of publishing design, I’ll share some fantastic in-depth tutorials for refining your skills, from designing EPUBs to developing your typesetting techniques.
What Is Self-Publishing?
Some decades ago, if you wanted to write a book, publish it and sell it, you would have no other option than to approach a publisher. Independent publishers and larger publishing houses have the infrastructure to edit, print, distribute, and market books. Today, you will still find that most books that are sold have been printed and distributed by a publisher.
However, with the invention of digital eBooks and wider accessibility to digital printing and eBook stores, it’s now feasible for almost anybody to write and publish a book. Whether you want to create a digital eBook for selling online or print a hard copy book for selling in bookstores or on Amazon, it’s now much easier and cheaper to do so.

Self-publishing a book can be a very rewarding endeavour in itself, allowing you to share a personal idea and story with the world, but it can be financially rewarding too.
Because the self-publishing market is effectively a free-for-all, this has led to saturation, and you might initially be intimidated by the sheer number of self-published books that are now available to buy. A beautifully designed book that’s tailored to a specific audience will be your best shot at getting noticed and getting sales.
Here I’m going to show you how you can teach yourself the principles of design for self-publishing, and be well on your way to creating the next self-published bestseller!
The Self-Publishing Process, From A to Z
Here we’ll walk through the steps of designing and publishing a book for both the digital and print markets. You’ll find insider tips and recommendations for getting started on your own self-publishing journey, and also some handy resources for making the process a whole lot smoother and quicker.
1. Choose Your Software
The first step towards publishing a book is to seek out the right software. Choosing software that not only is up to the publishing design task but also that you feel comfortable with using is going to be your first challenge. But don’t panic! There are tons of options, and it’s easy to find one that will suit both your skillset and budget.
It’s important to note that graphic designers might turn to Illustrator, Inkscape or Photoshop for many design tasks, but a publishing design job requires specialist publishing design software. Here’s the breakdown of the best options on the market right now:
Adobe InDesign
InDesign continues to lead the market, and it’s still considered by many professional book designers to be the crème de la crème of all publishing software. InDesign allows you to set up facing pages for the inside of your book, apply page numbers and chapter headings to master pages (which can be carried across all, or specific sections, of your book), and lay out text and images in a WYSIWYG (‘What You See is What You Get’) format. If you’re an InDesign newbie, it might feel initially like working with Word or Pages, but InDesign is much more advanced, and it has a number of special features to help you not only create a book, but create a really well-designed publication.
You can download Adobe InDesign CC as a single application, or as part of the Creative Cloud package, which allows you to create, edit and bring in images easily from its sister applications, Photoshop and Illustrator. A monthly subscription can feel a little on the pricey side if you’re on a tight budget, but many would argue that the superior interface is worth the extra cash.
QuarkXPress

Rather than paying a monthly subscription fee, you can choose to buy QuarkXPress as a keep-forever program. The predecessor of InDesign and former market leader for publishing design is still favored by many pro book designers who love its easy-to-use interface. If you want to have the professional feel of InDesign with a more intuitive workspace, Quark is the way to go.
Microsoft Publisher

Don't have the budget to stretch to InDesign or Quark? No problem—there are other software options which offer many of the same features and are tailored to book design.
Microsoft Publisher is included with any Office 365 subscription, so you may find you already have it installed on your computer. This is a great entry-level option for aspiring book designers looking to dip a toe into publishing design.
Scribus (Free!)

Scribus is a free-to-download desktop publishing program for Windows and Linux (unfortunately there’s no version for Mac at the moment). Scribus is a Jack-of-all-trades program, allowing you to design a range of publications, including books, newsletters, and brochures.
Affinity Publisher (Coming Soon for Mac...)

If you can hold off your self-publishing plans until next year, mark your diary for the 2017 release of Affinity Publisher, a new offering from Apple. It's hoping to compete with the market leader, InDesign, and we’ll have to wait and see how it fares for publishing designers.
Take the time to review your software choices and take them for a test-spin if you can. When you find the program to suit, you’re ready to get started with the design process...
2. Know Your Print & Digital Formats
Once you’re ready to start designing your book, you need to have a think about the format of your book. Do you want the book to be a traditional printed hard copy, or would you rather go down the route of designing an eBook (known to publishing designers as EPUBs, short for ‘electronic publication’) which can be read on digital devices like Kindles, tablets, and laptops?

Opting for a print or digital book format can have its own pros and cons.
Print books are more expensive to produce and may be more difficult to distribute without the help of a publisher. On the other hand, printed books have a tactile quality that some would argue cannot be matched by a digital eBook. A printed book is physical and can become a treasured item. You can also get really creative with the design of the book, creating a full wraparound cover and typesetting the pages in a traditional way.
Opting for a digital eBook instead may mean your book lacks some of the qualities that make printed books feel so special. However, this is definitely the easiest format to go for if you have no experience with distributing books. The cost of production is very low, taking into account only the software required and the time needed to design, and when you’re done you can simply upload your book to an eBook store.
Formats for Print
Hardbacks (or hardcovers) are one of the more traditional formats for books—they are made up of a page block, two boards, and a cloth or heavy-weight paper cover. The inside pages are sewn together into batches and then glued onto a soft, flexible spine between the boards.

A separate paper cover, known in the industry as a dust jacket, is printed separately and folded over the top of the whole cover, with flaps on the left and right edges to allow it to wrap around the edges of the board. Hardcovers, for a time considered outdated and expensive, are enjoying a surge of popularity. Hardcovers, particularly clothbound styles, tap into the trend for all things vintage and can become treasured items for their owners.

Paperbacks (or softcovers) became more widely used with the introduction of new printing techniques in the 19th Century. Cheaper to produce than hardbacks, they have a cover made of heavy paper or card, and the inside pages tend to be glued to the inside of the spine rather than sewn.
Publishers will often choose to release a ‘trade paperback’ after a hardback book has sold particularly well. This allows bookstores to sell the same book at a lower price point.
Formats for Digital
There's in theory a huge range of digital eBook formats out there, but actually only one format, the EPUB, is widely supported by e-Readers, such as the Amazon Kindle. All of the software options listed in Part 1, above, will allow you to export your design to an EPUB format.

Now that you’ve decided whether to publish your book digitally or in a print format, you need to get knowledgeable about sizing...
3. Get Savvy About Standard Sizes
Sizes for Print
Publishing design has various rules and standards when it comes to sizing books. This is due to a number of both historic and modern reasons. Even though you're self-publishing your book, it’s a wise idea to use a widely accepted standard size—this will make it easier for a printer to mass-produce your book and for a bookstore to stock your book and fit it on the shelves.
Both paperbacks and hardbacks come in a variety of standard sizes, and you’ll be sure to find an option to suit your project. Stick to an industry-accepted size and you’ll make life much easier for publishers, distributors and bookstores alike. These are some of the most commonly used standard sizes in the publishing industry:
For hardbacks (and some up-market paperbacks):
Demy: 135 mm in width and 216 mm in height
Royal: 153 mm in width and 234 mm in height
For paperbacks:
A-format: 110 mm in width and 178 mm in height
B-format: 130 mm in width and 198 mm in height
C-format (known as ‘trade paperback’): 135 mm in width and 216 mm in height
These are standard sizes for most types of fiction and non-fiction—novels, biographies, histories, etc. If you’re creating something a little different, like a cookbook or children’s book, there will also be rules about standard sizes which are specific to that genre, but in general they tend to be a little more flexible on sizing.
To help choose the right size for you, take some books off your shelf at home and measure them with a ruler—are they Demy, Royal, A-format, B-format? How does each size feel in your hand? Is there a particular style that you are attracted to or that you feel would suit the genre of your book best? Also be aware that hardbacks are more expensive to print than paperbacks, as are larger books in general.
Sizes for EPUBs
Digital book covers come in a variety of sizes (both in terms of dimensions and file size), and sizing can vary widely depending on the eBook publishing site (see a list of eBook stores in Part 6, below). Another thing to be aware of is that these eBook stores also regularly revise their recommended sizing, as new eReaders are released or publishing technology evolves.
With this in mind, you should routinely check the sizing recommendations of the publishing sites you are hoping to sell your eBook through, and revise the dimensions of your cover appropriately. Otherwise you may get a nasty shock when your cover appears blurry or stretched on your eReader.
In this tutorial I take you through the steps of designing a cover for an eBook using Amazon’s sizing recommendations:

Once you’re set on a size, you’re ready to dive into the more creative aspects of the self-publishing process. The next thing on the list? Creating an amazing cover of course!
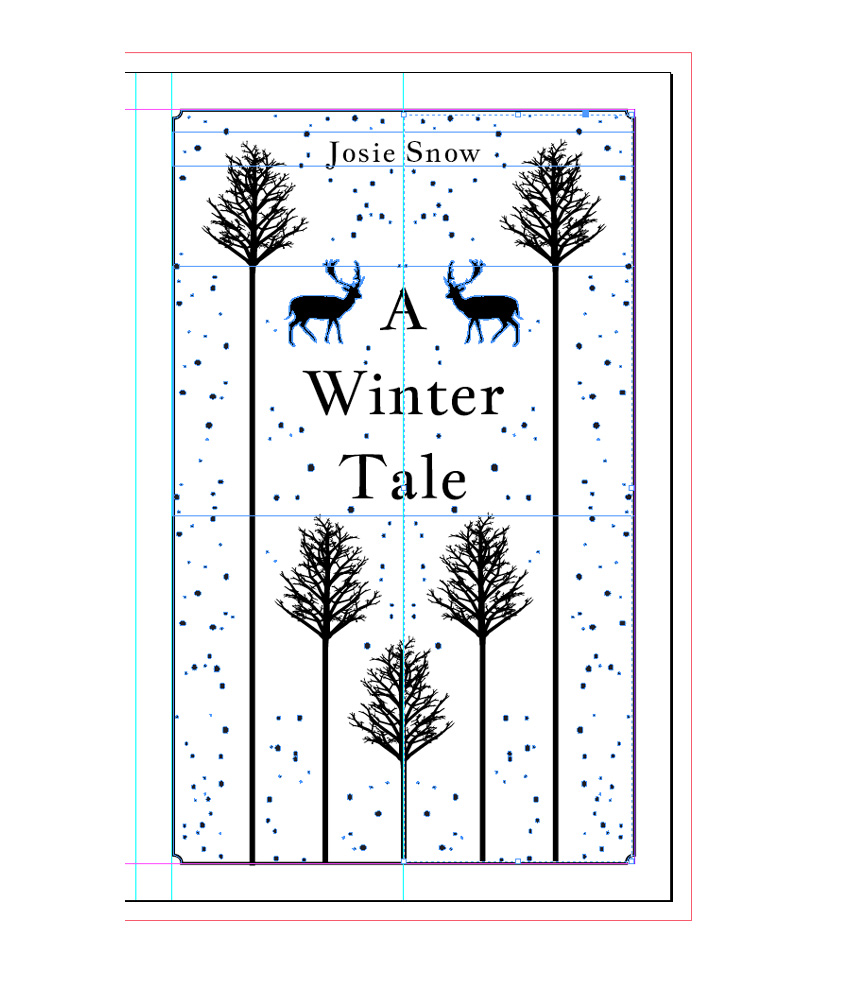
4. Design a Great Cover
Designing a cover for a book might be the most exciting and creative part of the self-publishing process, but it can be tricky to get started. A book cover represents the theme or mood of your book in a visual format, but you also need to ensure that the design is attention-grabbing and commercially adapted to encourage sales.
So where to get started? First, you need to explore some blue sky thinking. Move away from the computer, go outside or to a quiet space, and have a deep think about the main themes and subjects in the book. It may help to take a notepad and jot down some ideas. Book covers need to communicate an intellectual, symbolic, or emotional message, which will be best communicated by a single strong idea. See your cover as being a creative ‘ad’ for your book—sort out the idea first, and the visual stuff will come later.
When you have a few ideas, take a sketchbook and start drafting basic images and layout ideas. It can be helpful to draw a rectangular frame on the page and draw inside the lines to get a sense of the proportions of a cover. Don’t commit yourself at this stage to one idea. Do quick drafts of lots of ideas, and then review your designs and see if one has a stronger visual layout than the others.
You’re now ready to start drafting your cover for real. You may want to stick to pencil and paper at this stage, or move onto the computer if you feel more confident with drafting the idea digitally.
This book cover learning guide is a great place to pick up some inspiration and technical know-how for drafting and finalizing your cover design.
It’s also a really useful exercise to pay a visit to your local bookstore and do some research into popular cover designs. Does your genre have a particular look or style that seems to be popular? Which books have been chosen to be put on display? Out of these, can you spot common elements that they share, such as fonts, photos/illustrations, colors, or textures?

There is without a doubt a formula for making a cover that sells, and you can spot this when you look on a store’s shelves. Even if you think your cover idea is fantastic as it is, to ensure sales success you have to adapt your idea to a visual style that looks commercially appealing.
The final step of designing your cover is to ensure that it is adapted to a print or digital format. Browse the shelves at Barnes & Noble compared to Amazon’s Kindle Store and you’ll see that printed book covers and eBook covers are subtly different.

In this tutorial you’ll see how designing a cover for a paperback involves balancing typography and graphics to create a design that looks appealing when held at arm’s length:

In this tutorial we look at how designing a cover for an eBook instead emphasises the legibility of the title, to help it stand out in a sea of small preview images online:

Still have no idea where to begin with designing a cover for your book? A template can be a great starting point for creating something that looks professional and stylish. Check out these customizable templates for eBook covers and these fantastic templates for print covers.

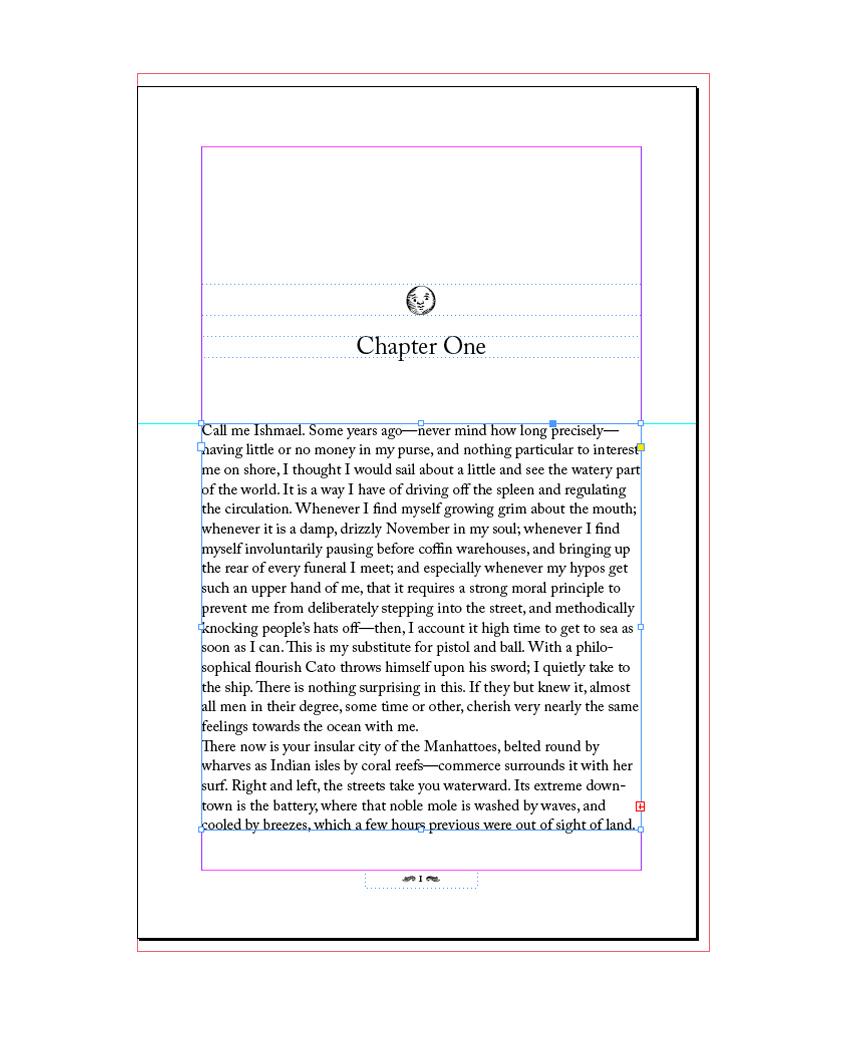
5. Typeset the Pages
Typesetting is the technique of arranging text on the inside pages of your book. Typesetting is based on a body of rules to help text appear legible and attractive on the page. Because the technique can take some practice, it is considered by many designers to be a specialist skill. Typesetters will be well-practiced at setting the text for books, and this can often be their main, if not only, design specialism.

However, the basics of typesetting can be learned by anyone, and being aware of a few key principles will help you to tackle typesetting your own books in no time.
If you’re designing for print, this tutorial will walk you through the basics of typesetting a text-heavy book, like a novel, in Adobe InDesign:

Once you’ve learned how to create running headers, insert page numbers and manage the flow of text across pages and chapters, you’re well on your way to typesetting a complete book.
For EPUBs, the typesetting process is similar at the start of the process, and many publishing programs like InDesign will allow you to export your typesetting work for either print or EPUB. However, the way in which the text is processed by reading devices can mean that some of your formatting will change or disappear depending on the device being used. Using a specialised EPUB typesetting program like Sigil to edit your typesetting may help to minimize some of these problems.
Typesetting is one of the most technical aspects of book design, and as a result it can sometimes feel frustrating and difficult at first. Give yourself plenty of time to understand the process and ask a friend or colleague to help review your work. Making frequent checks on things like type size, font legibility and margin width will help to make your typesetting work look consistent and ultra-professional.
Need professional help? Find a typesetting expert at Envato Studio for a great price.
6. Move to the Production Stage
Once you’ve designed a cover and typeset the pages of your book, you’re ready to share your book with the world! You’ve made it to the production stage and this will be a slightly different process depending on whether you’ve opted to produce a printed book or a digital book.
Producing a Print Book
Printing books used to be an expensive, specialist process, but nowadays you can find a wide range of online printing services offering low-cost, high-quality book printing.
It’s best to look for a printing service which specialises in producing books for the self-publishing market. These companies will offer a wide range of sizes and formats and are great value for self-publishers on a tight budget. One of my favorite online printers is Blurb, which also allows you to create books to suit specialist genres, such as children’s books, cookbooks, and graphic novels.

Some sites like Lulu even allow you to print your book and sell it via their online store straight away.
Once your book is printed, you may want to sell it online via a large bookstore like Amazon or distribute it locally by approaching bookstores or attending book fairs.
Producing an EPUB
EPUBs are in many ways more convenient to produce than print books. You won’t have to pay for printing, storage or distribution, and you can export and sell your eBook instantly. Both Blurb and Lulu offer eBook export services and help simplify the process for self-publishers who are new to the EPUB design process.

They will also guide you through the process of producing reflowable and fixed-layout EPUBs. Confused? Don’t be! This article will demystify these terms and much more to do with EPUB design:

You can upload your finished book to a range of eBook stores, such as Amazon (Kindle), Kobo, Barnes & Noble, Apple iBooks, Lulu, and Smashwords.

7. You’re Published! Now What?
Congratulations! You’re now a self-published author, having successfully designed and produced your book. Now what? Sit twiddling your thumbs until the sales start rolling in? Even though it’s taken a lot of energy to get to this stage, if you’re committed to making your book into a self-publishing success you’ll need to do some follow-up work.

The first thing you need to look at is promotion of your book. This may involve spreading the word on social media, offering to do readings at local bookstores, or approaching fan fiction blogs. Building a brand as an author may also help to reinforce your presence online and build a fanbase. Look at creating a logo and setting up a basic website for announcing news and sharing book extracts and cover designs.
If your hard work pays off and sales start to build, you may want to keep the momentum going by taking your book to publishing houses, who have the potential to distribute to a wider audience. Or why not look into creating a series of related books to build hype among your existing fanbase?
Steps to Publishing Design Success
In this article, we’ve walked through the whole process of designing a self-published book from A to Z. Whether you opt for a printed paperback or hardcover that you can treasure forever on your bookshelf or go down the route of the budget-friendly and forward-thinking EPUB, you can be sure that this guide will put you in good stead for making your first steps into the exciting world of publishing design.
Let’s have a quick refresh of those design steps. Keep this checklist to hand while you design; it will be super satisfying to see each step checked off as you go!
Choose your software—start with the right design tools to suit your budget and desired result.
Understand your formats—get to know the pros and cons of designing a book for print or digital.
Get to know standard sizes—books tend to be produced in a range of standard sizes; make sure to choose the right size to suit you!
Design a great cover—flex your creative muscles and design a cover that both references the theme of your book and is commercially adapted.
Typeset the pages—swot up on typesetting technique or hire a professional to help you out.
Move to the production stage—send your book to an online printer or export your book to EPUB format, and then track down suitable marketplaces for your book.
Follow up—look into promotion and marketing for your published book, and develop a brand as an author to keep the momentum going.
Self-publishing is a marathon, not a sprint—the process may take some work, but the end result can be really rewarding, both creatively and financially. I’d love to hear about your experiences with publishing design. Do you have any other tips or pitfalls to avoid? Share your thoughts in the comments below.
Give your book design adventure the best start possible with a high-impact book cover template or a complete book template from Envato Market.
In need of extra support? The Envato Studio team can help you set up cover layouts, typeset manuscripts and export your work for print or EPUB formats. Get in touch with them to help make your publishing dreams a reality in half the time!
Original Link:
TutsPlus - Design
More About this Source Visit TutsPlus - Design