
An Interest In:
Web News this Week
- April 28, 2024
- April 27, 2024
- April 26, 2024
- April 25, 2024
- April 24, 2024
- April 23, 2024
- April 22, 2024
Some of Our Sources
- BoingBoing
- The Logo Smith
- Vandelay Design
- Inspiredology
- Crazy Leaf Design
- Fudge Graphics
- Line 25
- Web Resource Source
- Hashedout
- The Verge
Help Webnuz
Referal links:
How to Create a Trippy Head Tunnel Effect in Adobe Photoshop

As we continue with our series of effects inspired by music videos, Zayn's Pillow Talk video continues to provide inspiration for fun and creative effects. In this tutorial, we will explore how to create the trippy head tunnel effect seen at the 1:40 mark in the video.
1. Prepare the Model Image
This effect works best with images of a strong profile. So when selecting an image for this, look for model shots that include a hairstyle that doesn't obscure the rear neckline, and it's helpful if the person has a strong jawline and sharp features.
Step 1
Begin with an image that features a clean profile shot. Profiles have a much more distinctive shape than other head angles and give better results. The example here uses this Young Male Fashion Model from Envato Market. Use the Quick Selection Tool (W) to create a selection of the model'shead and shoulders.

Step 2
Go to Layer > New > Layer Via Copy (Control-J) to copy the selection to a new layer. Rename the layer to Head and Shoulders.

Step 3
Create a copy of the Head and Shoulders layer by using the same Layer > New > Layer Via Copy (Control-J), and position the copy beneath the original in the Layers panel.

Step 4
Scale the copied layer up significantly with Edit > Transform > Scale and reduce the Opacity to 30%.

Step 5
Create a solid color layer just over the original background layer by going toLayer > New Fill Layer > Solid Color. Set the color to a deep blue hue #1a1c33.

Step 6
Use the Quick Selection Tool (W) and the Head and Shoulders layer to select the model's head and neck only. Use the Refine Edge feature and set the Radius to 1.5.

Step 7
Copy the selection to a new layer with Layer > New > Layer Via Copy (Control-J) and rename the new layer to Head. Then convert the layer to a Smart Object with Layer > Smart Object > Convert to Smart Object. Then scale the layer down to be significantly smaller than the original.

Step 8
Add a Hue/Saturation adjustment layer and place it directly over the Head and Shoulders copy layer. Then clip it with Layer > Create Clipping Mask (Alt-Control-G) so the adjustment layer only affects that layer. Set the Saturation to -100 and the Lightness to -10.

Step 9
Add a Gradient Mapadjustment layer over the Head and Shoulders layer.Then clip it withLayer > Create Clipping Mask (Alt-Control-G). Open the Gradient Editor and set the left color stop to a blue #0d1465, the middle color stop to red #ff0101, and the right color stop to white #ffffff.

Step 10
Reduce the Opacity of the Head and Shoulders layer to 30%. Then hold down the Alt key to drag a copy of the Gradient Map above the Head layer. Clip the copied Gradient Map to the Head layer.

Step 11
Add a Hue/Saturation adjustment layer and clip it to the Gradient Map adjustment layer with Layer > Create Clipping Mask (Alt-Control-G). Set the Saturation to -35 and the Lightness to +5.

2. Craft the Head Tunnel
The head tunnel effect is done by creating an outline of the profile and then creating increasingly larger copies of that outline. Fortunately, Photoshop has a great feature for quickly creating these copies so you don't need to worry about placing them by hand.
Step 1
Control-click on the Head layer to create a selection from it. Then go to Select > Refine Edge and increase the Smooth setting to 17 to smooth out the selection.

Step 2
Go to the Path panel and use the icon in the foot of the panel to Make work path from selection. This auto-traces the selection to create a smooth path around the model's head.

Step 3
With the newly formed path still active, go to Layer > New Fill Layer > Solid Color. It doesn't matter what fill color you select. Rename the shape to Outline. Use the Path Selection Tool (A) to select the path and set the Fill to Null, the Stroke to White, and the Stroke Width to 1 px.

Step 4
Create a copy of the Outline layer, name it Big Outline, and scale it up with Edit > Transform > Scale until it's slightly larger than the Head layer. Select this path with the Path Selection Tool (A) and set the Stroke Width to 3 px.

Step 5
Copy the original Outline layer again. Then go to Edit > Transform > Scale. Use the entry fields in the options bar to set the Width and Height both to 107%.

Step 6
Make sure the Move Tool (V) is active and hold down the Alt key and go to Edit > Transform > Again (Shift-Control-T). This will create another copy of the layer and repeat the last transformation, which is to scale up by 107%.

Step 7
Use the keyboard shortcut of holding down the Alt, Shift, and Control keys while tapping the T key repeatedly to continue making scaled-up copies of the outline layer. Continue until the canvas is filled with progressively larger outlines.

Step 8
Hold down the Shift key and select all of the outline copies in the Layers panel (with the exception of the Big Outline). Then group these all together with Layer > Group Layers (Control-G). Rename the group Outlines.
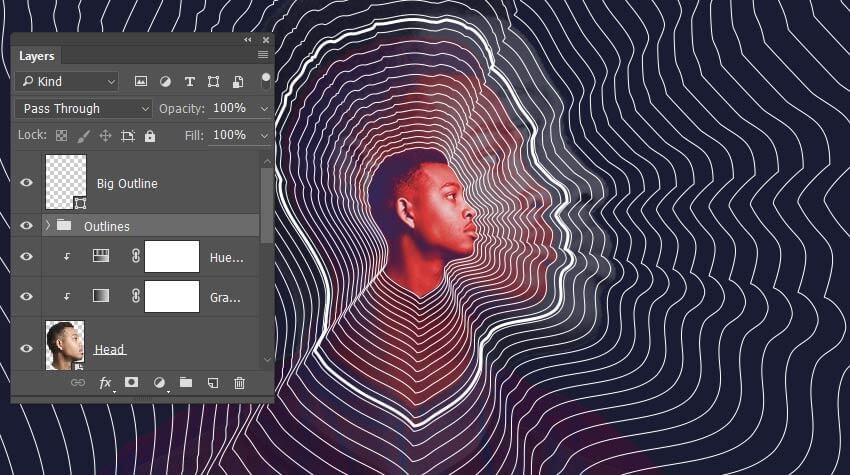
Step 9
Add a Layer Mask to the Outlines group. Then use the Gradient Tool (G) set to the Black to White preset. Click the Reverse option and draw out a Radial gradient on the mask to fade the outlines out as they grow larger.

3. Add the Final Color Effects
Now that the lines to create the primary head tunnel effect are complete, adding a few additional colors and gradients really completes the full visual impact of the effect.
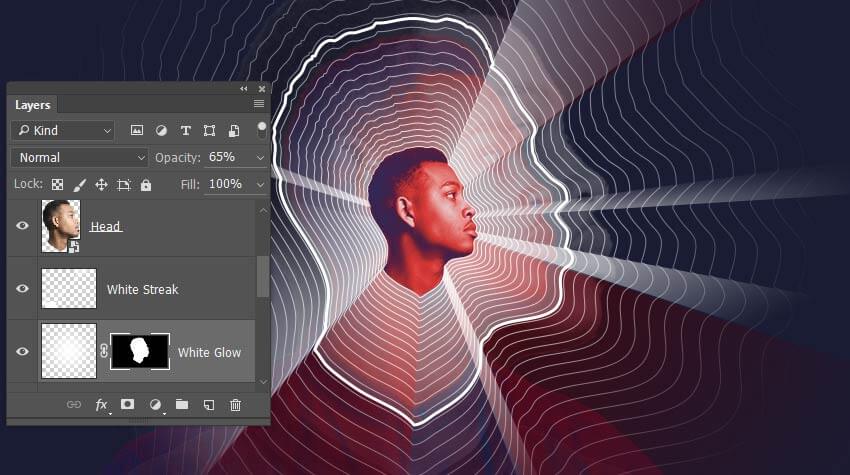
Step 1
Add a new layer called White Streak just under the Head layer. Use the Polygonal Lasso Tool (L) to create a triangular-shaped selection that follows the folds of the outlines. Then use the Gradient Tool (G) withForegroundset to Transparent to add a Linear gradient inside the selection.

Step 2
Go to Select > Deselect (Control-D) to cancel the selection, and then add additional selections to fill with the white gradient and create more white streaks.

Step 3
Add a new layer named Red Color and set the foreground color to a bright red #dd1515. Then create a Radial gradient emanating from the center of the canvas. Set the layer's blending mode to Soft Light.

Step 4
Use the Polygonal Lasso Tool (L) again to select several triangular areas emanating from the center. Then use that selection as a layer mask with Layer > Layer Mask > Reveal Selection.

Step 5
Add a new layer named White Glow and set the foreground color to white. Then add a Radial gradient emanating from the center of the canvas. Reduce the layer Opacity to 65%.

Step 6
Control-click on the Big Outline layer to create a selection. Then use that selection as a layer mask on the White Glow layer by going toLayer > Layer Mask > Reveal Selection.
You Are Done!
The result should look similar to the final image here.How did your trippy head tunnel effect come out? Share your results in the comments below.

Original Link:
TutsPlus - Design
More About this Source Visit TutsPlus - Design