
An Interest In:
Web News this Week
- April 15, 2024
- April 14, 2024
- April 13, 2024
- April 12, 2024
- April 11, 2024
- April 10, 2024
- April 9, 2024
Some of Our Sources
- BoingBoing
- Mashable
- Vandelay Design
- Creative Curio
- Naldz Graphics
- Web Design Ledger
- Reencoded
- 24 Ways
- Specky Boy
- Codrops
Help Webnuz
Referal links:
How to Create a Watercolor Texture in Adobe Illustrator

Get on trend with watercolor textures in Adobe Illustrator! In this tutorial we'll create our very own watercolor textures with a simple watercolor set, edit our images in Adobe Photoshop, and apply the textures in Adobe Illustrator using two different techniques.
You can also check out textures or hand-drawn fonts to supplement some of the designs used in this tutorial from Envato Market.
1. Create the Watercolor Textures
Step 1
Let's begin with the supplies you need or may want to use for creating watercolor textures:
- Watercolor paints
- Watercolor paper
- A soft paint brush
- Water cup
Personally, I think projects like these don't require the most sophisticated tools. You can create fun watercolor textures from a set of children's art supplies just as well as using Winsor & Newton paints. Below you'll see the supplies I had in my painting toolkit.

Step 2
Get some water on your brush, dip it into a watercolor pan, and start painting. Play with transparency and saturation. Make big puddles or little cloud areas of color. You really can't go wrong with experimenting with watercolors like this!

Step 3
If you paint with a wet brush onto a wet portion of paper, you'll find your watercolor will spread and create fun gradients on your paper. Feel free to dab or blot your watercolors with a paper towel or flick your brush over your paper to make a splatter texture.

Step 4
Layer up different degrees of color saturation on your paper, and play with other colors. Let some of your paint dry, and then continue painting until you have areas of color that you like.

Step 5
Create as many pages of watercolor textures as you want. When you're satisfied with your color and design choices, let your paper dry fully before moving on to the next section of this tutorial.

2. Edit the Textures
Step 1
Scan your textures and import them intoAdobe Photoshop. Alternatively, you can snap a photo. Since my scanner is a bit old, it doesn't always do the best job at making sure the paper is as white as I need for this project. Let's edit this further.

Step 2
To combat the yellowing of the paper, go toImage > Adjustments > Levels and carefully adjust the levels of the yellowing around your watercolor splashes. Typically I adjust the gray slider to the left and the white slider to the right a bit.

Step 3
Now that your watercolor textures are bright and clean, save your file as a high-resolutionJPG, and let's import it intoAdobe Illustrator.

3. Make Vectors From the Textures
Step 1
Import your watercolor texture into a newAdobe Illustrator document and open theImage Trace panel. For Mode, selectColor, and forPalette, selectFull Tone. HitPreview and wait a bit for your vector to render.
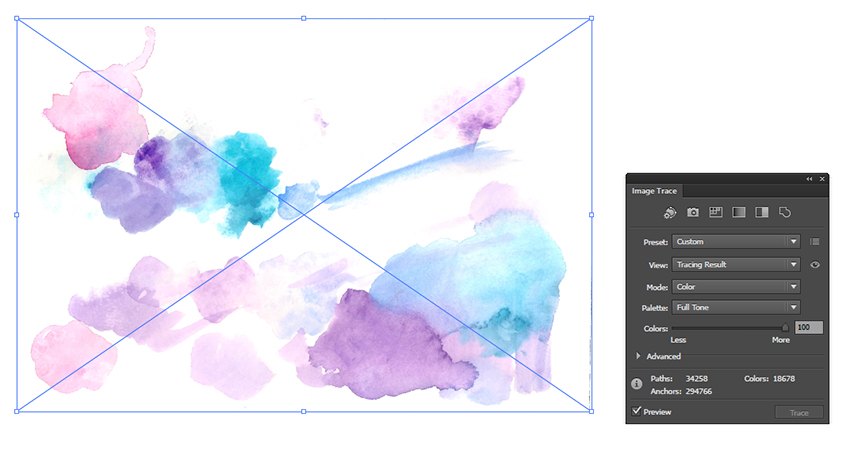
Step 2
I've zoomed in on my tracing result so you can see the vector objects a bit better. It's a remarkably easy way of converting real media textures into vector without recreating them inAdobe Illustrator by hand.

Step 3
You can also limit the amount of detail in your tracing result by choosingLimited (on the left below)for yourPalette instead ofFull Tone (on the right below). This will give you a more vectored look and a smaller file size.
Expandyour watercolor texture andUngroupit so you can use theLasso Tool (Q) to select around a section of your texture.Copy (Control-C) andPaste (Control-V) the texture onto aNew Layer in theLayers panel. Hide the other textures so you're only focused on your copied section.Group (Control-G) the texture together.

4. Create a Graphic Style
Step 1
Graphic Styles are fantastic. They allow you to easily apply all sorts of pattern, effects, and the like with a simple click of a button. They go hand-in-hand withActions for speeding up your process inAdobe Illustrator.
Select your texture group and, in thePattern Options panel, create aNew Pattern. Adjust theWidth andHeight of the pattern tile boundaries so the texture overlaps itself. In theAppearance panel, set the group'sBlending ModetoMultiply. When satisfied with how your pattern overlaps and repeats, hitDone.
Since this is such a complex vector texture, you may find that it takes a while to make the pattern. I tend to knit while my machine catches up to what I'm creating. Safety saves also help with any anxiety overAdobe Illustrator suddenly crashing.

Step 2
You'll find your newly made pattern in theSwatchespanel. Apply it to a simple rectangle shape. Open theGraphic Styles panel and, with the rectangle selected, make aNew Graphic Style. This allows you to retain anything you set up in theAppearance panel and apply it quickly and easily to any object without having to reapply the pattern and its other attributes. Make sure to save yourGraphic Style so you can access it from any document.

Step 3
Let's test out some text with the newGraphic Style. Using a fun script font, I've written out one of my favorite phrases courtesy of drag entertainerAlyssa Edwards. You can find similar typefaces in the font section of Envato Market.
Type out some text with theType Tool (T) andExpand(Object > Expand)your text toOutlines. Apply your newly createdGraphic Style. Take note of ways to improve your pattern or style, if any.

5. Create a Typographic Design
Step 1
Let's make something a bit more interesting than applying aGraphic Style to a simple font. Sketch out a typographic composition. Consider using script, serif, and sand-serif typefaces as examples of your hand-drawn type.
Alternatively, you can arrange text as you see fit rather than drawing out a separate design. I drew the design seen below inAdobe Photoshop and imported it into myAdobe Illustratordocument. Play with a variety of compositions and lettering styles with your quote of choice.If you're not using a graphic tablet, you may want to go with pre-made font faces for this tutorial.

Step 2
On a new layer, use theBlob Brush Tool (Shift-B) to smoothly redraw your design. Do your best to tighten up your line work and keep curves smooth and straight lines straight.

Step 3
Vary your line width in your lettering. This is where looking at examples of other lettering and typography will do wonders in helping you decide which portions of each letter should be thick and which should be thin. Experiment with both and see how it changes your design.

Step 4
Continue working around your composition. If you find that your sketch wasn't just right, you can adjust your content now. Alternatively, you can also use a different drawing tool, such as thePen Tool (P), in order to trace your sketch.

Step 5
For larger letter sections, outline the contour first and then fill in each shape. Speed up your process by using theShaper Tool (Shift-N) to fill in sections. Simply draw a scribble between objects and it will fill in as you can see below.

Step 6
When you've completed your text, delete your sketch layer and select your new text shapes.Unite these shapes in thePathfinder panel, making sure to expand them into aCompound shape. As we did before, feel free to apply yourGraphic Style to your newly created design.

6.Create a Clipping Mask
Step 1
As an alternative method to theGraphic Style, you canCreate a Clipping Mask (Control-7) to apply your texture. As we did in preparation for creating the pattern, select a portion of your Image Traced texture with the Lasso Tool andCopy it.
I decided to keep watercolor textures separate in their own documents so my working document wasn't as much of a memory hog on my machine.

Step 2
Paste your texture into your working document. I've set my fill color of my text to a light gray so both it and the overlapping texture can be easily seen. Set the texture'sBlending Mode toMultiply in theTransparency panel.

Step 3
Repeat this process of pasting watercolor texture sections over your text. Feel free toScale,Rotate, and place them in whatever manner you find best.

Step 4
When satisfied with your texture placement,Group them together over your design. Also make sure that most of your text design is covered in some way with a texture. You don't want whole letters to disappear when we make our Clipping Mask.

Step 5
Copy andPaste your text design over your watercolor texture group. Hide your original text design in the Layers panel. Select both andMake a Clipping Mask by hittingControl-7. If you find you'd like to change or add content to your Clipping Mask, simply open theLayers panel and select portions of your group within theClip Group to rearrange them in yourArtboard or even add new textures by dragging them into the group.

Well Done, You're Through!
Play with watercolor textures in whatever way you see fit. Whether you're creating aGraphic Style or aClipping Mask, you have options in how you apply your texture as well as other elements such as watercolor splatter or additional wash textures.
Share your designs in the comment section below! Whether you've created every element yourself or have used assets from Envato Market within your poster composition, we want to see them!

Original Link:
TutsPlus - Design
More About this Source Visit TutsPlus - Design